
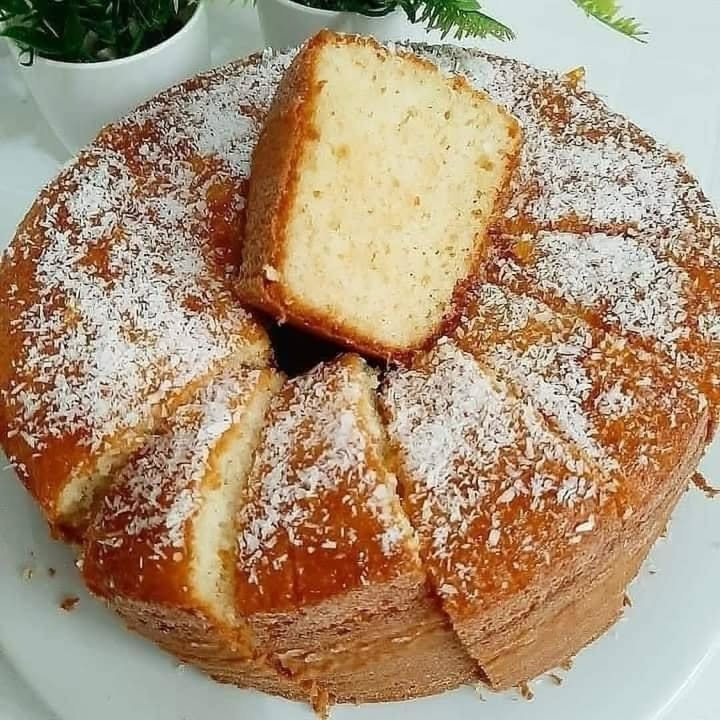
Why Coconut Butter Cake is a Slice of Heaven
There’s something magical about the smell of coconut wafting through the kitchen. It’s warm, tropical, and instantly comforting. Last summer, I baked this **Coconut Butter Cake** for a family gathering, and let me tell you—it was the star of the dessert table. Everyone kept asking for seconds (and thirds). The combination of rich buttery cake, creamy glaze, and sweet grated coconut is simply irresistible. Whether you’re a seasoned baker or just starting out, this recipe is easy to follow and delivers big on flavor.
A Little History Behind Coconut Butter Cake
Coconut has been a beloved ingredient in baking for centuries, especially in tropical regions where it grows abundantly. Coconut Butter Cake likely originated as a twist on classic butter cakes, with bakers adding shredded coconut to bring extra texture and sweetness. My grandma used to make a version of this cake during holidays, but hers was less refined—more rustic and dense. Over time, I’ve tweaked her recipe to create a lighter, fluffier cake that still pays homage to those nostalgic flavors. Trust me, once you try this modern take, you’ll see why it’s worth every bite.
Why You’ll Love This Recipe
This **Coconut Butter Cake** checks all the boxes: it’s moist, flavorful, and oh-so-satisfying. The buttery crumb melts in your mouth, while the coconut adds a subtle chewiness and fragrance. Plus, the glaze? Pure perfection. It’s not too sweet, just enough to balance the cake. What makes this recipe even better is how simple it is. No fancy techniques or hard-to-find ingredients—just good old-fashioned baking with a touch of island flair.
Perfect Occasions to Bake This Cake
Need a show-stopping dessert for Easter brunch? This cake will fit right in. Hosting a summer barbecue? Its tropical vibes scream beach day. Or maybe you’re looking for something special to celebrate a birthday or anniversary. Honestly, though, you don’t need a reason to bake this beauty. Whip it up on a random Tuesday, slice yourself a piece, and enjoy a little taste of paradise.
Ingredients You’ll Need
For the Cake:
- 3 cups of all-purpose flour
- 1/2 teaspoon baking powder
- 1/2 teaspoon of salt
- 1 1/2 cups of butter, softened
- 2 cups granulated sugar
- 4 large eggs
- 1 cup sour cream
- 1 teaspoon vanilla extract
- 1 teaspoon coconut extract
- 1 cup grated coconut
For the Glaze:
- 1/4 cup of butter, softened
- 1 1/2 cups powdered sugar
- 1-2 tablespoons milk
- 1/2 teaspoon vanilla extract
- 1/2 teaspoon coconut extract
- Grated coconut for decoration
Substitution Options
If you’re out of sour cream, Greek yogurt works beautifully as a substitute. For a dairy-free option, swap the butter with coconut oil and use almond or oat milk instead of regular milk. Want to amp up the coconut flavor? Toast the grated coconut before folding it into the batter—it adds a deeper, nuttier aroma. And if you’re short on extracts, a splash of rum or coconut liqueur can mimic that tropical essence.
Step-by-Step Preparation
Step 1: Preheat and Prep
Start by preheating your oven to 180°C (350°F). Grease and flour a cake mold, making sure every nook and cranny is coated. This step ensures your cake won’t stick and will slide out effortlessly later. Pro tip: Use parchment paper at the bottom of the pan for extra insurance.
Step 2: Mix Dry Ingredients
In a medium bowl, whisk together the flour, baking powder, and salt. This dry mixture helps give structure to your cake. Whisking also breaks up any lumps, so your cake stays smooth and velvety. Set it aside while you work on the wet ingredients.
Step 3: Cream Butter and Sugar
Using a stand mixer or hand mixer, beat the softened butter and sugar until light and fluffy. Think of it as giving your cake a head start on being soft and airy. Add the eggs one by one, mixing well after each addition. The batter should look pale and slightly glossy—almost like sunshine in a bowl.
Step 4: Combine Wet and Dry Ingredients
Now comes the fun part. Stir in the sour cream, vanilla extract, and coconut extract. These liquids infuse the batter with moisture and flavor. Gradually add the flour mixture, beating on low speed until everything is well combined. Fold in the grated coconut last—it gives the batter a speckled, inviting look.
Step 5: Bake to Perfection
Pour the batter into your prepared mold and smooth the top with a spatula. Pop it into the oven and bake for 1 hour and 15 minutes, or until a toothpick inserted into the center comes out clean. Your kitchen will smell heavenly! Let the cake cool in the mold for 10 minutes before transferring it to a wire rack to cool completely.
Step 6: Make the Glaze
While the cake cools, prepare the glaze. Beat the softened butter until creamy, then gradually add powdered sugar, alternating with milk. Add the vanilla and coconut extracts, and keep beating until the glaze is silky smooth. Spread it generously over the cooled cake and sprinkle with grated coconut for a finishing touch.
Chef’s Tip
To make the glaze extra dreamy, warm the milk slightly before adding it. It helps dissolve the powdered sugar more evenly, resulting in a smoother consistency.
Timing Breakdown
| Task | Time |
|---|---|
| Preparation | 20 minutes |
| Baking | 1 hour 15 minutes |
| Cooling | 30 minutes |
| Total Time | 2 hours 5 minutes |
Chef’s Secret
For an extra burst of coconut flavor, toast the grated coconut before sprinkling it on top. Just toss it in a dry skillet over medium heat for a few minutes until golden brown. The aroma alone is worth it!
Extra Info
Did you know that coconut is often called the “tree of life”? Every part of the coconut tree—from its water to its husk—is useful. No wonder it’s such a versatile ingredient in cooking and baking!
Necessary Equipment
- Stand mixer or hand mixer
- Mixing bowls
- Measuring cups and spoons
- Cake mold
- Wire cooling rack
- Spatula
Storage Tips
To keep your **Coconut Butter Cake** fresh, store it in an airtight container at room temperature for up to three days. If you live in a humid climate, refrigerate it to prevent the glaze from becoming sticky. Bring it back to room temperature before serving for the best texture.
For longer storage, wrap individual slices in plastic wrap and freeze them. They’ll stay good for up to two months. Simply thaw overnight in the fridge when you’re ready to indulge again.
Pro tip: Place a slice of bread inside the container with the cake. The bread absorbs excess moisture, keeping the cake soft and fresh longer.
Tips and Advice
- Don’t skip sifting the powdered sugar for the glaze—it prevents clumps.
- Use room-temperature butter for both the cake and glaze; it blends much easier.
- Let the cake cool completely before glazing. Otherwise, the glaze may melt and slide off.
Presentation Ideas
- Serve slices on colorful plates with a dollop of whipped cream.
- Garnish with fresh berries for a pop of color.
- Place the cake on a pedestal stand for a bakery-worthy display.
Healthier Alternatives
Looking to lighten up this recipe? Here are six variations to try:
- Low-Sugar Version: Replace granulated sugar with a sugar substitute like stevia or monk fruit.
- Gluten-Free Option: Swap all-purpose flour with a gluten-free blend.
- Dairy-Free Delight: Use coconut oil instead of butter and almond milk instead of regular milk.
- Eggless Cake: Substitute each egg with 1/4 cup of unsweetened applesauce.
- Vegan Twist: Combine the dairy-free and eggless swaps above.
- Whole Grain Goodness: Use whole wheat pastry flour for added fiber.
Common Mistakes to Avoid
Mistake 1: Overmixing the Batter
Overmixing leads to a dense, tough cake. Once the flour is incorporated, stop mixing. A few lumps are okay—they’ll disappear during baking.
Mistake 2: Skipping the Cooling Step
Rushing to glaze a warm cake causes the icing to melt and lose its glossy finish. Patience is key here!
Mistake 3: Using Cold Butter
Cold butter doesn’t cream properly, leaving your cake heavy instead of light. Take it out of the fridge 30 minutes before starting.
FAQs About Coconut Butter Cake
Can I use desiccated coconut instead of grated?
Yes, but desiccated coconut is finer, so it won’t add as much texture. Grated coconut provides a chewier bite.
How do I know when the cake is done?
Insert a toothpick into the center. If it comes out clean or with a few crumbs, it’s ready. If there’s wet batter, bake for another 5-10 minutes.
Can I make this cake ahead of time?
Absolutely. Bake it a day in advance, store it covered, and glaze it just before serving.
What’s the best way to toast coconut?
Spread it on a baking sheet and toast at 180°C (350°F) for 5-7 minutes, stirring halfway through. Watch closely to avoid burning.
Is sour cream essential?
It adds moisture and richness, but Greek yogurt or buttermilk can work as substitutes.
Can I freeze leftovers?
Yes, wrap slices tightly and freeze for up to two months. Thaw in the fridge before enjoying.
Why does my glaze crackle?
This happens if the glaze dries too quickly. Apply it evenly and let it set slowly at room temperature.
Do I have to use coconut extract?
No, but it enhances the flavor. Vanilla extract alone still tastes great.
What size cake mold should I use?
A standard 9-inch round or square mold works perfectly.
Can I add nuts to this recipe?
Definitely! Chopped macadamia or pecans pair wonderfully with coconut.
Final Thoughts
This **Coconut Butter Cake** is more than just a dessert—it’s a celebration of flavor, simplicity, and joy. Whether you’re baking for loved ones or treating yourself, this cake promises to deliver smiles and satisfied taste buds. So grab your apron, gather your ingredients, and get ready to create a masterpiece. Happy baking!
Equipment
- Mixing bowls
- Stand mixer
- Spatula
- Cake mold
- Wire cooling rack
Ingredients
- 3 cups all-purpose flour
- 1/2 teaspoon baking powder
- 1/2 teaspoon salt
- 1.5 cups butter softened
- 2 cups granulated sugar
- 4 large eggs
- 1 cup sour cream
- 1 teaspoon vanilla extract
- 1 teaspoon coconut extract
- 1 cup grated coconut
- 0.25 cups butter softened (for the glaze)
- 1.5 cups powdered sugar
- 1-2 tablespoons milk
- 0.5 teaspoon vanilla extract (for the glaze)
- 0.5 teaspoon coconut extract (for the glaze)
- q.s. grated coconut for decoration
Instructions
- Preheat your oven to 180°C (350°F) and grease and flour a cake mold.
- In a medium bowl, whisk together the flour, baking powder, and salt.
- Beat the softened butter and sugar until light and fluffy, adding eggs one at a time.
- Stir in the sour cream, vanilla extract, and coconut extract, then gradually add the dry ingredients, folding in the grated coconut last.
- Pour the batter into the prepared mold and bake for 1 hour and 15 minutes or until a toothpick comes out clean.
- Let the cake cool in the mold for 10 minutes before transferring it to a wire rack to cool completely.
- Beat softened butter for the glaze, gradually adding powdered sugar, alternating with milk, then add vanilla and coconut extracts, spreading it over the cooled cake.