
Why This Coconut Raspberry Delight is a Must-Try
I still remember the first time I made this Coconut Raspberry Delight for my book club. It was one of those days where everything just clicked—the creamy coconut, the tangy raspberry jam, and that fluffy buttercream came together like magic. The room went silent as everyone took their first bite. That’s how I knew this cake was special. Whether you’re new to baking or a seasoned pro, this recipe will win hearts with its tropical-meets-tangy charm.
A Little Background on Coconut Raspberry Delight
This cake has roots in tropical desserts, where coconut often takes center stage. Back in the day, bakers would use fresh coconut scraped straight from the shell, but modern shortcuts like desiccated coconut and coconut cream make it much easier. The addition of raspberry jam adds a playful twist, balancing the rich coconut flavors with a burst of fruity sweetness. Over the years, I’ve tweaked the recipe to make it simpler without losing its wow factor.
Why You’ll Love This Recipe
Let’s talk about why this Coconut Raspberry Delight deserves a spot in your recipe collection. First, it’s a flavor bomb—tropical coconut meets zesty raspberry in every bite. Second, it’s beginner-friendly. Even if you’ve never baked a cake before, this recipe guides you step-by-step. Lastly, it’s versatile. You can dress it up for a fancy dinner party or keep it casual for a family dessert night.
Perfect Occasions to Whip Up This Cake
This Coconut Raspberry Delight shines at any gathering. Picture it at a summer barbecue, where its light flavors cool down the heat. Or imagine it as the star of a holiday dessert table, decorated with fresh raspberries and a sprinkle of coconut flakes. It’s also perfect for birthdays, bridal showers, or even a cozy Sunday afternoon tea session with friends.
Ingredients You’ll Need
- For the cake:
- 3 medium eggs, beaten
- 50g desiccated coconut
- 2 tbsp coconut cream
- 175g softened butter
- 175g golden caster sugar
- 175g self-raising flour
- 1 tsp baking powder
- For the buttercream filling and topping:
- 280g icing sugar
- 100g softened butter
- 3 tbsp coconut cream
- 5 tbsp raspberry jam
Substitution Options
If you’re out of certain ingredients, don’t worry! Here are some swaps:
- Use regular caster sugar instead of golden caster sugar if needed.
- Swap coconut cream with heavy cream for a less intense coconut flavor.
- If raspberry jam isn’t available, try strawberry or blackberry jam.
- Self-raising flour can be replaced by all-purpose flour plus 1.5 tsp of baking powder.
Step 1: Preheat and Prep
Kick things off by preheating your oven to 180°C (160°C for fan ovens) or Gas Mark 4. Grab two 20cm (8-inch) sandwich tins and grease them generously with butter. Line the bottoms with parchment paper to prevent sticking. Pro tip: Use a pastry brush to spread the butter evenly—it makes a huge difference!
Step 2: Blend the Batter
In a food processor, toss in the butter, sugar, flour, baking powder, and eggs. Blend for about 2-3 minutes until the mixture is smooth and creamy. Now, stir in the desiccated coconut and coconut cream by hand. The batter should have a soft, velvety texture with tiny specks of coconut peeking through.
Step 3: Bake the Cakes
Divide the batter between your prepared tins, smoothing the tops with a spatula for an even bake. Pop them into the oven and let them bake for 25 minutes. You’ll know they’re ready when the cakes turn golden and spring back lightly when touched. Your kitchen will smell amazing—like warm coconut and sweet vanilla.
Step 4: Cool the Cakes
Once baked, let the cakes rest in their tins for 5 minutes. Then, carefully transfer them to a wire rack to cool completely. Removing the parchment paper while they’re still warm ensures no bits stick to the cake. Patience is key here; rushing the cooling process can lead to soggy layers.
Step 5: Make the Buttercream
For the buttercream, beat the softened butter, icing sugar, and coconut cream in a large bowl until light and fluffy. This step is pure therapy—the whisking transforms the ingredients into a cloud-like frosting that smells divine. Spread it generously for maximum indulgence.
Step 6: Assemble the Cake
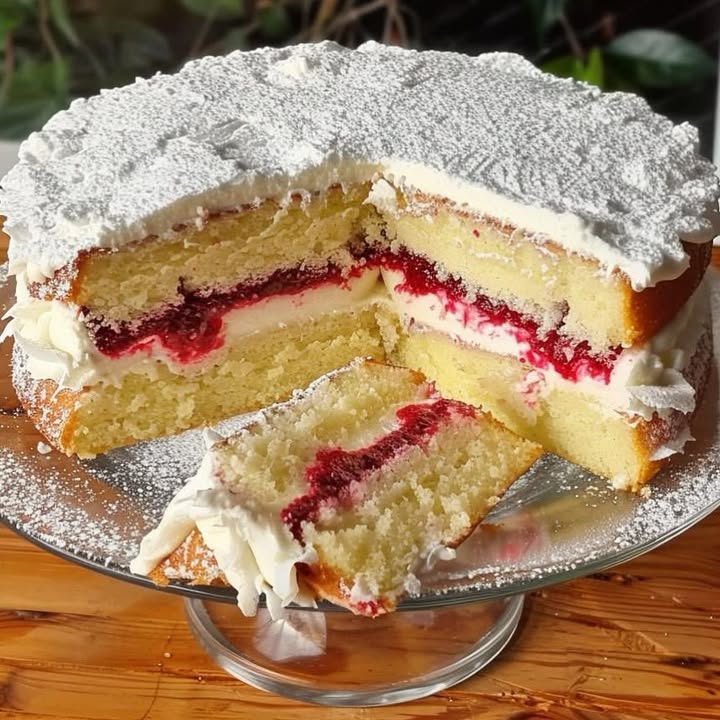
Spread a thin layer of raspberry jam on one cooled cake, then add a dollop of buttercream on top. Place the second cake gently to form the sandwich. Don’t skimp on the filling—it’s what makes this Coconut Raspberry Delight so irresistible.
Step 7: Decorate and Serve
Finish off by swirling the remaining buttercream on top of the cake. Add a dusting of desiccated coconut or fresh raspberries for extra flair. Slice into generous portions and watch everyone dig in with delight.
Chef’s Tip
For an extra touch of elegance, chill the assembled cake in the fridge for 15 minutes before serving. This firms up the buttercream, making it easier to slice cleanly.
Timing Breakdown
- Prep Time: 20 minutes
- Cooking Time: 25 minutes
- Resting/Cooling Time: 30 minutes
- Total Time: 1 hour 15 minutes
Chef’s Secret
Here’s a little secret: Toast the desiccated coconut lightly before adding it to the batter. It enhances the nutty aroma and adds depth to the overall flavor profile.
Extra Info
Did you know that coconut cream is simply the thick, creamy layer scooped from the top of chilled coconut milk? It’s a game-changer in baking, giving recipes a rich, luxurious texture.
Necessary Equipment
- Two 20cm (8-inch) sandwich tins
- Food processor or stand mixer
- Wire cooling rack
- Spatula
- Pastry brush
Storage Tips
To keep your Coconut Raspberry Delight fresh, store it in an airtight container. At room temperature, it stays good for up to two days. If you live in a warm climate, refrigerate it to preserve the buttercream. Just bring it back to room temperature before serving for the best taste.
For longer storage, freeze individual slices wrapped in plastic wrap and foil. They’ll last up to three months in the freezer. Simply thaw overnight in the fridge when you’re ready to enjoy.
Avoid leaving the cake uncovered, as it can dry out quickly. A slice of bread placed inside the container helps retain moisture.
Tips and Advice
Always use room-temperature ingredients for smoother blending. Cold butter or eggs can make the batter lumpy. Also, sift your icing sugar before making the buttercream to avoid gritty textures. Finally, measure your flour accurately by spooning it into the measuring cup and leveling it off.
Presentation Ideas
- Garnish with fresh raspberries and mint leaves for a pop of color.
- Dust the top with powdered sugar using a stencil for a professional look.
- Drizzle melted white chocolate over the finished cake for added decadence.
Healthier Alternatives
Want to lighten up this treat? Try these variations:
- Gluten-Free Option: Swap self-raising flour with a gluten-free blend.
- Low-Sugar Version: Use erythritol instead of caster sugar and icing sugar.
- Vegan Twist: Replace eggs with flaxseed meal and butter with vegan margarine.
- Reduced-Fat Cake: Cut the butter in half and replace it with Greek yogurt.
- No-Jam Alternative: Use mashed fresh raspberries mixed with a bit of honey.
- Protein-Packed Cake: Add a scoop of vanilla protein powder to the batter.
Mistake 1: Overmixing the Batter
Overmixing can lead to dense, tough cakes. Once the dry ingredients are incorporated, stop mixing. A few lumps are okay—they’ll disappear during baking. Pro tip: Fold in the coconut and coconut cream gently with a spatula instead of using a mixer.
Mistake 2: Skipping the Cooling Step
Rushing to assemble the cake while it’s still warm causes the buttercream to melt and slide off. Always let the cakes cool completely on a wire rack. This ensures clean layers and a beautiful finish.
Mistake 3: Using Old Baking Powder
Expired baking powder won’t give your cake the lift it needs. Test yours by mixing a teaspoon with water—if it doesn’t fizz, toss it and buy a fresh box.
Mistake 4: Overbaking the Layers
Keep an eye on the clock! Overbaked cakes turn dry and crumbly. Check for doneness a minute or two before the recommended time. A toothpick inserted should come out clean but slightly moist.
Mistake 5: Uneven Layer Assembly
An unevenly filled cake looks messy and can topple over. Use a scale to divide the batter equally between the tins. For the filling, spread the jam and buttercream evenly across the entire surface.
Frequently Asked Questions
Can I use coconut oil instead of butter?
Yes, you can substitute melted coconut oil for butter, though the flavor will be more pronounced. Use a 1:1 ratio for best results.
What if I don’t have a food processor?
No problem! A handheld electric mixer works just fine. Beat the wet and dry ingredients separately, then combine them by hand.
How do I prevent my cakes from sinking?
Avoid opening the oven door too early, as sudden temperature changes can cause sinking. Also, ensure your baking powder is fresh and active.
Can I make this cake ahead of time?
Absolutely! Bake the layers a day in advance and store them wrapped in plastic. Assemble the cake the next day for ultimate freshness.
Is golden caster sugar necessary?
Not at all. Regular caster sugar works perfectly, though golden gives a richer color.
Can I freeze the finished cake?
Yes, wrap individual slices tightly and freeze for up to three months. Thaw in the fridge before serving.
What other jams work well?
Strawberry, blueberry, or apricot jam pairs beautifully with the coconut flavors.
How do I toast desiccated coconut?
Spread it on a baking sheet and toast in a preheated oven at 160°C for 5-7 minutes, stirring occasionally.
Can I skip the coconut cream?
You can omit it, but the cake may lack some richness. Consider adding a splash of vanilla extract for extra flavor.
Why does my buttercream taste grainy?
Graininess usually happens when the icing sugar isn’t sifted. Sift it beforehand to achieve a silky-smooth texture.
Final Thoughts
This Coconut Raspberry Delight is more than just a cake—it’s a celebration of flavors and textures that everyone will adore. Whether you’re baking for loved ones or treating yourself, this recipe promises joy in every bite. So grab your apron, gather your ingredients, and let’s create something truly unforgettable!
Equipment
- Food processor or stand mixer
- Spatula
- Pastry brush
- Two 20cm (8-inch) sandwich tins
- Wire cooling rack
Ingredients
- 3 medium eggs beaten
- 50 g desiccated coconut
- 2 tbsp coconut cream
- 175 g softened butter
- 175 g golden caster sugar
- 175 g self-raising flour
- 1 tsp baking powder
- 280 g icing sugar
- 100 g softened butter
- 3 tbsp coconut cream
- 5 tbsp raspberry jam
Instructions
- Preheat your oven to 180°C (160°C for fan ovens) or Gas Mark 4 and grease two 20cm (8-inch) sandwich tins, lining the bottoms with parchment paper.
- In a food processor, blend the butter, sugar, flour, baking powder, and eggs for 2-3 minutes until smooth; then stir in desiccated coconut and coconut cream by hand.
- Divide the batter between the prepared tins, smoothing the tops, and bake for 25 minutes until golden and springy.
- Let the cakes rest in their tins for 5 minutes, then transfer to a wire rack to cool completely.
- For the buttercream, beat the softened butter, icing sugar, and coconut cream until light and fluffy.
- Spread raspberry jam on one cooled cake, add buttercream, and top with the second cake.
- Swirl remaining buttercream on top and decorate with desiccated coconut or fresh raspberries before serving.
Notes
Use room-temperature ingredients for better blending, and sift the icing sugar for a smooth buttercream.
For a lighter version, you can substitute ingredients like using Greek yogurt instead of butter or a gluten-free flour blend.
Add a touch of elegance by chilling the assembled cake before serving for firmer buttercream slices.
Nutrition

Hi, I’m Olivia Parker, the founder of BakingSecret.com and a lifelong lover of all things sweet and homemade. I grew up in a small town in Oregon, where the smell of fresh cookies in my family’s kitchen sparked my passion for baking. Over the years, I turned that passion into a mission: to help home bakers feel confident, inspired, and creative.
After studying food science and working in several artisan bakeries across the U.S., I decided to create a space where everyone from beginners to seasoned bakers can find reliable recipes, expert tips, and a warm, welcoming community. BakingSecret.com is my way of sharing the magic of baking with the world. When I’m not testing new recipes, you’ll find me exploring farmers’ markets, collecting vintage cookbooks, or perfecting my sourdough technique.