
Why This Decadent Cheesecake Parfait is a Must-Try
Picture this: it’s a hot summer afternoon, and the last thing you want to do is turn on your oven. But dessert cravings are real, my friends. That’s when I stumbled upon this Decadent No-Bake Brownie Cheesecake Parfait, and let me tell you—it’s been a game-changer in my kitchen. Layers of rich brownies, creamy cheesecake filling, and drizzles of chocolate syrup make this treat an absolute dream. It’s quick, easy, and oh-so-delicious. Plus, there’s no baking involved! I made this for a family barbecue last weekend, and everyone was raving about it. Trust me, once you try it, it’ll become your go-to dessert.
The Sweet History Behind Parfaits
Parfaits have come a long way from their French origins. The word “parfait” means “perfect” in French, and honestly, who can argue with that? Traditionally, parfaits were made with layers of custard, fruit, and cream. Over time, Americans gave them a fun twist by adding ingredients like granola, yogurt, and even ice cream. This Decadent Cheesecake Parfait takes inspiration from both worlds—classic elegance meets modern indulgence. When I first tried making this recipe, I was amazed at how simple yet sophisticated it felt. It’s like having a fancy dessert without all the fuss!
Why You’ll Love This Recipe
Let’s talk about why this No-Bake Brownie Cheesecake Parfait deserves a spot in your recipe collection. First, it’s incredibly easy to make. If you can stir and layer, you’re golden. Second, it’s packed with flavors that scream indulgence—chocolatey brownies, creamy cheesecake, and gooey chocolate syrup. And third, it’s versatile. You can customize it to suit your taste or dietary needs. Whether you’re feeding a crowd or treating yourself, this recipe has got you covered. Plus, it’s no-bake, so it’s perfect for those sweltering days when you don’t want to heat up your kitchen.
Perfect Occasions to Whip Up These Parfaits
These Decadent Cheesecake Parfaits are perfect for any occasion—or no occasion at all! Serve them at a summer BBQ, and watch them disappear faster than you can say “yum.” They’re also great for dinner parties because they look impressive but require minimal effort. Need a sweet treat for a potluck? Done. Want to surprise your kids with something special? Boom, you’ve got it. Heck, even a quiet night in calls for these parfaits. Honestly, any excuse to make them is a good one!
Ingredients You’ll Need
- 8 oz cream cheese, softened
- 1 cup whipped topping
- 1 cup brownies, crumbled
- 1/2 cup powdered sugar
- 1/4 cup unsweetened cocoa powder
- 1 teaspoon vanilla extract
- 1/4 cup chocolate syrup
- 1/2 cup mini chocolate chips
- Additional whipped topping for garnish
Substitution Options
Not everyone has the same ingredients on hand, and that’s okay! Here are some swaps you can make:
- If you don’t have whipped topping, use homemade whipped cream instead.
- Vegan? Swap the cream cheese for a plant-based alternative and use dairy-free whipped topping.
- No brownies? Crushed cookies or graham crackers work beautifully.
- Out of chocolate chips? Shaved chocolate or cocoa nibs can add texture.
Feel free to get creative—it’s your parfait, after all!
Step 1: Make the Creamy Cheesecake Filling
Start by grabbing a large mixing bowl and combining the softened cream cheese and powdered sugar. Use a hand mixer to beat them together until smooth and creamy. This step is crucial because it sets the foundation for your parfait. The mixture should be light and fluffy, almost cloud-like. Pro tip: Make sure your cream cheese is at room temperature. Cold cream cheese won’t blend as smoothly, and nobody wants lumps in their dessert!
Step 2: Fold in the Whipped Topping
Once your cream cheese mixture is ready, gently fold in the whipped topping and vanilla extract. Folding is key here—you want to keep the airy texture intact. Imagine folding a delicate soufflé; you’re aiming for soft, billowy layers. The vanilla adds a subtle warmth that ties all the flavors together. Take a moment to admire the velvety texture—it’s almost too pretty to eat. Almost.
Step 3: Layer the Crumbled Brownies
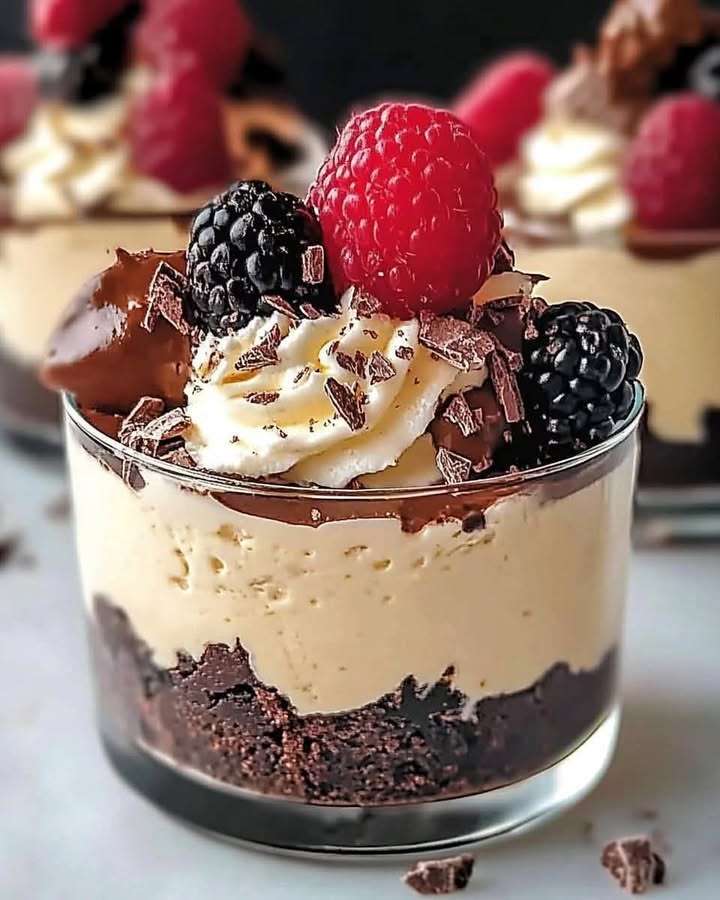
Now comes the fun part: layering! Grab your serving glasses and spoon a generous amount of crumbled brownies at the bottom. The brownies act as the sturdy base, providing a rich, fudgy contrast to the creamy layers above. Don’t skimp on the brownies—they’re the heart and soul of this dessert. If you’re using store-bought brownies, make sure they’re nice and chewy for the best texture.
Step 4: Add the Cheesecake Layer
Spoon a layer of your cheesecake mixture over the brownies, smoothing it out with a spatula. This step is where the magic happens. As you spread the creamy mixture, you’ll see the layers start to take shape. The contrast between the dark brownies and the pale cheesecake filling is simply stunning. Chef’s tip: Use a small offset spatula for a clean, professional finish.
Step 5: Drizzle and Sprinkle
Drizzle a little chocolate syrup over the cheesecake layer, then sprinkle a few mini chocolate chips on top. This step adds a touch of decadence and makes each bite extra special. The syrup creates beautiful swirls, while the chocolate chips add a satisfying crunch. Repeat the layers—brownies, cheesecake, syrup, chips—until your glasses are nearly full. It’s like building a delicious edible skyscraper!
Step 6: Finish with a Flourish
To complete your masterpiece, top each parfait with a generous dollop of whipped topping and a final sprinkle of chocolate chips. This finishing touch not only looks gorgeous but also adds a light, airy element to balance the richness below. Your parfaits are now ready for their grand debut. Pop them in the fridge to chill while you pat yourself on the back for a job well done.
Timing Breakdown
This recipe is a breeze when it comes to timing. Prep time clocks in at just 20 minutes, and since it’s no-bake, there’s zero cooking time. However, you’ll want to refrigerate the parfaits for at least 2 hours before serving. This resting period allows the flavors to meld and the layers to set. Total time? About 2 hours and 20 minutes. Perfect for those last-minute dessert emergencies!
Chef’s Secret
Here’s a little secret to elevate your Decadent Cheesecake Parfaits: toast the mini chocolate chips before sprinkling them on top. Simply toss them in a dry skillet over medium heat for a minute or two until fragrant. Toasted chocolate chips add a deeper, nuttier flavor that pairs beautifully with the other ingredients. Your guests will think you’re a pastry chef!
Extra Info
Did you know that chocolate has been called “the food of the gods”? The ancient Aztecs believed cacao had divine properties, and honestly, I’m inclined to agree. There’s something magical about the way chocolate transforms a simple dessert into something extraordinary. This parfait is proof positive of that magic!
Necessary Equipment
You don’t need fancy gadgets to make these parfaits. A few basic tools will do the trick:
- A large mixing bowl
- A hand mixer or whisk
- A spatula
- Serving glasses or jars
Simple, right? That’s the beauty of this recipe—it’s all about the flavors, not the equipment.
Storage Tips
Storing these Decadent Cheesecake Parfaits is a breeze. Keep them in the fridge, covered with plastic wrap or lids, for up to 3 days. The flavors continue to develop over time, making them even tastier the next day. Just be sure to keep them chilled—they’re best enjoyed cold. Avoid freezing, though, as the texture might change.
If you’re prepping ahead, assemble everything except the final whipped topping. Add that just before serving to keep it light and fluffy. This method ensures your parfaits stay fresh and picture-perfect.
For leftovers (if there are any!), transfer them to airtight containers. The layers may soften slightly, but the taste will still be amazing. These parfaits are forgiving, so don’t stress if they sit for a bit longer than planned.
Tips and Advice
Here are a few tips to make your No-Bake Brownie Cheesecake Parfaits shine:
- Use high-quality chocolate syrup for the best flavor.
- If you’re short on time, buy pre-made brownies instead of baking from scratch.
- Experiment with different toppings, like crushed nuts or caramel drizzle, for variety.
Remember, desserts are meant to be fun, so don’t be afraid to get creative!
Presentation Ideas
Want to wow your guests? Try these presentation ideas:
- Serve the parfaits in clear glass mason jars for a rustic vibe.
- Add a sprig of mint on top for a pop of color.
- Dust the final layer with a pinch of cocoa powder for an elegant touch.
Presentation matters, but the real star is the taste. Trust me, these parfaits speak for themselves!
Healthier Alternative Recipes
If you’re looking to lighten up this dessert, here are six variations to try:
- Low-Sugar Option: Use sugar-free whipped topping and reduced-sugar brownies.
- Vegan Version: Swap dairy ingredients for plant-based alternatives.
- Gluten-Free Twist: Use gluten-free brownies and ensure your chocolate chips are GF.
- Protein-Packed Parfait: Add a scoop of protein powder to the cheesecake mixture.
- Fruit-Filled Fun: Layer fresh berries between the cheesecake and brownies.
- Nutty Delight: Mix chopped nuts into the brownie crumbs for added crunch.
Each variation brings something unique to the table while keeping the essence of the original recipe.
Common Mistakes to Avoid
Mistake 1: Using Cold Cream Cheese
One of the biggest mistakes people make is using cream cheese straight from the fridge. Cold cream cheese won’t blend smoothly, leaving lumps in your filling. To avoid this, let your cream cheese sit at room temperature for at least 30 minutes before starting. Pro tip: Cut it into small cubes to speed up the softening process.
Mistake 2: Overmixing the Whipped Topping
Another common error is overmixing the whipped topping into the cheesecake mixture. Overmixing deflates the airy texture, making your filling dense instead of light. Gently fold the whipped topping in with a spatula, stopping as soon as it’s fully incorporated. Think gentle hands and patience!
Mistake 3: Skipping the Chill Time
Don’t skip the chilling step! Rushing to serve these parfaits without letting them rest in the fridge will result in less flavorful bites. The chill time allows the layers to set and the flavors to meld. Trust me, it’s worth the wait.
Mistake 4: Overloading the Layers
It’s tempting to pile on the goodies, but overloading the layers can make your parfaits messy and hard to eat. Aim for balanced proportions so each bite has a bit of everything. Less is more when it comes to layering!
FAQ
Can I make these parfaits ahead of time?
Absolutely! These Decadent Cheesecake Parfaits can be made up to a day in advance. Just hold off on adding the final whipped topping until right before serving to keep it fresh and fluffy.
What kind of brownies should I use?
You can use homemade or store-bought brownies. Opt for ones that are moist and chewy for the best texture. Fudgy brownies pair beautifully with the creamy cheesecake filling.
Can I freeze these parfaits?
Freezing isn’t recommended, as the texture of the whipped topping and cheesecake filling may change. Stick to refrigeration for optimal results.
How many servings does this recipe make?
This recipe makes about 4-6 servings, depending on the size of your glasses. Perfect for a small gathering or a cozy night in!
Can I use Greek yogurt instead of whipped topping?
Yes, you can substitute Greek yogurt for a tangier, healthier twist. Just note that the texture will be slightly denser.
What’s the best way to crumble brownies?
Break the brownies into chunks and pulse them in a food processor until crumbly. Alternatively, place them in a zip-top bag and crush them with a rolling pin.
Do I have to use chocolate syrup?
Nope! You can swap the syrup for caramel or strawberry sauce for a different flavor profile. Get creative!
Can I add alcohol to this dessert?
Of course! A splash of coffee liqueur or Baileys in the cheesecake mixture adds a grown-up twist. Just a tablespoon or two will do the trick.
How do I prevent the layers from mixing?
To keep the layers distinct, chill the parfaits after each layer. This helps them set before adding the next one.
What if I don’t have serving glasses?
No problem! Use mugs, jars, or even a trifle dish. The key is to have something clear so you can show off those gorgeous layers.
Final Thoughts
There you have it—your ultimate guide to making Decadent No-Bake Brownie Cheesecake Parfaits. This dessert is proof that you don’t need to spend hours in the kitchen to create something truly special. With its creamy layers, rich flavors, and no-bake simplicity, it’s a recipe that’s bound to become a favorite. So grab your ingredients, channel your inner dessert wizard, and treat yourself to a little slice of heaven. After all, life’s too short not to indulge every now and then!
Equipment
- Large mixing bowl
- Hand mixer or whisk
- Spatula
- Serving glasses or jars
- Sifter (for cocoa powder)
Ingredients
- 8 oz cream cheese, softened
- 1 cup whipped topping
- 1 cup brownies, crumbled
- 1/2 cup powdered sugar
- 1/4 cup unsweetened cocoa powder
- 1 teaspoon vanilla extract
- 1/4 cup chocolate syrup
- 1/2 cup mini chocolate chips
- to taste Additional whipped topping for garnish
Instructions
- Combine softened cream cheese and powdered sugar in a large mixing bowl and beat until smooth and creamy.
- Gently fold in the whipped topping and vanilla extract until just combined.
- Spoon a generous amount of crumbled brownies into the bottom of serving glasses.
- Layer the cheesecake mixture over the brownies and smooth it out.
- Drizzle chocolate syrup and sprinkle mini chocolate chips over the cheesecake layer.
- Repeat the layers until glasses are nearly full.
- Top with additional whipped topping and chocolate chips, then refrigerate for at least 2 hours before serving.
Notes
Nutrition

Hi, I’m Olivia Parker, the founder of BakingSecret.com and a lifelong lover of all things sweet and homemade. I grew up in a small town in Oregon, where the smell of fresh cookies in my family’s kitchen sparked my passion for baking. Over the years, I turned that passion into a mission: to help home bakers feel confident, inspired, and creative.
After studying food science and working in several artisan bakeries across the U.S., I decided to create a space where everyone from beginners to seasoned bakers can find reliable recipes, expert tips, and a warm, welcoming community. BakingSecret.com is my way of sharing the magic of baking with the world. When I’m not testing new recipes, you’ll find me exploring farmers’ markets, collecting vintage cookbooks, or perfecting my sourdough technique.