
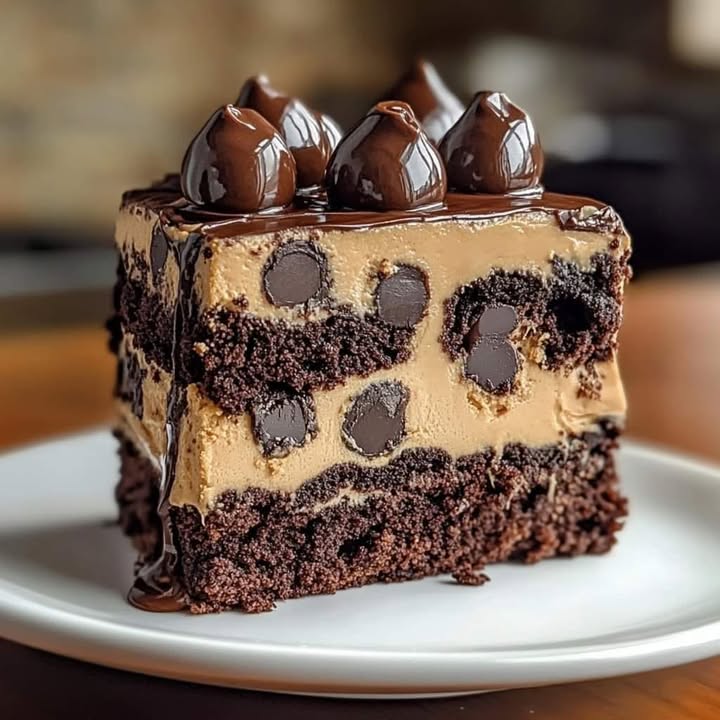
Ultimate Decadent Cookie Dough Cake: A Dream in Layers
You know that tough choice you have to make at the bakery? The one between a fudgy brownie and a tub of rich cookie dough? I was forever torn, until I said “forget it” and smashed them together into a cake. This Decadent Cookie Dough Brownie Cake is my happy place. It’s not just dessert; it’s an experience, with layers of gooey brownie, safe-to-eat cookie dough, and a shiny chocolate blanket on top. The first time I made it for my book club, the room went silent. And then there was just the sound of happy forks. Let’s make that magic happen in your kitchen.
The Tale of Two Treats in One Cake
This cake is a delicious piece of modern baking magic. While brownies have their roots in late 19th-century America, and chocolate chip cookies are famously a 1930s happy accident, combining them is a stroke of 21st-century genius. It captures that universal childhood joy of sneaking raw cookie dough from the bowl. My version is special because it features a safe-to-eat cookie dough layer—no raw eggs! It’s my go-to for when a regular cake feels too plain but a brownie feels too simple. It’s the ultimate “why choose?” solution for any true dessert lover.
Why You’ll Fall in Love With This Cookie Dough Brownie Cake
Look, if the name alone didn’t sell you, let me count the ways. First, it’s a texture party: chewy brownie, soft and slightly crumbly cookie dough, and silky ganache. Every bite is different. Second, it’s surprisingly straightforward. You’re making two simple batters and a two-ingredient sauce. No fancy techniques! It’s also the ultimate crowd-pleaser. This cake has single-handedly made me the designated dessert-bringer in my friend group. Kids, adults, chocolate fanatics—it makes everyone smile.
When to Whip Up This Showstopper
This cake doesn’t need a fancy reason, but it sure does turn any day into an event. It’s perfect for birthday parties where you want to skip the traditional frosting. It’s a superstar at potlucks (trust me, you’ll get recipe requests). Game day? Bake it in a rectangle pan and cut into squares. Having a tough week? This is what I call “Wednesday therapy baking.” It’s the edible hug everyone needs sometimes.
Gathering Your Ingredients for the Decadent Cookie Dough Cake
Let’s gather our treasures. Using quality ingredients makes a real difference here, especially for the chocolate!
For the Brownie Layers:
- 1 cup unsalted butter, melted
- 2 cups granulated sugar
- 4 large eggs
- 1 tsp vanilla extract
- 1 cup all-purpose flour
- 1 cup unsweetened cocoa powder
- 1/2 tsp salt
For the Cookie Dough Layer:
- 1/2 cup unsalted butter, softened
- 3/4 cup brown sugar, packed
- 1/4 cup granulated sugar
- 2 tbsp milk (or cream)
- 1 tsp vanilla extract
- 1 cup all-purpose flour
- 1/2 tsp salt
- 1 cup mini chocolate chips
For the Chocolate Ganache:
- 1 cup semi-sweet chocolate chips
- 1/2 cup heavy cream
No Worries! Handy Ingredient Swaps
Out of something? No panic. Here’s how to pivot:
- Cocoa Powder: Use Dutch-processed for a deeper, milder flavor.
- Flour in Cookie Dough: To make it 100% safe to eat raw, you can heat-treat your flour. Spread it on a baking sheet and bake at 350°F for 5-7 minutes. Let it cool completely before using.
- Heavy Cream: For the ganache, full-fat coconut milk is a great dairy-free substitute.
- Mini Chocolate Chips: Chop up a chocolate bar for rustic chunks, or use dark chocolate chips for a less sweet kick.
Step-by-Step to Decadent Cookie Dough Cake Bliss
Follow these steps, take your time, and enjoy the process. It’s like building a delicious chocolate tower!
Step 1: Bake the Fudgy Brownie Base
First, get your oven humming at 350°F (175°C). Grease and line your two cake pans with parchment paper—this is your ticket to easy, clean removal. In a big bowl, whisk that warm melted butter and granulated sugar together. It’ll look a bit gritty and beautiful. Crack in your eggs, one at a time, whisking well after each until the mix gets a bit shiny. Stir in the vanilla. Now, sift in your flour, cocoa powder, and salt. The sifting is key for lump-free brownies! Gently fold until the last streak of flour disappears. Split this thick, dark batter between your pans and smooth the tops. Bake for 20-25 minutes. A toothpick should come out with a few fudgy crumbs attached, not clean. This means they’ll stay moist. Let them cool completely right in the pans.
Step 2: Whip Up the Safe-to-Eat Cookie Dough
While the brownies cool, make the magic middle layer. In a mixing bowl, cream the softened butter with both sugars. You want it light, fluffy, and pale. This takes a couple of minutes with a mixer. Pour in the milk and vanilla, mixing until it’s smooth. Now, add your flour and salt. If you’re concerned about raw flour, remember you can use heat-treated flour here. Mix until just combined—don’t overwork it. Finally, gently fold in those adorable mini chocolate chips. The dough will be thick, sweet, and ready to spread. Set it aside until your brownies are fully cool to the touch.
Pro tip: If your cookie dough feels too soft to spread, pop it in the fridge for 10-15 minutes to firm up slightly.
Step 3: Create the Silky Chocolate Ganache
This is the elegant final touch. Place your chocolate chips in a heat-proof bowl. Heat the heavy cream in a small saucepan until it just starts to simmer—little bubbles around the edges. Pour the hot cream over the chocolate chips and let it sit, untouched, for 3-4 minutes. This melts the chocolate gently. Then, starting from the center, stir slowly until you have a smooth, glossy, and incredibly luxurious chocolate sauce. Let it cool for about 10 minutes. It will thicken slightly, perfect for draping over the cake.
Step 4: Assemble Your Masterpiece
Time to build! Carefully remove one brownie layer from its pan and place it on your serving plate. Take all of that wonderful cookie dough and spread it evenly over the top, right to the edges. Gently place the second brownie layer on top of the cookie dough, pressing down lightly. Now, pour your slightly cooled ganache right in the center of the top brownie. Use a spoon or offset spatula to nudge it to the edges, letting it cascade beautifully down the sides. Don’t worry about perfection—those drips are part of the charm.
Step 5: The Finale—Slice and Savor
Patience is a virtue! Let the ganache set for at least 30 minutes so you get clean slices. For the absolute best experience, serve this Decadent Cookie Dough Cake with a cold glass of milk or a scoop of vanilla ice cream. The contrast of warm cake and cold ice cream is heavenly. Slice with a sharp knife wiped clean between cuts. Get ready for the oohs and aahs.
Your Recipe Timetable
| Activity | Time Needed |
|---|---|
| Preparation & Mixing | 30 minutes |
| Brownie Baking | 25 minutes |
| Cooling & Assembly | 35 minutes |
| Total Time | About 1 hour 30 minutes |
Servings: 12 generous slices | Calories: Approximately 450 kcal per serving
Chef’s Secret for the Ultimate Ganache
For an extra-professional touch, add a tiny pinch of flaky sea salt to the ganache right after you pour it over the cake. It doesn’t make it salty—it just makes the chocolate flavor explode in your mouth. It’s the secret trick that makes people say, “What is in this?!”
A Fun Fact About Flour Power
That cookie dough layer is so good, you’ll want to eat it with a spoon. But did you know the caution about raw flour is as important as the one about raw eggs? Flour is a raw agricultural product. By using heat-treated flour or skipping raw eggs, we make this indulgence both delicious and mindful. It’s all about cooking consistency and safety, even in no-bake layers!
What You’ll Need to Make It
- Two 9-inch round cake pans
- Parchment paper
- Large mixing bowls
- Whisk and spatula
- Electric mixer (hand or stand)
- Small saucepan
- Heat-proof bowl
- Measuring cups and spoons
Storing Your Leftover Slice of Heaven
Cover any leftover cake tightly with plastic wrap or store it in an airtight container. It will stay fresh at room temperature for up to 2 days, thanks to the sugar content acting as a preservative.
For longer storage, you can refrigerate it for up to 5 days. The cold will firm up the ganache and cookie dough significantly. Let slices come to room temperature for about 30 minutes before serving for the best texture and flavor.
This cake also freezes beautifully! Wrap the whole cake or individual slices tightly in plastic wrap, then in foil. Freeze for up to 3 months. Thaw overnight in the refrigerator before serving.
My Top Tips for Guaranteed Success
- Use room temperature eggs for the brownies. They incorporate into the batter more easily, giving you a better rise and texture.
- Don’t overmix the brownie batter once you add the flour. Overmixing develops gluten, which can make your brownies tough instead of tender and fudgy.
- Let the brownie layers cool COMPLETELY before adding the cookie dough. If they’re warm, the dough will melt and become a messy, greasy layer.
- If your ganache splits or looks grainy, don’t dump it! Add a teaspoon of warm milk or cream and whisk vigorously. It should come right back together.
Make It Look as Good as It Tastes
- Dust the top with a light sprinkle of cocoa powder or flaky sea salt after the ganache sets.
- Top each slice with a small scoop of vanilla ice cream and a drizzle of caramel sauce.
- Garnish the plate with a few fresh raspberries or strawberries. The tart fruit cuts the richness perfectly.
- For a party, cut into small, bite-sized squares and serve as elegant dessert bites.
Want to Mix It Up? Try These Variations!
Once you’ve mastered the classic, the world is your chocolate oyster. Here are six delicious twists:
- Peanut Butter Swirl: Add 1/2 cup of warmed peanut butter to the cookie dough layer and swirl it into the ganache.
- Mint Chocolate: Add 1/2 tsp of peppermint extract to the ganache and use mint chocolate chips in the cookie dough.
- Salted Caramel: Drizzle store-bought or homemade salted caramel sauce between the brownie and cookie dough layers.
- Blondie Base: Swap the brownie layers for chewy blondies. It’s a vanilla-lover’s dream.
- Cookie Dough Cheesecake Layer: Mix 8 oz of softened cream cheese into the cookie dough for a tangy, creamy twist.
- Nutty Crunch: Fold 1/2 cup of chopped toasted pecans or walnuts into the brownie batter.
More Decadent Recipes You’ll Adore
If you love this kind of over-the-top dessert, you have to explore my other creations. For a completely different but equally tempting treat, try these Dubai Chocolate Bar Pistachio Cookies – they’re rich, filled, and absolutely stunning. Or, if you’re craving something fruity and refreshing, this Refreshing Cherry Lemon Delight Cheesecake is pure summer on a plate. For savory inspiration to balance all this sweetness, I often make these quick Cheesy Garlic Chicken Wraps for dinner or these irresistible Cheese Stuffed Potato Cakes as a side. This Decadent Cookie Dough Cake is just one of many amazing dessert cakes and cupcakes you can find right here to satisfy any craving.
Common Mistakes to Avoid for Perfect Cookie Dough Cake
Mistake 1: Using Hot Brownies for the Cookie Dough Layer
This is the biggest pitfall! Spreading that rich cookie dough onto warm or even slightly warm brownies is a recipe for disaster. The heat will melt the butter in the dough, causing it to turn greasy, slide off, and soak into the brownie, making a soggy mess instead of a distinct, creamy layer. Patience is non-negotiable. Let the brownie layers cool in their pans on a wire rack until they are completely at room temperature. Touch the center—if it’s warm, wait longer.
Mistake 2: Overbaking the Brownie Layers
Brownies should be fudgy and moist, especially in a layered cake like this. Overbaking them leads to dry, cakey layers that can crumble when you try to assemble the cake. Remember, you’re not baking a traditional cake; you’re baking a dense, fudgy brownie. Pull them out of the oven when a toothpick inserted into the center comes out with a few moist crumbs attached, not clean. They will continue to set as they cool. A good fudgy brownie is the essential foundation for this decadent dessert.
Mistake 3: Not Letting the Ganache Cool Slightly
Pouring piping hot ganache straight from the microwave or saucepan onto your cake is a common error. It will be too thin and runny, causing it to flood off the sides and pool around the base instead of clinging to the cake in a beautiful, glossy coat. It can also melt the cookie dough layer. After mixing your ganache, let it sit on the counter for about 10 minutes. Give it a gentle stir. It should be warm and pourable, but noticeably thicker. This ensures a perfect, controlled drip and a lovely layer on top.
Mistake 4: Skipping the Parchment Paper Liner
It might seem like an extra step you can skip if you grease the pan well. Don’t. Brownies are sticky, and this cake needs to be lifted out cleanly to be assembled. Without parchment paper, you risk breaking the delicate brownie layers when trying to remove them, turning your beautiful cake into a pile of crumbs and dough. Lining the pans is simple insurance for a stress-free and successful assembly process.
Your Cookie Dough Brownie Cake Questions, Answered
Can I make any parts of this cake ahead of time?
Absolutely! You can bake the brownie layers up to two days in advance. Let them cool completely, then wrap them tightly in plastic wrap and store at room temperature. The cookie dough can also be made ahead—store it covered in the refrigerator for up to 3 days, just let it soften slightly at room temperature so it’s spreadable. You can even make the ganache a day ahead; store it covered at room temperature and gently re-warm it for a few seconds before using.
Yes, in this recipe it is designed to be safe. It contains no raw eggs, which is the primary concern with traditional cookie dough. The only other concern is the raw flour. To be 100% safe, you can heat-treat your flour before using it. Simply spread the cup of flour on a baking sheet and bake at 350°F for about 5-7 minutes. Let it cool completely before adding it to your recipe. This simple step eliminates any potential risk.
My ganache turned out lumpy or separated. Can I fix it?
Don’t worry, ganache can be rescued! If it’s lumpy, it might mean the cream wasn’t hot enough to fully melt the chocolate. Try straining it through a fine-mesh sieve to remove lumps, or gently re-warm the mixture in short bursts in the microwave, stirring well. If it looks separated, greasy, or “broken,” it means the fat has split. Add a small amount (a teaspoon) of warm milk or cream and whisk vigorously. This should bring it back together into a smooth emulsion.
Can I use a box brownie mix instead?
You sure can for a shortcut! Prepare the box mix according to the “cake-like” brownie directions (usually this means adding an extra egg). Divide it between your two prepared pans and bake according to package directions, but check a few minutes early. Let them cool completely as directed. This is a great time-saver that still yields a delicious final cake.
How do I get clean, neat slices of this rich cake?
The key is a sharp knife and a clean cut. Run your knife under very hot water, wipe it completely dry with a towel, and then make your slice. The heat helps the knife glide through the firm ganache and fudgy layers without dragging. Wipe the knife clean and re-heat it between each slice for picture-perfect pieces.
Can I freeze the assembled cake?
Yes, this cake freezes wonderfully. Wrap the fully assembled and ganache-coated cake tightly in plastic wrap, then in a layer of aluminum foil. Freeze for up to 3 months. Thaw it overnight, unwrapped, in the refrigerator. Let it come to room temperature for an hour or so before serving for the best texture.
What can I use instead of heavy cream for the ganache?
If you need a dairy-free option, full-fat canned coconut milk is the best substitute. Make sure to use the creamy solid part from the top of the can. You can also use a lower-fat milk, but the ganache will be thinner and less rich. For a thicker ganache with milk, you can add a little more chocolate chips to balance it out.
Why did my brownie layers sink in the middle?
This usually happens from overmixing the batter after adding the flour, or from opening the oven door too early during baking. Overmixing adds too much air and develops gluten, which can collapse. Once the pans are in the oven, resist peeking for at least the first 15-20 minutes to prevent a sudden temperature drop that can cause sinking.
Can I make this in a 9×13 pan instead of round layers?
Of course! This makes a fantastic sheet cake or bar dessert. Press all the brownie batter into a greased 9×13 pan and bake (it may take 5-10 minutes longer – test with a toothpick). Let it cool, then spread the cookie dough over the entire top in the pan. Pour the ganache over that. Slice into squares directly in the pan for easy serving.
If your dough has been in the fridge or is just very firm, let it sit at room temperature for 10-15 minutes to soften. You can also use slightly damp hands to gently press and pat it into an even layer over the brownie. If it’s truly too dry, add another teaspoon of milk and mix until it’s spreadable.
The Last Slice
There you have it—the recipe for what might just become your new favorite dessert. This Decadent Cookie Dough Brownie Cake is more than just a list of ingredients; it’s a project filled with love, chocolate, and the promise of pure joy. It’s the cake that turns a regular Tuesday into a celebration and makes any gathering feel special. So preheat that oven, line those pans, and get ready to create something truly unforgettable. Don’t forget to share a slice (if you can bear to part with one!). Happy baking!
Equipment
- Grand bol
- Fouet
- Spatule
- Plaque à pâtisserie
- Papier sulfurisé
Ingredients
- 4 œufs
- 200 g sucre
- 90 g cacao en poudre
- 120 g farine tout usage
- 5 g sel
- 250 ml crème épaisse
- 70 g pépites de chocolat
- q.s. sucre glace pour saupoudrer
Instructions
- Préchauffez votre four à 175°C. Graissez et tapissez deux moules à gâteau ronds de 9 pouces avec du papier sulfurisé.
- Dans un grand bol, fouettez le beurre fondu et le sucre jusqu'à obtenir une texture granuleuse et bien mélangée. Ajoutez les œufs un par un en fouettant jusqu'à ce que le mélange soit brillant, puis incorporez l'extrait de vanille.
- Tamisez la farine, le cacao en poudre et le sel, puis incorporez délicatement jusqu'à ce que le mélange soit juste combiné, puis divisez la pâte entre les moules préparés.
- Faites cuire pendant 20-25 minutes jusqu'à ce qu'un cure-dent en ressorte avec quelques miettes fondantes, puis laissez refroidir complètement dans les moules.
- Dans un autre bol, crémez le beurre ramolli avec le sucre brun et le sucre cristallisé jusqu'à obtenir une consistance aérée, puis ajoutez le lait et l'extrait de vanille, en mélangeant jusqu'à obtenir un mélange homogène.
- Incorporez la farine et le sel jusqu'à juste combiné, puis ajoutez les pépites de chocolat et réservez.
- Pour la ganache, chauffez la crème épaisse jusqu'à frémissement, puis versez-la sur les pépites de chocolat et laissez reposer 3-4 minutes avant de mélanger jusqu'à consistance lisse.
- Une fois les brownies refroidis, étalez la couche de pâte à cookie sur le dessus d'un des brownie, puis placez le second brownie au-dessus et versez la ganache, en l'étalant pour qu'elle coule sur les côtés.
- Laissez la ganache prendre pendant au moins 30 minutes, puis tranchez et servez.
Notes
Nutrition

Hi, I’m Olivia Parker, the founder of BakingSecret.com and a lifelong lover of all things sweet and homemade. I grew up in a small town in Oregon, where the smell of fresh cookies in my family’s kitchen sparked my passion for baking. Over the years, I turned that passion into a mission: to help home bakers feel confident, inspired, and creative.
After studying food science and working in several artisan bakeries across the U.S., I decided to create a space where everyone from beginners to seasoned bakers can find reliable recipes, expert tips, and a warm, welcoming community. BakingSecret.com is my way of sharing the magic of baking with the world. When I’m not testing new recipes, you’ll find me exploring farmers’ markets, collecting vintage cookbooks, or perfecting my sourdough technique.