
A Cake That Feels Like a Hug
Picture this: you’re craving something sweet, creamy, and utterly indulgent. But wait—what if it’s also gluten-free? Sounds too good to be true, right? Well, let me introduce you to the Flourless White Chocolate Cake, a dessert that feels like a warm hug for your taste buds. This recipe is one of my all-time favorites because it’s simple, elegant, and perfect for anyone who loves cheesecake and white chocolate. I remember making it for the first time when friends came over unexpectedly—it was such a hit that they begged me for the recipe!
Where Did This Recipe Come From?
This Flourless White Chocolate Cake is inspired by classic cheesecakes but with a modern twist. The idea of combining cream cheese and white chocolate isn’t new, but removing flour takes it to another level. It creates a texture so soft and velvety, you won’t believe there’s no flour involved. I first stumbled upon a version of this cake while browsing old family recipes. Over time, I tweaked it to make it lighter and more decadent. Trust me, once you try it, you’ll see why it’s become a staple in my kitchen.
Why You’ll Love This Recipe
What makes this Flourless White Chocolate Cake stand out? First, it’s incredibly easy to make—no complicated techniques here. Second, it’s naturally gluten-free, which means everyone can enjoy it. Third, the flavors are divine. The tanginess of cream cheese balances the sweetness of white chocolate beautifully. Plus, its creamy texture melts in your mouth, leaving you wanting just one more slice (or two). Whether you’re a seasoned baker or a beginner, this recipe will make you feel like a pro.
Perfect Occasions for This Cake
This cake shines at dinner parties, birthdays, or even as a weekend treat. Imagine serving it at a holiday gathering—it looks fancy but doesn’t require hours of work. I’ve made it for bridal showers, potlucks, and cozy family dinners, and it always gets rave reviews. It’s versatile enough for formal events yet comforting enough for casual get-togethers.
Ingredients You’ll Need
- 1 cup of egg whites (about 6)
- 450 g of cream cheese
- 250 g of grated or melted white chocolate
- 2 teaspoons of vanilla essence
- Fresh blackberries to decorate
- Glass sugar to sprinkle
- Aerosol oil for the mold
Substitution Options
Don’t have all the ingredients on hand? No worries. Swap cream cheese for mascarpone for an even richer flavor. If you’re not a fan of white chocolate, dark chocolate works well too. For those avoiding dairy, use vegan cream cheese and plant-based chocolate. And instead of blackberries, raspberries or strawberries add a pop of color and freshness.
Step 1: Preheat Your Oven
Start by preheating your oven to 150°C (300°F). If you want an extra-creamy result, place a tray filled with water on the lower rack—it adds moisture during baking. While the oven heats up, grab your mixing bowls and prepare for some magic. Pro tip: Make sure your eggs are at room temperature; they whip better that way.
Step 2: Beat the Egg Whites
In a clean bowl, beat the egg whites until stiff peaks form. Think of fluffy clouds—that’s what you’re aiming for. Reserve them for later. Be patient; this step is crucial for achieving that light, airy texture. Chef’s tip: Add a pinch of salt to stabilize the whites while whipping.
Step 3: Cream the Cheese
Now, take the cream cheese and beat it until smooth and soft. This is where the base of your cake comes together. Once it’s creamy, add the vanilla essence and white chocolate. Mix everything thoroughly until it’s silky and fragrant. The aroma of melting white chocolate is pure bliss!
Step 4: Combine the Mixtures
Gently fold the beaten egg whites into the cream cheese mixture in three parts. Use enveloping movements to keep the airiness intact. Imagine folding a delicate soufflé—you don’t want to deflate the batter. This step ensures your Flourless White Chocolate Cake stays light and dreamy.
Step 5: Pour and Bake
Grease your removable mold with aerosol oil and pour the mixture inside. Tap it gently on the counter to release any air bubbles. Pop it into the oven for about an hour. The cake should be set but still jiggle slightly in the center. Don’t worry—it firms up as it cools.
Step 6: Cool and Chill
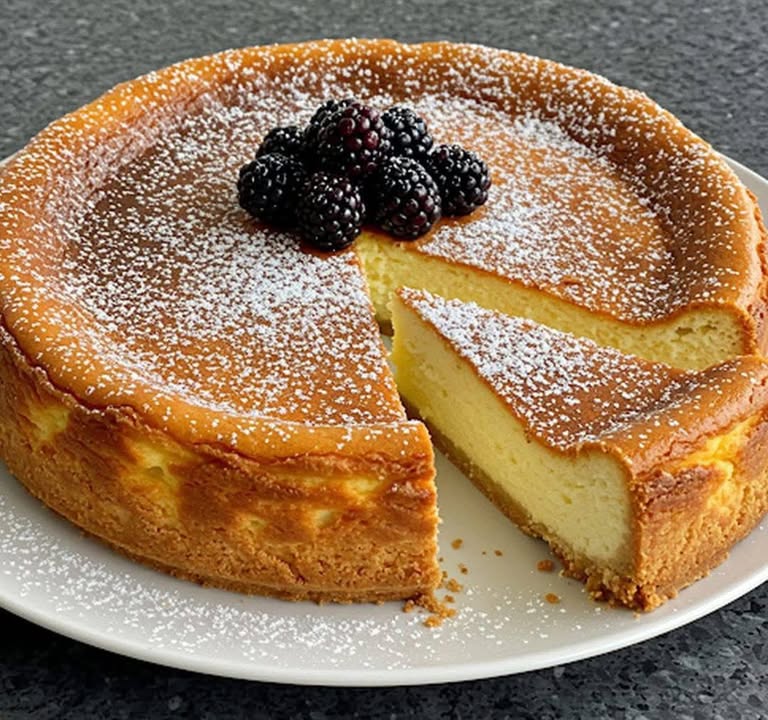
Once baked, let the cake cool completely before refrigerating it for at least an hour—or overnight for best results. Patience pays off here, folks! When chilled, unmold the cake, decorate with fresh blackberries, and sprinkle glass sugar for sparkle.
Timing Breakdown
- Prep Time: 20 minutes
- Cooking Time: 1 hour
- Resting Time: 1–8 hours (chilling)
- Total Time: Approximately 2 hours (plus chilling)
Chef’s Secret
To enhance the flavor, toast the white chocolate lightly before melting it. This brings out its nutty notes and adds depth to the cake. Just be careful not to burn it!
An Interesting Fact
Did you know that white chocolate isn’t technically chocolate? Unlike dark or milk chocolate, it contains no cocoa solids—only cocoa butter, sugar, and milk powder. Despite this, it pairs beautifully with cream cheese, creating a symphony of flavors in every bite.
Necessary Equipment
- Mixing bowls
- Electric mixer or whisk
- Removable cake mold
- Baking tray (optional, for water bath)
- Spatula
Storage Tips
Store your Flourless White Chocolate Cake in the fridge, covered with plastic wrap or in an airtight container. It stays fresh for up to 3 days. For longer storage, freeze slices individually wrapped in parchment paper. Thaw them overnight in the fridge before serving.
If you live in a humid area, avoid leaving the cake out for too long, as moisture can affect its texture. Always bring it back to room temperature before slicing for optimal flavor.
Leftovers? Lucky you! They make a delightful breakfast treat paired with a hot cup of coffee. Just saying.
Tips and Advice
- Use high-quality white chocolate for the best results.
- Don’t skip chilling—the cake needs time to set properly.
- Decorate creatively with seasonal fruits for a personalized touch.
Presentation Ideas
- Top with edible flowers for a whimsical look.
- Dust powdered sugar through a stencil for artistic patterns.
- Serve with a dollop of whipped cream on the side.
Healthier Alternatives
Here are six ways to tweak this recipe:
- Low-Sugar Version: Use stevia or monk fruit sweetener instead of regular sugar.
- Vegan Option: Substitute cream cheese with cashew cream and use plant-based chocolate.
- Protein Boost: Add a scoop of unflavored protein powder to the batter.
- Fruit Infusion: Swirl raspberry purée into the mixture before baking.
- Nutty Twist: Fold crushed almonds or hazelnuts into the batter.
- Spiced Delight: Add a dash of cinnamon or nutmeg for warmth.
Mistake 1: Overbeating the Egg Whites
Overbeating can cause the egg whites to become dry and grainy, ruining the cake’s texture. To avoid this, stop whipping as soon as stiff peaks form. Pro tip: Check frequently to ensure you don’t overdo it.
Mistake 2: Skipping the Water Bath
The water bath helps maintain moisture, preventing the cake from cracking. If you skip it, your cake might end up dry. Place a shallow pan of water on the lower rack to mimic professional bakers’ techniques.
Mistake 3: Opening the Oven Door Too Early
Opening the door too early lets heat escape, causing the cake to sink. Resist the urge to peek until at least halfway through baking. Trust the process!
FAQs
Can I use dark chocolate instead of white?
Absolutely! Dark chocolate gives the cake a richer, less sweet flavor profile. Melt it carefully to prevent burning.
Is this recipe keto-friendly?
Not inherently, due to the sugar content. However, using low-carb sweeteners and high-quality dark chocolate can adapt it for a keto diet.
How do I prevent cracks on top?
Cracks often happen due to sudden temperature changes. Cool the cake gradually in the oven with the door slightly ajar after baking.
Can I freeze this cake?
Yes, wrap individual slices tightly and freeze for up to a month. Thaw overnight in the fridge before enjoying.
What size mold should I use?
A standard 9-inch removable mold works perfectly. Adjust quantities if using a different size.
Do I need a mixer?
While a mixer speeds things up, you can whisk by hand if you’re feeling adventurous. Just be prepared for a workout!
Can I omit the vanilla?
You can, but vanilla enhances the overall flavor. A teaspoon of almond extract is a great alternative.
Why does my cake taste eggy?
Eggy flavors usually mean the egg whites weren’t folded in properly. Ensure you incorporate them gently to retain their lightness.
Should I grease the mold?
Yes, greasing prevents sticking. Aerosol oil works wonders, but butter or non-stick spray also does the trick.
How long can I store leftovers?
Refrigerated, the cake lasts up to 3 days. Beyond that, freeze for longer storage.
This Flourless White Chocolate Cake has quickly become a favorite in my home, and I hope it becomes one in yours too. With its creamy texture, rich flavor, and ease of preparation, it’s bound to impress anyone lucky enough to taste it. So go ahead, give it a try—you won’t regret it!
Equipment
- Mixing bowls
- Electric mixer or whisk
- Spatula
- Removable cake mold
- Baking tray (optional)
Ingredients
- 1 cup egg whites about 6
- 450 g cream cheese
- 250 g grated or melted white chocolate
- 2 teaspoons vanilla essence
- q.s. fresh blackberries for decoration
- q.s. glass sugar to sprinkle
- q.s. aerosol oil for greasing mold
Instructions
- Preheat your oven to 150°C (300°F), and place a tray filled with water on the lower rack for moisture.
- Beat the egg whites in a clean bowl until stiff peaks form and reserve.
- Beat the cream cheese until smooth, then add vanilla essence and melted white chocolate, mixing thoroughly.
- Gently fold the beaten egg whites into the cream cheese mixture in three parts.
- Grease a removable mold with aerosol oil and pour in the mixture, tapping gently on the counter to release air bubbles.
- Bake in the oven for about an hour until set but slightly jiggly in the center.
- Cool completely before refrigerating for at least an hour or overnight for best results.
- Decorate with fresh blackberries and sprinkle with glass sugar before serving.
Notes
Nutrition

Hi, I’m Olivia Parker, the founder of BakingSecret.com and a lifelong lover of all things sweet and homemade. I grew up in a small town in Oregon, where the smell of fresh cookies in my family’s kitchen sparked my passion for baking. Over the years, I turned that passion into a mission: to help home bakers feel confident, inspired, and creative.
After studying food science and working in several artisan bakeries across the U.S., I decided to create a space where everyone from beginners to seasoned bakers can find reliable recipes, expert tips, and a warm, welcoming community. BakingSecret.com is my way of sharing the magic of baking with the world. When I’m not testing new recipes, you’ll find me exploring farmers’ markets, collecting vintage cookbooks, or perfecting my sourdough technique.