
Why This Galaxy Peanut Butter Cake Will Blow Your Mind
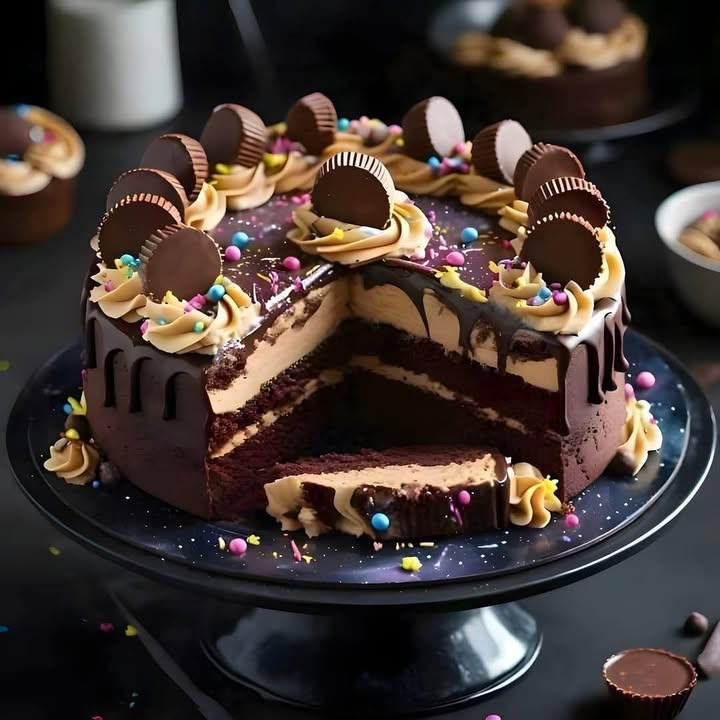
Picture this: a slice of cake so dreamy, it feels like you’re biting into the universe itself. That’s exactly what happened when I first made this Galaxy Peanut Butter Cake. The swirls of purple and blue, the rich chocolate ganache, and the creamy peanut butter buttercream came together in a way that felt almost magical. It’s not just a dessert—it’s an experience. Whether you’re baking for your family or hosting a party, this cake is sure to be the star of the show.
The Story Behind This Cosmic Treat
I stumbled upon the idea of a galaxy-themed cake while scrolling through social media late one night. At first, I thought it was too fancy for my kitchen skills. But then I remembered how much my kids love anything space-related—and peanut butter? They’re obsessed. So, I decided to combine their two favorite things. After a few tries (and some very messy countertops), I perfected this recipe. It’s become a family tradition now, especially for birthdays and holidays.
Why You’ll Love This Recipe
This Galaxy Peanut Butter Cake is all about balance. The fluffy chocolate cake layers are moist and rich, while the peanut butter buttercream adds a smooth, nutty contrast. The chocolate ganache ties everything together with its glossy finish. And let’s not forget the galaxy effect—it’s surprisingly easy to create but looks like you spent hours on it. Plus, it’s versatile enough to suit any occasion, from casual get-togethers to formal celebrations.
Perfect Occasions for This Cake
Need a show-stopping dessert for a birthday party? Done. Want something unique for a holiday feast? Check. Even if you’re just craving a sweet treat to share with friends over coffee, this cake fits the bill. I’ve served it at baby showers, potlucks, and even as a surprise “just because” dessert for my husband. Every time, it gets rave reviews.
Ingredients You’ll Need
- For the cake:
- 2 1/4 cups all-purpose flour
- 1 1/2 cups granulated sugar
- 2 teaspoons baking powder
- 1 teaspoon salt
- 1/2 cup unsweetened cocoa powder
- 1 cup whole milk, at room temperature
- 2 large eggs
- 1 teaspoon vanilla extract
- For the peanut butter buttercream:
- 1 1/2 cups creamy peanut butter
- 3 1/2 cups powdered sugar
- 2 tablespoons unsalted butter, softened
- 2 teaspoons vanilla extract
- For the chocolate ganache:
- 1 cup semisweet chocolate chips
- 1/2 cup heavy cream
- For the galaxy effect:
- 1/4 cup blue and purple gel or paste food coloring
- 1/4 cup white chocolate chips or chopped white chocolate
Substitution Options
If you need to tweak the recipe, here are some ideas:
- Swap all-purpose flour with gluten-free flour for a gluten-free version.
- Use almond milk instead of whole milk if you’re dairy-free.
- Replace peanut butter with sunflower seed butter for a nut-free option.
- Opt for dark chocolate chips if you prefer a bittersweet ganache.
Step 1: Preparing the Cake Layers
Start by preheating your oven to 350°F (180°C). Grease and flour three 8-inch round cake pans—this step is crucial for preventing sticking. In a large bowl, whisk together the dry ingredients: flour, sugar, baking powder, salt, and cocoa powder. In another bowl, mix the wet ingredients: milk, eggs, and vanilla. Combine them gently until the batter is smooth and velvety. Divide the batter evenly among the pans. As they bake, your kitchen will fill with the warm aroma of chocolate. Pro tip: Use a kitchen scale to divide the batter evenly for perfectly uniform layers.
Step 2: Making the Peanut Butter Buttercream
While the cakes cool, whip up the peanut butter buttercream. Cream the peanut butter and softened butter together until light and fluffy. Gradually add powdered sugar, one cup at a time, mixing on low speed to avoid a sugar storm. Finish with vanilla extract for extra flavor. The result? A cloud-like frosting that’s both sweet and nutty. Chef’s tip: Chill the buttercream for 15 minutes before spreading—it holds its shape better.
Step 3: Creating the Chocolate Ganache
Melt the chocolate chips and heavy cream in a heatproof bowl over simmering water. Stir until silky smooth. Let it cool slightly before pouring over the cake. Watching the ganache cascade down the sides is pure magic. Pro tip: If the ganache thickens too much, reheat it gently in the microwave for 10 seconds.
Step 4: Assembling the Cake
Place one cake layer on a serving plate and spread a generous amount of peanut butter buttercream on top. Repeat with the remaining layers. Cover the entire cake with a thin crumb coat of frosting, then chill for 15 minutes. This step locks in crumbs and makes the final decoration smoother. Once chilled, cover the cake with the rest of the buttercream.
Step 5: Adding the Galaxy Effect
Now comes the fun part! Melt the white chocolate and drizzle it randomly over the frosted cake. Use a toothpick to swirl it around for a marbled look. Add drops of blue and purple food coloring and blend lightly with a clean brush. The colors should mimic the swirling patterns of a galaxy. Don’t worry about perfection—galaxies are meant to be a little chaotic!
Timing Breakdown
Here’s how long each part takes:
- Prep time: 30 minutes
- Cooking time: 25-30 minutes
- Resting time: 1 hour (for cooling and chilling)
- Total time: About 2 hours
Chef’s Secret
To make the galaxy effect pop, sprinkle edible glitter or silver dust over the cake after adding the colors. It gives the illusion of stars twinkling in the night sky.
Extra Info
Did you know that peanut butter was invented in the United States in the late 1800s? It’s been a staple in American kitchens ever since. Combining it with chocolate creates a flavor duo that’s hard to resist.
Necessary Equipment
You’ll need:
- Three 8-inch round cake pans
- Electric mixer
- Spatula
- Offset knife for frosting
- Piping bag (optional)
Storage Tips
Store the Galaxy Peanut Butter Cake in an airtight container at room temperature for up to 2 days. For longer storage, refrigerate it for up to a week. Bring it back to room temperature before serving for the best texture.
If freezing, wrap individual slices tightly in plastic wrap and place them in a freezer-safe bag. They’ll keep for up to 3 months. Thaw overnight in the fridge before enjoying.
Avoid leaving the cake uncovered, as the frosting can dry out and lose its creamy texture.
Tips and Advice
For a flawless finish, level your cake layers with a serrated knife before assembling. This ensures even stacking. Also, taste-test your frosting—it’s the best part of the process!
Presentation Ideas
Garnish the cake with mini peanut butter cups, sprinkles, or edible flowers. Serve it on a decorative stand to elevate its cosmic vibe. Pair it with milk or coffee for a cozy touch.
Healthier Alternatives
Looking to lighten up this indulgent treat? Try these variations:
- Gluten-Free: Use almond flour instead of all-purpose flour.
- Low-Sugar: Substitute monk fruit sweetener for granulated sugar.
- Vegan: Replace eggs with flax eggs and use plant-based milk.
- Reduced-Fat: Swap full-fat peanut butter with reduced-fat versions.
- No-Bake Option: Make a layered trifle using the same ingredients.
- Protein-Packed: Add protein powder to the cake batter.
Mistake 1: Overmixing the Batter
Overmixing leads to dense, tough cake layers. Mix just until the ingredients come together. A few lumps are okay—they’ll disappear during baking. Pro tip: Use a spatula for the final mix to prevent overworking.
Mistake 2: Skipping the Crumb Coat
Without a crumb coat, stray crumbs can ruin the smooth finish of your frosting. Always apply a thin layer first, chill, and then proceed with the final coat.
Mistake 3: Rushing the Cooling Process
As tempting as it is to frost a warm cake, resist the urge. The heat will melt the frosting and cause it to slide off. Patience pays off here.
Frequently Asked Questions
Can I use natural peanut butter?
Natural peanut butter works, but it may alter the texture of the buttercream. Opt for brands without added oils or sugars for best results.
How do I prevent my ganache from splitting?
Split ganache happens when the cream and chocolate aren’t combined properly. Heat them gently and stir continuously to emulsify.
What if I don’t have gel food coloring?
Liquid food coloring can work, but it might dilute the frosting. Use less liquid to achieve vibrant colors.
Can I make this cake ahead of time?
Absolutely! Bake the layers and store them in the fridge for up to 3 days before assembling.
Is this cake kid-friendly?
Yes! Kids love the combination of chocolate and peanut butter. Just ensure no one has nut allergies.
How do I fix runny frosting?
Add more powdered sugar, a tablespoon at a time, until the frosting thickens.
Can I freeze the assembled cake?
Freezing the whole cake isn’t ideal, as the frosting may weep. Freeze individual slices instead.
What other flavors pair well with this cake?
Banana or caramel would complement the chocolate-peanut butter combo beautifully.
How do I clean my tools after working with food coloring?
Soak utensils in warm, soapy water immediately to prevent staining.
Can I use a different size pan?
Yes, but adjust the baking time accordingly. Larger pans will require less time; smaller ones will need more.
Final Thoughts
This Galaxy Peanut Butter Cake is more than just a dessert—it’s a celebration of creativity, flavor, and fun. Whether you’re baking for loved ones or treating yourself, it’s bound to leave a lasting impression. So grab your apron, turn on some music, and let the magic unfold in your kitchen. Trust me, once you try it, you’ll want to make it again and again.
Equipment
- Large mixing bowl
- Electric mixer
- Spatula
- Three 8-inch round cake pans
- Offset knife for frosting
Ingredients
- 2 1/4 cups all-purpose flour
- 1 1/2 cups granulated sugar
- 2 teaspoons baking powder
- 1 teaspoon salt
- 1/2 cup unsweetened cocoa powder
- 1 cup whole milk at room temperature
- 2 large eggs
- 1 teaspoon vanilla extract
- 1 1/2 cups creamy peanut butter
- 3 1/2 cups powdered sugar
- 2 tablespoons unsalted butter softened
- 2 teaspoons vanilla extract
- 1 cup semisweet chocolate chips
- 1/2 cup heavy cream
- 1/4 cup blue and purple gel or paste food coloring
- 1/4 cup white chocolate chips or chopped white chocolate
Instructions
- Preheat your oven to 350°F (180°C) and grease and flour three 8-inch round cake pans.
- In a large bowl, whisk together the dry ingredients: flour, sugar, baking powder, salt, and cocoa powder.
- In another bowl, mix the wet ingredients: milk, eggs, and vanilla, and then combine them gently with the dry ingredients until the batter is smooth.
- Divide the batter evenly among the prepared pans.
- While the cakes cool, make the peanut butter buttercream by creaming peanut butter and softened butter until light and fluffy.
- Gradually add powdered sugar, mixing on low speed, and finish with vanilla extract.
- To create the chocolate ganache, melt chocolate chips and heavy cream in a heatproof bowl over simmering water and stir until smooth.
- Place one cake layer on a serving plate and spread peanut butter buttercream on top. Repeat with remaining layers.
- Apply a thin crumb coat of frosting over the entire cake and chill for 15 minutes.
- Cover the cake with the remaining buttercream.
- Melt white chocolate and drizzle it over the frosted cake, swirling with a toothpick to create a marbled effect with blue and purple food coloring.
Notes
Nutrition

Hi, I’m Olivia Parker, the founder of BakingSecret.com and a lifelong lover of all things sweet and homemade. I grew up in a small town in Oregon, where the smell of fresh cookies in my family’s kitchen sparked my passion for baking. Over the years, I turned that passion into a mission: to help home bakers feel confident, inspired, and creative.
After studying food science and working in several artisan bakeries across the U.S., I decided to create a space where everyone from beginners to seasoned bakers can find reliable recipes, expert tips, and a warm, welcoming community. BakingSecret.com is my way of sharing the magic of baking with the world. When I’m not testing new recipes, you’ll find me exploring farmers’ markets, collecting vintage cookbooks, or perfecting my sourdough technique.