
Why This Guilt-Free Chocolate Indulgence is a Game Changer
I’ll never forget the first time I made this Healthy Triple Chocolate Mousse Cake. It was for my best friend’s birthday—she’s a self-proclaimed chocoholic but also watches her sugar intake like a hawk. I was nervous, but when I saw her eyes light up after the first bite, I knew I had struck gold. This cake is everything you love about chocolate desserts but with a healthier twist. Packed with wholesome ingredients and rich flavors, it’s proof that indulgence doesn’t have to come with guilt.
A Little History of Chocolate Mousse Magic
Chocolate mousse has been around since the late 1800s, originating in France as a decadent dessert for special occasions. Traditionally, it’s made with heavy cream, sugar, and chocolate—a trifecta of deliciousness but not exactly waistline-friendly. Over the years, creative bakers have experimented with healthier versions, swapping out refined sugars and dairy for plant-based alternatives. My version combines these modern tweaks with a triple-layered twist, making it a showstopper at any gathering. It’s like a hug for your taste buds, minus the sugar crash!
Why You’ll Love This Recipe
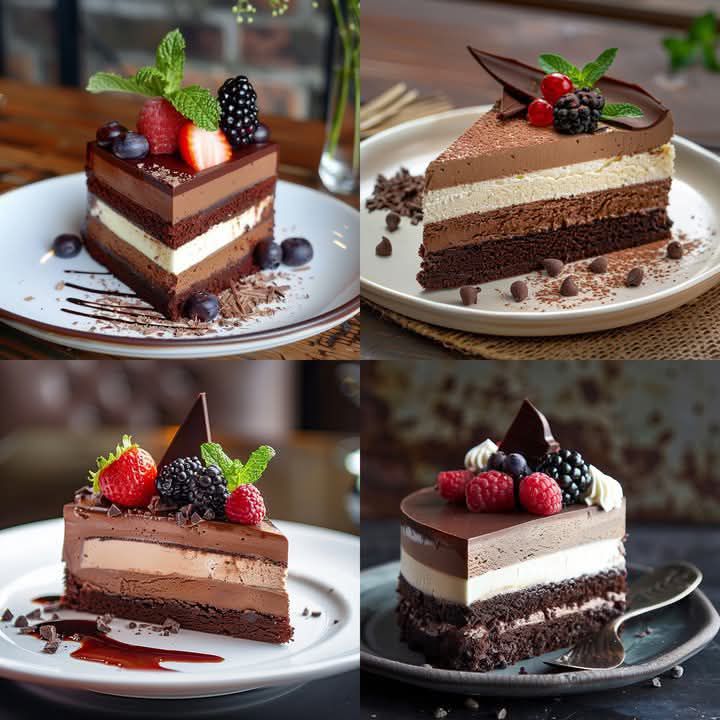
This Guilt-Free Chocolate Indulgence is all about balance. The crust is nutty and slightly sweet, thanks to almond flour and maple syrup. Each layer of mousse delivers a different chocolate experience—dark, milk, and white—but without the sugar overload. Plus, it’s surprisingly easy to make! No baking required, just a little patience while it sets in the fridge. Whether you’re feeding a crowd or treating yourself, this cake is sure to impress.
Perfect Occasions for This Chocolate Masterpiece
This cake is perfect for birthdays, dinner parties, or even a cozy night in. Imagine slicing into this beauty during a holiday feast or surprising your sweetheart with a romantic dessert. It’s also a hit at potlucks because it’s both gluten-free and dairy-free, catering to various dietary needs. Trust me, no one will guess it’s a healthier option—they’ll be too busy asking for seconds!
Ingredients for Your Guilt-Free Chocolate Indulgence
- Crust:
- 2 cups almond flour or oat flour
- 1/4 cup coconut oil, melted
- 2 tbsp pure maple syrup
- Chocolate Mousse Layers:
- 3/4 cup dark chocolate (70% cocoa or higher), melted
- 3/4 cup unsweetened milk chocolate alternative (e.g., cacao-based)
- 3/4 cup white chocolate alternative (dairy-free, if preferred)
- 3 cups coconut cream (chilled overnight)
- 3 tbsp coconut sugar for each mousse layer
- 1 tsp vanilla extract (optional)
- Ganache:
- 1/2 cup coconut cream
- 1/2 cup dark chocolate (70% cocoa or higher), chopped
Substitution Options
If you don’t have almond flour, oat flour works just as well. For the chocolate layers, feel free to use any dairy-free chocolate brands you prefer. Instead of coconut sugar, you can use maple syrup or honey, though it may slightly alter the texture. And if you’re not a fan of coconut cream, try using heavy whipping cream for a non-vegan option.
Step 1: Prepare the Crust
Start by mixing the almond flour, melted coconut oil, and maple syrup in a bowl. The mixture should resemble wet sand—it’s soft, slightly sticky, and smells amazing thanks to the natural sweetness of the syrup. Press it firmly into the base of a springform pan, creating an even layer. Pop it in the fridge for 30 minutes to set. Pro tip: Use the bottom of a glass to press the crust down for a smooth finish.
Step 2: Make the Dark Chocolate Mousse
Whip 1 cup of chilled coconut cream with 1 tbsp of coconut sugar until soft peaks form. Gently fold in the melted dark chocolate. The result is a velvety, rich mousse that’s almost too tempting to save for the cake. Spread this layer evenly over the crust, smoothing it out with a spatula. Chef’s tip: Chill the bowl and beaters before whipping the cream for fluffier results.
Step 3: Add the Milk Chocolate Mousse
Repeat the process with the milk chocolate alternative. The lighter color of this layer creates a beautiful contrast against the dark chocolate below. Spread it gently on top, being careful not to mix the layers. As you work, take a moment to admire the artistry—you’re basically a dessert Picasso!
Step 4: Finish with White Chocolate Mousse
For the final layer, fold melted white chocolate into the remaining whipped coconut cream. This layer adds a touch of elegance and sweetness, tying all the flavors together. Spread it evenly and give yourself a pat on the back—you’ve just created a masterpiece. Cover the cake and let it chill for 4-6 hours to set completely.
Step 5: Prepare the Ganache
Heat the coconut cream in a saucepan until it simmers, then pour it over the chopped dark chocolate. Let it sit for 2-3 minutes before stirring until smooth. The ganache should be glossy and luxurious, perfect for drizzling over the cake. Pour it over the chilled cake, letting it drip down the sides for a dramatic effect.
Timing Breakdown
- Preparation time: 30 minutes
- Cooking time: 0 minutes (no oven needed!)
- Resting time: 4-6 hours in the fridge
- Total time: Approximately 5-7 hours
Chef’s Secret
To enhance the flavors, let the cake sit overnight in the fridge. The layers meld together beautifully, creating an even more decadent experience. It’s like magic happens while you sleep!
Extra Info
Did you know that dark chocolate contains antioxidants? That’s right—this cake isn’t just delicious; it’s packed with health benefits too. Just another reason to indulge guilt-free!
Necessary Equipment
- Springform pan
- Mixing bowls
- Whisk or electric mixer
- Spatula
- Saucepan
Storage Tips
This cake stores beautifully in the fridge for up to 5 days. Keep it covered with plastic wrap or in an airtight container to prevent it from absorbing other flavors. If you want to freeze it, wrap individual slices tightly in parchment paper and store them in a freezer-safe bag. Thaw in the fridge overnight before serving.
For optimal freshness, avoid leaving the cake at room temperature for more than 2 hours. Chocolate desserts are sensitive to heat, so keep it cool to maintain its texture and flavor.
If you’re transporting the cake, place it in a sturdy container to prevent the layers from shifting. A chilled cooler bag works wonders for keeping it fresh during transit.
Tips and Advice
Make sure your coconut cream is thoroughly chilled before whipping—it makes all the difference in achieving fluffy mousse layers. Also, don’t rush the chilling process; patience ensures the layers set properly. Garnish with fresh berries or mint leaves for a pop of color and freshness.
Presentation Ideas
- Dust the top with cocoa powder for a classic look.
- Add edible flowers for a touch of elegance.
- Use chocolate shavings or curls for extra flair.
- Serve with a dollop of whipped coconut cream on the side.
Healthier Alternative Recipes
Here are six variations to try:
- Avocado Chocolate Mousse: Swap the coconut cream for avocado for a creamy, nutrient-packed base.
- Vegan Peanut Butter Swirl Cake: Add a peanut butter swirl between the layers for a salty-sweet twist.
- Gluten-Free Brownie Base: Replace the crust with a baked brownie layer for extra richness.
- Fruit-Topped Cake: Top with sliced bananas or strawberries for added natural sweetness.
- Matcha White Chocolate Layer: Infuse the white chocolate layer with matcha powder for a unique flavor.
- Spiced Chocolate Cake: Add cinnamon or chili powder to the dark chocolate layer for a spicy kick.
Mistake 1: Skipping the Chilling Step
One common mistake is rushing the chilling process. Without enough time in the fridge, the layers won’t set properly, leading to a messy slice. To avoid this, plan ahead and allow at least 4-6 hours for the cake to firm up. Practical tip: Prep the cake the night before for stress-free serving.
Mistake 2: Overmixing the Mousse
Overmixing can deflate the whipped coconut cream, resulting in dense mousse layers. Fold gently to preserve the airy texture. Remember, less is more when it comes to combining ingredients.
Mistake 3: Using Low-Quality Chocolate
The quality of your chocolate matters! Opt for high-quality, dairy-free options to ensure the best flavor. Cheap chocolate can leave a waxy aftertaste that ruins the experience.
Mistake 4: Not Measuring Ingredients
Baking is a science, and eyeballing measurements can lead to imbalanced flavors. Use measuring cups and spoons for precision.
Mistake 5: Rushing the Ganache
Don’t skip the resting time for the ganache. Letting it sit for 2-3 minutes allows the chocolate to melt evenly, creating a silky-smooth finish.
FAQ: Can I Use Regular Sugar Instead of Coconut Sugar?
Absolutely! While coconut sugar adds a subtle caramel flavor, regular sugar works fine too. Just note that it might slightly alter the taste and color of the mousse layers.
FAQ: Is This Cake Suitable for Vegans?
Yes, it is! By using dairy-free chocolate and coconut cream, this recipe is completely vegan-friendly. It’s a great option for those following plant-based diets.
FAQ: How Do I Know When the Coconut Cream is Ready?
Chill the cans of coconut cream overnight, then scoop out only the solid part from the top. Whip it until it forms soft peaks—it should hold its shape but still be light and airy.
FAQ: Can I Make This Cake Gluten-Free?
Definitely! The almond flour crust is naturally gluten-free, making this cake safe for those with gluten sensitivities.
FAQ: What Can I Substitute for Maple Syrup?
Honey or agave syrup are excellent alternatives to maple syrup. They provide similar sweetness and help bind the crust together.
FAQ: How Do I Prevent the Layers from Mixing?
Work carefully and spread each layer gently. Chilling the cake between steps helps the layers firm up, reducing the risk of mixing.
FAQ: Can I Use a Different Pan?
A springform pan is ideal, but you can use a regular cake pan lined with parchment paper. Just be mindful when removing the cake to serve.
FAQ: How Long Does the Cake Last?
Stored in the fridge, this cake stays fresh for up to 5 days. In the freezer, it lasts up to 2 months if wrapped properly.
FAQ: Can I Add Alcohol to the Ganache?
Of course! A splash of rum or liqueur adds depth to the ganache. Just stir it in after melting the chocolate.
FAQ: Why Did My Mousse Turn Grainy?
Grainy mousse often happens if the melted chocolate is too hot when folded in. Let it cool slightly before combining with the whipped cream.
FAQ: Can I Double the Recipe?
Yes, doubling the recipe works perfectly for larger gatherings. Just ensure you have enough space in your fridge for the bigger cake to set.
This Guilt-Free Chocolate Indulgence is more than just a dessert—it’s a celebration of flavor, creativity, and wellness. Whether you’re baking for loved ones or treating yourself, this cake proves that healthy eating doesn’t mean sacrificing taste. So grab your whisk, put on some music, and get ready to create a dessert that’s as nourishing as it is delightful. Happy baking!
Equipment
- Mixing bowls
- Whisk or electric mixer
- Spatula
- Springform pan
- Saucepan
Ingredients
- 2 cups almond flour or oat flour
- 1/4 cup coconut oil, melted
- 2 tbsp pure maple syrup
- 3/4 cup dark chocolate (70% cocoa or higher), melted
- 3/4 cup unsweetened milk chocolate alternative
- 3/4 cup white chocolate alternative (dairy-free, if preferred)
- 3 cups coconut cream (chilled overnight)
- 3 tbsp coconut sugar for each mousse layer
- 1 tsp vanilla extract (optional)
- 1/2 cup coconut cream for ganache
- 1/2 cup dark chocolate (70% cocoa or higher), chopped for ganache
Instructions
- Mix almond flour, melted coconut oil, and maple syrup in a bowl until it resembles wet sand.
- Press the mixture firmly into the base of a springform pan and refrigerate for 30 minutes to set.
- Whip 1 cup of chilled coconut cream with 1 tbsp of coconut sugar until soft peaks form, then fold in melted dark chocolate and spread over the crust.
- Repeat the whipping process with the milk chocolate alternative, spreading it gently on top of the dark chocolate layer.
- For the last layer, fold melted white chocolate into the remaining whipped coconut cream, then spread it evenly on top.
- Cover the cake and let it chill in the fridge for 4-6 hours to set.
- Heat the coconut cream in a saucepan until simmering, then pour it over chopped dark chocolate and stir until smooth for the ganache.
- Pour the ganache over the chilled cake, letting it drip down the sides.
Notes
Nutrition

Hi, I’m Olivia Parker, the founder of BakingSecret.com and a lifelong lover of all things sweet and homemade. I grew up in a small town in Oregon, where the smell of fresh cookies in my family’s kitchen sparked my passion for baking. Over the years, I turned that passion into a mission: to help home bakers feel confident, inspired, and creative.
After studying food science and working in several artisan bakeries across the U.S., I decided to create a space where everyone from beginners to seasoned bakers can find reliable recipes, expert tips, and a warm, welcoming community. BakingSecret.com is my way of sharing the magic of baking with the world. When I’m not testing new recipes, you’ll find me exploring farmers’ markets, collecting vintage cookbooks, or perfecting my sourdough technique.