
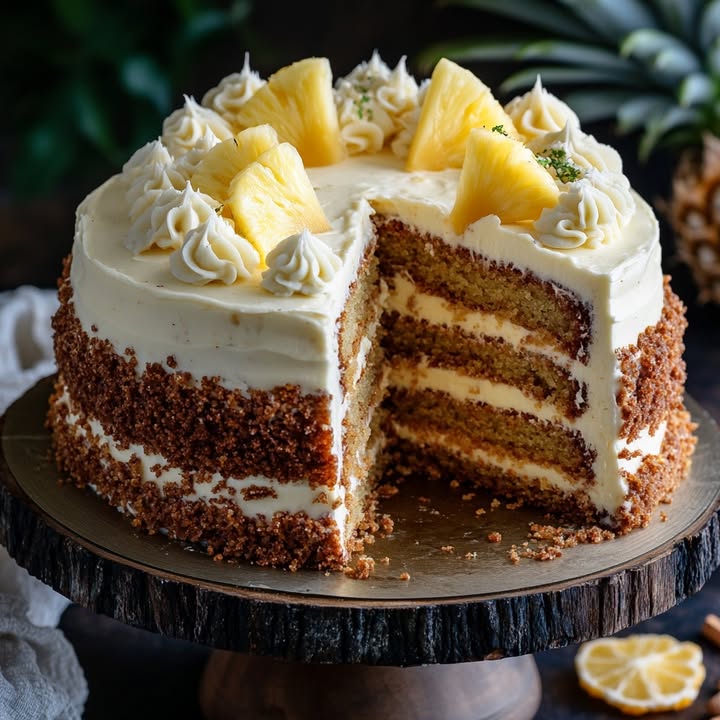
Aloha for Your Taste Buds: The Best Hawaiian Carrot Pineapple Cake
You know that feeling when a recipe just *works*? The kind that makes everyone at the table go quiet for a second, then erupt with “Oh my gosh, what IS this?” That’s exactly what happened the first time I made this Hawaiian Carrot Cake for a potluck. My friend’s husband, who “doesn’t usually like cake,” asked for a second slice. That’s when I knew I had to share this magic with you. It’s a classic carrot cake that took a fabulous tropical vacation and came back even better.
A Slice of Sunshine: The Story Behind Hawaiian Carrot Cake
While carrot cakes have deep roots in many cultures, the Hawaiian twist is a more modern, joyful creation. It’s not about strict tradition, but about a brilliant flavor pairing. Someone, somewhere, looked at a classic carrot cake and thought, “This needs more sunshine.” Adding that can of crushed pineapple was pure genius. The juice keeps the cake incredibly moist, while the bits of fruit add little bursts of sweet-tart flavor that make every bite exciting. It’s the perfect mix of cozy spice and island breeze.
Why You’ll Fall Head Over Heels for This Recipe
This isn’t a fussy, complicated dessert. It’s a one-bowl wonder (well, two bowls, but who’s counting?) that delivers insane flavor. The texture is unbelievably moist and tender, thanks to the carrots, pineapple, and oil. The warm cinnamon spice hugs the tropical sweetness in a way that just feels right. And let’s be honest, the thick layer of creamy, tangy cream cheese frosting is the crown jewel. It’s a cake that feels special but is simple enough for a Wednesday.
When to Serve Your Tropical Masterpiece
This cake is your new secret weapon for any gathering! It’s a showstopper at spring brunches and Easter celebrations. It brings a taste of sunshine to summer picnics and barbecues. It’s also a wonderful, comforting treat during the fall, where the spices feel right at home. Honestly, I’ve been known to make one “for the family” that mysteriously disappears before any guests even arrive. It’s that good.
What You’ll Need: Hawaiian Carrot Cake Ingredients
Gather these simple pantry staples. Seeing them all together is half the fun!
- 2 cups all-purpose flour
- 2 teaspoons baking soda
- 2 teaspoons cinnamon
- 1/2 teaspoon salt
- 1 1/2 cups sugar
- 3 large eggs
- 3/4 cup vegetable oil
- 1/2 cup buttermilk
- 2 teaspoons vanilla extract
- 2 cups shredded carrots
- 1 (8 ounce) can crushed pineapple, undrained
- 1/2 cup chopped walnuts or pecans (optional)
For the Cream Cheese Frosting:
- 1 (8 ounce) package cream cheese, softened
- 1/4 cup butter, softened
- 2 cups powdered sugar
- 1 teaspoon vanilla extract
No Stress Substitutions
Out of something? No panic. Here are easy swaps:
- Buttermilk: Make your own! Add 1 1/2 teaspoons of white vinegar or lemon juice to a measuring cup. Fill with regular milk to the 1/2 cup line. Stir and let sit for 5 minutes.
- Nuts: Leave them out for allergies, or swap for shredded coconut for an even more tropical vibe.
- Oil: Canola or a mild coconut oil work great here too.
- Pan: This works in two 9-inch round pans for a layer cake! Just reduce the bake time to 30-35 minutes.
Let’s Get Baking: Your Step-by-Step Guide
Step 1: Prep and Preheat
Start by turning your oven to 350°F (175°C). This gives it time to get perfectly hot. While it heats, grab your trusty 9×13-inch baking pan. Grease it generously with butter, oil, or non-stick spray. I like to give it a light dusting of flour after greasing for extra insurance. There’s nothing sadder than a delicious cake that sticks! Pro tip: Lining the bottom with parchment paper makes removal and cleanup a dream.
Step 2: Mix the Dry Ingredients
In a large mixing bowl, grab your whisk. Add the fluffy all-purpose flour, baking soda, fragrant cinnamon, and salt. Whisk them together for a good 30 seconds. You’re not just mixing; you’re making sure the baking soda is evenly distributed so your cake rises beautifully. The smell of the cinnamon already starts to tell the story of the delicious dessert to come.
Step 3: Combine the Wet Ingredients
In another bowl, it’s time for the wet team. Add the sugar, eggs, vegetable oil, buttermilk, and vanilla extract. Use an electric mixer on medium speed. Beat this for about 1-2 minutes. You want it to look smooth, pale, and perfectly emulsified. The sugar will start to dissolve into the liquids, creating the base of your batter. It should be shiny and inviting.
Step 4: Bring It All Together
Now, with your mixer on low speed, slowly add the bowl of dry ingredients to the wet ingredients. Mix just until the flour disappears. A few streaks are okay—you don’t want to overmix! Overmixing develops gluten and can make the cake tough. The batter will be thick and luxurious.
Step 5: Fold in the Goodies
This is the best part. Add your freshly shredded carrots, the entire can of crushed pineapple (juice and all!), and the nuts if you’re using them. Put down the mixer and use a sturdy spatula. Gently fold everything together. Watch the batter turn a beautiful orange-speckled color. Those juicy bits of pineapple will peek through, promising flavor in every bite.
Step 6: Bake to Golden Perfection
Pour the batter into your prepared pan. Use the spatula to spread it into an even layer. Place it in the center of your preheated oven. Bake for 35 to 40 minutes. The cake is done when the top is springy to the touch and a toothpick poked in the center comes out clean or with a few moist crumbs. Your kitchen will smell absolutely heavenly.
Step 7: Cool Completely (The Hardest Part!)
Take the cake out and place the pan on a wire cooling rack. This is crucial. You must, must, must let the cake cool completely before you even think about frosting. If you frost a warm cake, the frosting will melt into a sad, runny puddle. I know it’s tempting, but be patient! It usually takes about 1-2 hours.
Step 8: Whip Up the Dreamy Frosting
While the cake cools, make the frosting. In a clean bowl, beat the softened cream cheese and softened butter together until it’s completely smooth and creamy. There should be no lumps. Add the powdered sugar and vanilla. Start your mixer on low so you don’t get a sugar cloud, then beat on medium-high until it’s fluffy and dreamy. This takes about 2 minutes.
Step 9: Frost and Finish Your Masterpiece
Once the cake is completely cool, spread the frosting evenly over the top with an offset spatula or knife. Get it right to the edges. For pretty slices, you can make a little swoop or swirl pattern. Chef’s tip: For the cleanest slices, pop the frosted cake in the fridge for 30 minutes before cutting. This firms up the frosting and gives you perfect, neat pieces every time.
Your Hawaiian Carrot Cake Timeline
Don’t let the total time scare you—most of it is hands-off!
- Prep Time: A quick 20 minutes of measuring and mixing.
- Cook Time: 40 minutes of baking while you clean up or relax.
- Cooling Time: 1-2 hours (the perfect time to run errands or make the frosting).
- Total Time: About 2 hours from start to first bite.
- Kcal: Approximately 430 per serving (for 12 generous slices).
My Secret for the Ultimate Flavor
Here’s my little secret: toast your nuts. If you’re adding walnuts or pecans, spread them on a baking sheet and pop them in the oven at 350°F for 5-8 minutes. Let them cool before chopping. This deepens their flavor incredibly and adds a wonderful crunch that takes this Hawaiian Pineapple Cake to a whole new level.
A Fun Fact About Pineapple
That can of crushed pineapple isn’t just for flavor! Pineapple contains an enzyme called bromelain that helps tenderize. In our cake, it works subtly with the other ingredients to create that famously moist, tender crumb that stays delicious for days. It’s nature’s little baking helper!
Gather Your Kitchen Tools
You likely have everything you need:
- 9×13-inch baking pan
- Two large mixing bowls
- Electric hand mixer or stand mixer
- Whisk
- Rubber spatula
- Measuring cups and spoons
- Wire cooling rack
>Box grater (for the carrots)
Storing Your Delicious Cake
Because of the cream cheese frosting, this cake needs to be stored in the refrigerator. Cover the pan tightly with plastic wrap or transfer slices to an airtight container. It will stay fresh and moist for up to 5 days. The flavors actually meld and get even better by day two!
You can also freeze this cake for longer storage. Freeze the unfrosted cake, tightly wrapped, for up to 3 months. Thaw overnight in the fridge and frost the next day. You can also freeze individual frosted slices on a tray before wrapping them—perfect for a single-serving treat!
Let the cake sit at room temperature for about 20-30 minutes before serving straight from the fridge. This takes the chill off and allows the frosting to soften slightly, giving you the perfect texture and fullest flavor.
My Best Tips for Success
- Shred your own carrots. Pre-shredded carrots are often too dry and thick. Freshly grated carrots are juicier and blend into the cake better.
- Don’t drain the pineapple! That juice is liquid gold for moisture and flavor.
- Make sure your cream cheese and butter are truly softened to room temperature for a lump-free, silky frosting.
- For a stunning presentation, garnish the frosted cake with a sprinkle of extra chopped nuts or even a few shreds of toasted coconut.
How to Present Your Cake Like a Pro
- Serve on a pretty platter with a vintage cake server.
- Garnish each slice with a thin, curled strip of fresh pineapple or a tiny pineapple leaf.
- For a party, cut into small squares and serve as “cake bites” on a tiered stand.
- Pair with a cup of strong coffee or a glass of cold milk for the ultimate experience.
Love This? Try These Healthier Twists!
Want to mix it up? Here are six delicious variations on this Hawaiian Carrot Cake recipe:
- Whole Wheat Wonder: Swap half the all-purpose flour for whole wheat pastry flour. It adds a nutty depth and extra fiber without sacrificing tenderness.
- Reduced-S Sugar Swap: You can decrease the sugar in the cake to 1 cup without major issues. The pineapple adds plenty of natural sweetness.
- Greek Yogurt Frosting: For a lighter topping, blend 1 cup of plain Greek yogurt with 4 ounces of light cream cheese and a touch of honey or maple syrup.
- Apple sauce Version: Replace half the oil with an equal amount of unsweetened applesauce. The cake will be very moist with a slightly denser texture.
- Gluten-Free Aloha: Use a reputable 1:1 gluten-free all-purpose flour blend. The moist ingredients help ensure a great result.
- Mini Cake or Muffins: Pour the batter into a greased muffin tin. Bake for 18-22 minutes for perfect portable snacks or a fun breakfast treat.
Other Desserts You Might Adore
If you love how easy and festive this cake is, you absolutely must try my colorful Easter Bunny Poke Cake for your next holiday celebration. For another show-stopping creamy dessert, my Strawberry Swirl Cheesecake is always a hit. When you need a fancy bite-sized treat, these Salted Caramel Truffles are surprisingly simple. And for a quick, warm, and cozy dip, my Apple Pie Dip with graham crackers is impossible to resist.
Common Mistakes to Avoid
Mistake 1: Overmixing the Batter
This is the number one way to end up with a tough, dense carrot cake. Overmixing after adding the flour develops the gluten in the flour too much. You want a tender crumb, not a bread-like texture. Mix the dry and wet ingredients just until the flour disappears. A few small streaks are perfectly fine—they’ll blend in when you fold in the carrots and pineapple.
Mistake 2: Frosting a Warm Cake
We’ve all been tempted, but it’s a disaster waiting to happen. The heat from a warm cake will melt the butter and cream cheese in the frosting. You’ll get a runny, greasy mess that soaks into the cake instead of sitting proudly on top. Be patient. Let the cake cool on a wire rack until the pan is completely cool to the touch. This usually takes a full 1-2 hours.
Mistake 3: Using Hard, Cold Cream Cheese and Butter
If your frosting ingredients are straight from the fridge, you will have lumps. No amount of beating will get them completely smooth. To soften them properly, leave the blocks of cream cheese and butter on the counter for at least 1-2 hours before you start. They should be very soft but not melting. This is the key to a silky, spreadable, lump-free frosting.
Mistake 4: Draining the Pineapple
That juice in the can is not excess liquid to be poured out. It’s packed with flavor and is essential for the cake’s famous moisture. When the recipe says “undrained,” it means it! Dump the whole can, juice and all, right into the batter. Trust me on this one—your cake will thank you by staying deliciously moist for days.
When selecting ingredients like dairy and eggs, it’s always a good idea to follow trusted food quality standards for safety and the best results.
Frequently Asked Questions
Can I make this Hawaiian Carrot Cake ahead of time?
Absolutely! In fact, I think it tastes even better the next day. The flavors have more time to meld together. You can bake the cake up to two days in advance. Let it cool completely, then wrap the whole pan tightly in plastic wrap and store it at room temperature. Make the frosting the day you plan to serve it, frost the cake, and then refrigerate it until ready to eat. This is a huge time-saver for parties.
Can I use fresh pineapple instead of canned?
You can, but you need to make an adjustment. Canned pineapple is packed in juice, which is sweeter and softer. If using fresh, you’ll need about 1 cup of finely chopped fresh pineapple. To make up for the missing juice, add an extra 2-3 tablespoons of buttermilk or regular milk to the batter. The texture and sweetness might vary slightly, but it will still be delicious.
Why did my cake sink in the middle?
A sunken cake usually means there was too much leavening (baking soda) or the cake was underbaked. First, make sure your baking soda is fresh. Old baking soda loses its power. Second, be sure to test for doneness properly. The toothpick should come out clean, and the edges of the cake should be gently pulling away from the sides of the pan. Oven temperatures can vary, so an oven thermometer is a baker’s best friend.
How can I make my cream cheese frosting thicker?
If your frosting seems too soft to spread, it’s likely because the ingredients were too warm or your kitchen is very hot. The easiest fix is to pop the frosting bowl into the refrigerator for 15-20 minutes to firm up. Then give it a quick re-whip before using. You can also add a little more powdered sugar, about 1/4 cup at a time, until it reaches your desired consistency.
Can I freeze the frosted cake?
Yes, you can! Freeze individual slices first. Place slices on a baking sheet and freeze until solid (about 2 hours). Then, wrap each slice tightly in plastic wrap and foil, or place them in a freezer-safe container. They will keep for up to 2 months. Thaw overnight in the refrigerator or for a few hours at room temperature when you’re ready for a treat.
What’s the best way to shred carrots for carrot cake?
Use the medium holes on a box grater. This creates shreds that are small enough to soften perfectly during baking but still give you little bursts of carrot flavor and color. Avoid the tiny, pulp-like shreds from the smallest holes. And please, shred your own! Pre-shredded bagged carrots are coated to prevent drying, which can affect the texture and moisture of your cake.
My frosting is lumpy. Can I fix it?
You can try! If the lumps are from cold cream cheese, let the frosting sit at room temp for 10 minutes, then beat it vigorously with your mixer. If that doesn’t work, you can press the frosting through a fine-mesh sieve to remove the lumps. To prevent this next time, ensure your cream cheese and butter are truly softened at room temperature for a full hour or two before starting.
Is there a way to make this recipe into cupcakes?
Definitely! This batter makes wonderful carrot pineapple cupcakes. Line a muffin tin with paper liners and fill each about 2/3 full. Bake at the same temperature (350°F) for 18-22 minutes, or until a toothpick comes out clean. Let them cool completely before frosting. You’ll get about 18-24 delicious cupcakes perfect for sharing.
Can I omit the nuts for allergies?
Of course! The nuts are optional for a reason. The cake will be just as moist and flavorful without them. You won’t need to replace them with anything else. Simply leave them out. If you want a little textural contrast, you could add a handful of rolled oats or even some shredded coconut instead.
How do I know when the cake is truly done baking?
Use all the clues. First, the bake time should be close (35-40 min). Second, the top should be evenly golden brown and spring back when you gently press it. Third, the edges will start to pull away slightly from the sides of the pan. Finally, and most importantly, insert a toothpick into the center of the cake. It should come out clean or with a few dry crumbs attached. If you see wet batter, it needs more time.
For more inspiration that will make your dessert table the talk of the town, explore all our delightful ideas in the cakes and cupcakes collection.
Your New Go-To Celebration Cake
So there you have it. My absolute favorite, crowd-pleasing, can’t-go-wrong Hawaiian Carrot Pineapple Cake. It’s the recipe I turn to when I want to bring sunshine to the table, no matter the weather outside. It’s forgiving, deeply flavorful, and always gets rave reviews. I hope it becomes a treasured recipe in your home, creating happy memories one delicious slice at a time. Now, go preheat that oven and get ready for the compliments to roll in!
Equipment
- Grand bol
- Fouet
- Spatule
- Plaque à pâtisserie
- Papier sulfurisé
Ingredients
- 2 tasses farine tout usage
- 2 cuillères à café bicarbonate de soude
- 2 cuillères à café cannelle
- 1/2 cuillère à café sel
- 1 1/2 tasses sucre
- 3 grands œufs
- 3/4 tasse huile végétale
- 1/2 tasse babeurre
- 2 cuillères à café extrait de vanille
- 2 tasses carottes râpées
- 1 boîte (8 onces) ananas écrasés, non égouttés
- 1/2 tasse noix hachées ou pacanes (facultatif)
Instructions
- Préchauffez le four à 175°C (350°F) et graissez un moule à gâteau de 9x13 pouces.
- Dans un grand bol, fouettez ensemble la farine, le bicarbonate de soude, la cannelle et le sel pendant 30 secondes.
- Dans un autre bol, mélangez le sucre, les œufs, l'huile végétale, le babeurre et l'extrait de vanille avec un batteur électrique à vitesse moyenne pendant 1-2 minutes jusqu'à ce que le mélange soit lisse.
- Ajoutez progressivement les ingrédients secs aux ingrédients humides, en mélangeant à basse vitesse jusqu'à ce que le tout soit juste combiné.
- Incorporez délicatement les carottes râpées, l'ananas écrasé (jus inclus) et les noix (si vous en utilisez) avec une spatule.
- Versez la pâte dans le moule préparé et étalez-la uniformément.
- Faites cuire au four pendant 35 à 40 minutes, ou jusqu'à ce qu'un cure-dent inséré en ressorte propre.
- Laissez le gâteau refroidir complètement sur une grille pendant 1-2 heures.
- Pendant que le gâteau refroidit, préparez le glaçage en battant le fromage à la crème et le beurre jusqu'à ce qu'ils soient lisses, puis en ajoutant le sucre glace et l'extrait de vanille, et en mélangeant jusqu'à obtenir une consistance légère et aérée.
- Une fois le gâteau refroidi, glacer uniformément et le conserver au réfrigérateur jusqu'au moment de servir.
Notes
Nutrition

Hi, I’m Olivia Parker, the founder of BakingSecret.com and a lifelong lover of all things sweet and homemade. I grew up in a small town in Oregon, where the smell of fresh cookies in my family’s kitchen sparked my passion for baking. Over the years, I turned that passion into a mission: to help home bakers feel confident, inspired, and creative.
After studying food science and working in several artisan bakeries across the U.S., I decided to create a space where everyone from beginners to seasoned bakers can find reliable recipes, expert tips, and a warm, welcoming community. BakingSecret.com is my way of sharing the magic of baking with the world. When I’m not testing new recipes, you’ll find me exploring farmers’ markets, collecting vintage cookbooks, or perfecting my sourdough technique.