
Why You’ll Love These Healthy Coconut Chocolates
Let’s be honest—there’s nothing quite like biting into a creamy, coconutty chocolate treat. But what if I told you that you can enjoy the same indulgence with none of the guilt? A few weeks ago, I was craving something sweet but wanted to stick to my healthy eating goals. That’s when I stumbled upon this recipe for Healthy Coconut Chocolates. They’re quick to make, packed with wholesome ingredients, and taste absolutely divine. Plus, they’re perfect for sharing—or keeping all to yourself (no judgment here). Trust me, once you try these homemade gems, store-bought chocolates will never compare.
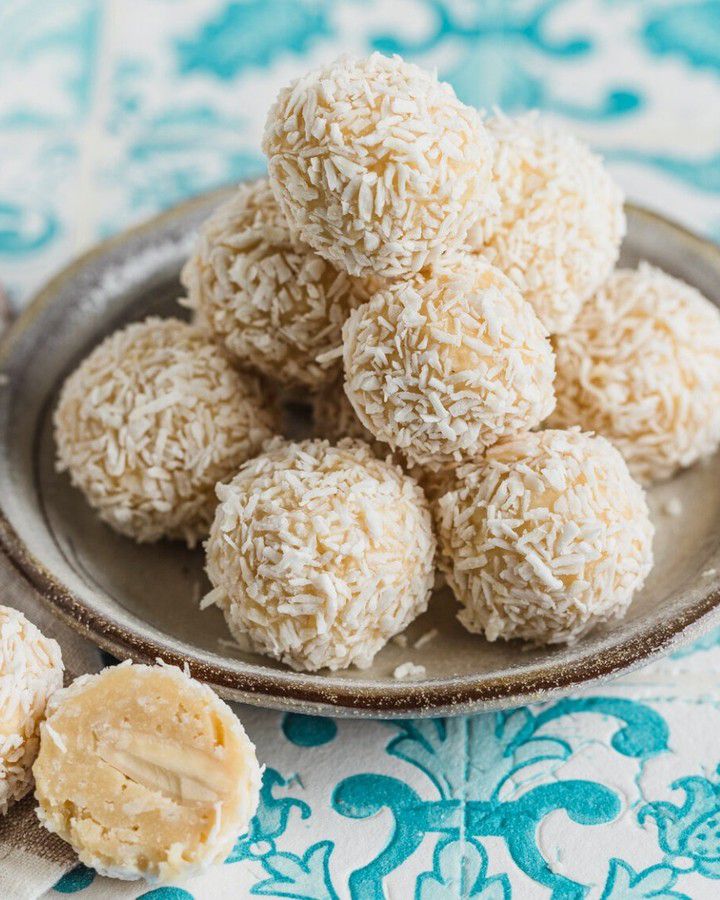
A Little History Behind Raffaello-Inspired Treats
Raffaello chocolates have been a beloved treat for decades, known for their creamy coconut centers and crunchy almond surprise. But did you know that many store-bought versions are loaded with sugar and artificial ingredients? I decided to take inspiration from these classic treats and create a healthier version using natural ingredients like coconut oil, maple syrup, and fresh almonds. While testing this recipe in my kitchen, I realized how easy it is to whip up a batch in just 15 minutes. My family couldn’t believe these were homemade—and healthy!
Why This Recipe Stands Out
What makes this recipe so special? First, it’s incredibly simple. No fancy equipment or baking skills required. Second, it’s customizable. Want it sweeter? Add an extra drizzle of maple syrup. Prefer a stronger coconut flavor? Double the coconut flakes. And finally, it’s guilt-free. Made with natural sweeteners and healthy fats, these chocolates are as nutritious as they are delicious. Plus, they’re vegan and gluten-free, making them a hit with everyone at the table.
Perfect Occasions to Make These Healthy Coconut Chocolates
These little coconut balls are perfect for any occasion—or no occasion at all! Bring them to a holiday party, serve them as dessert after a family dinner, or pack them as a sweet treat for your kids’ lunchboxes. I’ve even gifted them in cute mason jars tied with ribbon for birthdays and baby showers. They’re versatile, elegant, and always a crowd-pleaser.
Ingredients You’ll Need
Here’s what you’ll need to make 12 delicious Healthy Coconut Chocolates:
- 2 tablespoons melted coconut oil
- 4 tablespoons shredded coconut
- 1 tablespoon cashew butter
- 4 tablespoons maple syrup
- 1 pinch of bourbon vanilla extract
- 1 drop rum aroma (optional)
- 3–4 tablespoons coconut flakes for rolling
- 12 whole almonds
Substitution Options
Not everyone has every ingredient on hand, and that’s okay! Here are some easy swaps:
- Coconut oil: Use cacao butter for a chocolatey twist.
- Cashew butter: Swap with almond butter or peanut butter.
- Maple syrup: Replace with honey or agave nectar.
- Rum aroma: Skip it altogether or use a splash of vanilla extract instead.
Step 1: Melt and Mix
Start by melting the coconut oil, shredded coconut, and cashew butter together in a small bowl over a water bath. Stir gently until everything is smooth and well combined. Once melted, remove the bowl from heat and stir in the maple syrup, vanilla extract, and rum aroma. The mixture will be quite runny at first, but don’t worry—it firms up beautifully in the fridge. Pro tip: Use high-quality vanilla extract for the best flavor.
Step 2: Chill and Shape
After chilling the mixture for 1–2 hours, it’s time to get your hands dirty. Grab a teaspoon of the now-solid mixture and knead it briefly between your fingers to soften it. Press a whole almond into the center and roll the mixture into a smooth ball. Repeat until all the mixture is used up. This step is fun and therapeutic—plus, you get to sneak a taste test or two!
Step 3: Roll in Coconut Flakes
Pour your coconut flakes into a shallow bowl. Roll each ball gently in the flakes until fully coated. Place the finished chocolates on a plate and admire your handiwork. Don’t they look adorable? Chef’s tip: For an extra touch of elegance, sprinkle a pinch of edible glitter or cocoa powder on top.
Timing Breakdown
- Prep time: 15 minutes
- Chilling time: 1–2 hours
- Total time: About 2 hours
Chef’s Secret
For a richer flavor, toast the coconut flakes lightly before rolling the chocolates. It adds a subtle nuttiness that takes these treats to the next level.
An Interesting Fact About Coconut Oil
Did you know that coconut oil is often referred to as “brain fuel”? Its medium-chain triglycerides (MCTs) are quickly converted into energy by the body, making it a great ingredient for sustained focus and vitality. So, not only are these chocolates delicious, but they might also give you a little brain boost!
Necessary Equipment
You don’t need much to make these chocolates:
- A small mixing bowl
- A saucepan for the water bath
- A spoon or spatula for stirring
- A flat plate for shaping
Storage Tips
To keep your Healthy Coconut Chocolates fresh, store them in an airtight container in the fridge. They’ll stay good for up to two weeks, though they’re so tasty they probably won’t last that long! If you live in a warm climate, refrigeration is essential to prevent melting. For longer storage, you can freeze them for up to three months. Just let them thaw at room temperature before serving.
Another great option is to layer them in a mason jar separated by parchment paper. This not only keeps them fresh but also makes for a beautiful presentation if you’re gifting them.
Finally, avoid storing them near strong-smelling foods in the fridge, as coconut oil can absorb odors easily. Keep them in a dedicated spot to preserve their delicate flavor.
Tips and Advice
Here are a few tips to make this recipe foolproof:
- Use room-temperature ingredients for easier mixing.
- Don’t skip the chilling step—it’s crucial for firming up the mixture.
- If the mixture feels too sticky, wet your hands slightly before shaping the balls.
Presentation Ideas
Want to impress your guests? Serve these chocolates on a platter garnished with fresh mint leaves and a dusting of powdered sugar. For a festive touch, arrange them in a candy dish with colorful sprinkles or edible flowers. You can also place them in mini cupcake liners for an elegant look.
Healthier Alternative Recipes
Love experimenting in the kitchen? Try these variations:
- Chocolate-Coated Version: Dip the finished balls in melted dark chocolate for an extra decadent treat.
- Matcha Twist: Add a teaspoon of matcha powder to the mixture for a vibrant green color and earthy flavor.
- Peanut Butter Delight: Swap cashew butter with peanut butter and roll the balls in crushed peanuts.
- Lemon Zest Surprise: Add a teaspoon of lemon zest for a refreshing citrus kick.
- Spiced Coconut Balls: Mix in a pinch of cinnamon and nutmeg for a warm, cozy flavor.
- Protein-Packed Option: Add a scoop of protein powder to the mixture for a post-workout snack.
Mistake 1: Skipping the Chilling Step
One common mistake is skipping the chilling step because you’re eager to roll the balls. Without chilling, the mixture will be too soft and sticky to handle. To avoid this, set a timer and let the mixture firm up in the fridge for at least an hour.
Mistake 2: Overmixing the Ingredients
Overmixing can cause the mixture to become too oily, ruining its texture. Stir just until everything is combined, then stop. Pro tip: Use a silicone spatula for easier mixing.
Mistake 3: Using Old Coconut Oil
Old or rancid coconut oil can ruin the flavor of your chocolates. Always check the expiration date and smell the oil before using it. Fresh coconut oil should have a mild, sweet aroma.
FAQ
Can I use honey instead of maple syrup?
Absolutely! Honey works just as well as maple syrup in this recipe. Keep in mind that it may slightly alter the flavor profile, giving it a more floral taste.
Are these chocolates kid-friendly?
Yes, they’re perfect for kids! They’re naturally sweetened and packed with healthy fats and protein. Just omit the rum aroma if you’re making them for younger ones.
How long do they last in the fridge?
Stored in an airtight container, these chocolates can last up to two weeks in the fridge. However, they’re so delicious that they rarely last that long in my house!
Can I freeze them?
Definitely! Place the chocolates in a freezer-safe container and freeze for up to three months. Let them thaw at room temperature before enjoying.
Do I need to toast the coconut flakes?
Toasting is optional but highly recommended. It enhances the flavor and adds a lovely crunch to the chocolates.
What if I don’t have a water bath?
No problem! You can microwave the coconut oil and other ingredients in short bursts, stirring in between, until melted.
Are these chocolates vegan?
Yes, they’re completely vegan as long as you use plant-based ingredients like maple syrup and cashew butter.
Can I add nuts other than almonds?
Of course! Try pecans, hazelnuts, or even macadamia nuts for a different texture and flavor.
Why is my mixture too sticky?
If the mixture feels too sticky, chill it for a bit longer. You can also wet your hands slightly to make shaping easier.
Can I make these without coconut oil?
While coconut oil is key to the recipe’s texture, you can experiment with alternatives like cacao butter or even unsweetened applesauce for a lower-fat option.
Final Thoughts
These Healthy Coconut Chocolates are proof that you don’t need to sacrifice flavor for health. They’re quick, easy, and utterly delicious, making them a staple in my kitchen. Whether you’re treating yourself or sharing them with loved ones, these chocolates are sure to bring joy. So grab your ingredients and give this recipe a try—you won’t regret it!
Equipment
- Small mixing bowl
- Saucepan for water bath
- Spoon or spatula for stirring
- Flat plate for shaping
- Coconut flakes for rolling
Ingredients
- 2 tablespoons coconut oil melted
- 4 tablespoons shredded coconut
- 1 tablespoon cashew butter
- 4 tablespoons maple syrup
- 1 pinch bourbon vanilla extract
- 1 drop rum aroma (optional)
- 3-4 tablespoons coconut flakes for rolling
- 12 whole almonds
Instructions
- Melt the coconut oil, shredded coconut, and cashew butter together in a small bowl over a water bath.
- Stir gently until the mixture is smooth and well combined, then remove from heat.
- Stir in the maple syrup, vanilla extract, and rum aroma.
- Chill the mixture in the fridge for 1–2 hours.
- Once chilled, knead a teaspoon of the mixture briefly between your fingers to soften it.
- Press a whole almond into the center and roll the mixture into a smooth ball.
- Repeat until all the mixture is used up.
- Roll each ball in coconut flakes until fully coated.
- Place the finished chocolates on a plate.
Notes
Nutrition

Hi, I’m Olivia Parker, the founder of BakingSecret.com and a lifelong lover of all things sweet and homemade. I grew up in a small town in Oregon, where the smell of fresh cookies in my family’s kitchen sparked my passion for baking. Over the years, I turned that passion into a mission: to help home bakers feel confident, inspired, and creative.
After studying food science and working in several artisan bakeries across the U.S., I decided to create a space where everyone from beginners to seasoned bakers can find reliable recipes, expert tips, and a warm, welcoming community. BakingSecret.com is my way of sharing the magic of baking with the world. When I’m not testing new recipes, you’ll find me exploring farmers’ markets, collecting vintage cookbooks, or perfecting my sourdough technique.