
Why This Indulgent Chocolate Mousse Cake Will Steal Your Heart
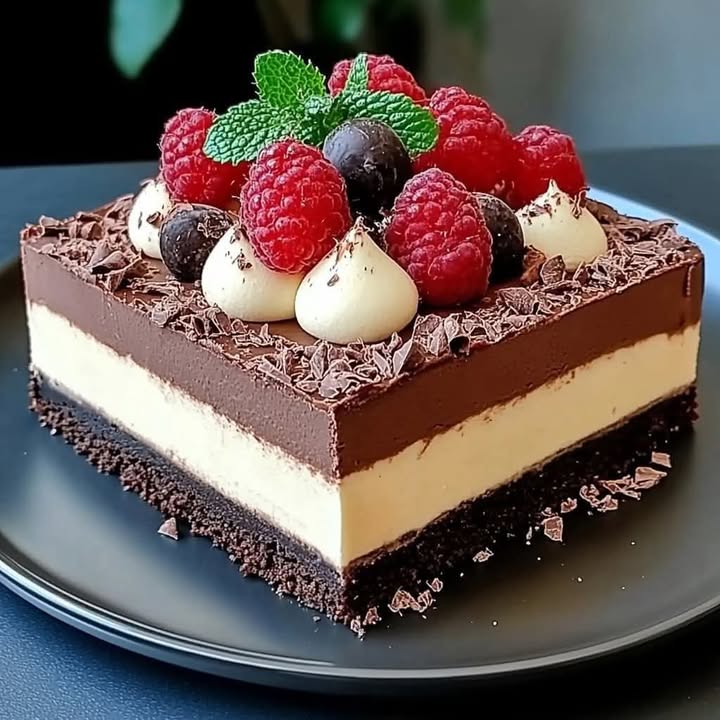
Picture this: a slice of cake so rich, so velvety, and so utterly decadent that it makes you forget about everything else. That’s what happened to me the first time I tasted a triple chocolate mousse cake. It was at a friend’s birthday party, and I remember thinking, “I have to recreate this magic.” After several attempts (and many happy taste testers later), I finally nailed the recipe. This Indulgent Chocolate Mousse Cake is not just a dessert; it’s an experience. Layers of dark, milk, and white chocolate mousse sit atop a rich chocolate base, creating a symphony of flavors that will leave your guests speechless.
A Little Sweet History
Mousse, as we know it today, has French origins and dates back to the 18th century. The word “mousse” means “foam” in French, which perfectly describes its light and airy texture. Over time, chefs around the world added their own twists, leading to creations like this triple-layered masterpiece. When I first decided to tackle this recipe, I wanted to honor the classic while making it approachable for home cooks. Let’s just say my family now requests this cake for every special occasion—and sometimes, just because!
Why You’ll Love This Recipe
This cake is all about indulgence without the fuss. The layers are surprisingly easy to make, and the result is nothing short of show-stopping. Whether you’re a seasoned baker or a newbie in the kitchen, this recipe will make you feel like a pro. Plus, who can resist the allure of three types of chocolate? Each bite offers a different flavor profile, keeping things exciting from start to finish.
Perfect Occasions to Prepare This Recipe
This Indulgent Chocolate Mousse Cake is perfect for birthdays, anniversaries, or any celebration where you want to impress. It’s also ideal for dinner parties, holidays like Valentine’s Day, or even a cozy night in with your favorite rom-com. Honestly, I’ve served it on random Tuesdays too—because why wait for a special occasion when you can have chocolate therapy?
Ingredients
Here’s what you’ll need to create this dreamy dessert:
- Chocolate Base:
- 1/2 cup all-purpose flour
- 1/4 cup unsweetened cocoa powder
- 1/2 cup granulated sugar
- 1/4 cup melted butter
- 2 eggs
- 1/2 tsp vanilla extract
- Dark Chocolate Mousse:
- 1 cup heavy cream
- 1/2 cup dark chocolate, melted
- 1/4 cup powdered sugar
- Milk Chocolate Mousse:
- 1 cup heavy cream
- 1/2 cup milk chocolate, melted
- 1/4 cup powdered sugar
- White Chocolate Mousse:
- 1 cup heavy cream
- 1/2 cup white chocolate, melted
- 1/4 cup powdered sugar
- Topping:
- Cocoa powder, for dusting
- Fresh raspberries
- Edible flowers, for decoration
Substitution Options
If you need to tweak the recipe, here are some ideas:
- Swap all-purpose flour with almond flour for a gluten-free option.
- Use coconut cream instead of heavy cream if you’re looking for a dairy-free alternative.
- Replace fresh raspberries with strawberries or blackberries for a seasonal twist.
Step 1: Preparing the Chocolate Base
Start by preheating your oven to 350°F (175°C). Grease a 9-inch springform pan—it’s key to preventing sticking. In a mixing bowl, combine the flour, cocoa powder, and sugar. Add the melted butter, eggs, and vanilla extract, stirring until smooth. Pour the batter into the pan and spread it evenly. Pop it into the oven for 20–25 minutes. You’ll know it’s done when the edges pull away slightly from the pan. Let the base cool completely before moving on. Pro tip: Place the pan on a wire rack to speed up cooling.
Step 2: Making the Dark Chocolate Mousse
In a large bowl, whip the heavy cream and powdered sugar until stiff peaks form. Gently fold in the melted dark chocolate. The mixture should be glossy and luxurious. Spread it over the cooled chocolate base, smoothing it out with a spatula. Chill the cake in the fridge for at least 30 minutes to set the layer. Pro tip: Use a warm spatula dipped in water for a smoother finish.
Step 3: Adding the Milk Chocolate Mousse
Repeat the same process for the milk chocolate mousse. Whip the cream and sugar, then fold in the melted milk chocolate. Carefully spread it over the chilled dark chocolate layer. Return the cake to the fridge for another 30 minutes. Watching the layers build is almost as satisfying as eating the final product!
Step 4: Finishing with White Chocolate Mousse
For the final layer, whip the cream and sugar again, folding in the melted white chocolate. Spread it evenly over the milk chocolate layer. Chill the cake for at least 2 hours to ensure all layers are set. Chef’s tip: For extra stability, chill overnight.
Step 5: Decorating Your Masterpiece
Once the mousse is fully set, dust the top with cocoa powder using a fine sieve. Arrange fresh raspberries and edible flowers for a pop of color. Serve chilled, and watch everyone swoon over your creation.
Timing
Here’s how long each step takes:
- Prep Time: 45 minutes
- Chill Time: 3 hours
- Total Time: 3 hours 45 minutes
Chef’s Secret
To enhance the flavors, let the melted chocolate cool slightly before folding it into the whipped cream. This prevents the cream from deflating and ensures a silky texture.
Extra Info
Did you know that white chocolate isn’t technically chocolate? It contains cocoa butter but no cocoa solids, which gives it a unique sweetness compared to dark and milk chocolate. Fun fact: I once forgot to chill one of the layers properly, and it turned into a delicious mess. Lesson learned!
Necessary Equipment
You’ll need a few tools to bring this cake to life:
- 9-inch springform pan
- Mixing bowls
- Electric mixer or whisk
- Spatula
- Fine sieve for dusting cocoa powder
Storage
Store leftovers in an airtight container in the fridge for up to 3 days. Make sure to cover the cake tightly with plastic wrap to prevent it from absorbing odors. If you plan to freeze it, wrap individual slices in parchment paper and place them in a freezer-safe bag. Thaw in the fridge overnight before serving.
When reheating, avoid microwaving, as it can ruin the delicate mousse layers. Instead, let the cake come to room temperature naturally for the best texture.
For optimal freshness, always serve the cake within 24 hours of assembling. Trust me, it won’t last long anyway!
Tips and Advice
- Use high-quality chocolate for the best flavor.
- Chill your mixing bowl and beaters before whipping cream—it helps achieve stiffer peaks.
- Don’t rush the chilling process; patience pays off in texture.
Presentation Tips
- Garnish with gold leaf for an elegant touch.
- Serve on a pedestal cake stand to elevate its visual appeal.
- Add a drizzle of chocolate sauce around the plate for restaurant-style flair.
Healthier Alternative Recipes
Looking to lighten up this indulgent treat? Try these variations:
- Low-Sugar Version: Replace granulated sugar with a sugar substitute like stevia or monk fruit.
- Vegan Option: Use plant-based cream and vegan chocolate.
- Gluten-Free Base: Swap all-purpose flour with almond or oat flour.
- Light Mousse: Substitute half the heavy cream with Greek yogurt.
- Fruit-Infused Layers: Add pureed berries to the mousse for a fruity twist.
- Nutty Crunch: Sprinkle crushed nuts between layers for added texture.
Common Mistakes to Avoid
Mistake 1: Skipping the Chilling Step
One of the biggest mistakes is rushing through the chilling process. Each layer needs time to set properly, or you risk ending up with a soupy mess. Be patient and give each layer at least 30 minutes in the fridge.
Mistake 2: Overmixing the Mousse
Overmixing can deflate the whipped cream, leaving your mousse flat and dense. Fold gently until just combined. Practical tip: Use a rubber spatula and scrape from the bottom up to incorporate ingredients evenly.
Mistake 3: Using Low-Quality Chocolate
The quality of your chocolate matters. Cheap chocolate often contains fillers that affect both flavor and texture. Splurge on good-quality bars—it’s worth every penny.
FAQ
Can I make this cake ahead of time?
Absolutely! This cake actually tastes better after resting overnight. Assemble it a day in advance, store it in the fridge, and decorate right before serving.
How do I prevent the layers from mixing?
Ensure each layer is fully set before adding the next. A quick test is to press lightly with your finger—if it feels firm, you’re good to go.
What if I don’t have a springform pan?
No worries! Use a regular cake pan lined with parchment paper for easy removal. Just be gentle when unmolding.
Can I use semi-sweet chocolate instead of dark?
Yes, semi-sweet works beautifully. Adjust the sugar accordingly to balance the sweetness.
How do I keep the raspberries fresh?
Add the raspberries just before serving to maintain their vibrant color and juicy texture.
Is this cake kid-friendly?
Kids love it! You can omit the edible flowers if they seem too fancy for little ones.
Can I double the recipe?
Definitely. Simply adjust ingredient quantities and use two pans or a larger one if available.
What’s the best way to cut clean slices?
Dip your knife in hot water, wipe it dry, and then slice. Repeat for each cut for picture-perfect results.
Can I add alcohol to the mousse?
For an adult version, stir in a splash of liqueur like Grand Marnier or Baileys. Yum!
How do I fix grainy mousse?
Graininess usually happens when chocolate seizes. To fix, reheat the mixture gently and whisk vigorously until smooth.
Final Thoughts
This Indulgent Chocolate Mousse Cake is more than just a dessert—it’s a labor of love that brings joy to everyone who tries it. From its rich chocolate base to its dreamy layers of mousse, it’s a true showstopper. So grab your apron, gather your ingredients, and get ready to create something magical. Happy baking! 🍫✨
Equipment
- Mixing Bowl
- Electric Mixer or Whisk
- Spatula
- 9-inch Springform Pan
- Fine Sieve for dusting cocoa powder
Notes
Nutrition

Hi, I’m Olivia Parker, the founder of BakingSecret.com and a lifelong lover of all things sweet and homemade. I grew up in a small town in Oregon, where the smell of fresh cookies in my family’s kitchen sparked my passion for baking. Over the years, I turned that passion into a mission: to help home bakers feel confident, inspired, and creative.
After studying food science and working in several artisan bakeries across the U.S., I decided to create a space where everyone from beginners to seasoned bakers can find reliable recipes, expert tips, and a warm, welcoming community. BakingSecret.com is my way of sharing the magic of baking with the world. When I’m not testing new recipes, you’ll find me exploring farmers’ markets, collecting vintage cookbooks, or perfecting my sourdough technique.