
Why This Black Velvet Cake is a Must-Try
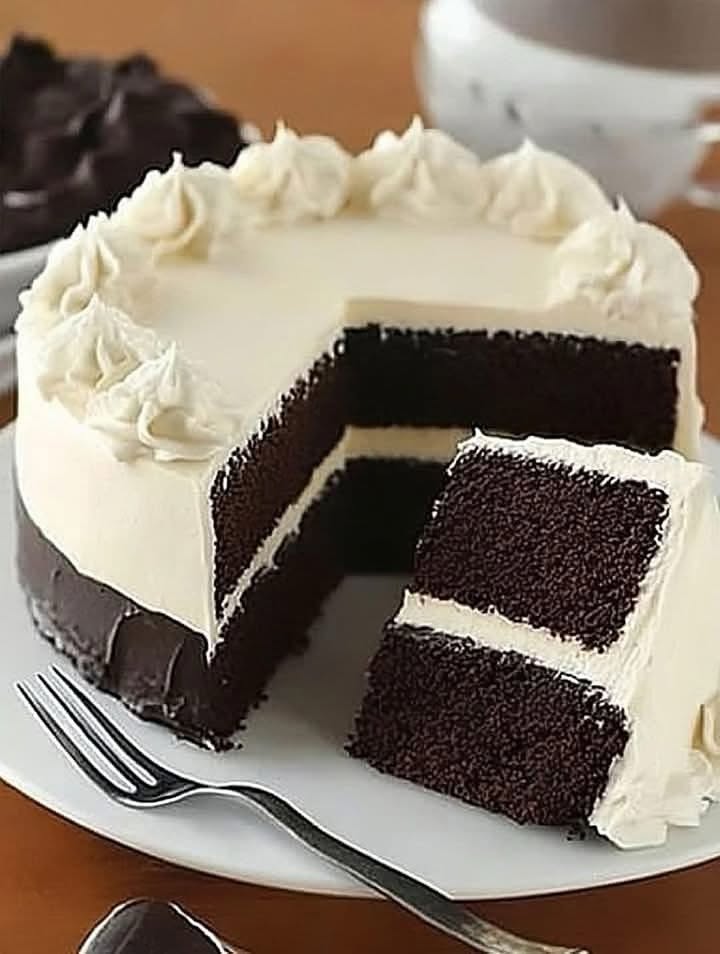
Let me tell you about the time I first made this Black Velvet Cake. It was for my best friend’s birthday, and she’s one of those people who can spot a store-bought cake from a mile away. I wanted something special—something that would make her say, “Wow, did you really make this?” Well, let me tell you, when she saw this dark, velvety beauty sitting on the table, her jaw dropped. The cake was soft, moist, and rich with chocolate flavor, while the creamy glaze added just the right amount of sweetness. That day, I realized this recipe wasn’t just a cake—it was an experience.
A Little History of the Black Velvet Cake
Now, you might be wondering, “What makes this cake so different from other chocolate cakes?” The secret lies in the use of black cocoa powder. Unlike regular cocoa, black cocoa has a deep, almost Oreo-like flavor and gives the cake its strikingly dark color. This ingredient is often used in red velvet cakes to enhance their color, but here, it takes center stage. While red velvet is all about subtle chocolate tones, the Black Velvet Cake leans fully into its chocolate identity. Fun fact: black cocoa was originally developed to mimic the taste of Dutch-processed chocolate, but bakers quickly realized its potential for creating dramatic desserts.
Why You’ll Love This Recipe
This cake isn’t just delicious—it’s also surprisingly easy to make. With simple pantry staples and a straightforward method, even beginner bakers can pull it off. Plus, the combination of rich chocolate cake and silky glaze is pure magic. Trust me, once you try this recipe, it’ll become your go-to dessert for impressing friends and family.
Perfect Occasions to Make This Cake
The Black Velvet Cake is perfect for any celebration—birthdays, anniversaries, holidays—you name it! But honestly, you don’t need a special occasion to whip up this treat. A slice (or two) pairs beautifully with a cup of coffee or tea for an afternoon pick-me-up. I’ve even served it at casual get-togethers, and everyone always raves about how decadent it feels without being overly complicated.
Ingredients for the Cake
Here’s what you’ll need to create this masterpiece:
- 1 cup all-purpose flour
- 1 cup granulated sugar
- ½ cup black cocoa powder (unsweetened)
- 1 teaspoon baking soda
- 1 tablespoon baking powder
- 1 teaspoon salt
- 2 large eggs
- 1 cup buttermilk
- ½ cup vegetable oil
- 2 teaspoons vanilla extract
- 1 cup boiling water
Substitution Options
If you’re missing an ingredient, don’t worry! Here are some swaps you can try:
- Buttermilk: Mix 1 cup of milk with 1 tablespoon of lemon juice or vinegar and let it sit for 5 minutes.
- Black cocoa powder: Use regular unsweetened cocoa powder, though the color won’t be as intense.
- Veggie oil: Melted butter works too, but the texture may vary slightly.
Step 1: Mixing Dry Ingredients
Start by whisking together the dry ingredients—flour, sugar, black cocoa powder, baking soda, baking powder, and salt—in a large bowl. This step ensures everything is evenly distributed, which helps the cake bake uniformly. As you mix, you’ll notice the cocoa powder turning the mixture into a rich, dark shade. Isn’t it gorgeous?
Step 2: Adding Wet Ingredients
Next, crack in the eggs and pour in the buttermilk, oil, and vanilla extract. Stir until the batter is smooth and glossy. At this point, the aroma of chocolate will start filling your kitchen, making it hard not to sneak a taste. Pro tip: Make sure all your wet ingredients are at room temperature for the best results.
Step 3: Incorporating Boiling Water
Slowly add the boiling water to the batter, stirring gently as you go. The mixture will thin out, but don’t panic—that’s exactly what you want. The hot water enhances the cocoa’s flavor and gives the cake its signature moist crumb. Just imagine how tender each bite will be!
Step 4: Baking the Cake
Pour the batter into greased cake pans and pop them into a preheated oven at 180°C (350°F). Bake for 30-35 minutes, or until a toothpick inserted comes out clean. As the cake bakes, your home will smell like a dreamy chocolate factory. Chef’s tip: Rotate the pans halfway through baking to ensure even cooking.
Step 5: Preparing the Glaze
While the cakes cool, whip up the glaze. Beat softened butter, powdered sugar, cocoa powder, vanilla extract, and milk or cream until light and fluffy. Adjust the milk for your desired consistency. Picture spreading this luscious glaze over the cooled layers—it’s like giving the cake a chocolate hug.
Step 6: Assembling the Cake
Once the cakes are completely cool, stack them with a layer of glaze in between. Then, cover the entire cake with the remaining glaze. Smooth it out with a spatula for a professional finish. Decorate with fresh berries, chocolate shavings, or sprinkles if you’re feeling fancy.
Timing Breakdown
- Prep Time: 15 minutes
- Cooking Time: 30-35 minutes
- Resting Time: 20 minutes (for cooling)
- Total Time: About 1 hour and 5 minutes
Chef’s Secret
For an extra burst of flavor, brush each cake layer with a little coffee syrup before adding the glaze. The coffee amplifies the chocolate notes without overpowering the cake. Your guests will wonder how you achieved such depth of flavor!
Extra Info
Did you know that black cocoa powder is what gives Oreos their iconic taste? It’s highly alkalized, meaning it has less acidity than regular cocoa, resulting in a smoother, more mellow chocolate flavor. No wonder this cake tastes so luxurious!
Necessary Equipment
To make this cake, you’ll need:
- Mixing bowls
- Whisk and spatula
- Measuring cups and spoons
- Cake pans (8-inch round or square)
- Electric mixer (optional)
- Parchment paper
Storage Tips
To keep your Black Velvet Cake fresh, store it in an airtight container at room temperature for up to 2 days. If you live in a warm climate, refrigerate it instead. Just bring it back to room temperature before serving for the best texture.
If you have leftovers (unlikely!), wrap individual slices in plastic wrap and freeze them. They’ll last up to 3 months. Simply thaw overnight in the fridge when you’re ready to indulge again.
Avoid leaving the cake uncovered, as it can dry out quickly. A little TLC goes a long way in preserving its moistness.
Tips and Advice
- Sift the dry ingredients to prevent lumps in the batter.
- Use a digital scale for precise measurements, especially for the cocoa powder.
- Don’t overmix the batter; stop as soon as everything is combined.
- Let the cakes cool completely before glazing to avoid melty messes.
Presentation Ideas
- Garnish with edible gold dust for a touch of elegance.
- Add fresh raspberries or strawberries for a pop of color.
- Dust the top with powdered sugar using a stencil for a decorative pattern.
Healthier Alternatives
Want to lighten things up? Try these variations:
- Gluten-Free Option: Swap the all-purpose flour for a gluten-free blend.
- Low-Sugar Version: Replace granulated sugar with a sugar substitute like erythritol.
- Vegan Twist: Use flax eggs and plant-based milk instead of eggs and buttermilk.
- Whole Grain Goodness: Substitute half the flour with whole wheat flour.
- Fruit-Infused Batter: Fold in mashed bananas or applesauce for natural sweetness.
- Avocado Frosting: Blend ripe avocado with cocoa powder and honey for a healthier glaze.
Mistake 1: Overmixing the Batter
Overmixing can lead to a dense, tough cake. When combining wet and dry ingredients, stir just until they come together. Remember, a few lumps are okay—they’ll disappear during baking.
Mistake 2: Skipping the Cooling Step
Patience is key! If you glaze the cake while it’s still warm, the icing will melt and slide off. Let the layers cool completely on a wire rack before assembling.
Mistake 3: Using Stale Cocoa Powder
Expired cocoa powder can ruin the flavor of your cake. Always check the expiration date and store it in a cool, dry place to maintain freshness.
Mistake 4: Not Greasing the Pans Properly
Nothing’s worse than having your cake stick to the pan. Line the bottoms with parchment paper and grease the sides generously to ensure easy removal.
Mistake 5: Rushing the Glazing Process
Take your time when applying the glaze. Work slowly and evenly to achieve a smooth, professional look. If needed, chill the cake briefly to set the first layer before adding more.
FAQ: How Do I Know When the Cake Is Done?
Insert a toothpick into the center of the cake. If it comes out clean or with a few crumbs, it’s done. Avoid opening the oven door too often, as this can cause uneven baking.
FAQ: Can I Make This Cake Ahead of Time?
Absolutely! You can bake the layers a day in advance and store them wrapped in plastic at room temperature. Assemble and glaze the cake closer to serving time for optimal freshness.
FAQ: What If I Don’t Have Black Cocoa Powder?
Regular unsweetened cocoa powder works fine, though the color and flavor will differ slightly. For a darker hue, mix in a teaspoon of espresso powder.
FAQ: Why Does My Cake Sink in the Middle?
This usually happens due to underbaking or incorrect oven temperature. Use an oven thermometer to verify accuracy and bake until fully set. Avoid jostling the cake while it’s still hot.
FAQ: Can I Freeze This Cake?
Yes! Wrap unfrosted layers tightly in plastic wrap and foil, then freeze for up to 3 months. Thaw overnight in the fridge before glazing.
FAQ: How Do I Fix a Runny Glaze?
Add small amounts of powdered sugar to thicken it. Conversely, thin it out with a splash of milk or cream. Stir well after each adjustment.
FAQ: Should I Refrigerate the Finished Cake?
If frosted, refrigeration helps preserve the glaze’s texture, especially in humid climates. Just remember to let it come to room temperature before slicing.
FAQ: Can I Use a Different Pan Size?
Yes, but adjust the baking time accordingly. Larger pans may require shorter baking times, while smaller ones take longer.
FAQ: How Many Servings Does This Recipe Yield?
This recipe typically serves 8-10 people, depending on how thickly you slice the cake. Perfect for intimate gatherings or family dinners.
FAQ: Can I Add Nuts or Chocolate Chips?
Of course! Fold in chopped nuts or mini chocolate chips after mixing the batter. These additions add delightful crunch and extra indulgence.
Final Thoughts
There you have it—the ultimate guide to making a show-stopping Black Velvet Cake. Whether you’re celebrating a special occasion or simply treating yourself, this cake promises to deliver joy in every bite. So grab your apron, gather your ingredients, and let’s get baking!
Equipment
- Mixing bowls
- Whisk and spatula
- Measuring cups and spoons
- Cake pans (8-inch round or square)
- Electric mixer (optional)
- Parchment paper
Ingredients
- 1 cup all-purpose flour
- 1 cup granulated sugar
- ½ cup black cocoa powder (unsweetened)
- 1 teaspoon baking soda
- 1 tablespoon baking powder
- 1 teaspoon salt
- 2 large eggs
- 1 cup buttermilk
- ½ cup vegetable oil
- 2 teaspoons vanilla extract
- 1 cup boiling water
Instructions
- Whisk together the dry ingredients (flour, sugar, black cocoa powder, baking soda, baking powder, and salt) in a large bowl.
- Add the eggs, buttermilk, oil, and vanilla extract, stirring until the batter is smooth and glossy.
- Slowly add the boiling water to the batter, stirring gently until combined.
- Pour the batter into greased cake pans and bake in a preheated oven at 180°C (350°F) for 30-35 minutes, or until a toothpick comes out clean.
- While cooling, prepare the glaze by beating together softened butter, powdered sugar, cocoa powder, vanilla extract, and milk or cream until light and fluffy.
- Once the cakes are completely cool, stack them with a layer of glaze in between and cover the entire cake with the remaining glaze.