
Why This Kiwi Cheesecake Is a Must-Try
I’ll never forget the first time I made this Kiwi Cream Cheesecake. It was for my niece’s birthday, and I wanted something that screamed “tropical paradise.” When I served it, the room went quiet—then erupted into oohs and ahhs. The creamy texture, the tangy-sweet kiwi topping, and that buttery crust were an instant hit. If you’re looking for a dessert that’s refreshing, indulgent, and just a little fancy, this recipe is your golden ticket.
A Little History of the Cheesecake
Cheesecakes have been around for centuries, with origins dating back to ancient Greece. But let’s be honest—the modern version we all know and love owes a lot to New York-style cheesecake. Adding kiwi? Well, that’s my twist! Kiwis bring a tropical zing that balances the rich creaminess of the cheesecake. I’ve tested this recipe dozens of times (yes, it’s a tough job), and it always gets rave reviews. Trust me, once you try it, you’ll see why it’s become a family favorite.
Why You’ll Love This Recipe
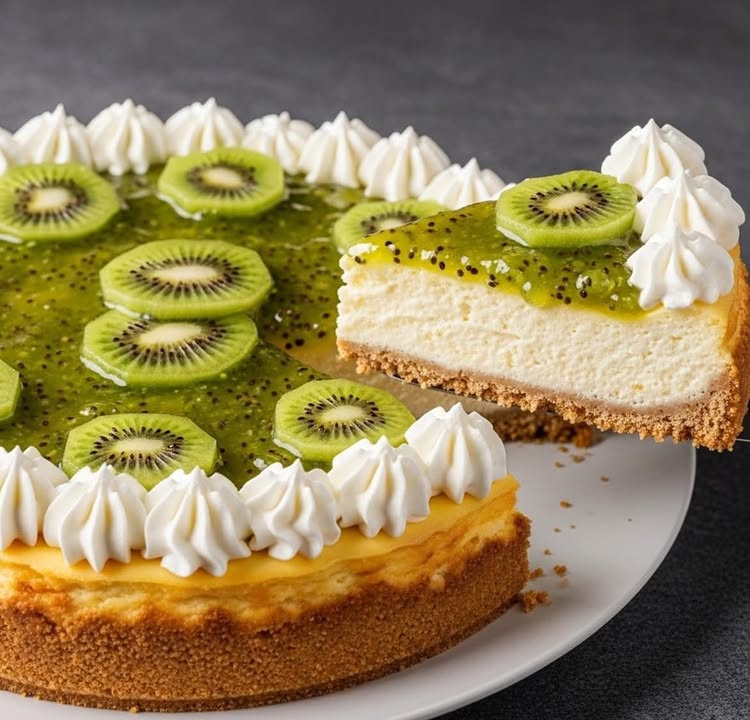
This Kiwi Cream Cheesecake is a crowd-pleaser for so many reasons. First, it’s easy to make—even if you’re not a baking pro. Second, the flavors are irresistible: creamy, tangy, sweet, and tropical all at once. And third, it looks stunning. That glossy kiwi topping makes it feel like a dessert from a high-end bakery. Plus, it’s perfect for warm weather when you want something light but still decadent.
Perfect Occasions to Make This Cheesecake
This cheesecake is versatile. Serve it at summer barbecues, holiday parties, or even as a special treat for date night. I’ve brought it to potlucks, baby showers, and family dinners, and it’s always the star of the table. It’s also a great way to impress guests without spending hours in the kitchen.
Ingredients
- Crust: 200 g digestive cookies, 100 g melted butter
- Filling: 500 g cream cheese, 200 ml liquid cream, 150 g sugar, 3 eggs, 2 crushed kiwis, 1 tsp vanilla extract
- Topping: 2 sliced kiwis, 50 g sugar, 1 tbsp lemon juice
Substitution Options
If you can’t find digestive cookies, graham crackers work just as well. Swap liquid cream for heavy cream if needed. For a dairy-free version, use vegan cream cheese and coconut cream. Instead of kiwis, mango or passion fruit can add a similar tropical vibe.
Step-by-Step Preparation
Step 1: Make the Crust
Start by crushing those digestive cookies into fine crumbs. I use a food processor, but a ziplock bag and rolling pin do the trick too. Mix the crumbs with melted butter until it resembles wet sand. Press this mixture firmly into your cake pan. Bake it at 180°C for 10 minutes to set. Pro tip: Use the bottom of a glass to press the crust evenly—it’s a game-changer!
Step 2: Prepare the Filling
In a large bowl, beat the cream cheese and sugar until smooth and creamy. Add the eggs one at a time, mixing gently after each addition. Stir in the liquid cream, crushed kiwis, and vanilla extract. The batter should be silky and fragrant. Pour this luscious filling over the cooled crust. Pro tip: Don’t overmix once the eggs are added—it can make the cheesecake crack.
Step 3: Bake the Cheesecake
Bake the cheesecake at 160°C for 50 minutes. The center should still jiggle slightly when you take it out—that’s a good sign! Let it cool in the oven with the door ajar to avoid cracks. Patience is key here; rushing the cooling process can ruin your masterpiece.
Step 4: Add the Topping
While the cheesecake cools, cook the sliced kiwis with sugar and lemon juice over low heat. Stir until it thickens into a light jam. Spread this vibrant topping over the chilled cheesecake. Garnish with fresh kiwi slices if you’re feeling fancy.
Timing
Prep Time: 20 minutes | Cooking Time: 60 minutes | Resting Time: 4 hours | Total Time: 5 hours 20 minutes
Chef’s Secret
To prevent cracks, place a shallow pan of water on the lower rack of your oven while baking. The steam keeps the cheesecake moist and helps it bake evenly.
Extra Info
Did you know kiwis are packed with vitamin C? They’re not just delicious—they’re good for you too. And their bright green color makes any dessert pop!
Necessary Equipment
- 9-inch springform pan
- Food processor or ziplock bag
- Mixing bowls
- Whisk or electric mixer
- Spatula
Storage
This cheesecake keeps beautifully in the fridge. Store it in an airtight container to keep it fresh for up to 3 days. For longer storage, freeze slices wrapped in plastic wrap and foil. Thaw in the fridge overnight before serving.
If you’re freezing, label the container with the date so you don’t forget how long it’s been in there. Always let the cheesecake come to room temperature before serving—it enhances the flavors.
Never leave this dessert out at room temperature for more than 2 hours. Dairy-based treats spoil quickly, and we don’t want any tummy troubles!
Tips and Advice
- Use room-temperature ingredients for a smoother batter.
- Don’t skip the water bath step—it’s worth the effort.
- Let the cheesecake chill for at least 4 hours before slicing for clean cuts.
Presentation Tips
- Garnish with mint leaves for a pop of color.
- Serve on a decorative plate with a drizzle of kiwi sauce.
- Add edible flowers for an elegant touch.
Healthier Alternatives
Want to make this cheesecake healthier? Try these variations:
- Low-Sugar Version: Substitute sugar with a natural sweetener like stevia or monk fruit.
- Vegan Cheesecake: Use cashew cream and coconut cream instead of dairy.
- Gluten-Free Crust: Swap digestive cookies for gluten-free graham crackers.
- No-Bake Option: Skip the oven and set the filling with gelatin.
- Protein-Packed: Add a scoop of vanilla protein powder to the filling.
- Fruit Swaps: Use strawberries or blueberries instead of kiwis.
Common Mistakes to Avoid
Mistake 1: Overmixing the Batter
Overmixing introduces too much air, which can cause cracks during baking. Mix gently and stop as soon as everything is combined. Tip: Use a spatula for the final mix to avoid overworking the batter.
Mistake 2: Skipping the Water Bath
The water bath keeps the cheesecake moist and prevents cracks. Don’t skip it unless you want a cracked surface. Tip: Wrap the pan in foil to prevent leaks.
Mistake 3: Rushing the Cooling Process
Taking the cheesecake out of the oven too quickly can cause it to sink or crack. Let it cool gradually in the oven with the door ajar. Tip: Set a timer to remind yourself to check on it.
FAQ
Can I use frozen kiwis?
Yes, but thaw them completely and drain any excess liquid before using. Fresh kiwis give the best flavor and texture, though.
How do I know when the cheesecake is done?
The edges should be set, but the center should still jiggle slightly. It will firm up as it cools.
Can I make this ahead of time?
Absolutely! This cheesecake tastes even better the next day, making it perfect for meal prep.
What if I don’t have a springform pan?
You can use a regular cake pan, but line it with parchment paper for easy removal.
Can I freeze this cheesecake?
Yes! Wrap slices tightly and freeze for up to 2 months. Thaw in the fridge before serving.
Why is my crust soggy?
Make sure you press the crust firmly into the pan and bake it long enough to set.
Can I use other fruits?
Of course! Mango, passion fruit, or berries work beautifully.
How do I slice it cleanly?
Dip your knife in hot water, wipe it dry, and then cut. Repeat for each slice.
What’s the best way to store leftovers?
Keep them in an airtight container in the fridge for up to 3 days.
Is this cheesecake kid-friendly?
Yes! Kids love the creamy texture and fruity topping. Just omit the lemon juice if they prefer sweeter flavors.
Final Thoughts
This Kiwi Cream Cheesecake is a dessert that truly has it all: flavor, texture, and presentation. Whether you’re baking for a special occasion or just because, it’s bound to become a favorite. So grab those kiwis, roll up your sleeves, and get ready to wow everyone with this tropical treat!
Equipment
- Mixing Bowl
- Whisk
- Spatula
- 9-inch Springform Pan
- Food Processor or Ziplock Bag
Ingredients
- 200 g digestive cookies
- 100 g melted butter
- 500 g cream cheese
- 200 ml liquid cream
- 150 g sugar
- 3 eggs
- 2 crushed kiwis
- 1 tsp vanilla extract
- 2 sliced kiwis
- 50 g sugar for topping
- 1 tbsp lemon juice
Instructions
- Crush the digestive cookies into fine crumbs and mix with melted butter until it resembles wet sand. Press this mixture firmly into your cake pan.
- Bake the crust at 180°C for 10 minutes.
- In a large bowl, beat the cream cheese and sugar until smooth and creamy, then add the eggs one at a time, mixing gently.
- Stir in the liquid cream, crushed kiwis, and vanilla extract. Pour the filling over the cooled crust.
- Bake the cheesecake at 160°C for 50 minutes, then let it cool in the oven with the door ajar.
- Cook the sliced kiwis with sugar and lemon juice over low heat until it thickens into a light jam, then spread it over the chilled cheesecake.