
A Slice of Sunshine: The Magic of Lemon Bliss Cake
There’s something magical about the smell of fresh lemon zest mingling with buttery cake batter. I remember the first time I made this Lemon Bliss Cake. It was a rainy afternoon, and my kitchen felt like the only cheerful spot in the house. As the cake baked, the citrus aroma filled the air, lifting everyone’s spirits. My kids came running, asking what smelled so good. That day, I realized this cake wasn’t just dessert—it was happiness on a plate.
The Sweet History of Lemon Bliss Cake
This cake is a modern twist on classic citrus desserts that have been around for generations. Lemon cakes were often served at tea parties in England, where they paired perfectly with a hot cup of Earl Grey. Over time, bakers added their own flair—extra zest here, a drizzle of glaze there. My version combines the best of both worlds: the softness of a traditional sponge cake with the zesty kick of fresh lemons. It’s simple yet unforgettable.
Why You’ll Fall in Love with This Recipe
What makes this Lemon Bliss Cake stand out? For starters, it’s incredibly easy to make. No fancy equipment or hard-to-find ingredients are needed. Plus, the flavors are bright and refreshing, making it perfect for any season. Whether you’re a beginner baker or a seasoned pro, this recipe will become a staple in your kitchen. And trust me, once you taste that first slice, you’ll understand why it’s called “bliss.”
Perfect Occasions for Lemon Bliss Cake
This cake shines at brunches, baby showers, and birthday parties. Its sunny flavor makes it ideal for spring and summer gatherings, but don’t let that stop you from baking it in winter—it’s like a little ray of sunshine on a cold day. I’ve even served it as a last-minute dessert when unexpected guests dropped by. Paired with a dollop of whipped cream or a dusting of powdered sugar, it’s always a hit.
Ingredients for Lemon Bliss Cake
- 1 1/2 cups all-purpose flour
- 1 teaspoon baking powder
- 1/2 teaspoon baking soda
- 1/2 teaspoon salt
- 1/2 cup softened butter
- 1 cup granulated sugar
- 2 large eggs
- 1/2 cup milk
- 1/4 cup fresh lemon juice
- Zest of 1 lemon
- 1 teaspoon vanilla extract
Substitution Options
If you’re out of certain ingredients, don’t worry! Here are some swaps:
- Butter: Use margarine or coconut oil for a dairy-free option.
- Milk: Substitute almond milk, oat milk, or any plant-based alternative.
- Eggs: Try flax eggs (1 tablespoon ground flaxseed mixed with 3 tablespoons water per egg).
- Lemon juice: Bottled lemon juice works in a pinch, though fresh is always better.
Preparation Steps
Step 1: Preheat and Prep
Start by preheating your oven to 350°F (175°C). While it heats up, grease and flour your cake pan. I love using a round 8-inch pan because it gives the cake a nice shape, but a square pan works too. Pro tip: Line the bottom with parchment paper for easy removal later. The anticipation builds as you imagine that golden crust forming in the oven.
Step 2: Mix Dry Ingredients
In a medium bowl, whisk together the flour, baking powder, baking soda, and salt. This step ensures everything is evenly distributed, so each bite has the same light texture. Imagine the fluffy clouds of flour swirling as you mix—doesn’t it feel therapeutic?
Step 3: Cream Butter and Sugar
Now comes the fun part! In a large bowl, beat the softened butter and sugar until light and fluffy. This is where the magic begins. Add the eggs one at a time, mixing well after each addition. The mixture should look pale and creamy, almost like sunshine in a bowl. Chef’s tip: Make sure your butter is truly softened; cold butter won’t cream properly.
Step 4: Add Citrus and Vanilla
Here’s where the real star of the show enters: the lemon. Stir in the fresh lemon juice, zest, and vanilla extract. As you mix, the sharp citrus scent will fill your kitchen, making it impossible not to smile. Fresh lemon juice is key—it adds brightness that bottled versions just can’t match.
Step 5: Combine Wet and Dry Ingredients
Alternate adding the dry ingredients and milk to the wet mixture, starting and ending with the flour. This technique keeps the batter tender and prevents overmixing. Gently fold everything together until just combined. Overmixing can lead to a dense cake, and nobody wants that!
Step 6: Bake to Perfection
Pour the batter into your prepared pan and smooth the top with a spatula. Pop it into the oven and bake for 30-35 minutes. You’ll know it’s done when a toothpick inserted in the center comes out clean. The golden edges and fragrant aroma will have everyone hovering near the kitchen.
Step 7: Cool Before Serving
Let the cake cool completely before slicing or decorating. Cooling allows the flavors to meld and the texture to set. Patience pays off—you’ll be rewarded with soft, melt-in-your-mouth slices.
Timing Breakdown
Here’s how long each stage takes:
- Prep Time: 15 minutes
- Cooking Time: 30-35 minutes
- Cooling Time: 30 minutes
- Total Time: About 1 hour and 15 minutes
Chef’s Secret
To take your Lemon Bliss Cake to the next level, brush the cooled cake with a simple syrup made from equal parts sugar and lemon juice. This trick locks in moisture and amps up the citrus flavor. Your guests won’t know what hit them!
Extra Info
Did you know lemons are packed with vitamin C? They were once considered so valuable that sailors carried them on long voyages to prevent scurvy. So not only does this cake taste amazing, but it also has a tiny health boost. How’s that for a win-win?
Necessary Equipment
You’ll need these tools to whip up this beauty:
- Mixing bowls
- Electric mixer or whisk
- Measuring cups and spoons
- 8-inch round or square cake pan
- Spatula
- Grater (for lemon zest)
Storage Tips
Store your Lemon Bliss Cake in an airtight container at room temperature for up to 2 days. If you live in a humid area, refrigerate it to keep it fresh longer. Bring it back to room temperature before serving for the best flavor. For longer storage, wrap individual slices in plastic wrap and freeze for up to 3 months.
If you decide to freeze the entire cake, wrap it tightly in aluminum foil first. Thaw overnight in the fridge before enjoying. Proper storage ensures every slice stays as soft and delicious as the day you baked it.
One more thing: Never store your cake uncovered. Air exposure dries it out faster than you’d think!
Tips and Advice
For an extra burst of flavor, use Meyer lemons if you can find them. Their sweeter, less acidic taste pairs beautifully with the cake. Also, sift your flour before measuring—it prevents lumps and ensures accurate proportions. Lastly, don’t skip the cooling step. Cutting into a warm cake might seem tempting, but it ruins the texture.
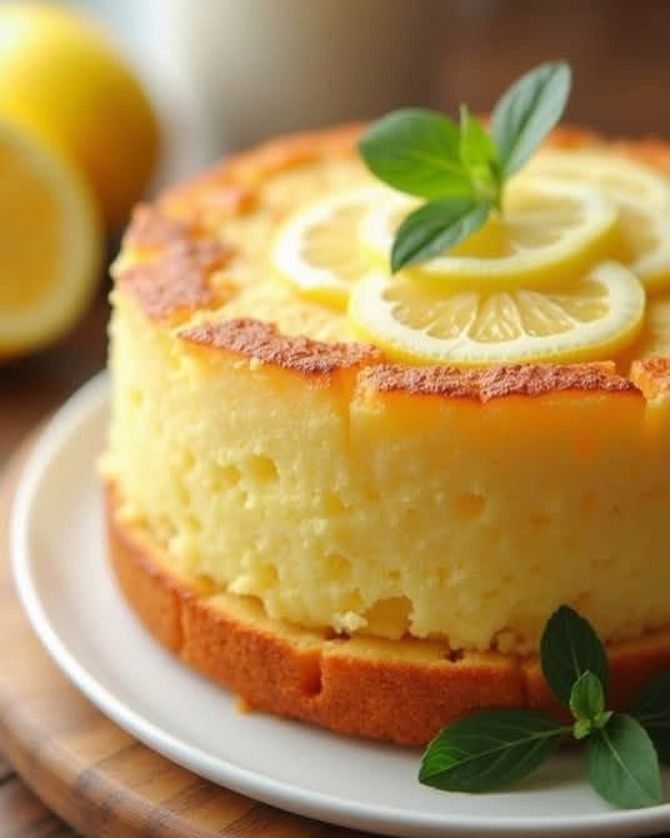
Presentation Ideas
Dust the top with powdered sugar for a classic look, or drizzle a glaze made from powdered sugar and lemon juice. Serve slices on pretty plates with a sprig of mint for color. For special occasions, layer the cake with lemon curd and whipped cream for a show-stopping dessert.
Healthier Alternatives
Want to lighten up your Lemon Bliss Cake? Try these variations:
- Gluten-Free: Swap all-purpose flour for a gluten-free blend.
- Low-Sugar: Replace half the sugar with a sugar substitute like stevia.
- Vegan: Use plant-based butter, milk, and flax eggs.
- Whole Grain: Substitute whole wheat pastry flour for added fiber.
- Oil-Free: Use unsweetened applesauce instead of butter.
- Protein-Packed: Add a scoop of vanilla protein powder to the batter.
Common Mistakes to Avoid
Mistake 1: Overmixing the Batter
Overmixing leads to a tough, dense cake. Once the dry ingredients are incorporated, stop mixing. A few lumps are okay—they’ll disappear during baking. Pro tip: Use a gentle folding motion instead of vigorous stirring.
Mistake 2: Skipping the Zest
The zest contains essential oils that give the cake its vibrant lemon flavor. Don’t leave it out! If you don’t have a grater, finely chop the peel with a knife.
Mistake 3: Opening the Oven Too Soon
Resist the urge to peek while the cake bakes. Opening the door lets heat escape, which can cause the cake to sink. Trust the timer—it’s your friend.
Mistake 4: Using Old Baking Powder
Baking powder loses potency over time. Test yours by sprinkling a bit into water; if it fizzes, it’s still good. Otherwise, replace it for best results.
Mistake 5: Not Cooling Completely
Cutting into a warm cake ruins the texture. Let it rest patiently—it’s worth the wait!
FAQs
Can I double the recipe?
Absolutely! Just make sure your pans are large enough to hold the extra batter. Doubling is great for feeding a crowd or freezing leftovers.
How do I know when the cake is done?
Insert a toothpick into the center. If it comes out clean or with a few crumbs, it’s ready. Avoid underbaking, as the cake won’t hold together well.
Can I use bottled lemon juice?
Yes, but fresh lemon juice offers superior flavor. Bottled juice lacks the natural oils found in fresh lemons, which contribute to the cake’s aroma.
What if I don’t have a mixer?
No problem! Whisk the ingredients by hand. It’ll take a bit more effort, but the result will still be delicious.
Can I add frosting?
Of course! A tangy cream cheese frosting complements the lemon flavor beautifully. Spread it generously for an indulgent treat.
Is this cake kid-friendly?
Definitely! Kids adore its sweet-tart flavor. Plus, it’s a great way to sneak some vitamin C into their diet.
Can I bake it in a bundt pan?
Yes, adjust the baking time slightly since bundt cakes are thicker. Check for doneness around the 40-minute mark.
Why is my cake dry?
Dry cakes usually result from overbaking or incorrect measurements. Measure your flour carefully and avoid opening the oven door too early.
Can I make mini cakes?
Yes! Divide the batter among muffin tins and reduce the baking time to 15-20 minutes. Perfect for portion control.
What other flavors pair well with lemon?
Blueberries, raspberries, and lavender are fantastic companions. Experiment with these additions for unique twists.
A Final Word on Lemon Bliss Cake
Baking a Lemon Bliss Cake is more than just following a recipe—it’s creating memories. Whether you’re sharing it with loved ones or savoring a quiet moment alone, this cake brings joy in every bite. So grab those lemons, roll up your sleeves, and let the magic begin. After all, life’s too short for boring desserts!
Equipment
- Mixing bowls
- Electric mixer or whisk
- Spatula
- 8-inch round or square cake pan
- Grater (for lemon zest)
Ingredients
- 1 1/2 cups all-purpose flour
- 1 teaspoon baking powder
- 1/2 teaspoon baking soda
- 1/2 teaspoon salt
- 1/2 cup softened butter
- 1 cup granulated sugar
- 2 large eggs
- 1/2 cup milk
- 1/4 cup fresh lemon juice
- 1 teaspoon vanilla extract
Instructions
- Preheat your oven to 350°F (175°C) and grease and flour your cake pan.
- In a medium bowl, whisk together the flour, baking powder, baking soda, and salt.
- In a large bowl, beat the softened butter and sugar until light and fluffy; add the eggs one at a time and mix well.
- Stir in the fresh lemon juice, zest, and vanilla extract.
- Alternate adding the dry ingredients and milk to the wet mixture, starting and ending with the flour, gently folding until just combined.
- Pour the batter into the prepared pan and smooth the top; bake for 30-35 minutes until a toothpick inserted comes out clean.
- Let the cake cool completely before slicing or decorating.