
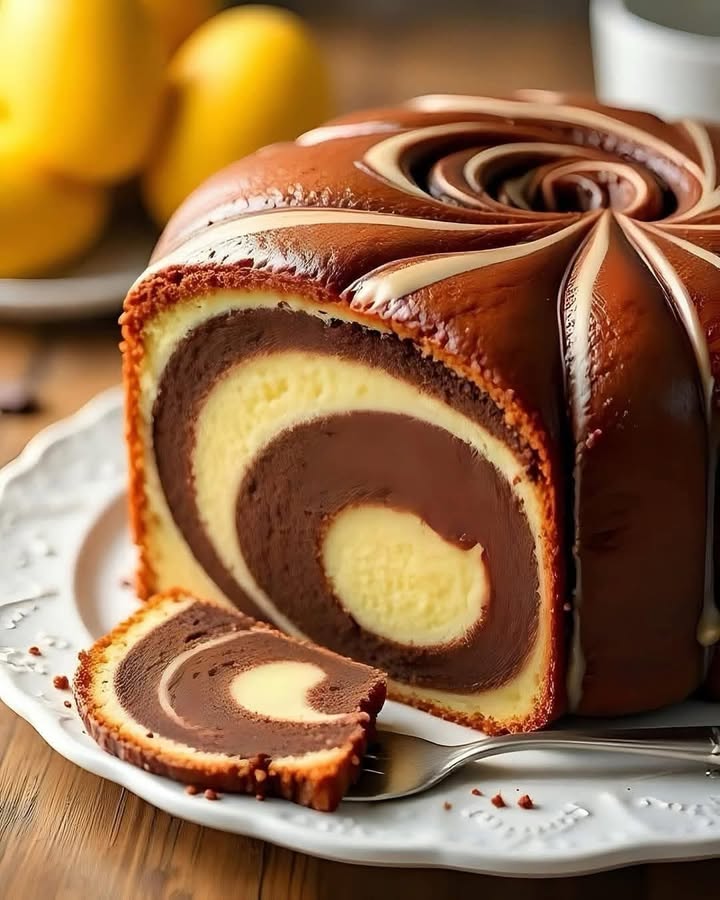
Why Marble Cake Magic Is a Must-Try
There’s something magical about slicing into a homemade marble cake. The swirls of vanilla and chocolate are like little edible art, and the aroma of buttery goodness fills your kitchen with warmth. I first made this recipe for my daughter’s birthday, and let me tell you—it was love at first bite! Everyone raved about how soft, spongy, and perfectly balanced it was. Whether you’re new to baking or a seasoned pro, this Marble Cake Magic will win hearts.
A Little History Behind Marble Cake
Marble cake has been around since the 19th century, blending two flavors into one delightful treat. It’s said to have originated in Germany, where bakers loved experimenting with contrasting colors and tastes. Over time, this classic dessert became a staple at family gatherings and celebrations worldwide. My grandmother used to make hers with cocoa powder and coffee for extra depth—something I’ve carried forward in my version. This timeless beauty bridges generations, making it more than just a cake; it’s a piece of history on your plate.
Why You’ll Love This Recipe
This Marble Cake Magic recipe is simple yet impressive. With its velvety texture and rich flavor, it’s sure to become a favorite. Plus, the process is straightforward enough for beginners but rewarding enough for experienced bakers. Imagine serving up slices of this beauty at brunch or tea time—your guests won’t believe you made it from scratch!
Perfect Occasions to Bake This Cake
From birthdays to lazy Sunday afternoons, this cake fits any occasion. Bring it to potlucks, serve it during holidays, or enjoy it as a cozy snack with a cup of coffee. One summer, I baked it for a neighborhood block party, and everyone kept asking for seconds (and the recipe!).
Ingredients You’ll Need
- 1 cup of unsalted softened butter
- 1 cup of granulated sugar
- 4 large eggs
- 1 cup of whole milk
- 2 cups of all-purpose flour
- 2 teaspoons of baking powder
- ½ teaspoon of salt
- ⅓ cup of cocoa powder
- 1 teaspoon of vanilla extract
Substitution Options
If you need alternatives, here are some swaps:
- Use almond or oat milk instead of whole milk for a dairy-free option.
- Swap granulated sugar for coconut sugar if you prefer less refined sweeteners.
- Replace butter with margarine or plant-based spreads for a vegan twist.
Step 1: Creaming Butter and Sugar
Start by beating the softened butter and sugar together until light and fluffy. This step is crucial because it incorporates air into the batter, giving your cake that dreamy, spongy texture. As you mix, watch the mixture transform into a pale yellow cloud of sweetness. Pro tip: Make sure your butter is truly softened—not melted—to get the best results.
Step 2: Adding Eggs
Crack each egg individually and add them one at a time, mixing well after each addition. This ensures everything blends smoothly without curdling. Don’t rush this part—the batter should look glossy and creamy when you’re done. Think of it as building the foundation for your masterpiece.
Step 3: Mixing Dry Ingredients
In another bowl, whisk together the flour, baking powder, and salt. These dry ingredients act as the backbone of your cake. Sifting them beforehand helps prevent lumps and makes your batter silky smooth. Picture the fine powders mingling together, ready to bring structure to your creation.
Step 4: Combining Wet and Dry Mixtures
Now comes the fun part—integrating the wet and dry components. Alternate adding the dry mixture and milk to the batter, starting and ending with the dry ingredients. This technique keeps the batter balanced and prevents overmixing, which could lead to a dense cake. Gently fold everything in, imagining the swirls of vanilla taking shape.
Step 5: Creating the Chocolate Batter
Separate one-third of the vanilla batter and stir in the cocoa powder. This step transforms plain batter into decadent chocolate magic. Watch as the deep brown color spreads evenly, creating a rich contrast against the golden vanilla base. Chef’s tip: Add a splash of espresso powder to enhance the chocolate flavor.
Step 6: Achieving the Marble Effect
Pour the vanilla batter into a greased loaf pan, then dollop the chocolate batter on top. Use a knife to gently swirl the two layers, creating beautiful marbled patterns. Be careful not to overmix—you want distinct swirls, not a muddy mess. This is where the real artistry happens!
Step 7: Baking to Perfection
Bake your cake at 350°F (175°C) for 50–60 minutes. The smell wafting through your home will be irresistible! Insert a toothpick into the center—if it comes out clean, your cake is ready. Let it cool completely before slicing to maintain those gorgeous swirls.
Timing Breakdown
- Prep Time: 20 minutes
- Cooking Time: 50–60 minutes
- Cooling Time: 30 minutes
- Total Time: About 1 hour and 40 minutes
Chef’s Secret
For an extra touch of elegance, brush the cooled cake with a simple glaze made from powdered sugar and milk. Not only does it add shine, but it also enhances the flavors subtly.
An Interesting Fact
Did you know that early versions of marble cake didn’t use chocolate? Bakers achieved the marbled effect using spices like cinnamon or nutmeg. Cocoa powder became popular later, thanks to advancements in chocolate production.
Necessary Equipment
- Mixing bowls
- Electric mixer or whisk
- Loaf pan
- Spatula
- Toothpick or skewer
Storage Tips
To keep your Marble Cake Magic fresh, store it in an airtight container at room temperature for up to three days. If you live in a warm climate, refrigerate it to extend its shelf life. For longer storage, wrap individual slices in plastic wrap and freeze them. When reheating, let frozen slices thaw overnight in the fridge, then warm them slightly in the microwave.
Proper storage preserves both the taste and texture of the cake. Avoid leaving it uncovered, as it can dry out quickly. A slice stored correctly tastes almost as good as freshly baked!
Finally, label your containers if freezing multiple desserts. Trust me, there’s nothing worse than forgetting what’s inside and finding freezer-burned surprises weeks later.
Tips and Advice
- Always measure your ingredients accurately for consistent results.
- Don’t skip preheating the oven—it affects how evenly your cake bakes.
- Let the cake cool completely before slicing to avoid crumbling.
Presentation Ideas
- Dust the top with powdered sugar for a rustic look.
- Garnish with fresh berries for a pop of color.
- Serve with a dollop of whipped cream or a scoop of vanilla ice cream.
Healthier Alternatives
Here are six variations to make your cake healthier:
- Whole Wheat Flour: Substitute half the all-purpose flour with whole wheat for added fiber.
- Applesauce Swap: Replace half the butter with unsweetened applesauce to reduce fat content.
- Honey Instead of Sugar: Use honey or maple syrup as a natural sweetener.
- Dark Cocoa Powder: Opt for dark cocoa powder for antioxidants.
- Almond Milk: Choose almond or soy milk for fewer calories.
- Vegan Option: Use flax eggs and plant-based butter for a vegan-friendly version.
Mistake 1: Overmixing the Batter
Overmixing leads to a tough, dense cake rather than a light and airy one. To avoid this, stop mixing as soon as the ingredients combine. Remember, a few lumps are okay—they’ll disappear during baking.
Mistake 2: Skipping the Cooling Step
Rushing to unmold or slice the cake while it’s still hot causes it to fall apart. Patience pays off here. Let it rest for at least 30 minutes before handling.
Mistake 3: Using Cold Butter
Cold butter won’t cream properly with the sugar, resulting in a flat cake. Take the butter out of the fridge an hour before starting or soften it in the microwave briefly.
FAQ Section
Can I use self-rising flour?
No, self-rising flour already contains leavening agents, which may alter the texture. Stick to all-purpose flour and add baking powder separately for the best results.
How do I know when the cake is done?
Insert a toothpick into the center. If it comes out clean or with a few crumbs, your cake is ready. Avoid opening the oven door too often, as this can cause uneven baking.
What size loaf pan should I use?
A standard 9×5-inch loaf pan works perfectly. Adjust baking times slightly if using a different size.
Can I double the recipe?
Yes, doubling the recipe is fine. Just ensure your bowls and pans are large enough to accommodate the increased volume.
Why did my cake sink in the middle?
This usually happens due to underbaking or opening the oven door too early. Keep the oven closed until the minimum baking time has passed.
Is it okay to add nuts or chocolate chips?
Absolutely! Fold in chopped walnuts or chocolate chips after combining the wet and dry mixtures for added crunch and flavor.
Can I make this gluten-free?
Yes, substitute the all-purpose flour with a gluten-free blend designed for baking. Check that your other ingredients are certified gluten-free too.
Why is my cake dry?
Dry cakes often result from overbaking or incorrect measurements. Follow the recipe closely and check for doneness a few minutes before the suggested time.
How long can I store leftovers?
Stored properly, your cake stays fresh for up to three days at room temperature or five days in the fridge.
Can I freeze the cake?
Yes, wrap individual slices tightly in plastic wrap and foil, then freeze for up to three months. Thaw at room temperature before serving.
Final Thoughts
Baking Marble Cake Magic is more than just following a recipe—it’s about creating memories and sharing joy. Whether you’re whipping it up for a special occasion or simply craving something sweet, this cake delivers every time. So grab your apron, gather your ingredients, and let the magic begin. Happy baking!
Equipment
- Mixing bowls
- Electric mixer or whisk
- Spatula
- Loaf pan
- Toothpick or skewer
Ingredients
- 1 cup Unsalted softened butter
- 1 cup Granulated sugar
- 4 Large eggs
- 1 cup Whole milk
- 2 cups All-purpose flour
- 2 teaspoons Baking powder
- 1/2 teaspoon Salt
- 1/3 cup Cocoa powder
- 1 teaspoon Vanilla extract
Instructions
- Beat the softened butter and sugar together until light and fluffy.
- Add eggs one at a time, mixing well after each addition.
- In another bowl, whisk together flour, baking powder, and salt.
- Alternate adding the dry mixture and milk to the batter, starting and ending with dry ingredients.
- Separate one-third of the vanilla batter and stir in cocoa powder.
- Pour the vanilla batter into a greased loaf pan, then dollop the chocolate batter on top and swirl gently.
- Bake at 350°F (175°C) for 50–60 minutes, checking for doneness with a toothpick.
Notes
Nutrition

Hi, I’m Olivia Parker, the founder of BakingSecret.com and a lifelong lover of all things sweet and homemade. I grew up in a small town in Oregon, where the smell of fresh cookies in my family’s kitchen sparked my passion for baking. Over the years, I turned that passion into a mission: to help home bakers feel confident, inspired, and creative.
After studying food science and working in several artisan bakeries across the U.S., I decided to create a space where everyone from beginners to seasoned bakers can find reliable recipes, expert tips, and a warm, welcoming community. BakingSecret.com is my way of sharing the magic of baking with the world. When I’m not testing new recipes, you’ll find me exploring farmers’ markets, collecting vintage cookbooks, or perfecting my sourdough technique.