
Why This Minty Chocolate Cheesecake is a Must-Try
Picture this: it’s a hot summer afternoon, and you’re craving something cool, creamy, and indulgent. That’s when I stumbled upon the idea of combining two of my favorite desserts—brownies and cheesecake—into one show-stopping creation. The result? A Minty Chocolate Cheesecake that’s rich, refreshing, and utterly irresistible. Whether you’re a fan of mint chocolate or just love experimenting in the kitchen, this recipe will leave you and your guests swooning.
A Little Background on This Sweet Treat
I first made this Minty Chocolate Cheesecake for a family gathering. Everyone was skeptical at first—mint and chocolate together in a cheesecake? But one bite was all it took to convert them into fans. This dessert has roots in classic American flavors, where mint chocolate has long been a favorite in candies and ice creams. Over time, creative bakers started incorporating these flavors into cakes and pies, but this brownie-based cheesecake takes it to a whole new level.
Why You’ll Love This Recipe
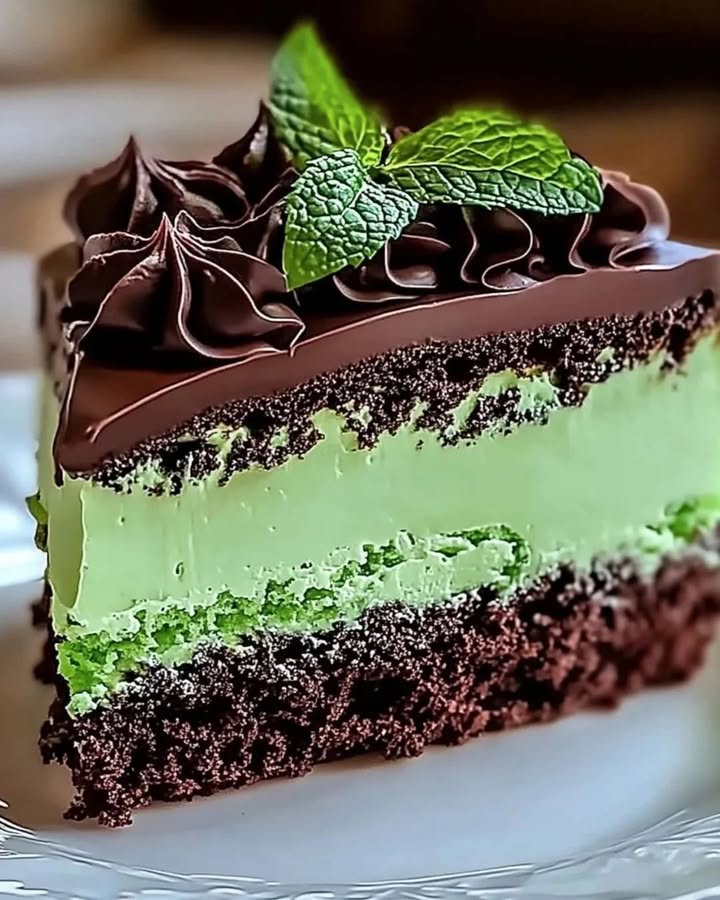
This Minty Chocolate Cheesecake is a dream come true for anyone who loves layered flavors. The fudgy brownie base provides a deep chocolatey foundation, while the mint cream filling adds a cool, airy contrast. Topped with a glossy chocolate drizzle, it’s a feast for both the eyes and the taste buds. Plus, it’s surprisingly easy to make—even if you’re not a seasoned baker!
Perfect Occasions to Whip Up This Dessert
This Minty Chocolate Cheesecake is perfect for any occasion. Serve it at birthday parties, holiday gatherings, or even as a special treat for date night. It’s also a fantastic dessert for potlucks because it travels well and always gets rave reviews. Trust me, once you bring this to the table, it’ll be the star of the show.
Ingredients You’ll Need
- For the Brownie Base:
- 1 box of brownie mix (or your favorite homemade recipe)
- Ingredients required for the brownie mix (typically eggs, oil, and water)
- For the Mint Cream Filling:
- 1 cup heavy cream
- 1 cup powdered sugar
- 1 tsp peppermint extract
- 8 oz cream cheese, softened
- ½ cup sour cream
- 2 cups whipped cream (or 1 cup heavy cream, whipped to stiff peaks)
- For the Chocolate Topping:
- 4 oz semi-sweet chocolate, chopped
- 1 tbsp butter
- For Garnish:
- Fresh mint leaves
- Shaved chocolate or chocolate curls
Substitution Options
If you’re looking to switch things up, here are some ideas:
- Swap the semi-sweet chocolate for dark chocolate for a more intense flavor.
- Use Greek yogurt instead of sour cream for a tangier twist.
- Replace peppermint extract with vanilla extract if you’re not a fan of mint.
- For a dairy-free version, use coconut cream and vegan cream cheese.
Step-by-Step Preparation
Step 1: Prepare the Brownie Base
Start by preheating your oven to 350°F (175°C). Grease a 9-inch springform pan to ensure the brownie doesn’t stick. Mix your brownie batter according to the package instructions—or whip up your favorite homemade recipe—and pour it into the pan. Bake for 20-25 minutes, or until a toothpick comes out clean. Let the brownie cool completely before moving on to the next step. Pro tip: Place the pan on a wire rack to speed up cooling.
Step 2: Make the Mint Cream Filling
In a large bowl, beat the softened cream cheese and sour cream until smooth and creamy. In another bowl, whip the heavy cream and powdered sugar until stiff peaks form—it should look like fluffy clouds! Gently fold the whipped cream and peppermint extract into the cream cheese mixture. Be careful not to overmix; you want to keep that light, airy texture. Chef’s tip: Taste the filling as you go and adjust the peppermint extract to suit your preference.
Step 3: Assemble the Cheesecake
Once the brownie base is cool, spread the mint cream filling evenly over it. Use a spatula to smooth the top for a polished look. Pop the assembled cheesecake into the fridge and let it chill for at least 4 hours—or overnight for best results. The chilling time allows the flavors to meld and the filling to set perfectly.
Step 4: Make the Chocolate Topping
While the cheesecake chills, melt the semi-sweet chocolate and butter in a heatproof bowl. Microwave in 20-second intervals, stirring between each round, until smooth and glossy. Let the mixture cool slightly before drizzling it over the chilled cheesecake. This step adds a decadent finishing touch that ties all the flavors together.
Step 5: Garnish & Serve
Before serving, decorate your Minty Chocolate Cheesecake with fresh mint leaves and chocolate curls for an elegant presentation. Slice into generous portions and watch everyone’s faces light up as they take their first bite. This dessert is sure to become a family favorite!
Timing Breakdown
- Prep Time: 20 minutes
- Bake Time: 25 minutes
- Chill Time: 4 hours (or overnight)
- Total Time: 4 hours 45 minutes
Chef’s Secret
To make the chocolate topping extra shiny, add a teaspoon of corn syrup while melting the chocolate. It creates a professional-looking glaze that makes your Minty Chocolate Cheesecake even more irresistible.
Extra Info
Did you know that peppermint has been used in desserts since ancient times? The Romans believed it had healing properties, and today, we just think it tastes amazing. Fun fact: Peppermint extract is much stronger than mint flavoring, so a little goes a long way!
Necessary Equipment
- 9-inch springform pan
- Mixing bowls
- Electric mixer or whisk
- Spatula
- Wire rack
- Heatproof bowl for melting chocolate
Storage Tips
This Minty Chocolate Cheesecake stores beautifully in the fridge. Cover it tightly with plastic wrap or transfer slices to an airtight container to prevent the filling from drying out. It stays fresh for up to 3 days, though I doubt it’ll last that long!
If you need to freeze it, wrap individual slices in plastic wrap and then foil. They’ll keep for up to a month. Just thaw in the fridge overnight before serving.
Pro tip: Always let the cheesecake come to room temperature for about 15 minutes before serving. It enhances the flavors and makes it easier to slice.
Tips and Advice
- Use high-quality chocolate for the topping—it makes a noticeable difference in flavor.
- Don’t skip the chilling time; it’s crucial for setting the filling.
- If you’re short on time, use store-bought whipped cream to simplify the process.
Presentation Ideas
- Serve slices on decorative plates with a sprig of mint for a pop of color.
- Drizzle extra chocolate sauce around the plate for a restaurant-worthy touch.
- Add a dusting of powdered sugar for a snowy effect.
Healthier Alternative Recipes
Want to lighten up this Minty Chocolate Cheesecake? Here are six variations:
- Low-Sugar Version: Use sugar-free brownie mix and sweeten the filling with stevia or monk fruit.
- Vegan Option: Substitute dairy ingredients with plant-based alternatives like coconut cream and vegan cream cheese.
- Gluten-Free: Choose a gluten-free brownie mix and ensure all other ingredients are certified gluten-free.
- Protein-Packed: Add a scoop of chocolate protein powder to the brownie batter for an extra boost.
- No-Bake: Skip the baking step by using a ready-made brownie crust or cookie crumbs mixed with melted butter.
- Fruit Twist: Swap the mint filling for a berry compote layer for a fruity spin.
Common Mistakes to Avoid
Mistake 1: Overmixing the Filling
Overmixing can deflate the whipped cream, leaving your filling dense instead of light and airy. To avoid this, fold gently and stop as soon as everything is combined. Pro tip: Use a rubber spatula for better control.
Mistake 2: Skipping the Cooling Step
Rushing the process by skipping the cooling or chilling steps can ruin the texture of your cheesecake. Patience is key here—trust me, it’s worth the wait!
Mistake 3: Burning the Chocolate
Melting chocolate can be tricky. If you heat it too quickly, it can seize and become grainy. Always melt in short intervals and stir frequently for a smooth result.
FAQs
Can I use a different type of extract?
Absolutely! While peppermint gives this cheesecake its signature flavor, you can try almond or orange extract for a unique twist.
How do I prevent cracks in the filling?
To avoid cracks, don’t overbeat the filling, and make sure the cheesecake chills undisturbed during setting.
Can I make this ahead of time?
Yes! This dessert actually tastes better after resting overnight, making it perfect for meal prep.
What’s the best way to cut clean slices?
Dip your knife in hot water, wipe it dry, and then slice. Repeat for each cut to keep the edges neat.
Is this recipe kid-friendly?
Kids love the mint-chocolate combo! Just check for any allergies before serving.
Can I double the recipe?
Of course! Simply double all ingredients and use a larger pan or make two separate cheesecakes.
What if I don’t have a springform pan?
You can use a regular cake pan, but line it with parchment paper for easy removal.
How do I know when the brownie base is done?
Insert a toothpick into the center. If it comes out clean or with a few moist crumbs, it’s ready.
Can I freeze leftovers?
Yes! Wrap slices individually and freeze for up to a month. Thaw in the fridge before enjoying.
What tools do I need for garnishing?
A vegetable peeler works great for creating chocolate curls, and small scissors help trim mint leaves neatly.
Final Thoughts
This Minty Chocolate Cheesecake is more than just a dessert—it’s an experience. From the rich brownie base to the cool mint filling and glossy chocolate topping, every bite is a celebration of flavor. Whether you’re baking for a crowd or treating yourself, this recipe is sure to impress. So grab your apron, gather your ingredients, and get ready to create a masterpiece that everyone will remember!
Equipment
- Mixing Bowls
- Electric Mixer or Whisk
- Spatula
- 9-inch Springform Pan
- Heatproof Bowl for Melting Chocolate
Ingredients
- 1 box Brownie Mix
- 3 large Eggs
- ⅓ cup Oil
- ¼ cup Water
- 1 cup Heavy Cream
- 1 cup Powdered Sugar
- 1 tsp Peppermint Extract
- 8 oz Cream Cheese, softened
- ½ cup Sour Cream
- 2 cups Whipped Cream or 1 cup heavy cream, whipped to stiff peaks
- 4 oz Semi-Sweet Chocolate, chopped
- 1 tbsp Butter
- to taste Fresh Mint Leaves
- to taste Shaved Chocolate or Chocolate Curls
Instructions
- Preheat oven to 350°F (175°C) and grease a 9-inch springform pan.
- Mix the brownie batter according to package instructions and pour into the pan.
- Bake for 20-25 minutes, or until a toothpick comes out clean, then let cool completely.
- In a large bowl, beat softened cream cheese and sour cream until smooth.
- In another bowl, whip heavy cream and powdered sugar until stiff peaks form.
- Gently fold whipped cream and peppermint extract into the cream cheese mixture.
- Spread the mint cream filling evenly over the cooled brownie base.
- Chill the assembled cheesecake in the fridge for at least 4 hours (or overnight).
- Melt semi-sweet chocolate and butter in a heatproof bowl in the microwave until smooth.
- Drizzle the chocolate topping over the chilled cheesecake.
- Garnish with fresh mint leaves and chocolate curls before serving.
Notes
Nutrition

Hi, I’m Olivia Parker, the founder of BakingSecret.com and a lifelong lover of all things sweet and homemade. I grew up in a small town in Oregon, where the smell of fresh cookies in my family’s kitchen sparked my passion for baking. Over the years, I turned that passion into a mission: to help home bakers feel confident, inspired, and creative.
After studying food science and working in several artisan bakeries across the U.S., I decided to create a space where everyone from beginners to seasoned bakers can find reliable recipes, expert tips, and a warm, welcoming community. BakingSecret.com is my way of sharing the magic of baking with the world. When I’m not testing new recipes, you’ll find me exploring farmers’ markets, collecting vintage cookbooks, or perfecting my sourdough technique.