
My No-Bake Ferrero Rocher Cheesecake: A Dream Come True
Have you ever tasted a fancy restaurant dessert and thought, “I could never make this at home”? I used to think that too. Then I discovered the magic of no-bake cheesecakes. Let me tell you, this No-Bake Ferrero Rocher Cheesecake is the showstopper that changed my mind. It looks like it came from a high-end patisserie, but it’s secretly one of the easiest, most fun desserts you’ll ever make. No oven required, just pure, unadulterated chocolate-hazelnut joy.
From Candy to Cake: The Story of a Golden Favorite
Ferrero Rocher chocolates have been a special-occasion treat in my house since I was a kid. That golden wrapper always meant a celebration! Turning that beloved candy—with its crunchy hazelnut, creamy filling, and wafer—into a luxurious cheesecake just made sense. While the traditional baked cheesecake has deep roots, the no-bake version is a modern lifesaver for home cooks. It captures all the decadence without any of the stress of a water bath or worrying about cracks. This recipe is my homage to that fancy chocolate, transformed into a shareable, sliceable masterpiece.
Why You’ll Fall in Love With This No-Bake Cheesecake
You will adore this recipe for so many reasons! First, it’s impossible to mess up. The filling sets in the fridge, so there’s no risk of over-baking. Second, the flavor is insanely good. It’s like eating the inside of a dozen Ferrero Rochers in one creamy, dreamy bite. Third, it’s the perfect make-ahead dessert. You can whip it up in the morning (or the night before) and let the fridge do all the work. It frees you up to enjoy your guests instead of being stuck in the kitchen.
The Perfect Moment for a Slice of Heaven
This isn’t just a dessert; it’s an event. I love bringing it out for birthdays, holiday dinners, or girls’ night in. It makes any Tuesday feel like a celebration! It’s also a guaranteed hit at potlucks—trust me, you’ll be asked for the recipe every single time. For a cozy winter gathering or a summer party where you don’t want to heat up the kitchen, this no-bake Ferrero Rocher dessert is always the right answer.
Gathering Your No-Bake Ferrero Cheesecake Ingredients
Here’s your shopping list for this glorious treat. Using full-fat, room-temperature cream cheese is the key to a smooth, lump-free filling.
For the Crust:
- 2 cups crushed graham crackers
- 1/2 cup melted butter
- 1/4 cup chopped hazelnuts
For the Filling:
- 24 oz (680g) cream cheese, softened
- 1 cup powdered sugar
- 1 teaspoon vanilla extract
- 1 cup Nutella
- 1 cup chopped Ferrero Rocher chocolates
- 1 cup whipped cream
For Decoration:
- Whole Ferrero Rocher chocolates
- Chopped hazelnuts
- Chocolate shavings
No Stress Substitutions
Don’t have every ingredient? No problem! Here are some easy swaps:
- Graham Crackers: Use digestive biscuits, vanilla wafers, or even Oreos (without the filling) for a chocolate crust.
- Hazelnuts: Almonds or pecans work beautifully for that crunchy texture.
- Whipped Cream: You can use 1 cup of heavy cream whipped with a tablespoon of sugar, or use the pre-whipped stuff from the tub for extra convenience.
- Nutella: Any chocolate-hazelnut spread will do, or you can use a straight-up chocolate spread for a different twist.
If you love combining peanut butter and chocolate, you must try our baked Reese’s Peanut Butter Cup Cheesecake for another indulgent experience.
How to Make Your No-Bake Ferrero Rocher Cheesecake
Let’s walk through the simple steps to create this masterpiece. Remember, the secret is in gentle folding and patience!
Step 1: Build Your Crunchy Foundation
First, let’s make the crust. Grab a medium-sized bowl and mix your finely crushed graham crackers with the finely chopped hazelnuts. The smell is already amazing! Pour the melted butter over this mixture. Use a fork to combine everything until it looks like wet sand and holds together when you pinch it. Pour it into your springform pan and press it down firmly and evenly with the bottom of a cup. This compact layer is the golden base for all that creamy goodness to come. Pop the pan into the fridge to firm up while you make the filling.
Step 2: Whip Up the Creamy Dream
Now, for the star of the show: the filling. In a large bowl, beat the softened cream cheese with an electric mixer until it’s perfectly smooth and fluffy. This should take about 2 minutes. No lumps allowed! Then, add the powdered sugar and vanilla extract. Mix on low at first to avoid a sugar cloud, then beat until it’s completely incorporated. The mixture will become light and silky. Pro tip: Letting your cream cheese sit out for an hour to soften is non-negotiable for a smooth texture.
Step 3: Bring in the Chocolate-Hazelnut Magic
Here’s where the flavor gets deep. Spoon that entire cup of Nutella into the cream cheese mixture. The rich, chocolaty aroma will fill your kitchen. Beat it again on medium speed until the Nutella is fully blended in and the filling is a uniform, beautiful light brown color. Scrape down the sides of the bowl to make sure everything is mixed well. At this point, it’s going to be very thick, but don’t worry—the next steps will lighten it up.
Step 4: Fold in the Fun Bits
This step adds wonderful texture. Take your chopped Ferrero Rocher chocolates—try not to eat them all!—and your whipped cream. Using a large spatula, gently fold them into the Nutella cream cheese mixture. “Folding” means you cut through the center and scoop underneath, turning the batter over itself. Be gentle so you don’t deflate the whipped cream. You’ll see lovely streaks at first, then a beautifully smooth, airy filling studded with chocolate and hazelnut pieces.
Step 5: Assemble and Let It Set
Pull your chilled crust from the fridge. Pour the glorious filling over the top. Use your spatula to spread it into an even, flat layer, making sure it reaches all the edges. Give the pan a gentle tap on the counter to release any air bubbles. Now, the most important step: patience. Cover the pan and chill the cheesecake for at least 4 hours, but overnight is truly best. This allows the flavors to meld and the texture to become perfectly sliceable.
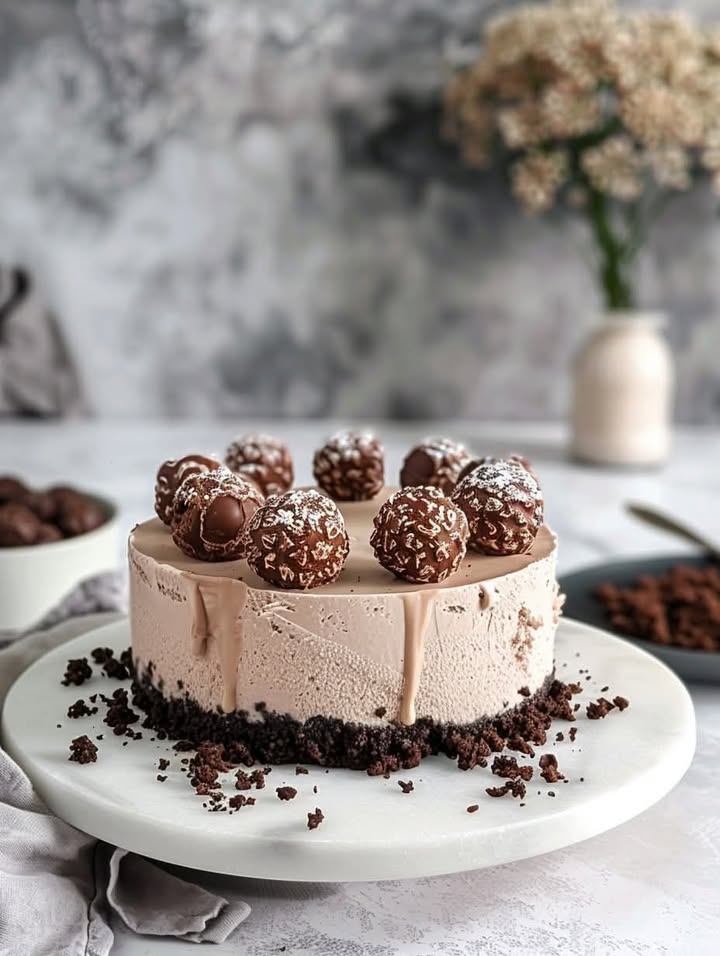
Step 6: The Grand Finale: Decoration
The fun part! Once your cheesecake is completely set, run a thin knife around the edge of the springform pan before unlocking the ring. Arrange whole Ferrero Rochers, a scattering of extra chopped hazelnuts, and delicate chocolate shavings on top. Let your creativity shine—these toppings add crunch, beauty, and extra bursts of flavor. For more elegant dessert ideas, our delicate Mascarpone Flavor Log is another stunning option.
Timing is Everything
While the active work is quick, planning ahead is key for the perfect no-bake dessert.
- Prep Time: 20 minutes (fun and easy!)
- Chilling Time: 4 hours minimum (overnight is ideal)
- Total Time: 4 hours 20 minutes
- Servings: 10-12 happy people
Chef’s Secret: The Warm Knife Trick
For magazine-perfect clean slices every time, here’s my secret: run your sharp knife under very hot water, wipe it dry, and then cut. Do this between each slice. The warm blade glides through the chilled creamy filling and crispy crust without dragging or cracking the surface. It makes serving look incredibly professional.
A Little Extra Fun Fact
Did you know the hazelnuts in your cheesecake are a great source of good fats and vitamin E? Of course, we’re here for the taste first! But it’s nice to know there’s a little nutritional benefit hidden in all that decadence. Learning about your ingredients is a wonderful part of building healthy cooking skills that make every meal better.
What You’ll Need to Make It
You don’t need fancy equipment! Just gather these basics:
- 9-inch springform pan (this is essential for easy removal)
- Mixing bowls (one large, one medium)
- Electric hand mixer or stand mixer
- Spatula
- Measuring cups and spoons
- Knife and cutting board (for chopping)
Storing Your Decadent Creation
This No-Bake Ferrero Cheesecake stores beautifully. Keep it covered in the refrigerator, and it will stay fresh and delicious for up to 4-5 days. The crust may soften slightly after day two, but the flavor will only get better as it continues to set.
You can also freeze this cheesecake for longer storage! Wrap the whole cheesecake (or individual slices) tightly in plastic wrap and then in aluminum foil. It will keep in the freezer for up to 2 months. When you’re ready to enjoy, simply thaw it overnight in the refrigerator.
For serving leftovers, always use a clean knife to cut slices. This keeps the rest of the cake looking fresh. And remember, because it’s a no-bake recipe with dairy, it should always be stored in the fridge, never left out at room temperature for more than an hour or two.
Top Tips for No-Bake Cheesecake Success
- Soften That Cheese: Seriously, room-temperature cream cheese is the #1 rule. It blends smoothly and prevents a grainy filling.
- Chill Out: Don’t rush the chilling time. Four hours is the minimum, but overnight chilling gives you the firmest, cleanest slices.
- Fold Gently: When adding the whipped cream and chopped chocolates, fold instead of stir. This keeps the filling light and airy.
- Crust Press: Press the crust mixture firmly and evenly into the pan. A solid base makes slicing so much easier.
Make It Look Like a Million Bucks
Presentation turns a great dessert into a memorable one! Try these ideas:
- Drizzle the plate with a little melted chocolate or caramel sauce before placing the slice.
- Add a dollop of freshly whipped cream and a single gold-dusted hazelnut on top of each slice.
- Serve on a beautiful cake stand for a real “wow” factor when you bring it to the table.
- Use a microplane to create delicate chocolate shavings from a chocolate bar for the top.
Want to Mix It Up? Try These Variations!
Love the idea but want a different flavor? Here are six fantastic twists on the no-bake cheesecake:
- Cookies and Cream: Swap the graham crackers for Oreo crumbs (filling included!) and fold in chopped Oreos instead of Ferrero Rocher.
- Salted Caramel Pretzel: Use a pretzel crust, omit the Nutella, and fold in salted caramel sauce and pretzel pieces into the filling.
- Lemon Berry: Use a vanilla wafer crust. Omit Nutella and chocolates. Add lemon zest and juice to the filling, then top with a fresh berry compote.
- Mint Chocolate Chip: Add 1/2 teaspoon peppermint extract to the filling and fold in mini chocolate chips. A chocolate cookie crust works great here.
- Tropical Escape: Use a ginger snap or coconut cookie crust. Fold in finely chopped dried mango and toasted coconut into the vanilla-based filling.
- Triple Chocolate: For the ultimate chocolate fix, use a chocolate cookie crust. Divide the filling into thirds and mix melted dark, milk, and white chocolate into each part. Layer them for a stunning effect, much like our gorgeous Triple Chocolate Mousse Cake.
For a fabulous frozen option, check out our refreshing Mango Ice Cream Cake perfect for summer days.
Common Mistakes to Avoid
Steer clear of these common pitfalls to ensure your no-bake cheesecake is perfect every single time.
Mistake 1: Using Cold Cream Cheese
This is the biggest culprit behind a lumpy, difficult-to-mix filling. Cold cream cheese will never blend smoothly with the other ingredients. It leaves little bits of cheese throughout your batter. How to avoid it: Simply plan ahead. Take the cream cheese out of the fridge and let it sit on your counter for at least 1-2 hours before you start baking. It should be soft to the touch but not melted.
Mistake 2: Not Chilling Long Enough
Impatience can lead to a soupy, un-sliceable mess. The no-bake filling needs ample time for the ingredients to set together properly. If you try to cut it after just an hour or two, it will ooze everywhere. How to avoid it: Treat the 4-hour chill time as a bare minimum. For the absolute best texture and cleanest slices, make it the day before and let it set overnight in the refrigerator. Your future self will thank you when you serve perfect slices.
Mistake 3: Over-Mixing the Whipped Cream
When you fold in the whipped cream, being too rough or mixing for too long can deflate it. This takes the air out of your filling, making it dense and heavy instead of light and fluffy. How to avoid it: Use a large spatula and a gentle hand. “Fold” by cutting down through the middle, scooping under, and turning the mixture over. It’s okay if you see a few streaks at first; they will blend in with a few more turns. Stop as soon as the mixture is uniform.
Mistake 4: A Soggy or Crumbly Crust
A crust that falls apart or gets soggy can ruin the experience. This usually happens from not using enough butter or not pressing the crust firmly into the pan. How to avoid it: Make sure your crust mixture holds together when you pinch it. If it’s too dry, add a tiny bit more melted butter. Then, really press it down hard and evenly with the bottom of a glass or measuring cup. A solid, compact crust is your foundation.
Your No-Bake Ferrero Cheesecake Questions, Answered
Can I make this cheesecake ahead of time?
Absolutely, and I highly recommend it! This is the ultimate make-ahead dessert. You can prepare the entire cheesecake up to 2 days before you plan to serve it. Just keep it tightly covered in the refrigerator. I often add the final decorations (like the whole Ferrero Rochers and chocolate shavings) a few hours before serving so they look their freshest. The long chill time only improves the flavor and makes it easier to slice neatly.
What can I use instead of a springform pan?
A springform pan is best because the removable sides make it easy to get the cheesecake out without damaging it. If you don’t have one, you can use a regular 9-inch pie dish. You’ll just serve the cheesecake directly from the dish. For a different presentation, you could also make individual servings in muffin tins lined with paper liners. Just reduce the chilling time for mini cheesecakes to about 2 hours.
My filling is too runny. What did I do wrong?
A runny filling usually points to one of two issues. First, the cream cheese may not have been softened enough, causing you to over-mix and thin out the filling. Second, the whipped cream might have been under-whipped. Your whipped cream should hold stiff peaks before you fold it in. Don’t worry—if it’s runny before chilling, just pour it onto the crust and give it extra time in the fridge, perhaps overnight. It will likely firm up significantly.
Can I freeze this no-bake cheesecake?
Yes, you can! Freeze it whole or in slices. Wrap it very tightly in several layers of plastic wrap, then a layer of aluminum foil to prevent freezer burn. It will keep well for 1-2 months. To serve, transfer it to the refrigerator and let it thaw overnight. The texture will be slightly denser but still delicious. I don’t recommend freezing the decorated top with whole chocolates, as they can get mushy when thawed.
Is it okay to use low-fat cream cheese?
For the best texture and flavor, I strongly recommend using full-fat, brick-style cream cheese. Low-fat or whipped cream cheese often has more water and stabilizers added. This can keep your filling from setting properly, making it soft or even watery. This dessert is a treat, so go for the good stuff! The rich, creamy result is worth it.
How do I get the cheesecake out of the pan cleanly?
Here’s my foolproof method. First, make sure the cheesecake is fully chilled. Run a thin, sharp knife under hot water, wipe it dry, and slowly run it around the very edge between the cake and the pan. Don’t use a sawing motion—one smooth glide is best. Then, unlock the spring on the side of the pan and gently lift the ring straight up and away. If you used parchment paper on the bottom, you can slide the whole cake onto a serving plate.
The crust is sticking to the pan. Help!
To prevent sticking, I like to line the bottom of my springform pan with a round of parchment paper. You don’t need to grease the sides. After pressing in the crust, chilling it helps it set and bind together, making it less likely to crumble. When you remove the springform ring, if a few crumbs stick, don’t panic—just use a butter knife to gently loosen them.
Can I add alcohol to this recipe?
You can add a splash for an adult twist! A tablespoon of Frangelico (hazelnut liqueur), Kahlúa (coffee liqueur), or Bailey’s Irish Cream would complement the flavors beautifully. Add it when you mix in the vanilla extract. Be careful not to add too much liquid, as it could prevent the filling from setting firmly. A little goes a long way for flavor.
How long can it sit out at a party?
Because it’s a dairy-based dessert, you should not leave it out at room temperature for more than 2 hours. For longer parties, keep it in the fridge and bring it out for serving, then return it promptly. This keeps it food-safe and ensures the perfect cool, firm texture that makes a no-bake cheesecake so delightful.
My Nutella made the filling too thick. What should I do?
Nutella can be stiff straight from the jar, especially if it’s cool. If it’s resisting blending and making the filling overly thick, you can gently warm it. Scoop it into a microwave-safe bowl and heat it for 10-15 seconds, just until it’s slightly softened and easier to stir. Let it cool for a minute before adding it to the cream cheese mixture. This will make it incorporate much more smoothly.
If this No-Bake Ferrero Rocher Cheesecake has you hooked, explore our entire collection of delicious cheesecake recipes for more inspiration, from classic New York style to fruity summer versions.
Go Ahead, Be the Dessert Hero
So there you have it—my favorite recipe for a truly spectacular, no-fuss dessert. This No-Bake Ferrero Rocher Cheesecake proves that incredible things can happen without even turning on your oven. It’s rich, it’s creamy, it’s packed with crunchy, chocolaty surprises, and it never fails to impress. Whether it’s for a special day or just because it’s Tuesday, this cheesecake is a little slice of happiness. So gather your ingredients, put on some fun music, and get ready to make something amazing. Don’t forget to take a picture before everyone digs in!
Equipment
- Grand bol
- Fouet électrique
- Spatule
- Moules à charnière
- Couteau
Ingredients
- 2 tasses biscuits Graham écrasés
- 1/2 tasse beurre fondu
- 1/4 tasse noisettes hachées
- 680 g fromage à la crème, ramolli
- 1 tasse sucre en poudre
- 1 cuil. à café extrait de vanille
- 1 tasse Nutella
- 1 tasse Ferrero Rocher hachés
- 1 tasse crème fouettée
Instructions
- Mélangez les biscuits Graham écrasés et les noisettes hachées dans un bol moyen, puis versez le beurre fondu par-dessus. Combinez jusqu'à ce que le mélange ressemble à du sable humide.
- Presser le mélange dans un moule à charnière et réfrigérer pour raffermir.
- Battez le fromage à la crème ramolli dans un grand bol jusqu'à obtenir un mélange lisse.
- Ajoutez progressivement le sucre en poudre et l'extrait de vanille, en mélangeant jusqu'à ce que le tout soit bien incorporé.
- Ajoutez le Nutella au mélange de fromage à la crème et battez jusqu'à obtenir un mélange homogène.
- Incorporez délicatement les Ferrero Rocher hachés et la crème fouettée pour préserver la légèreté.
- Versez la garniture sur la croûte refroidie et lissez le dessus.
- Couvrir et réfrigérer pendant au moins 4 heures ou de préférence toute la nuit pour bien prendre.
- Une fois pris, décorer avec des Ferrero Rocher entiers, des noisettes hachées et des copeaux de chocolat.
Notes
Nutrition

Hi, I’m Olivia Parker, the founder of BakingSecret.com and a lifelong lover of all things sweet and homemade. I grew up in a small town in Oregon, where the smell of fresh cookies in my family’s kitchen sparked my passion for baking. Over the years, I turned that passion into a mission: to help home bakers feel confident, inspired, and creative.
After studying food science and working in several artisan bakeries across the U.S., I decided to create a space where everyone from beginners to seasoned bakers can find reliable recipes, expert tips, and a warm, welcoming community. BakingSecret.com is my way of sharing the magic of baking with the world. When I’m not testing new recipes, you’ll find me exploring farmers’ markets, collecting vintage cookbooks, or perfecting my sourdough technique.