
Craving a Cool, Creamy Treat? Try This No-Bake Mint Cheesecake!
There’s something magical about a dessert that feels like summer in every bite. I remember the first time I made this No-Bake Mint Cheesecake. It was for a backyard get-together, and everyone kept asking, “Wait, you didn’t bake this?” The minty coolness paired with rich chocolate cookie crust is a game-changer. Best of all? No oven required. Whether you’re a busy mom or just someone who loves fuss-free recipes, this cheesecake will quickly become your go-to dessert.
A Little History Behind This Minty Marvel
This dessert is inspired by classic cheesecakes but swaps the heavy baking process for a refreshing no-bake twist. Mint has long been used in desserts for its cooling effect, especially in warm weather. Paired with chocolate, it’s an irresistible combo that dates back to early candy-making traditions. I love how modern twists—like marbling and colorful decorations—make this recipe feel fresh and fun while staying true to its roots.
Why You’ll Love This Recipe
This No-Bake Mint Cheesecake is creamy, minty, and chocolatey all at once. It’s perfect for those who crave a dessert that’s light yet indulgent. Plus, it’s incredibly easy to make. No need to worry about cracking tops or overbaking. Just mix, chill, and serve. Whether you’re a seasoned baker or a newbie, you’ll find this recipe foolproof and rewarding.
Perfect Occasions to Whip Up This Dessert
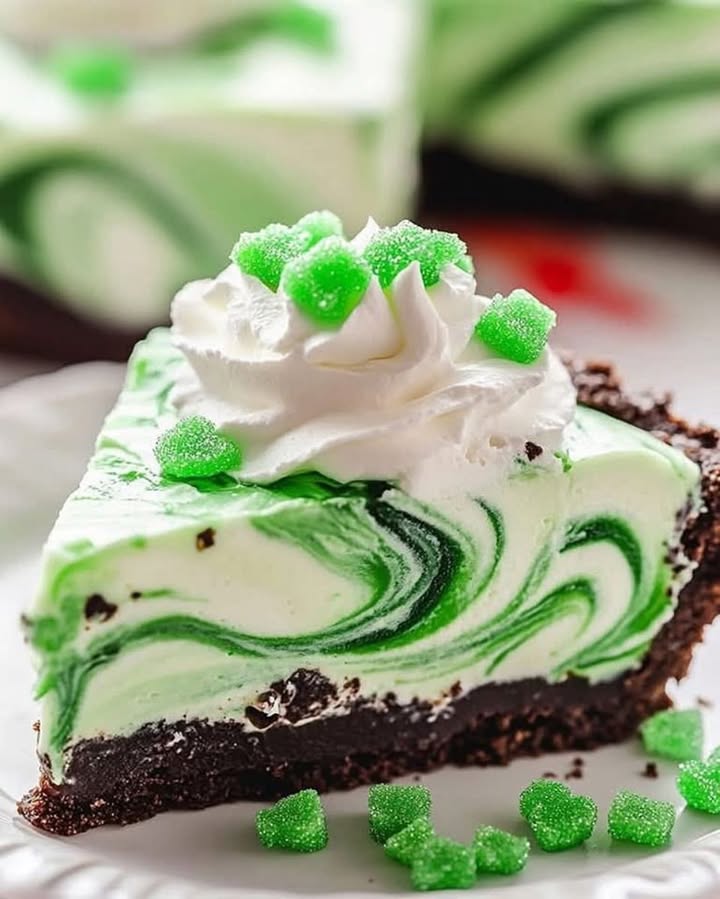
This cheesecake shines at casual family dinners, holiday parties, or even as a sweet surprise for a hot summer day. Imagine serving it at a St. Patrick’s Day celebration with its green hues or as a refreshing end to a barbecue feast. It’s also a hit with kids thanks to the fun mint candies on top. Trust me, it’s a crowd-pleaser no matter the occasion!
Ingredients to Gather
Here’s what you’ll need to create this masterpiece:
For the Base:
- 1 cup of chocolate cookie crumbs
- ½ cup of melted butter
For the Filling:
- 16 oz (450 g) cream cheese, softened
- 1 cup of sugar
- 1 teaspoon mint extract
- 2 cups of whipped cream or whipped topping
- Green food coloring (optional)
- Chocolate chips or pieces
For Decoration:
- Extra whipped cream
- Green gummies or mint candies
- Chocolate sprinkles (optional)
Substitution Options
Don’t have everything on hand? No worries! Swap chocolate cookies for graham crackers if needed. Vegan? Use dairy-free cream cheese and coconut whipped cream. If you’re not a fan of artificial colors, skip the dye and let the natural beauty of the ingredients shine. For a lower-sugar version, try a sugar substitute like stevia.
Step-by-Step Preparation
Step 1: Create the Cookie Crust
Start by mixing the chocolate cookie crumbs with melted butter until they resemble wet sand. Press this mixture firmly into the bottom of a removable-bottom tart pan or springform pan. Make sure it’s evenly spread and compact. Pop it in the fridge for 15 minutes to set. Pro tip: Use the back of a spoon or a glass to press down firmly for a sturdy base.
Step 2: Whip Up the Minty Filling
In a large bowl, beat the softened cream cheese with sugar until smooth and creamy. Add the mint extract and a few drops of green food coloring if you want that marbled look. Fold in the whipped cream gently, so the filling stays light and airy. If you’re feeling adventurous, toss in some chocolate chips for extra texture. Chef’s tip: Taste the filling before adding chocolate to ensure the mint flavor is just right.
Step 3: Assemble Your Cheesecake
Pour the minty filling onto the chilled crust and smooth it out with a spatula. If you’ve added dye, take a toothpick or skewer and swirl it through the filling to create beautiful marbled patterns. It’s like painting with food! This step is where the magic happens, turning a simple cheesecake into a work of art.
Step 4: Chill Until Set
Cover the cheesecake with plastic wrap and refrigerate for at least 4 hours—or better yet, overnight. Patience is key here! The cold helps the flavors meld together and gives the cheesecake its signature firmness. Pro tip: Place a note on the fridge to remind everyone not to sneak a slice too early.
Step 5: Add the Finishing Touches
Before serving, decorate your cheesecake with dollops of whipped cream, green gummies, and chocolate sprinkles. Let your creativity run wild! A little garnish goes a long way in making this dessert Instagram-worthy.
Timing Breakdown
- Prep Time: 20 minutes
- Chilling Time: 4–8 hours
- Total Time: Approximately 5 hours
Chef’s Secret
For an extra burst of mint flavor, soak the chocolate chips in a bit of mint extract before folding them into the filling. This small step elevates the taste and makes every bite pop.
Extra Info
Did you know mint has been used in desserts since ancient times? Its cooling properties were prized in warm climates, and today, it adds a playful twist to sweets. Fun fact: Mint extract is made by steeping fresh mint leaves in alcohol—a simple process that packs a punch of flavor.
Necessary Equipment
- Removable-bottom tart pan or springform pan
- Mixing bowls
- Electric mixer or whisk
- Spatula
- Toothpick or skewer for marbling
Storage Tips
Store your No-Bake Mint Cheesecake in the fridge, covered tightly with plastic wrap or foil. It will stay fresh for up to 3 days. Keep it away from strong-smelling foods to prevent flavor transfer. If you need to freeze it, wrap individual slices in parchment paper and place them in an airtight container. Frozen slices can last up to a month.
When thawing frozen cheesecake, leave it in the fridge overnight. Don’t rush the process by leaving it out at room temperature, as this can affect the texture. Always serve chilled for the best experience.
Tips and Advice
- Use room-temperature cream cheese for a smoother filling.
- Don’t overmix the whipped cream; fold it gently to keep the filling light.
- If you don’t have mint extract, peppermint oil works too—but use sparingly!
Presentation Ideas
- Add edible glitter for a festive touch.
- Serve slices on colorful plates for contrast.
- Garnish with fresh mint leaves for a natural look.
Healthier Alternatives
Looking to lighten up this treat? Here are six variations:
- Low-Sugar Version: Replace sugar with a keto-friendly sweetener and use sugar-free whipped cream.
- Vegan Delight: Swap cream cheese for cashew-based alternatives and use coconut cream instead of whipped cream.
- Gluten-Free: Use gluten-free chocolate cookies for the crust.
- Protein-Packed: Add a scoop of vanilla protein powder to the filling.
- Fruit Twist: Mix in chopped strawberries or raspberries for a fruity kick.
- Dairy-Free: Opt for almond milk-based cream cheese and coconut whipped cream.
Common Mistakes to Avoid
Mistake 1: Skipping the Chilling Time
Rushing the chilling process is a common error. Without enough time in the fridge, the cheesecake won’t set properly and could fall apart when sliced. Always chill for at least 4 hours to ensure a firm texture.
Mistake 2: Overmixing the Whipped Cream
Overmixing turns fluffy whipped cream into buttery mush. To avoid this, fold it gently into the filling using a spatula. Pro tip: Stop mixing as soon as streaks disappear.
Mistake 3: Using Cold Cream Cheese
Cold cream cheese leads to lumpy filling. Take it out of the fridge an hour before starting, or microwave it briefly to soften.
FAQ
Can I use store-bought whipped cream?
Absolutely! Store-bought whipped topping works perfectly fine and saves time. Just make sure it’s thawed if frozen.
How do I achieve the marbled effect?
Swirl green-tinted filling with plain filling using a toothpick. Start with gentle motions to avoid mixing too much.
What if I don’t have a springform pan?
A regular pie dish works too, though removing slices might be trickier. Line it with parchment paper for easier release.
Can I make this ahead of time?
Yes! This cheesecake actually tastes better after sitting overnight. Prepare it a day in advance for stress-free entertaining.
Is mint extract the same as peppermint extract?
Not quite. Mint extract has a milder flavor, while peppermint is stronger. Adjust quantities accordingly.
Can I freeze this cheesecake?
Yes, wrap slices individually and freeze for up to a month. Thaw in the fridge before serving.
What can I substitute for chocolate chips?
Try chopped dark chocolate or white chocolate chunks for variety.
How do I know when the cheesecake is set?
The filling should feel firm to the touch and hold its shape when sliced. If it’s still soft, chill longer.
Can I use fresh mint instead of extract?
Fresh mint won’t blend well into the filling. Stick to extracts for consistent flavor.
What other flavors pair well with mint?
Chocolate is classic, but citrus zest or berries add a refreshing twist.
Final Thoughts
This No-Bake Mint Cheesecake is a delightful treat that combines ease, elegance, and incredible flavor. Whether you’re hosting a party or simply craving something sweet, this recipe delivers. Give it a try—you might just find yourself making it again and again!
Equipment
- Mixing bowls
- Electric mixer or whisk
- Spatula
- Removable-bottom tart pan or springform pan
- Toothpick or skewer for marbling
Ingredients
- 1 cup chocolate cookie crumbs
- ½ cup melted butter
- 16 oz cream cheese, softened
- 1 cup sugar
- 1 teaspoon mint extract
- 2 cups whipped cream or whipped topping
- q.s. green food coloring (optional)
- q.s. chocolate chips or pieces
Instructions
- Mix the chocolate cookie crumbs with melted butter until resembling wet sand, then press firmly into the bottom of a removable-bottom tart pan or springform pan and refrigerate for 15 minutes.
- In a large bowl, beat the softened cream cheese with sugar until smooth, then add mint extract and optional green food coloring.
- Fold in the whipped cream gently, then add chocolate chips if desired, and combine.
- Pour the minty filling onto the chilled crust, smooth it out, and create marbled patterns with a toothpick if using dye.
- Cover with plastic wrap and refrigerate for at least 4 hours or overnight to set.
- Decorate with whipped cream, green gummies, and chocolate sprinkles before serving.
Notes
Nutrition

Hi, I’m Olivia Parker, the founder of BakingSecret.com and a lifelong lover of all things sweet and homemade. I grew up in a small town in Oregon, where the smell of fresh cookies in my family’s kitchen sparked my passion for baking. Over the years, I turned that passion into a mission: to help home bakers feel confident, inspired, and creative.
After studying food science and working in several artisan bakeries across the U.S., I decided to create a space where everyone from beginners to seasoned bakers can find reliable recipes, expert tips, and a warm, welcoming community. BakingSecret.com is my way of sharing the magic of baking with the world. When I’m not testing new recipes, you’ll find me exploring farmers’ markets, collecting vintage cookbooks, or perfecting my sourdough technique.