
My No-Bake Nutella Cheesecake: A Dreamy Dessert for Chocolate Lovers
I have a little secret: I believe any occasion can be improved with a slice of cheesecake. Last summer, when my family begged for a dessert that was both decadent and easy, I created this no-bake Nutella cheesecake. The creamy filling swirled with Nutella and dulce de leche, sitting on a crunchy biscuit base, became an instant legend in our home. It’s the perfect treat when you want something fancy without the fuss of baking.
From Classic Cheesecake to a No-Bake Marvel
Cheesecake has been a star for centuries, from ancient Greek feasts to New York delis. The classic baked version is wonderful, but I adore the magic of no-bake cheesecakes. They’re forgiving, quick, and perfect for warm weather. This recipe takes that modern no-bake method and layers it with two of the world’s most beloved sweet spreads: Nutella and dulce de leche. It’s a fusion of Italian hazelnut chocolate and creamy Argentine caramel that feels both familiar and wonderfully new.
Why You’ll Love This No-Bake Cheesecake Recipe
You will love this recipe for three big reasons. First, it’s incredibly easy. No oven, no worrying about cracks or over-baking. Second, the flavors are a party. The rich hazelnut chocolate and sweet, milky caramel dance together in every bite. Third, it’s a showstopper. That beautiful marbled top looks like it came from a fancy bakery, but you made it at home. It’s the kind of dessert that makes people pause and say, “Wow, you made this?”
Perfect Occasions for Your Dulce de Leche & Nutella Cheesecake
This cheesecake shines at almost any gathering. It’s my go-to for birthday parties (kids and adults adore it), potluck dinners, and holiday celebrations like Thanksgiving or Christmas. I’ve even served it at casual weekend barbecues because it’s so refreshing. If you have a friend who needs cheering up, bringing them this Nutella and dulce de leche cheesecake is a surefire way to brighten their day.
Ingredients for Your No-Bake Dulce de Leche Cheesecake
Gather these simple ingredients for about 10 delicious slices.
For the Crust:
- 130g digestive biscuits or Graham crackers
- 50g unsalted butter, melted
For the Cheesecake Filling:
- 450g cream cheese, at room temperature
- 130g powdered sugar, sifted
- 1 tsp vanilla extract
- 1/4 cup (60ml) cold heavy cream, 35% fat
- 5g unflavored gelatin powder (enough to set ~420ml liquid)
- 1 tablespoon water
For the Flavorings:
- 1/2 cup (150g) Nutella
- 1/2 cup (150g) dulce de leche
Handy Substitution Options
Don’t fret if you’re missing something! Here are easy swaps:
- For the biscuits: Use any plain sweet cookie like shortbread or even Oreos (without the filling) for a chocolate crust.
- For the gelatin: Agar-agar powder (use the same amount) works for a vegetarian version. Always check the package instructions for setting power.
- For the heavy cream: Full-fat coconut cream can be used for a dairy-free twist, though the flavor will change slightly.
- For the dulce de leche: Caramel sauce or even a thick salted caramel spread is a great alternative.
How to Make the Ultimate No-Bake Cheesecake
Step 1: Make the Crust
Start by turning your biscuits into fine crumbs. I use my food processor, but a plastic bag and a rolling pin works just as well—my kids love helping with this part! The sound of the crackers crumbling is so satisfying. Mix the crumbs with the melted butter until it looks like wet sand. The smell of buttery biscuits is divine. Press this mixture firmly into the bottom of an 18cm springform pan. A flat-bottomed glass helps to get it even and tight. Pop it in the fridge to set. This cold, crisp base will hold all our creamy goodness later.
Step 2: Make the Cheesecake Filling
In a large bowl, beat the room-temperature cream cheese until it’s smooth and airy. There should be no lumps. Add the sifted powdered sugar and vanilla. Keep beating until it’s perfectly combined—the mixture will become pale and fluffy. Now, pour in the cold heavy cream. Beat just until it thickens slightly. Be careful not to over-whisk, as heavy cream can separate if worked too hard. Pro tip: Everything should be cold or room temperature, never warm, to help the filling set properly.
Step 3: Prepare and Add the Gelatin
In a small bowl, sprinkle the gelatin powder over the tablespoon of water. Let it sit for about 5 minutes to hydrate. It will become a spongy, solid blob. Then, heat it gently in the microwave in 15-second bursts until it becomes a clear liquid, stirring between each burst. This liquid is our setting agent. To incorporate it smoothly, take 2-3 spoonfuls of the cheesecake mixture and stir them one by one into the dissolved gelatin. This tempers it and prevents lumps. Then, fold this gelatin mixture back into the main cheesecake bowl. Mix well until everything is uniform.
Step 4: Add the Nutella and Dulce de Leche
Divide the cheesecake filling into three separate bowls. This is where the magic happens! In one bowl, add the Nutella. In the second bowl, add the dulce de leche. Leave the third bowl plain. Stir each one vigorously until the colors are uniform—a deep chocolate brown, a lovely caramel tan, and pristine white. Chef’s tip: If your Nutella and dulce de leche are very thick, warm them for 10 seconds in the microwave. This makes them much easier to blend into the creamy filling without overworking it.
Step 5: Assemble and Swirl
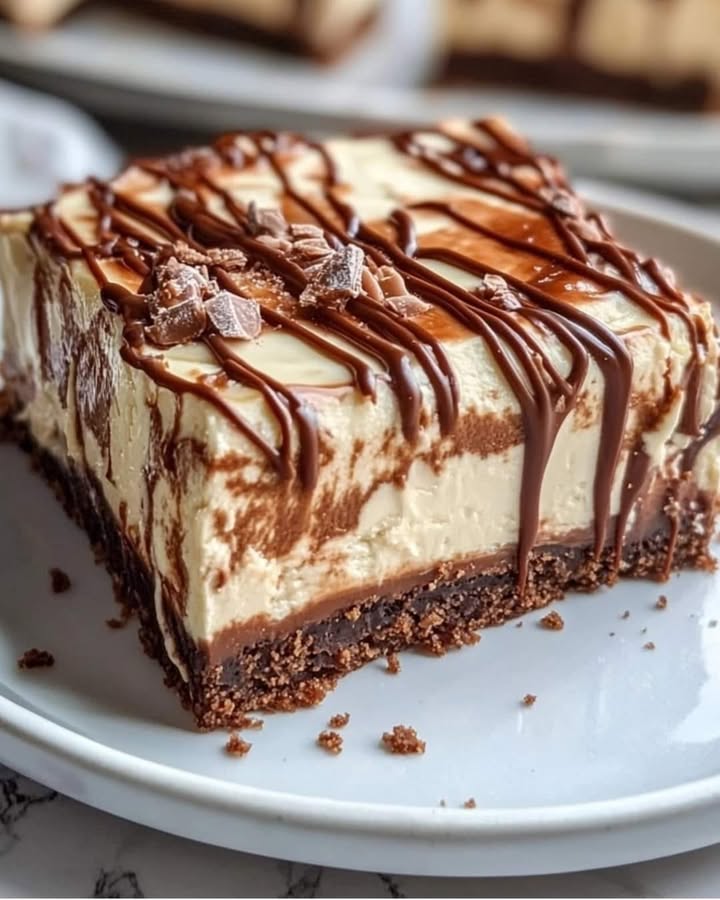
Bring your crust out of the fridge. Now, spoon the three different fillings randomly over the base. Alternate between dollops of plain, Nutella, and dulce de leche mixtures. Don’t try to make it neat! The random pattern is key. Then, take a toothpick or a skewer and gently drag it through the dollops in swirls and loops. You’ll see the beautiful marble effect appear instantly. It’s like painting with dessert! Once swirled, carefully place the whole pan in the refrigerator.
Step 6: Chill and Serve
Your no-bake cheesecake needs time to become firm. Let it chill for at least 8 hours, or overnight is best. This long rest allows the gelatin to work its magic, transforming the creamy mixture into a sliceable, dreamy dessert. The next day, run a knife around the edge, release the springform clasp, and marvel at your creation. Slice with a clean, warm knife for perfect pieces. Each slice will show that gorgeous marbled pattern.
Timing Breakdown
Here’s what to expect for your time investment:
- Prep Time: 25 minutes
- Chilling Time: 8 hours (minimum)
- Total Time: 8 hours 25 minutes
Most of the “work” is just waiting, which makes this recipe perfect for planning ahead.
Extra Info: The Sweet Story of Dulce de Leche
Dulce de leche, which means “sweet of milk,” has a lovely origin story. It’s said to have been discovered accidentally in Argentina when a maid left milk and sugar cooking on the stove for too long. The result was this rich, caramelized spread that became a national treasure. Combining it with Nutella, an Italian invention, in a no-bake cheesecake is a delicious celebration of global sweets!
Necessary Equipment
You don’t need fancy tools:
- 18cm (7-inch) springform pan
- Food processor or plastic bag + rolling pin
- Mixer (hand or stand)
- Measuring cups and spoons
- Small bowls for dividing filling
- Toothpick or skewer for swirling
Storage Tips for Your No-Bake Nutella Cheesecake
This cheesecake must stay cold. Always keep it covered in the refrigerator. I use the springform pan lid or simply cover the top with plastic wrap.
It will stay fresh and delicious for up to 4 days. The flavors actually meld and become even richer after a day or two.
Do not freeze this cheesecake. The gelatin-set texture doesn’t handle freezing well and can become grainy when thawed.
Tips and Advice for Success
- Room Temperature is Key: Ensure your cream cheese is truly at room temperature. Cold cream cheese will lump and won’t blend smoothly.
- Sift Your Sugar: Powdered sugar often has little lumps. Sifting it ensures your filling is perfectly smooth.
- Don’t Rush the Chill: That 8-hour chill is not just for firmness. It lets the flavors fully develop. Patience pays off!
Presentation Ideas
Make your dessert table sparkle:
- Serve each slice on a white plate with a tiny dollop of extra dulce de leche on the side.
- Garnish with a few toasted hazelnuts or a light sprinkle of sea salt for a fancy touch.
- For a party, make individual mini cheesecakes in small jars or ramekins using the same method.
Healthier & Fun Alternative Recipes
Love cheesecake but want to try different flavors? Here are six wonderful twists you can explore:
- Fruit Swirl Cheesecake: Replace Nutella and dulce de leche with fruit purees like raspberry or mango. It’s fresh and tangy.
- Lighter Yogurt Base: Use half cream cheese and half full-fat Greek yogurt for a slightly tangier, lighter filling.
- Crust Alternatives: Try a crust made from nuts (like almonds) and dates for a grain-free option.
- Citrus Zest: Add lemon or orange zest to the plain cheesecake portion for a bright, refreshing flavor.
- Coffee Infusion: Mix a tablespoon of instant espresso powder into one portion of the filling for a mocha twist.
- Peanut Butter Swap: Use smooth peanut butter instead of Nutella for a different nutty, classic flavor.
More Amazing Desserts to Try
If you loved this no-bake creation, you might also enjoy other cheesecake styles. For a summer treat, try these Peach Cream Cheesecake Bars with their buttery crust. If you’re catering for vegan friends, this Vegan Chocolate Cake with Chocolate-Orange Frosting is a real crowd-pleaser. When fruits are in season, a stunning Layered Summer Fruit Salad is the perfect fresh side. And for a spectacular baked dessert, a Red Velvet Cheesecake combines two classics in one beautiful cake. You can find even more inspiration in our full collection of cheesecake recipes.
Common Mistakes to Avoid
Mistake 1: Using Cold Cream Cheese
This is the most common error. Cold cream cheese is hard to blend. It leads to a lumpy filling that won’t become smooth and airy. Always take your cream cheese out of the fridge at least an hour before you start. Let it soften on the counter. If you forget, you can cut it into small pieces and microwave it very briefly (5-10 seconds) to soften it slightly, but be careful not to melt it.
Mistake 2: Over-Whipping the Heavy Cream
When you add the cold heavy cream, you only need to whip until it just thickens and incorporates. If you whip it like you’re making whipped cream, it can separate and make your cheesecake filling greasy or grainy. The goal is to lightly thicken the mixture, not to form peaks. A quick, gentle whisking is enough.
Mistake 3: Not Tempering the Gelatin
Adding the dissolved gelatin directly to the main bowl can cause it to set into strings or lumps as it hits the cooler mixture. Always temper it first. Mixing a few spoonfuls of the cheesecake filling into the warm gelatin liquid (step 3) warms the gelatin slightly and allows it to blend in seamlessly. This ensures a smooth, uniformly set cheesecake.
Mistake 4: Skipping the Long Chill
A no-bake cheesecake needs time to set. Chill for at least 8 hours. Trying to serve it after only 3 or 4 hours will result in a soft, almost runny slice. The gelatin needs that full time to do its job. Plan ahead and make it the day before you need it. It’s actually better the next day!
Mistake 5: Swirling Too Aggressively
When creating the marble effect, use a gentle hand. If you mix the three batters too much, they will blend into one homogenous color and you’ll lose the beautiful swirls. Just a few lazy loops and drags with a toothpick are enough. Think of it as making a simple pattern, not mixing them together.
Frequently Asked Questions
Can I make this cheesecake without gelatin?
Yes, you can, but the texture will be different. Gelatin gives a firm, sliceable set. For a vegetarian option, you can use agar-agar powder, following the equivalent setting instructions on its package. Without any setting agent, the cheesecake will be very soft and more like a mousse. It would need to be served in cups rather than sliced. If you choose to omit it, be prepared for a softer dessert and keep it very cold.
My Nutella is too thick to mix in easily. What can I do?
This is very common, especially with cold Nutella. Simply spoon the Nutella into a small bowl and microwave it for just 10-15 seconds. This will warm it slightly and make it much more fluid and easier to blend into the cheesecake filling without overworking the mixture. Do the same for thick dulce de leche. Be careful not to overheat it.
What can I use instead of dulce de leche?
If you can’t find dulce de leche, a good store-bought caramel sauce or a thick salted caramel spread works wonderfully. You could also make a quick caramel by simmering canned condensed milk (check trusted sources for safe food handling tips regarding cooking temperatures). The goal is a sweet, milky caramel flavor that pairs with the chocolate.
How do I know if my cheesecake is set properly?
The best test is the finger test. After the full chilling time, gently press the center of the cheesecake with a clean finger. It should feel firm and should not stick to your finger. If it feels soft or jiggles like jelly, it needs more time in the fridge. Also, the edges will look slightly more set than the center when it’s ready.
Can I use a different size pan?
You can, but it will affect the thickness and serving size. An 18cm (7-inch) springform pan is ideal. If you use a larger pan (like 9-inch), the cheesecake will be thinner and you might need to adjust chilling time slightly. For a smaller pan, it will be taller and might need a bit more time to set through. Just ensure your pan has a removable bottom for easy serving.
Why does my crust seem crumbly and not holding together?
This usually means you didn’t use enough butter, or you didn’t press the crust mixture firmly enough into the pan. The butter binds the crumbs. Make sure your crumbs are like wet sand before pressing. Use the bottom of a glass or a measuring cup to press very firmly and evenly. A well-compacted crust won’t crumble when sliced.
Can I add toppings to this cheesecake?
Absolutely! Toppings add fun. Just add them after chilling, right before serving. A drizzle of extra Nutella or dulce de leche, some chopped hazelnuts, chocolate shavings, or even a sprinkle of sea salt are all great ideas. Fresh berries like raspberries also add a nice fresh contrast to the rich flavors.
Is it okay to use low-fat cream cheese?
I don’t recommend it for this recipe. Full-fat cream cheese gives the rich, creamy texture and stability that a no-bake cheesecake needs. Low-fat versions often have more water and additives, which can lead to a softer, less stable filling that might not set as well. For the best taste and texture, stick with regular cream cheese.
How long can I store leftovers?
Store any leftover cheesecake covered in the refrigerator. It will keep well for up to 4 days. The flavors remain great, though the crust may soften slightly after a couple of days near the moist filling. It’s best enjoyed within 2-3 days for the perfect texture.
Can I make this for a large crowd?
Yes, you can easily double the recipe. Use two identical springform pans, or one very large pan (like a 9×13 inch dish). If using a large rectangular dish, note that you won’t be able to remove the whole cheesecake like from a springform pan. You’ll serve it directly from the dish. Double all ingredients and ensure you have enough gelatin for the increased liquid volume.
Ready to Make Your Dream Dessert?
This no-bake Nutella and dulce de leche cheesecake is more than just a recipe. It’s a guaranteed way to create something spectacular with simple steps. The joy of swirling those three beautiful fillings and the pride when you unveil the chilled, marbled masterpiece is pure kitchen magic. It’s a dessert that feels fancy but is friendly enough for any home cook. So grab your springform pan, warm up that Nutella, and get ready for the compliments. Your friends and family will be asking for this recipe, and you can smile knowing how easy it truly was. Happy no-baking!
Equipment
- Mélangeur
- Bol
- Spatule
- Moule à gâteau à charnière
- Processus alimentaire
Ingredients
- 130 g biscuits digestifs ou crackers Graham
- 50 g beurre non salé, fondu
- 450 g fromage à la crème, à température ambiante
- 130 g sucre en poudre, tamisé
- 1 cuil. extrait de vanille
- 60 ml crème épaisse froide, 35% de matière grasse
- 5 g gelée sans saveur en poudre suffisant pour gélifier ~420ml de liquide
- 1 cuil. eau
- 150 g Nutella
- 150 g dulce de leche
Instructions
- Transformez les biscuits en crumbs fins à l'aide d'un robot culinaire ou d'un sac plastique et d'un rouleau à pâtisserie.
- Mélangez les crumbs avec le beurre fondu jusqu'à ce que ça ressemble à du sable humide.
- Pressez le mélange au fond d'un moule à charnière de 18cm et réfrigérez pour faire prendre.
- Dans un grand bol, battez le fromage à la crème à température ambiante jusqu'à obtenir une texture lisse et aérienne, puis ajoutez le sucre en poudre tamisé et la vanille.
- Battez jusqu'à ce que ce soit bien mélangé, puis versez la crème épaisse froide et battez jusqu'à ce qu'elle épaississe légèrement.
- Dans un petit bol, saupoudrez la gélatine sur l'eau et laissez reposer pendant environ 5 minutes.
- Chauffez la gélatine au micro-ondes jusqu'à ce qu'elle devienne un liquide clair.
- Mélangez 2-3 cuillerées de la préparation du cheesecake dans la gélatine dissoute pour l'épaissir.
- Incorporez le mélange de gélatine dans le bol principal du cheesecake et mélangez bien.
- Divisez la préparation du cheesecake en trois bols, en ajoutant le Nutella dans un, le dulce de leche dans un autre, et en laissant le troisième bol nature.
- Mélangez chaque bol jusqu'à ce que les couleurs soient uniformes.
- Déposez des cuillerées de chaque préparation au hasard sur la croûte.
- Utilisez un cure-dent ou une pique à brochette pour faire des tourbillons entre les préparations.
- Placez le moule au réfrigérateur et laissez refroidir pendant au moins 8 heures ou toute la nuit.
- Une fois pris, libérez le fermoir du moule, découpez et servez.
Notes
Nutrition

Hi, I’m Olivia Parker, the founder of BakingSecret.com and a lifelong lover of all things sweet and homemade. I grew up in a small town in Oregon, where the smell of fresh cookies in my family’s kitchen sparked my passion for baking. Over the years, I turned that passion into a mission: to help home bakers feel confident, inspired, and creative.
After studying food science and working in several artisan bakeries across the U.S., I decided to create a space where everyone from beginners to seasoned bakers can find reliable recipes, expert tips, and a warm, welcoming community. BakingSecret.com is my way of sharing the magic of baking with the world. When I’m not testing new recipes, you’ll find me exploring farmers’ markets, collecting vintage cookbooks, or perfecting my sourdough technique.