
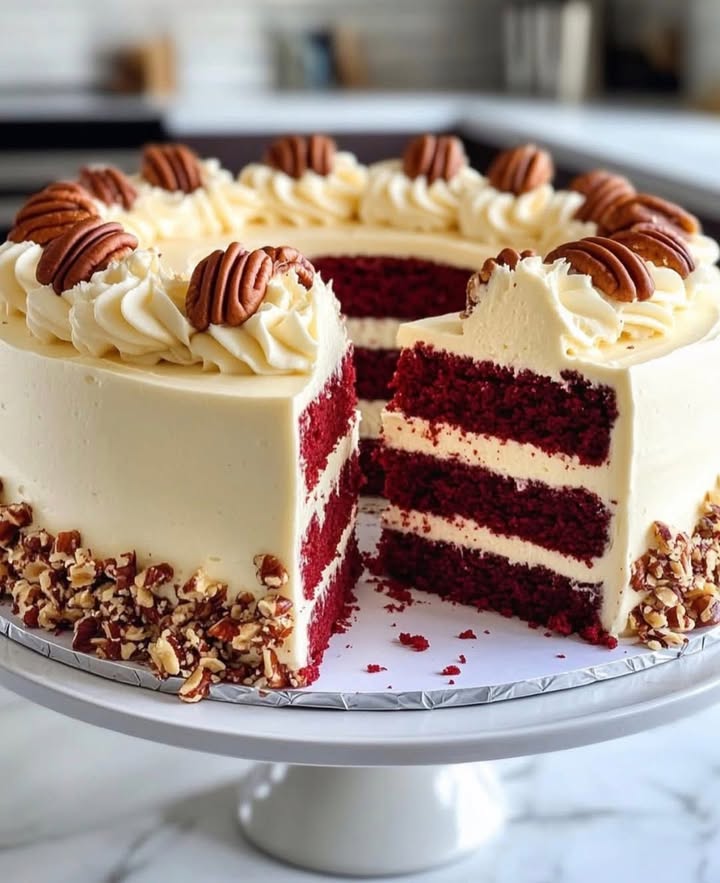
Why This Nutty Velvet Cheesecake is a Game-Changer
I remember the first time I made this **Nutty Velvet Cheesecake**. It was for my best friend’s birthday, and I wanted something that would wow everyone without breaking a sweat. Let me tell you, when I pulled it out of the fridge and saw those layers of crimson red velvet cake and creamy cheesecake topped with toasted nuts, I knew I had hit the jackpot. The dessert disappeared within minutes, leaving behind only crumbs and happy faces. This recipe is special because it combines two crowd-pleasers—red velvet cake and cheesecake—into one decadent treat. Trust me, once you try it, you’ll want to make it again and again.
The Story Behind the Layers
This **Nutty Velvet Cheesecake** has roots in both Southern baking traditions and modern dessert trends. Red velvet cake itself dates back to the early 1900s, gaining fame for its striking color and velvety texture. Meanwhile, cheesecake has been around since ancient Greece, evolving into the creamy delight we know today. Combining these two classics feels like giving them a warm hug. When I baked this for the first time, I couldn’t help but think about how versatile it is—it’s perfect for celebrations but also cozy enough for a weekend family dessert.
Why You’ll Love This Recipe
This **Nutty Velvet Cheesecake** is a flavor bomb. The rich cocoa notes from the red velvet layer blend beautifully with the tangy cream cheese filling. Add the crunch of toasted nuts, and you’ve got a symphony of textures and tastes. Plus, it’s surprisingly simple to make! Even if you’re not a pro baker, this recipe walks you through every step so you can nail it on your first try. And let’s not forget how impressive it looks on the table—a guaranteed showstopper!
Perfect Occasions to Whip Up This Dessert
Need a dessert for Thanksgiving, Christmas, or Valentine’s Day? This **Nutty Velvet Cheesecake** fits the bill perfectly. Its festive colors make it ideal for holidays, while its indulgent flavors are just right for birthdays and anniversaries. I’ve even served it at casual dinner parties, where guests raved about how “fancy” it felt. Whether it’s a celebration or just a random Tuesday, this cheesecake adds a touch of magic to any occasion.
Ingredients for Your Nutty Velvet Cheesecake
- Red Velvet Cake Layers:
- 125 g of flour
- 200 g of granulated sugar
- 1 teaspoon of sodium bicarbonate
- 1 teaspoon of cocoa powder
- ½ teaspoon of salt
- 240 ml of milk serum
- 120 ml of vegetable oil
- 2 large eggs
- 1 teaspoon of vanilla extract
- 1 teaspoon of white vinegar
- 1 tablespoon of red dye
- Cheesecake Layer with Nuts:
- 450 g of cream cheese
- 100 g of granulated sugar
- 100 g of brown sugar
- 2 large eggs
- 1 teaspoon of vanilla extract
- 150 g of chopped nuts, toasted
- 120 g of melted butter
- Cream Cheese Glaze:
- 225 g of cream cheese
- 115 g of unsalted butter
- 500 g of powdered sugar
- 2 teaspoons of vanilla extract
- Decoration:
- 75 g of chopped nuts, toasted
- Velvet red pastel mumbas (optional)
Substitution Options
If you’re looking to tweak this recipe, here are some swaps:
- For the red velvet layer, use beetroot powder instead of red dye for a natural alternative.
- Swap walnuts or almonds for pecans if you prefer different nut flavors.
- Use Greek yogurt instead of milk serum for added tanginess.
- If dairy-free, opt for plant-based cream cheese and butter.
These tweaks keep the essence of the **Nutty Velvet Cheesecake** intact while catering to dietary preferences.
Step 1: Preparing the Red Velvet Cake Layers
Start by preheating your oven to 350°F (175°C). In a mixing bowl, whisk together the flour, sugar, cocoa powder, baking soda, and salt. This dry mix smells faintly chocolatey and sets the stage for the vibrant red hue. In another bowl, combine the milk serum, vegetable oil, eggs, vanilla extract, vinegar, and red dye. The red dye transforms the batter into a bold, eye-catching shade—almost too pretty to bake! Gently fold the wet ingredients into the dry ones until smooth. Pour the batter into a lined cake pan and bake for 25–30 minutes. Pro tip: Insert a toothpick to check doneness; it should come out clean. Let the layers cool completely before assembling.
Step 2: Making the Cheesecake Layer
While the cake cools, whip up the cheesecake layer. Beat the cream cheese, granulated sugar, and brown sugar until fluffy and light. Crack in the eggs one at a time, blending well after each addition. Stir in the vanilla extract and melted butter, which gives the mixture a glossy finish. Fold in the toasted nuts—they add a satisfying crunch that contrasts beautifully with the creamy texture. Spread this mixture evenly over the cooled red velvet layer. Chef’s tip: Toasting the nuts beforehand enhances their flavor and aroma.
Step 3: Assembling and Chilling
Once assembled, pop the cheesecake into the fridge for at least 4 hours—or overnight if you have the patience. Chilling firms up the layers and allows the flavors to meld together. While waiting, prepare the cream cheese glaze by beating cream cheese, butter, powdered sugar, and vanilla extract until silky smooth. Drizzle this glaze generously over the chilled cheesecake. Finally, sprinkle toasted nuts and optional velvet red pastel mumbas for decoration. Admire your handiwork—it’s almost too pretty to eat!
Timing Breakdown
- Prep Time: 30 minutes
- Cooking Time: 30 minutes
- Chilling Time: 4–8 hours
- Total Time: Approximately 6–9 hours
Chef’s Secret
Here’s a little secret: To prevent cracks in your cheesecake layer, avoid overmixing the batter. Overmixing incorporates too much air, causing the cheesecake to puff up and then sink as it cools. A gentle hand ensures a silky-smooth result every time.
A Sweet Anecdote About Nuts
Did you know that pistachios were once considered a luxury item in ancient Persia? They were reserved for royalty and used as currency. Today, they’re a popular choice for desserts like this **Nutty Velvet Cheesecake**, adding a regal touch to your kitchen creations. Funny enough, I accidentally bought salted pistachios once, thinking they’d work fine. Let’s just say my cheesecake had an unexpected savory twist!
Necessary Equipment
- Mixing bowls
- Electric mixer or whisk
- Cake pans
- Spatula
- Parchment paper
- Refrigerator space for chilling
Storage Tips
To store your **Nutty Velvet Cheesecake**, cover it tightly with plastic wrap or transfer it to an airtight container. Keep it refrigerated to maintain freshness. It stays good for up to 5 days, though I doubt it’ll last that long!
If freezing, wrap individual slices in plastic wrap and place them in a freezer-safe bag. Thaw overnight in the fridge before serving. Frozen slices are perfect for impromptu cravings.
Always serve cold for the best texture. Warm cheesecake might taste great, but it won’t hold its shape as beautifully.
Tips and Advice
- Use room-temperature ingredients for smoother batters.
- Don’t skip toasting the nuts—it makes all the difference.
- Double-check measurements, especially for the red dye, to achieve that signature hue.
Presentation Ideas
- Serve on a decorative plate with fresh berries.
- Add edible flowers for a rustic yet elegant look.
- Drizzle extra glaze artfully around the edges.
Healthier Alternatives
Looking for lighter versions? Try these ideas:
- Low-Sugar Option: Replace granulated sugar with monk fruit sweetener.
- Dairy-Free Version: Use coconut cream instead of cream cheese.
- Gluten-Free Twist: Swap regular flour with almond flour.
- Vegan Delight: Substitute eggs with flaxseed gel.
- Lactose-Free: Opt for lactose-free cream cheese and butter.
- Keto-Friendly: Replace sugars with erythritol and use almond flour.
Mistake 1: Overbaking the Red Velvet Layer
Overbaking leads to dry, crumbly cake layers. To avoid this, set a timer and stick to the recommended baking time. Check for doneness by inserting a toothpick—it should come out clean but slightly moist. Pro tip: Rotate the pan halfway through baking for even cooking.
Mistake 2: Skipping the Chill Time
Rushing the chilling process ruins the cheesecake’s texture. Give it ample time to set properly. Patience pays off here—trust me, the wait is worth it.
Mistake 3: Using Stale Nuts
Stale nuts lack flavor and crunch. Always toast them fresh before adding to the recipe. Toss them in a skillet over medium heat until fragrant.
Mistake 4: Overmixing the Batter
Overmixing creates dense layers. Mix just until combined to keep the texture light and airy. Less is more when it comes to folding ingredients.
Frequently Asked Questions
Can I make this ahead of time?
Absolutely! This **Nutty Velvet Cheesecake** actually benefits from being made a day in advance. The flavors deepen, making it even tastier. Just keep it chilled until ready to serve.
What type of nuts work best?
Pecans, walnuts, and almonds are excellent choices. Choose based on personal preference or what you have on hand. Toasting enhances their natural flavors.
How do I get the red color right?
Use high-quality red food dye or beetroot powder for a natural alternative. Measure carefully to achieve the desired vibrancy without overpowering the other flavors.
Can I freeze leftovers?
Yes, slice and freeze individual portions for up to 3 months. Thaw in the fridge overnight before enjoying.
Is this suitable for vegans?
With a few substitutions, yes! Use plant-based cream cheese, butter, and egg replacers for a vegan version.
Why does my cheesecake crack?
Cracks often occur due to overmixing or uneven cooling. Avoid both issues by handling the batter gently and letting the cheesecake cool gradually in the fridge.
Can I omit the nuts?
Of course! Simply leave them out or replace them with seeds like pumpkin or sunflower for a similar crunch.
How do I know when it’s fully set?
The cheesecake layer should feel firm to the touch and no longer jiggle when moved. If unsure, chill longer—it’s better to err on the side of caution.
What if I don’t have milk serum?
No problem! Substitute with buttermilk or thinned Greek yogurt mixed with water for a similar tangy effect.
Can I use a springform pan?
Definitely. A springform pan makes removing the cheesecake easier and ensures neat slices for serving.
Final Thoughts
This **Nutty Velvet Cheesecake** truly shines as a dessert that combines elegance, flavor, and fun. Whether you’re baking for loved ones or treating yourself, it’s sure to impress. So grab your apron, gather your ingredients, and let’s create something delicious together. Happy baking!
Equipment
- Mixing bowls
- Electric mixer or whisk
- Spatula
- Cake pans
- Parchment paper
- Refrigerator space for chilling
Ingredients
- 125 g flour
- 200 g granulated sugar
- 1 teaspoon sodium bicarbonate
- 1 teaspoon cocoa powder
- ½ teaspoon salt
- 240 ml milk serum
- 120 ml vegetable oil
- 2 large eggs
- 1 teaspoon vanilla extract
- 1 teaspoon white vinegar
- 1 tablespoon red dye
- 450 g cream cheese
- 100 g granulated sugar
- 100 g brown sugar
- 2 large eggs
- 1 teaspoon vanilla extract
- 150 g chopped nuts, toasted
- 120 g melted butter
- 225 g cream cheese
- 115 g unsalted butter
- 500 g powdered sugar
- 2 teaspoons vanilla extract
Instructions
- Preheat your oven to 350°F (175°C).
- In a mixing bowl, whisk together the flour, sugar, cocoa powder, baking soda, and salt.
- In another bowl, combine the milk serum, vegetable oil, eggs, vanilla extract, vinegar, and red dye.
- Gently fold the wet ingredients into the dry ingredients until smooth.
- Pour the batter into a lined cake pan and bake for 25-30 minutes.
- Let the layers cool completely before assembling.
- While the cake cools, whip up the cheesecake layer by beating cream cheese, granulated sugar, and brown sugar until fluffy and light.
- Add eggs one at a time, blending well after each addition.
- Stir in the vanilla extract and melted butter.
- Fold in the toasted nuts and spread the mixture evenly over the cooled red velvet layer.
- Chill the cheesecake in the fridge for at least 4 hours or overnight.
- Prepare the cream cheese glaze by beating cream cheese, butter, powdered sugar, and vanilla extract until smooth.
- Drizzle the glaze over the chilled cheesecake.
- Sprinkle with toasted nuts and optional velvet red pastel mumbas.