
Why This Oreo Creamy Delight is a Must-Try
Picture this: a hot summer afternoon, the kids running around, and me craving something sweet but not too heavy. That’s when I stumbled upon this magical no-bake Oreo Creamy Delight. It’s creamy, crunchy, and oh-so-addictive. The best part? No oven needed! Just mix, chill, and serve. Trust me, once you try this recipe, it’ll become your go-to dessert for every occasion.
A Little Backstory About This Sweet Treat
I first made this cake for a family gathering last spring. Everyone was skeptical at first—how could something so easy taste so good? But after one bite, my nephew declared it “better than store-bought cheesecake.” Since then, it’s been a hit at potlucks, birthday parties, and even lazy Sunday afternoons. The combination of crunchy Marias cookies, creamy filling, and chopped Oreos is simply irresistible.
Why You’ll Love This Recipe
This Oreo Creamy Delight is perfect for anyone who loves desserts that are rich but not overly complicated. The texture is dreamy—soft and velvety with just the right amount of crunch from the cookie base and Oreos. Plus, it’s quick to make and requires minimal effort. Whether you’re a seasoned baker or a kitchen newbie, this recipe will make you look like a pro!
Perfect Occasions to Whip Up This Dessert
From casual get-togethers to festive celebrations, this cake fits everywhere. Serve it at:
- Birthday parties: Kids and adults alike will rave about it.
- Potlucks: It travels well and always gets compliments.
- Summer barbecues: A refreshing cold dessert on a hot day? Yes, please!
- Holiday feasts: Add a modern twist to your dessert table.
Ingredients
Here’s what you’ll need to create this masterpiece:
- 1 package of Marias cookies
- 100 g of unsalted butter, melted
- 190 g of cream cheese
- 1 cup of whole milk
- 1 can of condensed milk
- 1 tablespoon of vanilla essence
- 10 g of grenetina (gelatin)
- 6 tablespoons of water
- 14 chopped Oreo cookies
Substitution Options
Don’t have all the ingredients? No worries! Here are some swaps:
- Marias cookies: Substitute with graham crackers or digestive biscuits.
- Cream cheese: Use mascarpone for a richer flavor.
- Grenetina: Replace with unflavored gelatin if needed.
- Whole milk: Any milk works—almond, oat, or skimmed.
Step 1: Crispy Base
Start by crushing the Marias cookies into fine crumbs. Mix them with melted butter until they resemble wet sand. Press this mixture firmly into your mold to form the base. Pop it in the fridge for 30 minutes to set. Pro tip: Use the back of a spoon or a glass to press evenly—it makes the base sturdy and professional-looking.
Step 2: Irresistible Cream
In a blender, combine cream cheese, whole milk, condensed milk, and vanilla essence. Blend until smooth and silky. Meanwhile, hydrate the grenetina with water and microwave for 10 seconds to dissolve. Add this to the creamy mixture and blend again for another minute. The result? A luscious, velvety filling that smells heavenly.
Step 3: Oreo Touch!
Now comes the fun part—adding those chopped Oreos! Gently fold them into the creamy mixture using a spatula. Be careful not to overmix; you want chunks of Oreo for that satisfying crunch. This step transforms the cake into a true Oreo Creamy Delight.
Step 4: Monta and Cool
Pour the Oreo-filled mixture onto the chilled cookie base. Smooth the top with a spatula for an even finish. Refrigerate for at least 2 hours—or overnight if you can wait that long. The longer it chills, the firmer and tastier it becomes.
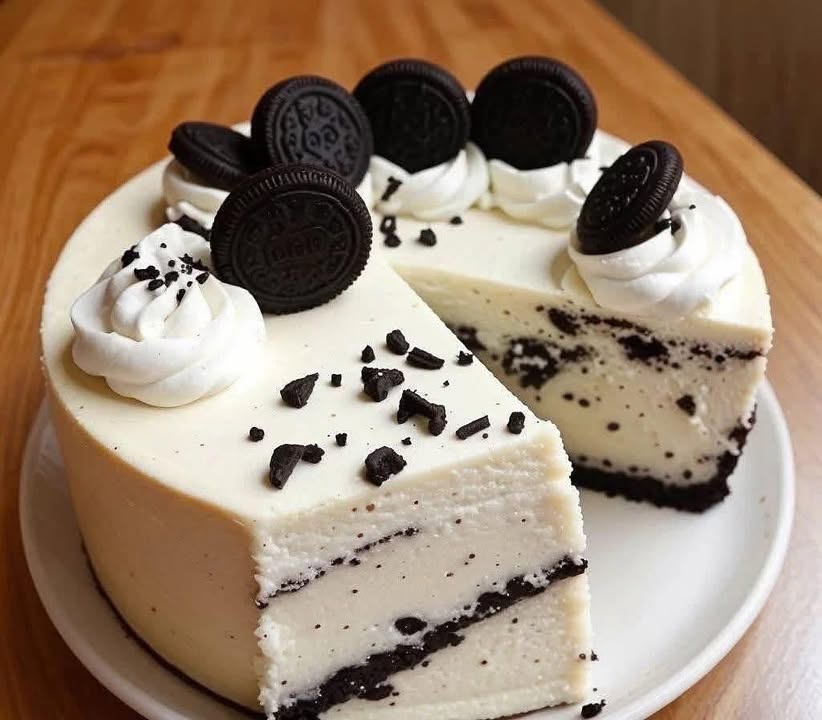
Step 5: Decora & Serves
Before serving, sprinkle extra chopped Oreos on top for a decorative touch. Slice carefully with a warm knife for clean edges. Each bite offers layers of creamy goodness, crunchy cookies, and chocolatey bliss. Serve chilled and watch everyone dig in happily!
Chef’s Tip
To enhance the flavor, let the cake sit at room temperature for 5-10 minutes before slicing. This softens the texture slightly and intensifies the taste.
Timing
Prep time: 20 minutes
Chilling time: 2 hours
Total time: 2 hours 20 minutes
Extra Info
Did you know grenetina (gelatin) has been used in desserts since the 19th century? It gives structure without altering the flavor, making it a baker’s secret weapon.
Necessary Equipment
You’ll need:
- Blender or food processor
- Mixing bowls
- Spatula
- 8×8-inch baking pan or round mold
- Refrigerator space
Storage Tips
This cake stores beautifully in the fridge. Cover it tightly with plastic wrap or transfer slices to an airtight container. It stays fresh for up to 3 days, though I doubt it’ll last that long!
If you live in a warm climate, keep it chilled until serving time. Avoid leaving it out for more than 2 hours to prevent melting.
For longer storage, freeze individual portions wrapped in parchment paper. Thaw in the fridge before enjoying.
Tips and Advice
Use high-quality ingredients—they make a difference. Fresh cream cheese and real vanilla essence elevate the flavors. Also, chop the Oreos coarsely for a chunkier texture.
Presentation Ideas
Get creative! Top with whipped cream, drizzle chocolate sauce, or garnish with mint leaves. Serving on colorful plates adds a festive touch.
Healthier Alternative Recipes
Looking for lighter options? Try these variations:
- Low-sugar version: Use sugar-free condensed milk and low-fat cream cheese.
- Vegan delight: Swap dairy products with plant-based alternatives like coconut cream and almond milk.
- Gluten-free base: Replace Marias cookies with gluten-free biscuits.
- Fruit fusion: Add strawberries or raspberries to the cream layer.
- Protein-packed: Mix protein powder into the cream mixture.
- Mini cakes: Make individual servings using muffin tins.
Mistake 1: Skipping the Chilling Time
Rushing the chilling process ruins the cake’s texture. Patience is key here—allow enough time for the layers to firm up properly. Pro tip: Set a timer as a reminder.
Mistake 2: Overmixing the Oreos
Overmixing breaks down the Oreos too much, losing their signature crunch. Fold gently to maintain texture.
Mistake 3: Using Salted Butter
Salted butter can overpower the sweetness. Always opt for unsalted butter for balanced flavors.
FAQ
Can I use regular gelatin instead of grenetina?
Yes, unflavored gelatin works perfectly as a substitute for grenetina. Follow the same instructions for hydration and dissolving.
How do I prevent the base from sticking?
Line your mold with parchment paper before pressing in the cookie mixture. This ensures easy removal later.
What if I don’t have a blender?
No problem! Use a hand mixer or whisk to combine the cream ingredients manually. It takes a bit more effort but yields similar results.
Can I freeze this cake?
Absolutely! Wrap slices individually and freeze for up to a month. Thaw in the fridge before serving.
Is this recipe kid-friendly?
Definitely! Kids love helping crush cookies and decorate the top. Plus, it’s a crowd-pleaser at parties.
How can I make it less sweet?
Reduce the amount of condensed milk or choose dark chocolate Oreos for a bittersweet twist.
What size pan should I use?
An 8×8-inch square pan or a 9-inch round mold works best for this recipe.
Can I add fruit to the filling?
Yes! Berries pair wonderfully with the creamy filling. Just fold them in gently during Step 3.
Why is my cake too soft?
It may not have chilled long enough. Return it to the fridge for another hour to firm up.
Can I double the recipe?
Of course! Simply double all ingredients and use a larger pan or two molds.
Final Thoughts
This Oreo Creamy Delight is proof that delicious desserts don’t have to be complicated. With its creamy texture, crunchy cookies, and chocolatey goodness, it’s a winner for any occasion. So grab your ingredients, follow the steps, and treat yourself—and your loved ones—to a slice of happiness. Enjoy!
Equipment
- Blender or food processor
- Mixing bowls
- Spatula
- 8x8-inch baking pan or round mold
- Refrigerator
Ingredients
- 1 package Marias cookies
- 100 g unsalted butter, melted
- 190 g cream cheese
- 1 cup whole milk
- 1 can condensed milk
- 1 tablespoon vanilla essence
- 10 g grenetina (gelatin)
- 6 tablespoons water
- 14 chopped Oreo cookies
- q.s. extra chopped Oreos for topping
Instructions
- Crush the Marias cookies into fine crumbs and mix with melted butter until resembling wet sand.
- Press the cookie mixture firmly into your mold to form the base and refrigerate for 30 minutes to set.
- In a blender, combine cream cheese, whole milk, condensed milk, and vanilla essence and blend until smooth.
- Hydrate the grenetina with water, microwave to dissolve, and add it to the creamy mixture; blend again for another minute.
- Gently fold the chopped Oreos into the creamy mixture using a spatula without overmixing.
- Pour the Oreo-filled mixture onto the chilled cookie base and smooth the top with a spatula.
- Refrigerate for at least 2 hours or overnight to firm up.
- Before serving, sprinkle extra chopped Oreos on top, slice carefully, and serve chilled.
Notes
Nutrition

Hi, I’m Olivia Parker, the founder of BakingSecret.com and a lifelong lover of all things sweet and homemade. I grew up in a small town in Oregon, where the smell of fresh cookies in my family’s kitchen sparked my passion for baking. Over the years, I turned that passion into a mission: to help home bakers feel confident, inspired, and creative.
After studying food science and working in several artisan bakeries across the U.S., I decided to create a space where everyone from beginners to seasoned bakers can find reliable recipes, expert tips, and a warm, welcoming community. BakingSecret.com is my way of sharing the magic of baking with the world. When I’m not testing new recipes, you’ll find me exploring farmers’ markets, collecting vintage cookbooks, or perfecting my sourdough technique.