
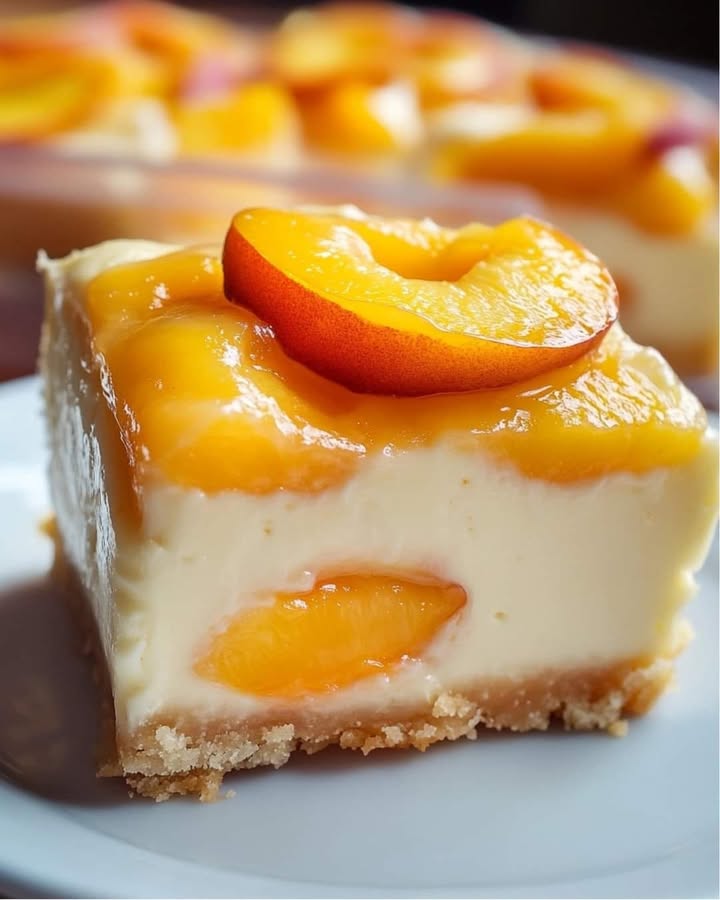
Summer’s Sweetest Secret: Peach Cream Cheesecake Bars
You know that feeling when summer sunshine hits a ripe peach? I wanted to bake that feeling. I dreamt up these Peach Cream Cheesecake Bars on a sweltering afternoon, craving something that tasted like a hug from a summer day. When I pulled them out of the oven, the smell of sweet peaches and buttery crust filled my kitchen. My family descended so fast, the pan was half gone before it even cooled. That’s when I knew this recipe was a true winner.
A Slice of Sunshine: The Story Behind the Bars
Cheesecake bars are the clever, no-fuss cousins of the classic New York-style cheesecake. They ditch the fussy water bath and long chill time. My twist adds a layer of juicy peach pie filling, which bakes right into the creamy cheese layer. It’s a beautiful mix of old-fashioned fruit dessert and creamy indulgence. While a layered chocolate cheesecake is for serious chocolate lovers, these bars are pure, fruity joy. They remind me of county fairs and picnic blankets, but fancy enough for a dinner party.
Why You’ll Fall in Love with This Peach Cheesecake Recipe
First, they are stunningly easy. You make one simple dough that acts as both the crust and the crumbly topping. No separate steps! Second, the flavors. The tangy cream cheese perfectly balances the sweet peaches. That almond glaze on top? It’s the “chef’s kiss” that ties everything together. Finally, they’re portable. You can bring these to a BBQ, potluck, or beach day without a worry. They’re sturdier than a slice of cheesecake but just as impressive.
Perfect Occasions for Peach Cream Cheesecake Bars
These bars are your new go-to for any warm-weather gathering. They’re a star at Fourth of July parties, baby showers, and backyard birthday bashes. I love packing them for picnics in the park. They also make a wonderful “thank you” gift for a neighbor. Basically, any event that calls for smiles and a sweet treat is the right occasion for this dessert.
What You’ll Need: Ingredients for Peach Cheesecake Bars
Gather these simple ingredients for a taste of summer magic.
For the Buttery Bars:
- 1 cup unsalted butter, softened
- 2 cups granulated sugar
- 4 large eggs
- 2 teaspoons vanilla extract
- 3 cups all-purpose flour
- 1 teaspoon salt
- 1 (21 oz) can peach pie filling
For the Cream Cheese Layer:
- 1 (8 oz) block cream cheese, softened
- 1/2 cup granulated sugar
- 1 teaspoon vanilla extract
- 1 egg
For the Almond Glaze:
- 1 cup powdered sugar
- 2 tablespoons milk
- 1 teaspoon almond extract
No-Stress Substitutions
Don’t have exactly these ingredients? No problem! Here are easy swaps:
- Peach Pie Filling: Use apple, cherry, or blueberry pie filling instead.
- Almond Extract: Use all vanilla extract if you prefer.
- Cream Cheese: Use full-fat for the creamiest texture, but reduced-fat works in a pinch.
- To Add Nuts: Sprinkle 1/2 cup of chopped pecans or almonds over the peach layer before adding the final dough dollops.
Creating Your Peach Cream Cheesecake Bars: Step-by-Step
Step 1: Prep Your Pan and Oven
Start by preheating your oven to 350°F (175°C). This gives it time to reach the perfect temperature. While it heats, generously grease a 9×13 inch baking pan. I use butter or a non-stick spray. A well-greased pan means your bars will come out cleanly later, giving you those perfect, sharp edges everyone loves.
Step 2: Make the Magic Dough
In a large mixing bowl, cream together the softened butter and 2 cups of sugar. You want it light and fluffy, which takes about 2-3 minutes with a mixer. Add the 4 eggs and 2 teaspoons of vanilla. Beat until the mixture is smooth and pale yellow. Now, gradually add in the flour and salt. Mix just until the flour disappears. The dough will be thick and cookie-like. This is your base, your topping, and your masterpiece all in one bowl! Pro tip: Don’t overmix once the flour is added, or your bars can become tough.
Step 3: Layer the Base and Create the Creamy Filling
Take just over half of your dough and press it evenly into the bottom of your greased pan. Use your fingers or the bottom of a glass to create a firm, compact layer. Now, in a clean bowl, beat the softened cream cheese, 1/2 cup sugar, 1 teaspoon vanilla, and 1 egg. Beat it until it’s completely smooth with no lumps. Pour this heavenly cream cheese mixture over your dough base and spread it gently into an even layer with a spatula.
Step 4: Add the Peaches and Top It Off
Here comes the summer! Spoon the peach pie filling over the cream cheese layer. Try to distribute the peach slices somewhat evenly. Now, take the remaining dough. It will be sticky. Drop small spoonfuls of it all over the top of the peaches. Don’t worry about covering every single bit—the gaps let the beautiful peach filling peek through as it bakes.
Step 5: Bake to Golden Perfection
Carefully place your pan in the preheated oven. Bake for 30-35 minutes. You’ll know it’s done when the top is a gorgeous golden brown and a toothpick inserted near the center comes out clean or with just a few moist crumbs. The smell in your kitchen will be incredible. Once baked, let the pan cool completely on a wire rack. This is crucial for the layers to set properly before you cut them.
Step 6: Drizzle with the Final Touch
While the bars cool, make the simple glaze. In a small bowl, whisk the powdered sugar, milk, and almond extract until perfectly smooth. If it’s too thick, add a splash more milk. Too thin? Add a bit more sugar. Once the bars are completely cool, drizzle the glaze back and forth over the top with a spoon. Chef’s tip: Letting the bars cool completely before glazing prevents the glaze from melting and soaking in.
Timing is Everything
- Prep Time: 20 minutes
- Cook Time: 35 minutes
- Cooling Time: 1.5 hours
- Total Time: About 2 hours 25 minutes
Chef’s Secret for the Best Texture
For an incredibly tender, melt-in-your-mouth base, make sure your butter and cream cheese are truly softened at room temperature. This allows them to cream with the sugar perfectly, creating a light and airy texture. Taking them out of the fridge an hour before you start baking makes all the difference.
A Peach of Trivia
Did you know peaches are a member of the rose family? It’s true! They’re also packed with vitamins A and C. Pairing them with dairy, like cream cheese, creates a classic and comforting flavor combination. Using quality ingredients, like real butter and vanilla, is a simple step for better taste and a more satisfying dessert experience. Making mindful choices about food quality is a sweet little nod to your overall heart health.
Equipment You’ll Need
- 9×13 inch baking pan
- Hand mixer or stand mixer
- Two large mixing bowls
- Measuring cups and spoons
- Spatula
- Wire cooling rack
- Small bowl for glaze
Storing Your Delicious Dessert Bars
Once cut, these Peach Cream Cheesecake Bars store beautifully. Place them in a single layer in an airtight container. You can separate layers with parchment paper if you need to stack them. They will keep perfectly in the refrigerator for up to 4 days. The flavors actually meld and get even better on the second day!
For longer storage, these bars freeze exceptionally well. Wrap individual bars tightly in plastic wrap and then place them in a freezer-safe bag or container. They can be frozen for up to 2 months. When a craving hits, simply thaw a bar in the fridge overnight or for a few hours on the counter.
Always remember to store any dessert with cream cheese or dairy in the refrigerator. Leaving it out at room temperature for more than 2 hours is not recommended for food safety. Chilling them also gives you a firmer, cleaner slice when you serve them.
Tips and Advice for Baking Success
- Use a kitchen scale to measure your flour for the most accuracy. If using cups, spoon the flour into the cup and level it off.
- If your peach pie filling has very large chunks, you can give them a rough chop so they distribute more evenly.
- For a more pronounced almond flavor, add 1/4 teaspoon of almond extract to the cream cheese layer as well.
- Let the bars cool completely before attempting to cut them. This patience prevents a gooey mess and gives you neat, professional-looking squares.
Presentation Ideas to Impress
- Serve on a white platter with a few fresh mint leaves scattered around.
- Dust with a light sprinkling of powdered sugar just before serving for a snowy effect.
- Add a small dollop of whipped cream and a thin, fresh peach slice on top of each bar.
- For a party, cut them into smaller, bite-sized pieces for easy grabbing.
Common Mistakes to Avoid
Mistake 1: Using Cold Cream Cheese and Butter
This is the most common pitfall. Cold ingredients don’t blend smoothly. You’ll end up with lumpy cream cheese filling and a dense, greasy base. The sugar can’t create air pockets in cold fat. To avoid this, let your cream cheese and butter sit on the counter for at least an hour before you start. They should be soft to the touch but not melted.
Mistake 2: Overmixing the Dough After Adding Flour
Once you add the flour, you just want to mix until the flour disappears. Overmixing develops the gluten in the flour. This makes your bar layer tough and chewy instead of tender and crumbly. Mix on low speed and stop as soon as you see no more dry flour streaks. A few small streaks are better than overdoing it.
Mistake 3: Cutting the Bars While Warm
I know it’s hard to wait! But if you cut into these bars while they’re still warm, the layers will squish together and you’ll have a gooey, messy slice. The cream cheese layer needs time to set up as it cools. For perfect, clean squares, let the pan cool on a rack until it’s completely at room temperature. Then, use a sharp knife, wiping it clean between cuts.
Mistake 4: Spreading the Top Layer of Dough
Don’t try to spread the dollops of dough you drop on top of the peaches. They are supposed to be in clumps! As the bars bake, these clumps will settle and puff up a bit, creating a beautiful, rustic, cobblestone-like topping. If you try to spread it, you’ll just push it into the peaches and lose that lovely texture.
More Dessert Bar Inspiration
If you love easy, shareable treats like these, you have to explore our whole collection of dessert bars and brownies. They are the ultimate fuss-free sweets for any occasion. For another rich cheesecake experience, try our decadent Chocolate Caramel Cheesecake. Need a savory break? Our Homemade Mexican Pizza is a fun and flavorful dinner. And for a light, healthy main, this Lemon Garlic Cod is always a winner.
Healthier Twists on Peach Cream Cheesecake Bars
Want to lighten things up? Here are six simple variations:
- Whole Wheat Version: Substitute half of the all-purpose flour with whole wheat pastry flour for added fiber.
- Reduced Sugar: Cut the sugar in the bar dough by 1/4 cup. The peaches and glaze provide plenty of sweetness.
- Greek Yogurt Swirl: Mix 1/2 cup of plain Greek yogurt into the cream cheese layer for extra protein and tang.
- Fresh Peach Swap: Use 2 cups of thinly sliced fresh peaches tossed with 1 tablespoon of flour and 2 tablespoons of sugar instead of canned filling.
- Gluten-Free Peach Bars: Use a 1-to-1 gluten-free all-purpose flour blend in place of regular flour.
- Nutty Crust: Replace 1/2 cup of the flour in the dough with finely ground almonds or oat flour for a nuttier flavor and different texture.
Frequently Asked Questions
Can I use fresh peaches instead of pie filling?
Absolutely! You’ll need about 2 to 2.5 cups of peeled and sliced fresh peaches. Toss them with 2 tablespoons of sugar and 1 tablespoon of cornstarch or flour. This helps thicken the juices they release while baking. The flavor will be brighter and less sweet than using canned filling.
Why did my cream cheese layer crack?
A few small cracks are normal and won’t affect the taste. But large cracks usually happen from overbaking or a sudden temperature change. Make sure to bake just until the center is set. Also, avoid opening the oven door frequently during baking. Let the bars cool gradually in the pan on the counter, not in the fridge.
How do I get really clean cuts on my bars?
Use a sharp, thin-bladed knife. Run it under very hot water, wipe it dry, and then make your cut. The heat helps the knife glide through the layers cleanly. Wipe the blade clean and reheat it between each cut for the prettiest results.
Can I make these bars ahead of time?
Yes, they are an excellent make-ahead dessert. Bake and cool them completely. Do not add the glaze. Cover the pan tightly and refrigerate for up to 2 days. On the day you plan to serve them, let the pan sit at room temperature for 20 minutes, then drizzle with the fresh glaze and cut.
Can I freeze Peach Cream Cheesecake Bars?
They freeze wonderfully! Freeze the unglazed bars first on a baking sheet until solid, then wrap individually. Thaw in the refrigerator overnight and add the glaze just before serving. This keeps the glaze from getting sticky or absorbing into the bar.
What can I use if I don’t have almond extract?
Vanilla extract is a perfect substitute. You can use the same amount—1 teaspoon. The flavor will be slightly different but still delicious. A tiny bit of lemon zest in the glaze would also be lovely with the peaches.
My dough was really sticky and hard to press. What did I do wrong?
This likely means your butter was a bit too soft or warm. It’s okay! For sticky dough, lightly wet your fingertips or use the bottom of a glass dusted with flour to press it into the pan. Chilling the dough for 15 minutes before pressing can also help.
Are these bars suitable for a potluck?
They are the ultimate potluck dessert! They travel well, don’t need to be kept piping hot or frozen, and serve a crowd from one pan. People go crazy for them, and you’ll almost certainly be asked for the recipe.
Can I use a different size pan?
A 9×13 inch pan is ideal. A slightly smaller pan will make thicker bars that need longer baking time. A larger pan will make thinner bars that bake faster. I don’t recommend changing the pan size unless you’re willing to adjust the bake time and watch them closely.
The middle seems a little soft when I take it out. Is it done?
The center should look set but may still have a slight jiggle. Remember, it will continue to cook and firm up as it cools on the counter. As long as a toothpick comes out without wet batter, it’s done. Overbaking is the real enemy of a creamy texture.
So there you have it! My all-time favorite summer bar recipe. These Peach Cream Cheesecake Bars are the perfect mix of simple baking and spectacular results. They bring a little sunshine to the table and create happy memories with every bite. I hope your family loves them as much as mine does. Now, go preheat that oven and get baking!
Equipment
- Grand bol
- Fouet
- Spatule
- Plaque à pâtisserie
- Papier sulfurisé
Ingredients
- 4 œufs
- 400 g sucre
- 180 g farine tout usage
- 1 g sel
- 300 g crème de fromage
- 1 c à café extrait de vanille
- 300 g garniture de tarte aux pêches
- 150 g sucre glace pour le glaçage
- 2 c à soupe lait pour le glaçage
- 1 c à café extrait d'amande pour le glaçage
Instructions
- Préchauffez votre four à 175°C et graissez un moule à pâtisserie de 9x13 pouces.
- Dans un grand bol, crémez ensemble le beurre mou et 400 g de sucre jusqu'à ce que le mélange soit léger et mousseux.
- Ajoutez 4 œufs et 1 c à café de vanille au mélange et battez jusqu'à obtention d'une pâte lisse.
- Incorporez progressivement 180 g de farine et 1 g de sel jusqu'à ce qu'ils soient juste mélangés.
- Pressez un peu plus de la moitié de la pâte uniformément dans le fond du moule graissé.
- Dans un bol propre, battez ensemble le fromage à la crème ramolli, 150 g de sucre, 1 c à café de vanille, et 1 œuf jusqu'à consistance lisse.
- Versez le mélange de fromage à la crème sur la base de la pâte et étalez-le uniformément.
- Déposez la garniture de tarte aux pêches sur la couche de fromage à la crème.
- Déposez des petites cuillerées de la pâte restante sur le dessus des pêches.
- Faites cuire au four pendant 30 à 35 minutes, jusqu'à ce qu'elles soient dorées et qu'un cure-dent inséré en ressorte propre.
- Laissez complètement refroidir sur une grille.
- Fouettez ensemble le sucre glace, le lait, et l'extrait d'amande pour préparer le glaçage.
- Versez le glaçage sur les barres refroidies.
Notes
Nutrition

Hi, I’m Olivia Parker, the founder of BakingSecret.com and a lifelong lover of all things sweet and homemade. I grew up in a small town in Oregon, where the smell of fresh cookies in my family’s kitchen sparked my passion for baking. Over the years, I turned that passion into a mission: to help home bakers feel confident, inspired, and creative.
After studying food science and working in several artisan bakeries across the U.S., I decided to create a space where everyone from beginners to seasoned bakers can find reliable recipes, expert tips, and a warm, welcoming community. BakingSecret.com is my way of sharing the magic of baking with the world. When I’m not testing new recipes, you’ll find me exploring farmers’ markets, collecting vintage cookbooks, or perfecting my sourdough technique.