
There’s something magical about a dessert that feels like a hug. These Peanut Butter Chocolate Swirl Cookies are exactly that. They combine two of the world’s greatest flavors into a single, swoon-worthy bite. Think of a rich, nutty peanut butter cookie and a deep, luxurious chocolate cookie dancing together in perfect harmony. It’s a combo that never fails to make my family’s eyes light up when I pull them from the oven.
The Sweet Story Behind Swirl Cookies
I have a soft spot for any recipe that lets me play. The concept of swirl cookies has been around for ages. It started with simple marbled pound cakes. Clever home bakers then adapted the idea for cookies. This recipe is my own playful twist. After many (many) batches of testing, I found the perfect ratio. The key is using a soft dough that’s easy to twist without blending them into a muddy mess. It’s a modern take on two classic cookie flavors. Every swirl is a little unique, just like the people you’ll share them with.
Why You’ll Absolutely Love These Peanut Butter Swirl Cookies
This recipe is a winner for so many reasons!
- Unbeatable Flavor: The peanut butter and chocolate combo is legendary. It’s salty, sweet, and deeply satisfying.
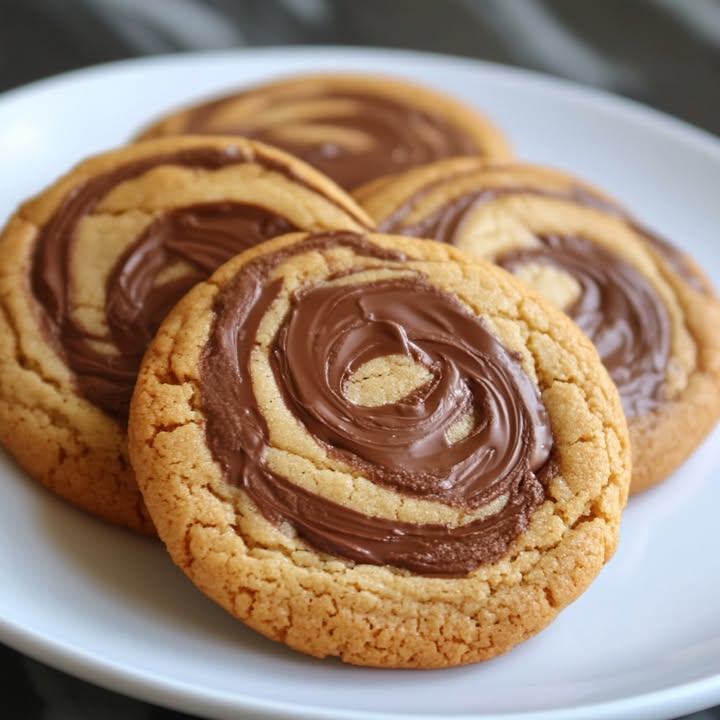
- Visual Wow Factor: The beautiful swirls make these cookies look like they came from a fancy bakery. They’re as pretty as they are tasty.
- Simple Process: While they look impressive, the method is straightforward. It’s just two batches of dough from one base recipe.
- Chewy Texture: Baking them just until the edges set guarantees a soft, chewy center. That’s the cookie texture dreams are made of.
Perfect Occasions for Your Cookie Creations
These swirl cookies are versatile little treats. They shine at so many events!
- After-School Snack: A homemade cookie beats any packaged treat.
- Potlucks & Parties: They’re always a conversation starter. “How did you get that swirl?” people will ask.
- Gift Giving: Pack them in a cute box or tin. It’s a heartfelt gift for neighbors, teachers, or friends.
- Just Because: Sometimes, a Tuesday afternoon just needs a special cookie.
Ingredients for Peanut Butter Chocolate Swirl Cookies
Gathering your ingredients is the first step to success. Here’s what you’ll need:
- 1/2 cup unsalted butter, softened
- 1/2 cup creamy peanut butter
- 1/2 cup brown sugar
- 1/4 cup granulated sugar
- 1 large egg
- 1 teaspoon vanilla extract
- 1 1/4 cups all-purpose flour
- 1/2 teaspoon baking soda
- 1/4 teaspoon salt
- 3 ounces semi-sweet chocolate, melted and slightly cooled
Smart Substitution Options
Don’t worry if you’re missing an ingredient! Here are some easy swaps.
- Butter: You can use salted butter. Just omit the added salt in the recipe.
- Peanut Butter: Natural peanut butter works, but the dough may be a bit oilier. Crunchy peanut butter adds a nice texture.
- Chocolate: Dark chocolate or milk chocolate chips can be melted instead of semi-sweet. Use what you love!
- Flour: For a gluten-free version, use a 1:1 gluten-free all-purpose flour blend.
How to Make Your Swirl Cookies
Step 1: Prep Your Oven and Bowl
Start by preheating your oven to 350°F (175°C). Line your baking sheets with parchment paper. This little step is a lifesaver. It prevents sticking and makes cleanup a breeze. Now, grab your large mixing bowl. In it, place the softened butter, creamy peanut butter, brown sugar, and granulated sugar. The smell of peanut butter and sugar together is already heavenly. Pro tip: Really let your butter soften at room temperature. It makes creaming much easier and leads to a softer cookie.
Step 2: Cream the Wet Ingredients
Using a hand mixer or stand mixer, beat the butter, peanut butter, and sugars together. Do this for about 2-3 minutes. You want it to become light, fluffy, and pale in color. This process incorporates air. That air helps give your cookies a tender texture. Then, beat in the large egg and vanilla extract. Mix until everything is smooth and fully combined. The mixture will look glossy and inviting.
Step 3: Combine with the Dry Ingredients
In a separate bowl, whisk together your all-purpose flour, baking soda, and salt. This ensures the leavening agent is evenly distributed. Now, gradually add these dry ingredients to your wet mixture. Mix on low speed just until a soft dough forms. You’ll see it pull away from the sides of the bowl. The dough will be thick and pliable. Pro tip: Stop mixing as soon as the flour is incorporated. Over-mixing can lead to tough cookies.
Step 4: Create the Chocolate Swirl
Divide your lovely dough into two equal halves. Place one half back in the bowl. Pour your melted, slightly cooled semi-sweet chocolate over it. The chocolate should be warm but not hot. Stir it gently into the dough until it’s fully blended. The dough will transform into a rich, dark brown. The other half remains your beautiful golden peanut butter dough. Now you have two distinct, flavorful doughs ready to become friends.
Step 5: Twist and Shape the Cookies
This is the fun part! Take a small portion of each dough, about a tablespoon-sized chunk. Gently twist or swirl them together with your hands. Don’t overwork it. You want visible streaks of both colors. Roll the combined dough into a ball. Place it on your prepared baking sheet and give it a slight flatten with your palm. This helps them bake evenly. Repeat with all the dough, spacing the cookies about 2 inches apart.
Step 6: Bake to Perfect Chewiness
Place your sheets in the preheated oven. Bake for 10-12 minutes. Watch for the edges to become set and firm. The centers should still look a bit soft. This is the secret to a chewy cookie! The cookies will puff up and your kitchen will smell incredible. Chef’s tip: If you love extra chewy cookies, lean toward the 10-minute mark. For a bit more crispness, go for 12 minutes.
Step 7: Let Them Cool and Settle
When done, remove the baking sheets from the oven. Let the cookies cool on the sheet for 5 minutes. This allows them to finish setting up without becoming too hard. Then, transfer them to a wire rack to cool completely. I promise, the wait is worth it. A cooled cookie has the perfect texture and flavor.
Your Baking Timeline
This recipe is wonderfully quick from start to finish.
- Prep Time: 15 minutes
- Cooking Time: 12 minutes
- Total Time: 27 minutes
- Servings: About 18 delicious cookies
Chef’s Secret for the Best Swirl
My secret is to keep the doughs cool. If the dough feels too soft or sticky after adding the chocolate, chill it for 10 minutes. Cool dough is much easier to twist without the colors blending into one. It keeps that beautiful, defined swirl pattern.
A Fun Cookie Fact
The peanut butter and chocolate combo became famous in America with the Reese’s Peanut Butter Cup in 1928. Bringing those two flavors into a homemade cookie feels like honoring a classic. Yet, you get the bonus of a stunning marbled look.
Necessary Equipment
You likely have most of this in your kitchen already!
- Large mixing bowl
- Hand mixer or stand mixer
- Measuring cups and spoons
- Whisk
- Baking sheets
- Parchment paper or silicone mats
- Wire cooling rack
Storing Your Homemade Swirl Cookies
These cookies store beautifully. At room temperature, place them in an airtight container. They will stay soft and chewy for up to 5 days. A piece of bread in the container can help absorb excess moisture and keep them perfect.
For longer storage, you can freeze them. Make sure they are completely cooled first. Layer them between parchment paper in a freezer-safe container or bag. They can be frozen for up to 3 months. Thaw at room temperature for an hour before serving.
If you want to freeze the dough, it works great! Shape the cookies into balls and freeze them on a tray. Once solid, transfer to a bag. You can bake frozen dough balls directly, just add 1-2 extra minutes to the baking time.
Tips and Advice for Success
- Always use a kitchen scale for flour if possible. Measuring by cups can vary. 1 1/4 cups is about 160 grams.
- Let your melted chocolate cool for 5 minutes before adding to the dough. Too-hot chocolate can melt the butter in the dough.
- Rotate your baking sheets halfway through baking if your oven has hot spots. This ensures even color.
- For consistent size, use a tablespoon measuring spoon to scoop each dough portion.
Presentation Ideas to Impress
Make your cookies part of the celebration!
- Stack them on a vintage cake stand for a party.
- Place a few in a small mason jar with a ribbon for a sweet gift.
- Serve them with a glass of cold milk or a cup of coffee for a cozy treat.
- Add them to a dessert platter alongside other favorites like Cinnamon Streusel Coffee Cake.
Healthier & Creative Recipe Variations
You can easily adapt this recipe to suit different tastes or needs.
- Gluten-Free Swirl Cookies: Swap the all-purpose flour for a trusted gluten-free blend. The method stays exactly the same.
- Vegan Swirl Cookies: Use a plant-based butter, vegan peanut butter, and a flax egg. Choose a vegan chocolate for melting.
- Nut-Free Swirl Cookies: Replace the peanut butter with sunflower seed butter. It gives a similar texture and color.
- Double Chocolate Swirl: Add 1/4 cup cocoa powder to the peanut butter dough half. You’ll get a double chocolate and peanut butter swirl.
- Sugar-Conscious Swirls: Reduce the granulated sugar by half. The brown sugar and peanut butter provide plenty of sweetness.
- Add-In Fun: Stir 1/4 cup of chopped peanuts or chocolate chips into the respective doughs before swirling for extra texture.
Common Mistakes to Avoid
Mistake 1: Over-mixing the Dough
This is a common error. After adding the flour, people often keep mixing until it’s ultra-smooth. Over-mixing develops the gluten in the flour. That leads to tough, dense cookies instead of soft, chewy ones. Mix just until the flour is incorporated and no dry patches remain. The dough will look a bit shaggy, but that’s okay.
Mistake 2: Using Hot Melted Chocolate
If you add the chocolate while it’s still very hot, it can melt the butter in your dough. This makes the chocolate dough too soft and greasy. It becomes hard to swirl. Let the melted chocolate sit off the heat for about 5 minutes. It should be warm, but not hot. This keeps both doughs at a similar, workable consistency.
Mistake 3: Over-baking for a “Done” Look
Many bakers wait until the cookie looks fully set and firm. For these swirl cookies, that means they’re overdone. The perfect cookie has set edges but a soft, slightly puffy center when it comes out of the oven. It will finish setting as it cools. Bake for the minimum time and check. If the edges are golden and set, they’re ready.
Mistake 4: Not Chilling Soft Dough
Sometimes, especially on a warm day, your dough can be very soft. If you try to swirl soft dough, the two colors will mush together into one brown dough. You lose the beautiful swirl. If your dough feels sticky or doesn’t hold shape, chill both portions in the fridge for 10-15 minutes. This makes twisting easy and keeps the pattern clear.
Mistake 5: Measuring Flour Incorrectly
Scooping flour directly from the bag with your measuring cup packs it down. You end up with too much flour. Too much flour makes dry, crumbly cookies. For accuracy, spoon the flour into your measuring cup and level it off. Or, use a kitchen scale. For reference, the USDA Food Data Central provides detailed nutrient information, which emphasizes the importance of accurate measurements for consistent results, just like knowing the exact fat content in your ingredients.
Frequently Asked Questions
Can I use natural peanut butter in this recipe?
Yes, you can use natural peanut butter. It often has a different texture and can be more oily. The dough might be a bit softer. If your dough seems too soft after mixing, chill it in the refrigerator for 15 minutes before dividing and adding the chocolate. This will make it easier to handle and swirl. The flavor will still be great, just a bit less sweet than with conventional peanut butter.
Why do I need to divide the dough before adding the chocolate?
Dividing the dough ensures you have two equal portions. One stays as the pure peanut butter base. The other becomes the chocolate dough. This method guarantees you get a balanced swirl of both flavors. If you added chocolate to the entire batch, you’d get a uniform chocolate peanut butter cookie. That’s tasty, but you lose the stunning visual swirl effect that makes these cookies special.
Making gluten-free Peanut Butter Chocolate Swirl Cookies is simple. Replace the all-purpose flour with a good-quality 1:1 gluten-free all-purpose flour blend. Brands like King Arthur or Bob’s Red Mill work well. Keep all other ingredients and steps the same. The texture might be slightly different, but they will still be delicious chewy cookies. For more inspiration, check out our other gluten-free biscotti recipes.
My swirls blended together. How can I prevent that?
This usually happens if the dough is too warm or soft. After making the two doughs, if they feel sticky, chill them briefly. Ten minutes in the fridge can firm them up. Also, when twisting, be gentle. Don’t knead or roll them together aggressively. Just a light twist and a quick roll into a ball is enough. Keeping the doughs cool is the key to distinct swirls.
Absolutely! Freezing unbaked dough is a great trick. Shape the cookies into balls as directed. Place them on a tray and freeze until solid. Then transfer the frozen balls to a freezer bag. You can bake them directly from frozen. Just add 1-2 extra minutes to the baking time. This lets you have fresh-baked cookies anytime you want.
What type of chocolate is best for melting?
I prefer semi-sweet chocolate baking bars or good-quality chocolate chips. They melt smoothly and have a rich flavor that balances the peanut butter. You can use dark chocolate for a less sweet taste or milk chocolate for a sweeter cookie. Avoid chocolate with very high cocoa butter content as it can sometimes seize. Chop the chocolate finely before melting for even results.
Store your cooled cookies in an airtight container at room temperature. A plastic container or cookie jar with a tight seal works best. If you want to ensure maximum softness, you can place a slice of bread in the container. The bread releases moisture that the cookies absorb. They will stay beautifully chewy for up to 5 days.
Can I add nuts or other ingredients to the dough?
Yes, feel free to add about 1/4 cup of chopped peanuts to the peanut butter dough. Or add 1/4 cup of chocolate chips to the chocolate dough. Do this before you start swirling the two together. It adds extra texture and flavor. Just be mindful that adding too many extras can make the dough harder to swirl neatly.
Too much spreading often means your butter was too soft or melted. Make sure your butter is softened at room temperature, not melted. Also, check that you measured your flour correctly. Too little flour can lead to flat cookies. Finally, make sure your baking soda is fresh. Old baking soda loses its potency and won’t help the cookies rise properly.
They are a fantastic choice for bake sales! They look professional and taste amazing. They are also generally kid-friendly. Just be sure to check your school’s policy on peanut products. If peanuts are not allowed, you can use the nut-free variation with sunflower seed butter. They will still be a hit! For other bake sale ideas, my double chocolate biscotti and chocolate chip biscotti recipe are also great options.
I hope this recipe brings as much joy to your kitchen as it has to mine. Baking is about sharing love, one sweet treat at a time. These Peanut Butter Chocolate Swirl Cookies are a perfect way to do that. For more cookie inspiration and baking fun, explore all our sweet ideas in the cookie and biscuits category. Happy swirling and baking!
Equipment
- Grand bol
- Fouet
- Spatule
- Plaque à pâtisserie
- Papier sulfurisé
Ingredients
- 115 g beurre non salé, ramolli
- 125 g beurre de cacahuète crémeux
- 85 g sucre brun
- 50 g sucre blanc
- 1 unité oeuf
- 1 cuillère à café extrait de vanille
- 155 g farine tout usage
- 2 g poudre à lever
- 1 g sel
- 85 g chocolat noir, fondu et légèrement refroidi
Instructions
- Préchauffez votre four à 175°C (350°F) et tapissez des plaques à pâtisserie de papier sulfurisé.
- Dans un grand bol, mélangez le beurre ramolli, le beurre de cacahuète, le sucre brun et le sucre blanc. Battez jusqu'à obtenir une texture légère et crémeuse.
- Incorporez l'œuf et l'extrait de vanille jusqu'à ce que le mélange soit homogène.
- Dans un autre bol, mélangez la farine, la poudre à lever et le sel. Incorporez progressivement ce mélange aux ingrédients humides jusqu'à former une pâte molle.
- Divisez la pâte en deux. Incorporez le chocolat fondu dans une moitié jusqu'à ce qu'il soit bien mélangé.
- Prélevez une cuillère à soupe de chaque pâte et torsadez-les ensemble. Roulez en boule et placez sur la plaque de cuisson.
- Enfournez pendant 10-12 minutes jusqu'à ce que les bords soient fixés mais que le centre reste moelleux.
- Laissez refroidir sur la plaque pendant 5 minutes avant de transférer sur une grille pour refroidir complètement.
Notes
Nutrition

Hi, I’m Olivia Parker, the founder of BakingSecret.com and a lifelong lover of all things sweet and homemade. I grew up in a small town in Oregon, where the smell of fresh cookies in my family’s kitchen sparked my passion for baking. Over the years, I turned that passion into a mission: to help home bakers feel confident, inspired, and creative.
After studying food science and working in several artisan bakeries across the U.S., I decided to create a space where everyone from beginners to seasoned bakers can find reliable recipes, expert tips, and a warm, welcoming community. BakingSecret.com is my way of sharing the magic of baking with the world. When I’m not testing new recipes, you’ll find me exploring farmers’ markets, collecting vintage cookbooks, or perfecting my sourdough technique.