
Introduction: The Easiest Pecan Pie Dump Cake Recipe You’ll Ever Make
Last Thanksgiving, I found myself in a total panic. Twenty relatives were coming over in three hours, and I’d completely forgotten about dessert. My fancy pecan pie plans? Out the window. That’s when I discovered this pecan pie dump cake recipe, and let me tell you, it saved the day. Everyone raved about it so much that now they actually request it instead of my from-scratch pies.
Welcome to my kitchen! Today, I’m excited to share this super easy and delicious treat that’s become my secret weapon for entertaining. This pecan pie dump cake combines everything we love about traditional pecan pie with the simplicity of a dump cake. You literally dump ingredients into a pan and let the oven do the work. No rolling out pie crusts, no worry about soggy bottoms, and no stress about whether your filling will set properly.
This dessert works perfectly for any occasion. I’ve made it for holiday gatherings, church potlucks, birthday parties, and regular Tuesday nights when my family needs something sweet. The beauty of this recipe is that it looks and tastes like you spent hours in the kitchen, but you’ll know the real truth: it took you maybe 10 minutes of actual work.
Why do I love this pecan pie dump cake recipe so much? First, it never fails. I’ve made it at least 30 times now, and it’s come out perfect every single time. Second, it feeds a crowd. One 9×13 pan gives you at least 12 generous servings. Third, you can make it ahead. I’ve prepared it the night before and just popped it in the oven when guests arrived. The smell alone makes everyone hungry.
My kids actually prefer this over traditional pecan pie. They love how the cake layer on top gets crispy and golden, while the middle stays gooey and rich. My husband, who isn’t usually a dessert person, will sneak into the kitchen for second and third helpings. I caught him eating it straight from the pan at midnight once.
The ingredients are simple and affordable. You won’t need to hunt down specialty items at expensive grocery stores. Most of what you need is probably already in your pantry. This makes it perfect for those last-minute dessert emergencies we all face sometimes.
Ingredients You’ll Need for Your Pecan Pie Dump Cake
Let me walk you through everything you’ll need to make this amazing easy pecan pie dump cake. I’ve organized the ingredients into categories to make your shopping easier.
For the Base Layer:
- 1 box (15.25 oz) yellow cake mix
- 1 cup (2 sticks) unsalted butter, melted
- 2 cups pecan halves or chopped pecans
For the Filling:
- 3 large eggs
- 1 cup light corn syrup (I’ll explain the light versus dark debate in a moment)
- 1/2 cup packed brown sugar
- 1/4 cup granulated white sugar
- 2 teaspoons pure vanilla extract
- 1/4 teaspoon salt
That’s it. Nine ingredients total, and nothing weird or hard to find. You can pick up everything at your regular grocery store in one quick trip.
Where to Find These Ingredients:
The cake mix lives in the baking aisle, usually near the frosting. I prefer Duncan Hines or Betty Crocker, but any brand works fine. Just make sure you grab yellow cake mix, not vanilla or butter. The yellow variety has the right flavor profile for this recipe.
Fresh pecans make a difference here. I buy mine from the baking aisle, but you can also find them in the produce section or bulk bins. If you have a Costco membership, their pecan bags are a great value. I always buy extra and freeze them for future batches.
For the corn syrup, head to the baking aisle near the sugar. You’ll see both light and dark varieties. Here’s my take on the light or dark Karo syrup for pecan pie question: I always use light corn syrup. Dark corn syrup has molasses added, which makes the flavor stronger and more robust. While some people love that deep, intense taste, I find it can overpower the buttery, nutty flavors we want in this dessert. Light corn syrup lets the pecans and vanilla shine through. That said, if you prefer a bolder flavor, dark corn syrup works too.
Ingredient Alternatives and Substitutions:
Life happens, and sometimes you don’t have exactly what a recipe calls for. Here are some swaps that actually work:
If you can’t find yellow cake mix, butter golden cake mix makes an excellent substitute. I’ve even used spice cake mix for fall gatherings, and it added a lovely warmth to the dessert.
No pecans? Walnuts work in a pinch, though the flavor will be different. I’ve also mixed half pecans and half walnuts when I ran short. Some people skip the nuts entirely due to allergies and add chocolate chips instead. It’s not traditional, but it tastes amazing.
Out of brown sugar? You can use all white sugar, though you’ll lose some of that rich, caramel-like depth. In a real emergency, I’ve mixed white sugar with a tiny splash of molasses to create a brown sugar substitute.
For the butter, I strongly recommend sticking with real unsalted butter. Margarine or oil substitutes will affect the texture and flavor. This is one place where quality matters.
The Importance of Quality Ingredients:
While this is definitely a simple, budget-friendly recipe, using quality ingredients makes a noticeable difference. I learned this the hard way when I bought the cheapest pecans I could find. They were stale and bitter, and the whole dessert suffered.
Fresh pecans should smell sweet and nutty, never musty or sour. Taste one before you use them. If it doesn’t taste good raw, it won’t taste good baked.
Real vanilla extract beats imitation every time. You’re only using two teaspoons, so one bottle lasts forever. The depth of flavor it adds is worth the extra dollar or two.
For the eggs, I use whatever’s in my fridge. Room temperature eggs mix more easily into the filling, but cold eggs work fine too. Just let them sit on the counter for 15 minutes before you start.
The butter quality matters more than you might think. This pecan pie dump cake recipe uses a full two sticks, so it’s a major flavor component. I buy whatever brand is on sale, but I always choose real butter over spreads or margarine products.

Step-by-Step Instructions for Making Your Pecan Pie Dump Cake
Now that you’ve got all your ingredients ready, let’s get to the fun part. Honestly, calling this a recipe almost feels like cheating because it’s so ridiculously simple. I remember the first time I made it, I kept thinking I must be forgetting something because no dessert this easy should taste this good.
Step One: Preheat and Prep (5 minutes)
Start by preheating your oven to 350°F. I know, I know—everyone says to preheat, and sometimes we skip it. Don’t skip it this time. The even temperature matters for getting that perfect texture contrast between the crispy top and gooey middle.
While the oven heats up, grab a 9×13-inch baking dish. I use a glass Pyrex because I like seeing the golden edges form, but metal pans work perfectly fine too. Don’t grease it or spray it with anything. One of my favorite things about this dump cake is that nothing sticks, even without greasing. Something about all that butter just makes everything release beautifully.
Step Two: Create Your Filling Layer
In a medium mixing bowl, crack your three eggs and beat them lightly with a fork or whisk. They don’t need to be perfectly mixed—just break up the yolks. Pour in the corn syrup, both sugars, vanilla extract, and salt. Whisk everything together until the sugars dissolve and the mixture looks smooth and glossy. This takes maybe two minutes of stirring.
Here’s the thing: this filling won’t look like much at this stage. It’s thin and runny, and the first time I made it, I worried something was wrong. Trust the process. It thickens beautifully as it bakes.
Step Three: Layer Like You Mean It
Pour your filling mixture directly into your unbaked 9×13 pan. Spread it around gently with a spoon so it covers the bottom evenly. Now sprinkle your pecans over the filling. I like using whole pecan halves because they look gorgeous when the cake is done, but chopped pecans distribute more evenly throughout each serving. Your choice depends on whether you care more about presentation or texture consistency.
Next comes the part that feels wrong but is absolutely right: take your dry cake mix straight from the box and sprinkle it evenly over the pecans. Don’t mix it with anything. Don’t add water or eggs like the box instructions say. Just dump that powder right on top and spread it into an even layer. The first time I did this, my daughter walked into the kitchen and asked if I’d forgotten something. Nope. This is exactly how it’s supposed to work.
Step Four: The Butter Drizzle
Remember those two sticks of butter you melted? Now’s their moment to shine. Drizzle the melted butter evenly over the dry cake mix, trying to cover as much of the surface as possible. I pour it back and forth in stripes, then use the back of a spoon to spread it around any dry spots. You want most of the cake mix moistened, though a few dry patches are fine—they’ll catch butter from neighboring areas as everything bakes.
Some people ask if they can just pour all the butter in one spot. Technically yes, but you’ll get uneven results. Taking thirty extra seconds to drizzle it properly makes a real difference in how uniformly golden and crispy your top layer becomes.
Step Five: Bake and Wait (The Hardest Part)
Slide your pan into the preheated oven and set a timer for 45 minutes. Every oven runs a little different, so start checking around the 40-minute mark. You’re looking for a golden-brown top with edges that have pulled slightly away from the pan sides. The center should still jiggle just a tiny bit when you gently shake the pan—that jiggle means gooey perfection inside.
My oven runs hot, so mine is usually done at 42 minutes. My mom’s oven takes a full 50 minutes. Get to know your oven’s personality. If the top is browning too quickly but the middle isn’t set, tent some aluminum foil loosely over the top for the last 10 minutes of baking.
The smell that fills your kitchen during this time is absolutely incredible. That combination of toasted pecans, caramelizing sugar, and buttery cake makes everyone in the house wander into the kitchen asking when dessert will be ready.
Step Six: Cool Before Serving
This is where willpower comes in. Let the pecan pie dump cake cool for at least 20 minutes before cutting into it. I know waiting feels impossible, but if you serve it too hot, the filling hasn’t set properly and everything turns into a delicious but messy puddle on the plate.
After 20 minutes, it’s perfect. Still warm enough to feel comforting, but set enough to hold its shape when you cut squares. I use a sharp knife and wipe it clean between cuts for prettier servings, though honestly, even messy pieces disappear fast.
What Is the Biggest Mistake to Avoid When Making a Dump Cake?
Funny enough, the most common mistake people make is overthinking it. I’ve seen friends try to mix the cake mix with the butter before sprinkling it, or stir everything together into one uniform layer. Don’t do that. The magic of a dump cake happens because the layers stay separate during assembly and then meld together while baking.
Another mistake is using too small of a pan. I tried making this in a 9×9 square pan once when I halved the recipe, and it overflowed all over my oven. Stick with the 9×13 size for the full recipe, or properly calculate adjustments if you’re changing quantities.
Also, resist the urge to add water. The cake mix box will tell you to add water, but in dump cake land, we ignore those instructions. The butter and the moisture from the filling provide everything the cake needs. Adding water makes it soggy instead of perfectly textured. By the way, if you’re interested in other creative cake mix recipes, I’ve had great success with a dairy free cake mix version that my lactose-intolerant sister absolutely loved.
Variations and Customizations for Your Dump Cake
Once you’ve mastered the basic recipe, the fun really begins. This dessert is incredibly forgiving and welcomes all sorts of creative twists.
Serving Suggestions:
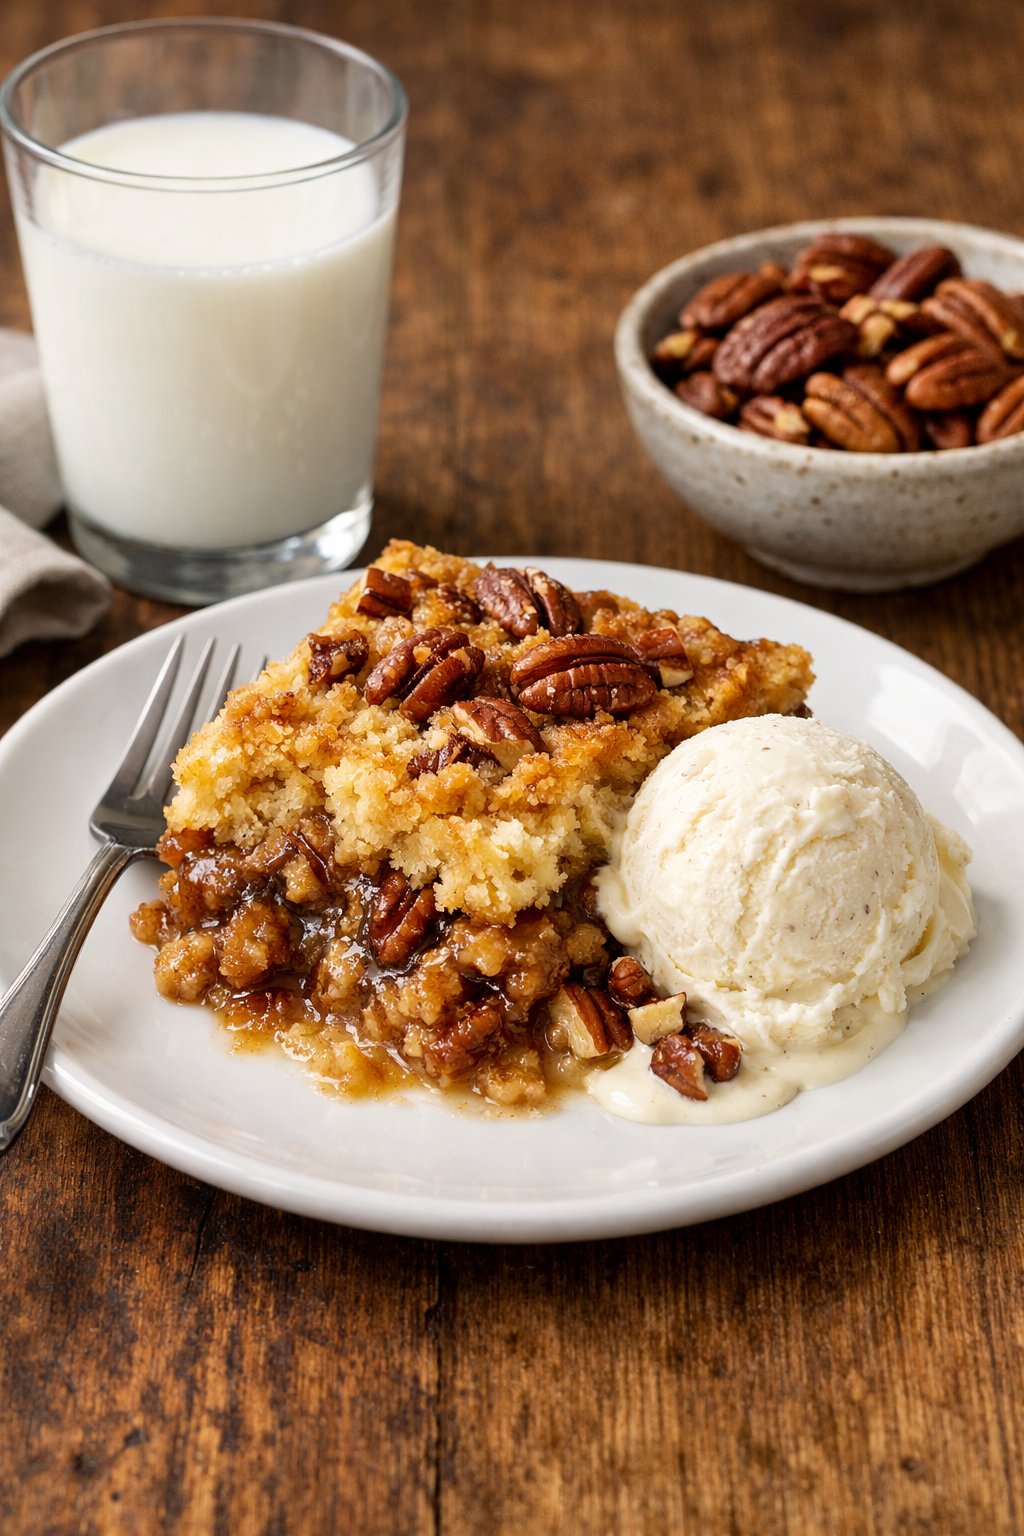
Warm pecan pie dump cake with a scoop of vanilla ice cream is basically heaven on a plate. The cold ice cream melting into the warm, gooey cake creates this incredible contrast. I also love serving it with fresh whipped cream—the lightness balances the richness beautifully. For fancy occasions, I’ll drizzle caramel sauce over each serving and add a pinch of flaky sea salt.
My friend Sarah serves hers with bourbon whipped cream at dinner parties, and people go absolutely crazy for it. She just adds a tablespoon of bourbon to her heavy cream before whipping. The slight boozy warmth pairs perfectly with the pecans.
Flavor Variations:
Want to change things up? Try using spice cake mix instead of yellow for a more autumnal flavor. The cinnamon and nutmeg notes complement pecans wonderfully. I’ve also made this with butter pecan cake mix, which adds an extra layer of pecan flavor that enthusiasts really appreciate.
Adding a handful of chocolate chips to the pecan layer creates a turtle-inspired version that my kids request for their birthdays. Dark chocolate works better than milk chocolate because it doesn’t get too sweet.
Some people swirl in a cream cheese layer. Beat 8 ounces of softened cream cheese with 1/4 cup sugar and drop spoonfuls over the filling layer before adding the pecans. It creates these tangy pockets throughout the cake that cut through the sweetness.
Dietary Modifications:
For gluten-free friends, swap the regular yellow cake mix for a gluten-free cake mix that you trust. I’ve tested this with Bob’s Red Mill gluten-free yellow cake mix, and it worked perfectly. Just make sure your corn syrup and other ingredients are certified gluten-free if you’re dealing with celiac disease rather than just sensitivity.
Making it dairy-free requires swapping the butter for a quality dairy-free alternative. I’ve had good results with Earth Balance baking sticks. The texture isn’t quite as rich, but it’s still delicious. Make sure your cake mix doesn’t contain milk powder—some do, some don’t.
For a lower-sugar version, you can reduce the granulated sugar to 2 tablespoons instead of 1/4 cup. I wouldn’t cut it more than that because the sugar helps the filling set properly. You could also try a sugar substitute designed for baking, though I haven’t personally tested that.
Nut-free versions work if you skip the pecans entirely and maybe add some shredded coconut instead for texture. It becomes a different dessert, obviously, but still tasty. One of my readers told me she uses crushed pretzels for a sweet-salty combination that sounds wild but apparently works great.
If you’re looking for more special occasion desserts that are equally easy, the happiness cake I make for celebrations uses similar dump-and-bake techniques with different flavor profiles. And for weekend breakfast treats, that Sara Lee coffee cake copycat recipe hits the spot without much effort either.
The beauty of this pecan pie dump cake recipe is that it’s both foolproof enough for beginners and flexible enough for experienced bakers who want to experiment. Start with the basic version, then let your creativity run wild once you see how simple it really is.
Storage and Serving Tips for Your Pecan Pie Dump Cake
Alright, so you’ve made this gorgeous pecan pie dump cake, and now you’re wondering how to keep it fresh and when exactly to serve it. Let me share what I’ve learned through trial and error—and yes, there have been some errors along the way.
Should Pecan Pie Dump Cake Be Refrigerated?
This question comes up constantly, and honestly, I get why it’s confusing. Traditional pecan pie gets refrigerated because of the egg-based filling. This dump cake has eggs too, so the same logic applies. I always refrigerate mine after it’s completely cooled to room temperature.
Here’s what I do: Once the cake has cooled for about an hour on the counter, I cover it tightly with aluminum foil or plastic wrap and pop it in the fridge. It’ll stay fresh for up to five days this way, though in my house, it never lasts more than two. My teenage son has a radar for desserts.
The first time I made this, I left it on the counter overnight because I figured the sugar would preserve it like cookies. Wrong move. By morning, the filling had separated slightly and the texture was off. Not terrible, but definitely not as good as it should have been. Plus, proper kitchen hygiene and food safety practices recommend refrigerating anything with eggs that won’t be consumed within two hours of baking.
One thing I’ve noticed is that refrigerated dump cake actually tastes amazing cold. Some people reheat their slices in the microwave for 20 seconds before serving, which brings back that fresh-from-the-oven warmth. Others—like my husband—prefer it straight from the fridge because the filling gets this fudgy, almost candy-like consistency when it’s cold. Both ways work beautifully.
Freezing Your Dump Cake
Can you freeze it? Absolutely. I do this all the time when I’m planning ahead for holidays. Cut the cooled cake into individual portions, wrap each piece tightly in plastic wrap, then place them all in a freezer-safe container or zip-top bag. They’ll keep for up to three months.
To thaw, just move a piece from the freezer to the fridge the night before you want to eat it. Or if you’re impatient like me, microwave it for 30-45 seconds straight from frozen. The texture holds up remarkably well. I actually think the cake layer gets even more tender after freezing, though I have no scientific explanation for why.
Last Christmas, I made three of these dump cakes, served one fresh, and froze the other two in pre-cut squares. Throughout January, whenever someone dropped by unexpectedly, I could offer them homemade dessert in under a minute. Made me look like the most prepared host ever, when really I was just being strategic.
Should I Make Dump Cake Night Before or Day Of?
This depends entirely on your schedule and preferences. Both options work, and I’ve done it both ways dozens of times.
Making it the night before has some real advantages. First, you get all the messy prep work out of the way when you’re not stressed about guests arriving. Second, the flavors have more time to meld together overnight in the fridge, which some people swear makes it taste even better. Third, you can serve it cold or just warm it up before serving.
When I make it ahead, I bake it the evening before, let it cool completely, cover it well, and refrigerate overnight. About 30 minutes before serving time, I take it out to remove the chill slightly, or I warm the whole pan in a 300°F oven for about 15 minutes. This brings back that fresh-baked feel without drying anything out.
Making it day-of works great too, especially if you want that incredible fresh-from-the-oven experience. The smell alone when guests walk in creates this cozy, welcoming atmosphere that you just can’t replicate with reheated dessert. Plus, there’s something special about cutting into a cake that’s still slightly warm.
The timing works out perfectly for dinner parties. If your guests are arriving at 6 PM for a 6:30 dinner, you can pop the cake in the oven at 5 PM. It bakes while you’re doing final dinner prep, fills your house with amazing smells, and is ready to cool while everyone eats. By dessert time, it’s at that perfect temperature.
Here’s my honest take: if I’m hosting a casual family gathering, I make it day-of for maximum freshness. If I’m dealing with a more formal dinner party or a potluck where timing is unpredictable, I make it the night before to eliminate variables. Both approaches have never let me down.
Best Serving Temperature
Everyone has different preferences here, but I’ll tell you what I’ve observed. Warm dump cake is absolutely divine—the filling is gooey, the cake is soft, and everything melts together beautifully. Room temperature is probably the most versatile because the textures are balanced and the flavors come through clearly. Cold from the fridge has its own charm with that denser, fudgier quality.
For parties, I usually serve it slightly warm or at room temperature because it cuts more cleanly and looks prettier on the plate. For family movie nights, we eat it warm with ice cream and don’t care how it looks.
Presenting Your Dump Cake
Even though this is a super casual dessert, you can definitely dress it up for special occasions. I’ve brought this to fancy dinner parties, and nobody needs to know it took me 10 minutes to throw together.
For nice presentations, I cut neat squares and plate them individually. A dusting of powdered sugar over the top makes anything look more sophisticated—just use a small mesh strainer and tap it gently over each serving. Add a pecan half on top for a clear signal of what flavor to expect.
Caramel drizzle transforms the presentation completely. I buy the squeeze bottles of caramel sauce and drizzle artistic lines across each plate before placing the cake square on top. Scatter a few extra chopped pecans around the plate, and suddenly your dump cake looks like something from a restaurant.
Whipped cream rosettes make everything elegant. I buy the spray can kind because I’m lazy, but if you have the energy to whip fresh cream, it’s even better. Pipe it on top using a star tip, and boom—instant upgrade.
For potlucks or church events, I keep it simple. The dump cake stays in its 9×13 pan, covered with foil, and I bring a serving spatula. I’ll sometimes sprinkle some extra pecan halves on top before covering it, just for visual interest when people first see it. Honestly though, this dessert is so good it doesn’t need fancy presentation to disappear quickly.
Gifting Your Dump Cake
This makes a wonderful gift for new neighbors, friends who’ve had a baby, or anyone going through a tough time. I’ve given it to people recovering from surgery, new parents who need easy meals, and elderly neighbors who appreciate homemade treats.
For gifting, I use disposable aluminum pans so recipients don’t need to worry about returning dishes. I cover the cooled cake with plastic wrap, then foil, and attach a little note with reheating instructions. Something simple like: “Enjoy within 5 days. Keep refrigerated. Warm at 300°F for 15 minutes or microwave individual pieces for 20 seconds.”
I also include serving suggestions on my note—mentioning that it’s amazing with vanilla ice cream or whipped cream. People appreciate the guidance, especially if they’re not big bakers themselves.
One time I brought this to a grieving family, and the mom later told me it was the first dessert her kids had eaten in days. Sometimes comfort food provides actual comfort, you know? That experience reminded me that simple, delicious food can mean so much more than fancy complicated dishes.
Keeping It Fresh at Parties
If you’re serving this at an outdoor event or somewhere without easy refrigeration, keep it on ice. I set the pan inside a larger pan filled with ice, which keeps everything at a safe temperature. For indoor parties that last several hours, I’ll cut and serve half the pan, keeping the other half covered in the fridge until needed.
The cake does dry out if left uncovered too long, so keep it covered with foil until serving time. The moisture from the filling usually keeps everything pretty tender, but why risk it?
By the way, if you’re interested in exploring more easy cake and cupcake recipes that work great for entertaining, I’ve got a whole collection of crowd-pleasers that follow this same simple philosophy—maximum flavor with minimum stress.
The versatility of this dessert still amazes me. Whether you’re feeding two people or twenty, serving it fresh or reheated, dressing it up or keeping it casual, this pecan pie dump cake recipe adapts to whatever you need. That flexibility, combined with the incredible taste, is exactly why it’s become my most-requested dessert. Give it a try, experiment with the timing and serving style that works for your life, and I bet it’ll become a regular in your rotation too.
Conclusion
The best part about this recipe isn’t just how easy it is or how delicious it tastes—it’s the confidence it gives you in the kitchen. You don’t need to be an experienced baker to create something that makes people smile. Just grab those simple ingredients, trust the process, and let the oven work its magic. I hope this becomes a recipe you turn to again and again, creating your own memories and traditions around it.
Frequently Asked Questions
Is light or dark Karo syrup better for pecan pie?
Light corn syrup is my personal preference because it allows the natural pecan and butter flavors to shine through without competing with the molasses notes found in dark corn syrup. Dark syrup creates a more robust, intensely flavored dessert that some people absolutely love, so it really comes down to whether you prefer subtle sweetness or bold richness. I’ve made this dump cake both ways, and my family consistently votes for the light version. If you can’t decide, try light first since it’s more traditional, then experiment with dark for your second batch. Either way, you’ll end up with a delicious dessert.
Can I use a different type of cake mix?
Absolutely! While yellow cake mix is traditional and works beautifully, butter golden cake mix, vanilla cake mix, or even spice cake mix all create excellent results. I’ve experimented with different flavors for various occasions—spice cake for Thanksgiving, butter pecan for summer gatherings. The key is avoiding cake mixes with pudding already added, as they can make the texture gummy rather than perfectly layered. Stick with basic cake mix varieties and you’ll be fine.
Why is my dump cake soggy in the middle?
This usually happens when the cake hasn’t baked long enough or when too much liquid was added. Make sure you’re not adding any water to the cake mix—just use it dry straight from the box. Also, check that your oven temperature is accurate with an oven thermometer, as many ovens run cooler than their settings indicate. If your dump cake still seems too wet after the recommended baking time, simply leave it in the oven for another 5-10 minutes until the top is golden and the center barely jiggles. Every oven is different, so trust your eyes more than the timer.
Can I make this in a smaller pan?
You can, but you’ll need to adjust the recipe proportions and watch the baking time carefully. For a 9×9 pan, I’d cut the entire recipe in half and start checking for doneness around 35 minutes. For an 8×8 pan, definitely halve everything and reduce baking time. Never try to fit the full recipe into a smaller pan or you’ll have overflow disasters—trust me, I learned this the hard way with a very messy oven.
What should I do if the top browns too quickly?
Simply tent a piece of aluminum foil loosely over the top of the pan for the remaining baking time. This protects the surface from direct heat while allowing the inside to continue cooking properly. I’ve had to do this occasionally when my oven runs hot or when I’ve placed the pan on a higher rack. Just make sure the foil doesn’t touch the cake surface—keep it loose and domed above the pan.
Can I make this without corn syrup?
While corn syrup creates the authentic pecan pie texture, you can substitute it with maple syrup, honey, or even golden syrup in equal amounts. The flavor will be noticeably different—maple syrup adds earthy sweetness, honey brings floral notes—but the texture works out similarly. I’ve used pure maple syrup for a more natural version, and while it doesn’t taste exactly like traditional pecan pie, it’s absolutely delicious in its own right.
How do I know when the dump cake is done?
Look for a golden-brown top that’s crispy around the edges, with the center still having just a slight jiggle when you gently shake the pan. The edges should have pulled away slightly from the pan sides. If you insert a knife into the cake portion (not the gooey filling below), it should come out with just a few moist crumbs. Remember that the cake continues cooking slightly as it cools, so slightly underdone is better than overbaked.
Can I add chocolate to this recipe?
Definitely! Chocolate chips make an excellent addition for turtle-style dump cake. I sprinkle about a cup of dark or semi-sweet chocolate chips over the pecan layer before adding the dry cake mix. Milk chocolate works too but can make it quite sweet. Some people drizzle melted chocolate over the top after baking, which looks gorgeous and adds extra richness. White chocolate chips create an interesting flavor contrast as well.
Is this recipe suitable for people with nut allergies?
The traditional version isn’t since pecans are the star ingredient, but you can create a nut-free variation by omitting the pecans entirely and substituting crushed pretzels, shredded coconut, or even chocolate chips for texture. Obviously this changes the character of the dessert significantly—it won’t be pecan pie dump cake anymore—but it’ll still be a delicious layered dessert. Just make absolutely certain your cake mix was processed in a nut-free facility if you’re dealing with severe allergies.
What’s the best way to reheat leftovers?
For individual servings, microwave for 15-20 seconds to bring it to room temperature, or 30-40 seconds if you want it warm. For reheating the whole pan, cover it with foil and warm at 300°F for about 15 minutes. I prefer the oven method for parties because it heats more evenly and brings back that fresh-baked texture. The microwave is perfect for quick personal servings though—I use it almost daily when sneaking leftover dessert after the kids go to bed.
Equipment
- Mixing Bowl
- Whisk or Fork
- 9x13-inch Baking Dish
- Oven
- Spatula
Ingredients
- 1 box yellow cake mix
- 1 cup unsalted butter melted
- 2 cups pecan halves or chopped pecans
- 3 large eggs
- 1 cup light corn syrup
- 1/2 cup packed brown sugar
- 1/4 cup granulated white sugar
- 2 teaspoons pure vanilla extract
- 1/4 teaspoon salt
Instructions
- Preheat your oven to 350°F and prepare a 9x13-inch baking dish without greasing it.
- In a medium mixing bowl, beat the three eggs lightly, then whisk in the corn syrup, both sugars, vanilla extract, and salt until smooth.
- Pour the egg mixture into the prepared baking dish and spread it evenly.
- Sprinkle pecans evenly over the filling mixture.
- Evenly sprinkle the dry cake mix over the pecans, do not mix.
- Drizzle melted butter evenly over the dry cake mix.
- Bake for 40-50 minutes, watching for a golden-brown top and a slightly jiggly center.
- Allow to cool for at least 20 minutes before serving.
Notes
Nutrition

Hello! I’m Sarah Mitchell, and I’m passionate about bringing creativity and innovation to baking. My love for baking started in high school when I first tried my hand at decorating cupcakes for a class project. What began as a fun hobby quickly became a full-time passion. I’ve spent the past decade working in bakeries and dessert shops, honing my skills in everything from simple cookies to intricate wedding cakes.
After working in some of the top bakeries across the country, I realized that baking was about more than just following recipes — it was about infusing your personality into each creation. At BakingSecret.com, I love creating recipes that push boundaries while staying true to the heart of classic baking. I specialize in creating delicious and visually stunning pastries that will wow your guests.
When I’m not baking, I enjoy teaching baking classes, trying out new cake decoration techniques, and traveling to find inspiration in global dessert traditions. I’m so excited to share my tips and tricks with you to help elevate your baking game!