
Why Pistachio Pineapple Tartlets Are a Must-Try
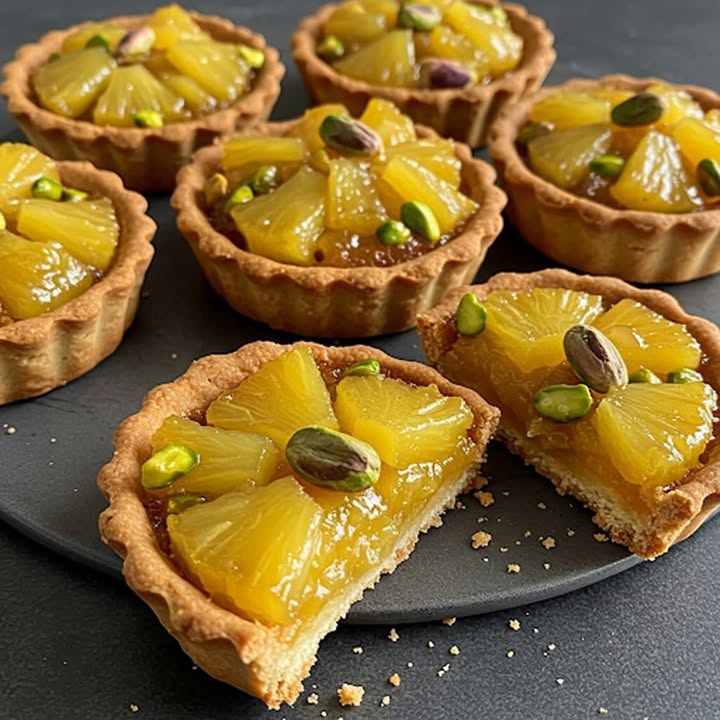
Picture this: a buttery cookie crust, a creamy pistachio filling studded with sweet pineapple chunks, and a sprinkle of chopped pistachios on top. Sounds dreamy, right? That’s exactly what happened when I first made Pistachio Pineapple Tartlets for my family. The combination of nutty pistachios and tropical pineapple is simply irresistible. These tartlets are not just a dessert; they’re an experience. Whether you’re hosting a dinner party or just craving something sweet, these little treats will steal the show.
A Little History Behind This Sweet Treat
Tartlets have been around for ages, but their charm lies in how versatile they are. You can fill them with anything from fruit to custard, and each version tells a story. My love for pistachios and pineapple started during a trip to Hawaii, where I discovered how well these two flavors complement each other. Back home, I decided to recreate that magic in a bite-sized dessert. Over time, I’ve tweaked the recipe to make it as easy as possible while keeping the flavors bold and exciting.
Why You’ll Love This Recipe
First off, these Pistachio Pineapple Tartlets are super simple to make. No fancy techniques or hard-to-find ingredients—just straightforward steps that anyone can follow. Plus, the flavor combo is out of this world. The pistachios add a rich, nutty crunch, while the pineapple brings a burst of sweetness and tanginess. And let’s not forget the texture: the buttery crust, creamy filling, and juicy pineapple chunks create a party in your mouth. Trust me, one bite, and you’ll be hooked!
Perfect Occasions for Pistachio Pineapple Tartlets
These tartlets are perfect for any occasion. Serve them at a summer BBQ, a holiday gathering, or even a cozy family dinner. They’re also great for bridal showers, baby showers, or afternoon tea parties. Honestly, you don’t need a special reason to whip these up. Sometimes, a random Tuesday night calls for something sweet and fancy, and these tartlets fit the bill perfectly.
Ingredients for Pistachio Pineapple Tartlets
Here’s what you’ll need:
For the Base:
- 1 cup crushed Digestive or Graham cookies
- ½ cup melted butter
- 2 tbsp sugar
For the Filling:
- 1 cup shelled, roasted pistachios
- ½ cup sugar
- 2 eggs
- ½ cup heavy cream
- ½ cup well-drained crushed pineapple
- 1 tsp vanilla extract
To Decorate:
- Fresh pineapple slices or chunks
- Chopped pistachios (optional)
Substitution Options
If you’re missing an ingredient or want to switch things up, here are some ideas:
- Cookies: Use any plain cookie like shortbread or vanilla wafers instead of Digestive or Graham crackers.
- Pistachios: Almonds or cashews work as substitutes if you can’t find pistachios.
- Pineapple: Swap crushed pineapple with mango or peach chunks for a different fruity twist.
- Dairy-Free Option: Use coconut cream instead of heavy cream and vegan butter for the crust.
Preparation Section
Step 1: Preheat and Prep
Start by preheating your oven to 180°C (350°F). While the oven heats up, grab your ingredients and tools. Making the base is a breeze—just mix crushed cookies, melted butter, and sugar until it resembles wet sand. Press this mixture firmly into tartlet molds. Pro tip: Use the back of a spoon to smooth the crust evenly. Bake for 10 minutes, then let it cool while you prepare the filling.
Step 2: Blend the Filling
In a blender, combine pistachios, sugar, eggs, heavy cream, crushed pineapple, and vanilla extract. Blend until smooth and creamy. The aroma of roasted pistachios combined with the sweetness of pineapple is heavenly! Pour this luscious filling over the cooled crusts, making sure each mold gets an equal amount. Don’t worry if it looks too liquidy—it will set beautifully once baked.
Step 3: Bake to Perfection
Bake the tartlets for 20–25 minutes, or until the filling is firm and slightly golden on top. Keep an eye on them to avoid overbaking. Once done, remove them from the oven and let them cool completely. Chef’s tip: For extra shine, brush a thin layer of apricot jam on top before adding decorations.
Step 4: Decorate and Serve
Now comes the fun part—decorating! Add fresh pineapple slices or chunks on top, along with a sprinkle of chopped pistachios for a pop of color and crunch. If you’re feeling fancy, dust a little icing sugar over the tartlets for a professional touch. Serve them chilled or at room temperature—they’re delicious either way!
Timing
Here’s a quick breakdown of the timing:
- Prep Time: 15 minutes
- Cooking Time: 30–35 minutes
- Resting Time: 30 minutes (to cool)
- Total Time: About 1 hour 15 minutes
Chef’s Secret
For an extra layer of flavor, toast the pistachios lightly before blending them. This enhances their natural nuttiness and adds depth to the filling. It’s a small step that makes a big difference!
Extra Info
Did you know that pistachios are often called the “happy nut”? Their vibrant green color and unique shape make them stand out, but they’re also packed with nutrients. Pairing them with pineapple creates a balance of healthy fats and vitamins—a guilt-free indulgence!
Necessary Equipment
You don’t need much to make these tartlets:
- Tartlet molds or a muffin tin
- Blender or food processor
- Mixing bowls
- Spatula
- Oven
Storage
These tartlets store beautifully. Place them in an airtight container and keep them in the fridge for up to 3 days. The flavors deepen over time, so they taste even better the next day. If you want to freeze them, wrap each tartlet individually in plastic wrap and place them in a freezer-safe bag. They’ll last up to a month.
When reheating, let them come to room temperature first. Avoid microwaving, as it can soften the crust. Instead, warm them slightly in the oven for a few minutes if desired.
Pro tip: Always decorate with fresh toppings right before serving to maintain freshness and presentation.
Tips and Advice
- Use a fine mesh strainer to drain the crushed pineapple thoroughly. Excess moisture can make the filling soggy.
- Don’t skip the cooling step after baking. It helps the filling set properly.
- If you’re using a muffin tin instead of tartlet molds, line it with cupcake liners for easy removal.
Presentation Tips
Make your tartlets look Instagram-worthy with these ideas:
- Arrange them on a tiered dessert stand for a fancy display.
- Add edible flowers or mint leaves for a pop of color.
- Serve them on colorful plates to highlight their vibrant hues.
Healthier Alternative Recipes
Want to tweak the recipe? Here are six variations:
- Gluten-Free: Use gluten-free cookies for the crust.
- Low-Sugar: Replace sugar with a sugar substitute like stevia or monk fruit.
- Vegan: Substitute eggs with flax eggs and use coconut cream.
- Spiced Version: Add a pinch of cinnamon or cardamom to the filling.
- Chocolate Twist: Drizzle melted dark chocolate on top before serving.
- Fruit Swap: Try mango or peaches instead of pineapple.
Common Mistakes to Avoid
Mistake 1: Skipping the Cooling Step
Rushing through the process can ruin your tartlets. If you don’t let the filling set properly, it may collapse or become runny. Patience pays off here!
Mistake 2: Overfilling the Molds
Filling the molds too high can cause spills during baking. Leave a little space at the top to allow the filling to rise without overflowing.
Mistake 3: Using Wet Pineapple
Excess moisture from undrained pineapple can ruin the texture. Always drain it well to ensure a creamy filling.
FAQ
Can I make these tartlets ahead of time?
Absolutely! These tartlets can be made a day in advance and stored in the fridge. Just add the final decorations before serving.
What can I use instead of heavy cream?
Coconut cream or full-fat Greek yogurt works as a great substitute for heavy cream.
Place the cookies in a ziplock bag and crush them with a rolling pin. It’s quick and mess-free!
Can I freeze these tartlets?
Yes, you can freeze them for up to a month. Wrap them individually to prevent freezer burn.
Do I need a blender for the filling?
A blender gives the smoothest texture, but you can also use a food processor or whisk by hand if needed.
What size should the tartlets be?
Standard tartlet molds are about 3 inches wide, but you can adjust based on your preference.
Can I use canned pineapple?
Yes, just make sure it’s well-drained to avoid excess moisture.
How many tartlets does this recipe make?
This recipe yields about 12 small tartlets, depending on the mold size.
Are these tartlets kid-friendly?
Definitely! Kids love the sweet pineapple and nutty pistachio combo.
What’s the best way to serve them?
Serve them chilled or at room temperature, garnished with fresh pineapple and pistachios.
Final Thoughts
Pistachio Pineapple Tartlets are more than just a dessert—they’re a celebration of flavors and textures. From the buttery crust to the creamy filling and the tropical twist of pineapple, every bite is pure joy. Whether you’re a seasoned baker or a beginner, this recipe is sure to impress. So go ahead, give it a try, and watch as these tartlets become your new favorite treat!
Equipment
- Mixing bowls
- Blender or food processor
- Spatula
- Tartlet molds or muffin tin
- Oven
Ingredients
- 1 cup crushed Digestive or Graham cookies
- ½ cup melted butter
- 2 tbsp sugar
- 1 cup shelled, roasted pistachios
- ½ cup sugar
- 2 large eggs
- ½ cup heavy cream
- ½ cup well-drained crushed pineapple
- 1 tsp vanilla extract
- to taste Fresh pineapple slices or chunks for decoration
- to taste Chopped pistachios optional for decoration
Instructions
- Preheat the oven to 180°C (350°F).
- Mix the crushed cookies, melted butter, and sugar until it resembles wet sand.
- Press the mixture firmly into tartlet molds and smooth the crust with a spoon.
- Bake for 10 minutes and let cool.
- In a blender, combine pistachios, sugar, eggs, heavy cream, crushed pineapple, and vanilla extract. Blend until smooth.
- Pour the filling over the cooled crusts evenly.
- Bake tartlets for 20-25 minutes until filling is firm and slightly golden.
- Let cool completely and optionally brush with apricot jam for shine.
- Decorate with fresh pineapple and chopped pistachios before serving.
- This recipe can be made a day in advance—just add decorations before serving.
Notes
Nutrition

Hi, I’m Olivia Parker, the founder of BakingSecret.com and a lifelong lover of all things sweet and homemade. I grew up in a small town in Oregon, where the smell of fresh cookies in my family’s kitchen sparked my passion for baking. Over the years, I turned that passion into a mission: to help home bakers feel confident, inspired, and creative.
After studying food science and working in several artisan bakeries across the U.S., I decided to create a space where everyone from beginners to seasoned bakers can find reliable recipes, expert tips, and a warm, welcoming community. BakingSecret.com is my way of sharing the magic of baking with the world. When I’m not testing new recipes, you’ll find me exploring farmers’ markets, collecting vintage cookbooks, or perfecting my sourdough technique.