
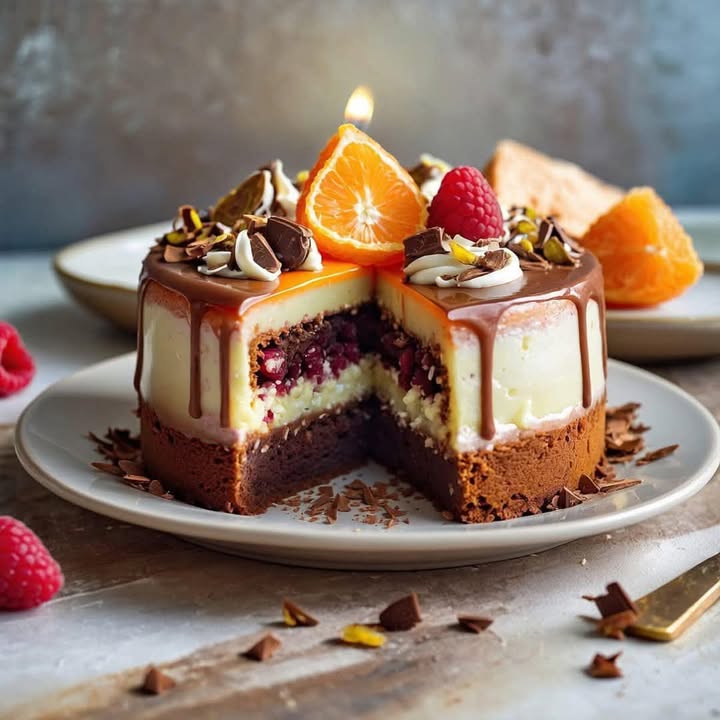
Why This Raspberry Chocolate Cheesecake Is a Showstopper
Let me tell you about the day I discovered this Raspberry Chocolate Cheesecake. It was a rainy Sunday afternoon, and I needed something to lift my spirits. My best friend had just dropped off a jar of homemade raspberry puree, and I thought, “Why not bake something luxurious?” Little did I know, this recipe would become my go-to dessert for impressing guests and treating my family. Layers of creamy cheesecake, rich chocolate, and fresh raspberries come together in this decadent treat. Trust me, once you try it, you’ll understand why it’s so special.
A Little History Behind the Magic
Chocolate and raspberries have been a match made in heaven for centuries. Raspberries were first cultivated in Europe during the Middle Ages, while chocolate traveled from the Aztecs to Europe in the 16th century. Fast forward to today, and we’ve elevated this pairing into a modern masterpiece: the Raspberry Chocolate Cheesecake. I love how this cake combines old-world flavors with a contemporary twist. The layers remind me of my grandmother’s trifle, but with a richness that feels indulgent yet comforting.
Why You’ll Fall Head Over Heels for This Recipe
This Raspberry Chocolate Cheesecake is a dream come true for anyone who loves bold flavors. The tangy cream cheese frosting balances the sweetness of the chocolate cake, while the fresh raspberries add a pop of color and freshness. What’s more? It’s surprisingly simple to make! Even if you’re not a seasoned baker, this recipe guides you step by step. Plus, the aroma of chocolate and raspberries wafting through your kitchen is worth every minute of effort.
Perfect Occasions to Whip Up This Dessert
Need a dessert for a birthday party, anniversary dinner, or holiday gathering? This Raspberry Chocolate Cheesecake is your answer. It’s elegant enough for formal events but cozy enough for family dinners. I once served it at a surprise birthday party, and everyone raved about how it looked like it came from a fancy bakery. Whether you’re celebrating a milestone or just craving something sweet, this cake fits the bill.
Ingredients You’ll Need
- 2 cups all-purpose flour
- 1 cup granulated sugar
- ½ cup unsweetened cocoa powder
- 2 tsp baking powder
- 1 tsp baking soda
- 1 tsp salt
- 1 tsp vanilla extract
- 1 cup milk
- ½ cup vegetable oil
- 2 eggs
- 1 cup raspberry puree
- 1½ cups cream cheese, softened
- ½ cup powdered sugar
- 1 tsp vanilla extract for frosting
- 1 cup fresh raspberries
Substitution Options for Flexibility
Don’t stress if you’re missing an ingredient. Here are some easy swaps:
- Use almond or oat milk instead of regular milk for a dairy-free option.
- Swap coconut oil for vegetable oil to add a hint of tropical flavor.
- If you can’t find fresh raspberries, frozen ones work too—just thaw them first.
- For a gluten-free version, use a 1:1 gluten-free flour blend.
Step 1: Preheat and Prep
Start by preheating your oven to 350°F (175°C) and greasing three 9-inch round pans. I always use parchment paper circles on the bottoms to prevent sticking—it’s a lifesaver. While the oven heats up, gather all your ingredients. Pro tip: Measure everything beforehand so you’re not scrambling mid-recipe. The dry ingredients will create a rich, chocolatey base, while the wet ingredients bring moisture and flavor.
Step 2: Mix the Dry Ingredients
In a large bowl, sift together the flour, sugar, cocoa powder, baking powder, baking soda, and salt. Sifting ensures there are no lumps, which makes for a smoother batter. As you mix, take a moment to inhale the deep, earthy scent of cocoa powder. It’s like a warm hug for your senses. This step sets the foundation for your Raspberry Chocolate Cheesecake, so don’t rush it.
Step 3: Combine Wet Ingredients
Add the milk, vegetable oil, eggs, and vanilla extract to the dry mixture. Beat on medium speed for 2 minutes until the batter is smooth and glossy. You’ll notice how the vanilla adds a subtle sweetness that complements the chocolate. Now comes the fun part: stirring in the raspberry puree. Watch as the batter transforms into a beautiful pinkish hue, hinting at the fruity goodness inside.
Step 4: Bake to Perfection
Pour the batter evenly into the prepared pans. Pop them into the oven and bake for 25–30 minutes. Keep an eye on the cakes—they’re done when a toothpick inserted in the center comes out clean. As they bake, your kitchen will fill with the irresistible aroma of chocolate and raspberries. Let the cakes cool completely before moving on to the next step.
Step 5: Whip Up the Frosting
While the cakes cool, beat the cream cheese, powdered sugar, and vanilla extract until smooth. This frosting is light, creamy, and oh-so-delicious. Chef’s tip: Chill the bowl and beaters before whipping to keep the frosting extra fluffy. Spread a generous layer between each cake, adding fresh raspberries for a burst of tartness.
Step 6: Assemble and Decorate
Stack the layers, spreading frosting and raspberries between each one. Once assembled, frost the outside with the remaining cream cheese mixture. Finish with fresh raspberries and chocolate shavings for a touch of elegance. Take a step back and admire your handiwork—you’ve just created a showstopping dessert!
Timing Breakdown
Here’s how long each stage takes:
- Prep time: 20 minutes
- Cooking time: 30 minutes
- Resting time: 1 hour (for cooling)
- Total time: 2 hours
Chef’s Secret for Extra Flavor
For an extra layer of flavor, brush each cake layer with a simple syrup made from equal parts sugar and water. This keeps the cake moist and adds a subtle sweetness that pairs beautifully with the tangy cream cheese frosting.
An Interesting Fact About Raspberries
Did you know raspberries belong to the rose family? They’re delicate, fragrant, and packed with antioxidants. Their vibrant red color makes them a natural choice for desserts like this Raspberry Chocolate Cheesecake.
Necessary Equipment
You’ll need:
- Three 9-inch round cake pans
- Parchment paper
- Mixing bowls
- Electric mixer
- Spatula
- Cooling rack
Storage Tips
Store your Raspberry Chocolate Cheesecake in the fridge to keep it fresh. Cover it tightly with plastic wrap or place it in an airtight container. It should last up to 5 days. If you want to freeze it, wrap individual slices in foil and store them in a freezer-safe bag. Thaw overnight in the fridge before serving.
For longer storage, avoid slicing the cake until you’re ready to eat. This prevents the layers from drying out. Always let the cake come to room temperature before serving for the best texture and flavor.
Tips and Advice
- Use room-temperature eggs and cream cheese for easier mixing.
- Don’t overmix the batter—it can make the cake dense.
- Chill the frosted cake for 30 minutes before slicing for cleaner cuts.
Presentation Ideas
Elevate your dessert with these creative touches:
- Garnish with edible flowers for a whimsical look.
- Dust powdered sugar over the top for a rustic finish.
- Serve slices on decorative plates with a drizzle of raspberry sauce.
Healthier Alternatives
Want to lighten up this recipe? Try these variations:
- Low-Sugar Option: Use a sugar substitute like stevia or monk fruit in both the cake and frosting.
- Vegan Version: Swap eggs for flax eggs and use plant-based cream cheese.
- Gluten-Free Cake: Use a gluten-free flour blend and ensure your baking powder is gluten-free.
- Reduced-Fat Frosting: Use low-fat cream cheese and Greek yogurt for a lighter frosting.
- Whole Grain Base: Substitute half the flour with whole wheat flour for added fiber.
- No-Bake Option: Make a crust from crushed cookies and layer with no-bake cheesecake filling.
Mistake 1: Skipping the Cooling Step
One common mistake is assembling the cake while the layers are still warm. This causes the frosting to melt and slide off. To avoid this, let the cakes cool completely on a wire rack. Pro tip: Place them in the fridge for 15 minutes to speed up the process.
Mistake 2: Overmixing the Batter
Overmixing can lead to a dense, tough cake. Mix just until the ingredients are combined. Think of it as folding rather than beating. A gentle hand ensures a light and airy texture.
Mistake 3: Using Stale Raspberries
Fresh raspberries are key to this recipe. Stale ones can be mushy and lack flavor. Check for firmness and vibrant color before buying. If using frozen berries, pat them dry after thawing to remove excess moisture.
Mistake 4: Not Leveling the Cakes
Uneven layers can make stacking tricky. Use a serrated knife to trim any domed tops before assembling. This creates a stable base for your Raspberry Chocolate Cheesecake.
Mistake 5: Rushing the Decoration
Decorating too quickly can result in smudged frosting. Chill the frosted cake for 30 minutes before adding final touches. This gives the frosting time to set and makes decorating easier.
FAQ: Can I Make This Cake Ahead of Time?
Absolutely! This Raspberry Chocolate Cheesecake tastes even better the next day as the flavors meld together. Store it in the fridge and bring it to room temperature before serving.
FAQ: What Can I Use Instead of Raspberry Puree?
If you don’t have raspberry puree, try strawberry or cherry puree. Both pair beautifully with chocolate and cream cheese. Just adjust the sugar slightly to balance the sweetness.
FAQ: How Do I Prevent the Cake Layers from Sticking?
Grease your pans thoroughly and line the bottoms with parchment paper. This double layer of protection ensures the cakes release easily without tearing.
FAQ: Can I Use Store-Bought Frosting?
While homemade frosting is ideal, store-bought cream cheese frosting works in a pinch. Add a teaspoon of vanilla extract to enhance the flavor.
FAQ: Why Did My Cake Sink in the Middle?
A sunken cake often results from underbaking or opening the oven door too soon. Make sure the toothpick comes out clean before removing the cakes from the oven.
FAQ: Is This Recipe Kid-Friendly?
Kids love the combination of chocolate and raspberries. For picky eaters, omit the seeds from the raspberry puree to reduce texture concerns.
FAQ: Can I Double the Recipe?
Yes, doubling the recipe is easy. Just use larger pans or make two separate cakes. Adjust the baking time slightly if needed.
FAQ: How Do I Know When the Frosting Is Ready?
The frosting should be smooth, creamy, and spreadable. If it’s too stiff, add a splash of milk. If it’s too runny, chill it for 10–15 minutes.
FAQ: Can I Freeze the Entire Cake?
Yes, wrap the fully assembled cake in plastic wrap and foil, then freeze. Thaw in the fridge overnight before serving.
FAQ: What Tools Do I Need for Decorating?
A small offset spatula helps spread frosting evenly. For intricate designs, use piping bags and tips. Keep a damp cloth handy to wipe away smudges.
Final Thoughts
This Raspberry Chocolate Cheesecake is more than just a dessert—it’s an experience. From its rich chocolate layers to its tangy cream cheese frosting and fresh raspberries, every bite is a celebration of flavor. Whether you’re baking for loved ones or treating yourself, this recipe promises joy in every slice. So grab your apron, turn on some music, and get ready to create a masterpiece!
Equipment
- Mixing bowls
- Electric mixer
- Spatula
- Three 9-inch round pans
- Cooling rack
Ingredients
- 2 cups all-purpose flour
- 1 cup granulated sugar
- ½ cup unsweetened cocoa powder
- 2 tsp baking powder
- 1 tsp baking soda
- 1 tsp salt
- 1 tsp vanilla extract
- 1 cup milk
- ½ cup vegetable oil
- 2 eggs
- 1 cup raspberry puree
- 1½ cups cream cheese softened
- ½ cup powdered sugar
- 1 tsp vanilla extract for frosting
- 1 cup fresh raspberries
Instructions
- Preheat the oven to 350°F (175°C) and grease three 9-inch round pans.
- In a large bowl, sift together the flour, sugar, cocoa powder, baking powder, baking soda, and salt.
- Add milk, vegetable oil, eggs, and vanilla extract to the dry ingredients, and beat on medium speed for 2 minutes.
- Stir in the raspberry puree until the batter is uniform and pinkish.
- Pour the batter evenly into prepared pans and bake for 25–30 minutes or until a toothpick comes out clean.
- Allow the cakes to cool completely on a cooling rack.
- Beat the cream cheese, powdered sugar, and vanilla extract until smooth to make the frosting.
- Spread frosting and fresh raspberries between each layer of cake.
- Stack the layers and frost the outside with the remaining cream cheese mixture, garnishing with fresh raspberries and chocolate shavings.
Notes
Nutrition

Hi, I’m Olivia Parker, the founder of BakingSecret.com and a lifelong lover of all things sweet and homemade. I grew up in a small town in Oregon, where the smell of fresh cookies in my family’s kitchen sparked my passion for baking. Over the years, I turned that passion into a mission: to help home bakers feel confident, inspired, and creative.
After studying food science and working in several artisan bakeries across the U.S., I decided to create a space where everyone from beginners to seasoned bakers can find reliable recipes, expert tips, and a warm, welcoming community. BakingSecret.com is my way of sharing the magic of baking with the world. When I’m not testing new recipes, you’ll find me exploring farmers’ markets, collecting vintage cookbooks, or perfecting my sourdough technique.