
The Red Velvet Cheesecake Delight That Stole My Heart
I’ll never forget the first time I served this cake. My friend’s eyes went wide, and she whispered, “Is that what I think it is?” One bite confirmed it: a stunning red velvet cake with a surprise cheesecake heart. It was love at first slice. This isn’t just baking; it’s creating edible magic for the people you care about.
A Cake Fit for Royalty: The Red Velvet Story
Red velvet’s story is as rich as its color. Some say it started in the Victorian era, where the cocoa’s natural acidity reacted with buttermilk for a subtle red tint. Modern red velvet gets its iconic hue from a touch (or more!) of food coloring. Then, someone brilliant thought, “Let’s put a cheesecake *inside* it,” and the Red Velvet Cheesecake Delight was born. It’s a perfect marriage of classic Southern charm and modern, creamy indulgence that always feels like a celebration.
Why This Red Velvet Cheesecake Recipe Is a Keeper
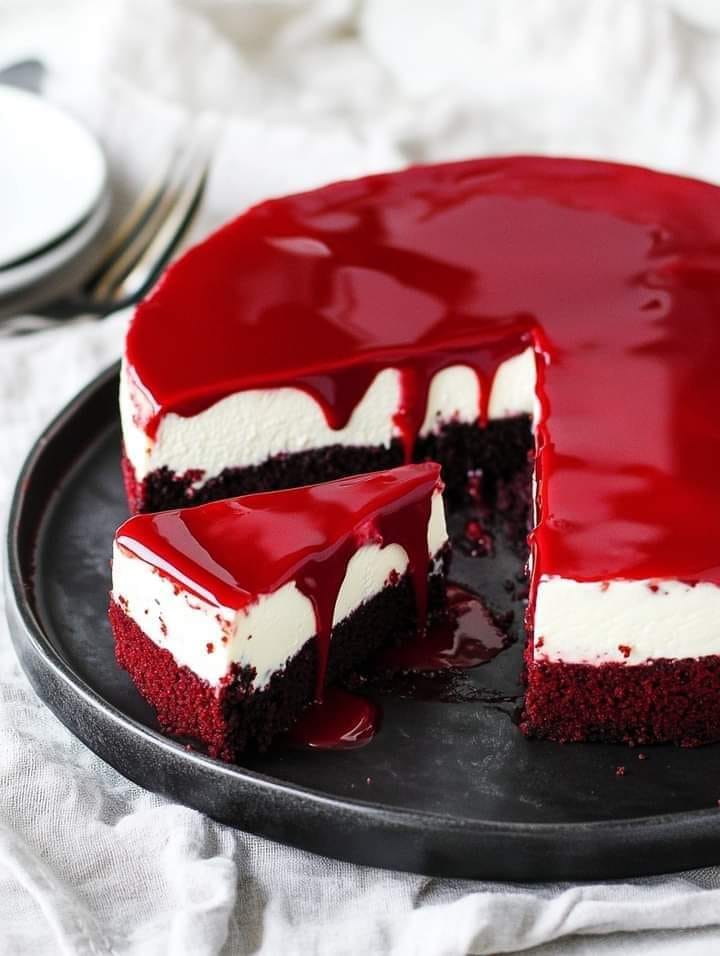
This recipe is special. It combines the moist, lightly chocolaty crumb of red velvet with the cool, creamy luxury of cheesecake. No need to pick your favorite dessert! It looks impressive but is surprisingly straightforward to layer. The best part? That dramatic reveal when you cut into it. The hidden cheesecake stripe always gets a “wow.” It’s my go-to for making an ordinary day feel extraordinary.
Perfect Occasions for Your Masterpiece
This cake is a showstopper for any event where you want to show a little extra love. It’s perfect for Valentine’s Day (hello, red and white!), birthdays, Mother’s Day brunch, or a festive holiday potluck. I’ve even baked it as a “just because” treat to cheer up a neighbor. It says “you’re special” in the sweetest way possible.
Gathering Your Ingredients for Red Velvet Cheesecake
Here’s what you’ll need. Bringing ingredients like eggs and buttermilk to room temperature is a chef’s secret for a smooth, even batter.
For the Red Velvet Cake:
- 2 ½ cups all-purpose flour
- 1 ½ cups granulated sugar
- 1 tsp baking powder
- 1 tsp baking soda
- ½ tsp salt
- 1 ½ tbsp cocoa powder
- 1 ½ cups vegetable oil
- 1 cup buttermilk (room temperature)
- 2 large eggs (room temperature)
- 2 tbsp red food coloring (liquid or gel)
- 1 tsp vanilla extract
- 1 tsp white or apple cider vinegar
For the Cheesecake Layer:
- 16 oz cream cheese (softened)
- ½ cup granulated sugar
- 2 large eggs
- 1 tsp vanilla extract
No Stress Substitutions
Don’t fret if you’re missing something! Here are easy swaps:
- Buttermilk: Make your own by adding 1 tbsp of lemon juice or vinegar to a cup of regular milk. Let it sit for 5 minutes.
- Cocoa Powder: Use either natural or Dutch-processed. Dutch-processed will give a deeper, darker color.
- Food Coloring: For a more natural hue, try beet powder! Start with 2-3 tablespoons mixed with the wet ingredients.
- Cream Cheese: Use full-fat for the best texture. Low-fat can make the layer runny.
Creating Your Red Velvet Cheesecake Delight: Step-by-Step
Step 1: Prep and Preheat
Start by preheating your oven to 325°F (163°C). This lower temperature is key for gentle, even baking. Grease and flour two 9-inch round cake pans. I like to trace a circle of parchment paper for the bottoms—it guarantees a clean release every time. This simple step saves so much heartache later!
Step 2: Make the Red Velvet Batter
In a large bowl, whisk together your dry ingredients: flour, sugar, baking powder, baking soda, salt, and that lovely cocoa powder. In another bowl, whisk the wet ingredients. Watch the vibrant red color bloom as you mix the oil, buttermilk, eggs, food coloring, vanilla, and vinegar. Pro tip: Pour the wet ingredients into the dry. Gently fold them together until just combined. A few small lumps are okay! Overmixing leads to a tough cake.
Step 3: Whip Up the Cheesecake Filling
Now, for the creamy surprise! In a mixing bowl, beat the softened cream cheese until it’s completely smooth and creamy. No lumps allowed here. Add the sugar, eggs, and vanilla. Beat again until everything is fully incorporated and the mixture is silky. You’ll see the texture change to a beautiful, pale yellow, cloud-like consistency.
Step 4: Layer It Like a Pro
This is the fun part. Divide your red velvet batter. Pour about two-thirds of it into one pan to form the bottom layer. Carefully spoon all of the cheesecake filling over this red layer. Spread it evenly. Gently pour the remaining red velvet batter over the cheesecake layer. Use a spatula to smooth the top. Don’t worry if it seems thin—it will rise as it bakes!
Step 5: Bake to Perfection
Place your masterpiece in the oven. Bake for 45-50 minutes. The cake is done when the top springs back lightly to the touch, and a toothpick inserted into the center comes out clean or with a few moist crumbs. Pro tip: Avoid opening the oven door too early, as this can cause the cake to fall. Let the cake cool in the pans for 10 minutes before turning it out onto a wire rack to cool completely.
Chef’s Tip: For the cleanest slices and perfect layers, you must refrigerate the cake for at least 2-4 hours after it cools. This sets the cheesecake layer firmly, making it slice like a dream.
Understanding Your Time Commitment
- Prep Time: 25 minutes
- Cook Time: 50 minutes
- Cooling Time: 1 hour
- Chilling Time: 4 hours (essential!)
- Total Time: About 6 hours 15 minutes
A Secret for Super-Moist Cake
My little secret? That teaspoon of vinegar is a superstar. It reacts with the baking soda to create an incredible rise and an unbelievably tender, moist crumb. Don’t skip it! It also helps enhance that iconic red color. You won’t taste it, but you’ll definitely taste the difference it makes.
Did You Know?
Red velvet cake was once a symbol of luxury during the Great Depression. The red dye was pricey, so serving it signaled a special occasion. Adding a cheesecake layer? Well, that just takes the luxury to a whole new level of fabulous.
Tools You’ll Need
- Two 9-inch round cake pans
- Mixing bowls (large and medium)
- Hand mixer or stand mixer
- Whisk and spatula
- Measuring cups and spoons
- Wire cooling rack
- Parchment paper (highly recommended)
How to Keep Your Cake Fresh
Because of the cheesecake layer, this cake must be stored in the refrigerator. Cover it tightly with plastic wrap or place it in a cake carrier once it’s completely cooled. This prevents it from absorbing any fridge odors and keeps it moist.
It will stay fresh and delicious for up to 5 days. The flavors actually meld and improve after a day! For longer storage, you can freeze individual slices. Wrap them tightly in plastic wrap and then foil. Thaw in the fridge overnight when you’re ready for a treat.
Proper food storage is key to maintaining quality and safety. Following guidelines helps ensure your delicious creations are as safe as they are tasty.
Top Tips for Red Velvet Success
- Room Temp is Rule #1: Cold ingredients don’t blend well. Take the chill off your buttermilk, eggs, and cream cheese.
- Measure Flour Correctly: Spoon flour into your measuring cup and level it off with a knife. Don’t scoop directly from the bag—you’ll pack in too much.
- Grease Those Pans Well: Use butter or baking spray and a dusting of flour, or use parchment circles for foolproof release.
- Don’t Rush the Chill: Patience is key. Letting the cake set in the fridge makes slicing beautiful and clean.
Make Your Red Velvet Cheesecake Shine
- Dust the top with a light snowfall of powdered sugar for a classic, elegant look.
- Frost with cream cheese frosting for a traditional “cake” appearance.
- Arrange fresh raspberries or strawberries around the top edge.
- Drizzle slices with a simple chocolate ganache or salted caramel sauce right before serving.
Healthier & Fun Variations to Try
Love this concept? Try these other delicious spins on the layered dessert idea.
- Whole Wheat Red Velvet: Swap half the all-purpose flour for whole wheat pastry flour for a nuttier taste and extra fiber.
- Greek Yogurt Cheesecake: For a lighter filling, use half cream cheese and half full-fat Greek yogurt. It’s tangy and rich but with less fat.
- Beet-Colored Velvet: Skip the food coloring. Use pureed roasted beets in the wet ingredients for a natural, earthy red hue and a hint of sweetness.
- Marble Swirl Cheesecake: Skip the full middle layer. Instead, dollop the cheesecake batter onto the red velvet in the pan and swirl with a knife for a beautiful marbled effect before baking.
- Mini Cheesecake Cupcakes: Portion the batters into a lined muffin tin. Start with red velvet batter, add a spoonful of cheesecake, top with more red velvet. Bake for 18-22 minutes for perfect single servings.
- Orange Zest Infusion: Add the zest of one orange to the cheesecake batter for a bright, citrusy twist that complements the chocolate notes beautifully.
More Cheesecake Inspiration
If you’re as obsessed with creamy desserts as I am, you’ll adore our decadent Chocolate Caramel Cheesecake. For a fruity, handheld option perfect for summer, you must try these easy Peach Cream Cheesecake Bars. And if you’re baking for dietary needs, our delicious Vegan Chocolate Delight is a crowd-pleaser. For a fresh side, my Ultimate Summer Fruit Salad is the perfect complement to any rich dessert.
Common Mistakes to Avoid With Red Velvet Cheesecake
Mistake 1: Using Cold Ingredients
This is the number one reason batters look curdled or don’t mix smoothly. Cold cream cheese will stay lumpy no matter how long you beat it. Cold eggs and buttermilk can cause the oil to solidify into little droplets. Always plan ahead! Pull your dairy and eggs out of the fridge at least an hour before you start baking for a silky, homogeneous batter.
Mistake 2: Overmixing the Cake Batter
Once you add the wet ingredients to the dry, switch from a whisk to a spatula. Gently fold the batter until the last streaks of flour disappear. Overmixing develops the gluten in the flour, which leads to a dense, tough, and rubbery cake instead of a light, tender crumb. A few small lumps are perfectly fine—they’ll bake out.
Mistake 3: Not Letting the Cake Chill Thoroughly
It’s so tempting to cut into that beautiful cake right away. But if you do, the cheesecake layer will be soft and runny, creating a messy slice and causing the layers to squish. The refrigeration time is non-negotiable. It firms up the cheesecake, sets the structure, and makes slicing clean and easy. Trust me, the wait is worth it.
Mistake 4: Skimping on the Food Coloring
A pale pink cake just isn’t the same as a bold red velvet. Be sure to use a good quality gel or liquid food coloring. Liquid coloring can sometimes require a bit more to get a deep, vibrant red. Gel coloring is more concentrated, so you use less. Don’t be afraid of the color—it’s what makes this cake so visually stunning.
Your Cheesecake Questions, Answered
Can I make this red velvet cheesecake ahead of time?
Absolutely! In fact, I recommend it. This cake tastes even better the next day as the flavors have more time to meld. You can bake it, let it cool completely, and refrigerate it (tightly covered) for up to 2 days before serving. Wait to add any powdered sugar or fresh fruit garnish until just before you’re ready to serve.
Why did my cake sink in the middle while baking?
A sunken cake usually means it wasn’t fully baked, the oven door was opened too early, or there was too much leavening (baking soda/powder). Make sure your oven is properly preheated. Don’t open the door before at least 40 minutes of bake time. Also, double-check your measurements for baking soda and powder—using a leveled measuring spoon is crucial.
Can I freeze the whole cake or leftovers?
Yes, you can freeze this cake beautifully. Wrap the completely cooled cake (or individual slices) tightly in plastic wrap, then in aluminum foil. Freeze for up to 2 months. Thaw overnight in the refrigerator. This is a great way to always have a spectacular dessert on hand for unexpected guests or a last-minute celebration.
My cream cheese filling is lumpy. How can I fix it?
Lumpy filling means your cream cheese was too cold. To fix it, you can try beating it for several more minutes with your mixer. If that doesn’t work, press the mixture through a fine-mesh sieve to remove the lumps. For next time, ensure your cream cheese is truly softened—it should dent easily when you press it with a finger.
Can I use a different size or type of pan?
For best results, stick to the two 9-inch round pans. Using a 13×9-inch pan will make a thinner cake with a shorter baking time. If you only have one pan, you can bake the layers sequentially, but you must let the pan cool completely, wash, and re-grease it between batches. The batter will be fine waiting at room temperature.
Do I have to use buttermilk?
Buttermilk is essential for the classic tangy flavor and tender texture. If you don’t have any, make the easy substitute mentioned earlier: 1 cup of milk mixed with 1 tablespoon of lemon juice or vinegar. Let it sit for 5-10 minutes until it looks slightly curdled. This works perfectly in a pinch.
How do I get a perfectly clean slice?
Use a long, thin, sharp knife. Run it under very hot water, wipe it dry, and make your cut. Clean the knife with hot water and dry it between each slice. This melts through the cheesecake layer cleanly and prevents crumbs and smears, giving you beautiful, professional-looking pieces.
Is the vinegar really necessary?
Yes, it is. The vinegar activates the baking soda, giving the cake a better rise. It also tenderizes the gluten and enhances the red color. The amount is so small you won’t taste it at all, but you’ll miss it if it’s gone. It’s a key player in the chemical reaction that makes red velvet so special.
Can I add frosting to this cake?
You certainly can! A classic cream cheese frosting is a perfect match. Just ensure the cake is completely cool before you frost it. If you’ve chilled it, let it sit out for 15-20 minutes so the frosting spreads easily. You could also do a simple whipped cream topping or a drizzle of white chocolate ganache.
My cake is very dark red, almost brown. What happened?
This is likely due to the type of cocoa powder you used. Natural cocoa powder is acidic and lighter, while Dutch-processed cocoa is alkalized, darker, and less acidic. Dutch-processed can sometimes mute the red color, leading to a darker shade. For the brightest red, use a natural, non-alkalized cocoa powder and a trusted red food coloring.
I hope this guide gives you the confidence to bake this stunning Red Velvet Cheesecake Delight. Remember, baking is about the joy you share, not just perfection. So have fun with it, and get ready for the compliments to roll in!
Ready, Set, Bake!
There you have it—my ultimate guide to a show-stopping Red Velvet Cheesecake Delight. This recipe has brought so much happiness to my kitchen table, and I know it will to yours. It’s more than a dessert; it’s a little piece of edible art that shows your love. So preheat that oven, gather your ingredients, and create some magic. Don’t forget to share a slice with someone special. Happy baking!
Equipment
- Grand bol
- Fouet
- Spatule
- Plaque à pâtisserie
- Papier sulfurisé
Ingredients
- 2 ½ tasses farine tout usage
- 1 ½ tasses sucre
- 1 cuil. à thé poudre à lever
- 1 cuil. à thé bicarbonate de soude
- ½ cuil. à thé sel
- 1 ½ cuil. à soupe cacao en poudre
- 1 ½ tasses huile végétale
- 1 tasse buttermilk
- 2 grands œufs
- 2 cuil. à soupe colorant alimentaire rouge liquide ou en gel
- 1 cuil. à thé extrait de vanille
- 1 cuil. à thé vinaigre blanc ou de cidre
- 16 oz fromage à tartiner ramolli
- ½ tasse sucre
- 2 grands œufs
- 1 cuil. à thé extrait de vanille
Instructions
- Préchauffez le four à 163°C et graissez et farinez deux moules à gâteau ronds de 9 pouces.
- Dans un grand bol, fouettez ensemble les ingrédients secs (farine, sucre, poudre à lever, bicarbonate de soude, sel, cacao en poudre).
- Dans un autre bol, fouettez les ingrédients humides (huile, buttermilk, œufs, colorant, vanille, vinaigre) jusqu'à ce qu'ils soient bien mélangés.
- Versez les ingrédients humides dans les ingrédients secs et incorporez délicatement jusqu'à ce que le tout soit juste mélangé.
- Dans un bol, battez le fromage à tartiner ramolli jusqu'à ce qu'il soit lisse. Ajoutez le sucre, les œufs et la vanille, et battez jusqu'à obtenir un mélange soyeux.
- Versez deux tiers de la pâte de red velvet dans un moule.
- Ajoutez la garniture de cheesecake sur la couche de red velvet et étalez uniformément.
- Versez le reste de la pâte de red velvet sur la garniture de cheesecake et lissez le dessus.
- Faites cuire pendant 45-50 minutes jusqu'à ce que le dessus rebondisse et qu'un cure-dent ressorte propre.
- Laissez le gâteau refroidir dans les moules pendant 10 minutes, puis transférez-le sur une grille pour le laisser refroidir complètement.
- Réfrigérez le gâteau pendant au moins 2-4 heures pour que la couche de cheesecake prenne avant de couper.
Notes
Nutrition

Hi, I’m Olivia Parker, the founder of BakingSecret.com and a lifelong lover of all things sweet and homemade. I grew up in a small town in Oregon, where the smell of fresh cookies in my family’s kitchen sparked my passion for baking. Over the years, I turned that passion into a mission: to help home bakers feel confident, inspired, and creative.
After studying food science and working in several artisan bakeries across the U.S., I decided to create a space where everyone from beginners to seasoned bakers can find reliable recipes, expert tips, and a warm, welcoming community. BakingSecret.com is my way of sharing the magic of baking with the world. When I’m not testing new recipes, you’ll find me exploring farmers’ markets, collecting vintage cookbooks, or perfecting my sourdough technique.