
Introduction
There’s something special about homemade sourdough sandwich bread. The smell of fresh bread in the kitchen is unbeatable. I adore this recipe because it’s simple yet deeply satisfying. Whether you’re a pro baker or just starting, this loaf will quickly become your favorite.
A Brief History of Sourdough Bread
Sourdough bread has been around for ages. Ancient Egyptians used wild yeast to bake bread long before commercial yeast existed. The tangy flavor comes from natural fermentation. Today, sourdough sandwich bread blends tradition with modern convenience. I’ve made this countless times, tweaking it for softness and taste. It’s perfect for sandwiches or toast.
Why You’ll Love This Sourdough Sandwich Bread Recipe
This bread is light, airy, and full of flavor. The hint of sourdough tang pairs well with sweet jams or savory fillings. Plus, it’s easy to make at home. No fancy tools needed—just patience and passion.
Perfect Occasions to Prepare This Bread
This sourdough sandwich bread is great for weekend brunches, family dinners, or gifting. It’s also ideal for meal prep since it stays fresh for days when stored properly.
Ingredients
- 1 cup active sourdough starter
- 3 cups all-purpose flour
- 1 cup warm water
- 1 teaspoon salt
- 1 tablespoon sugar
Substitution Options
- Swap all-purpose flour for whole wheat for a nuttier taste.
- Use honey or maple syrup instead of sugar for natural sweetness.
- If your starter isn’t active, add ½ teaspoon of instant yeast.
Preparation
Step 1: Mix the Starter and Water
Combine your sourdough starter and warm water in a large bowl. Stir until smooth and bubbly. This wakes up the yeast. Use lukewarm water—not too hot—to avoid killing it.
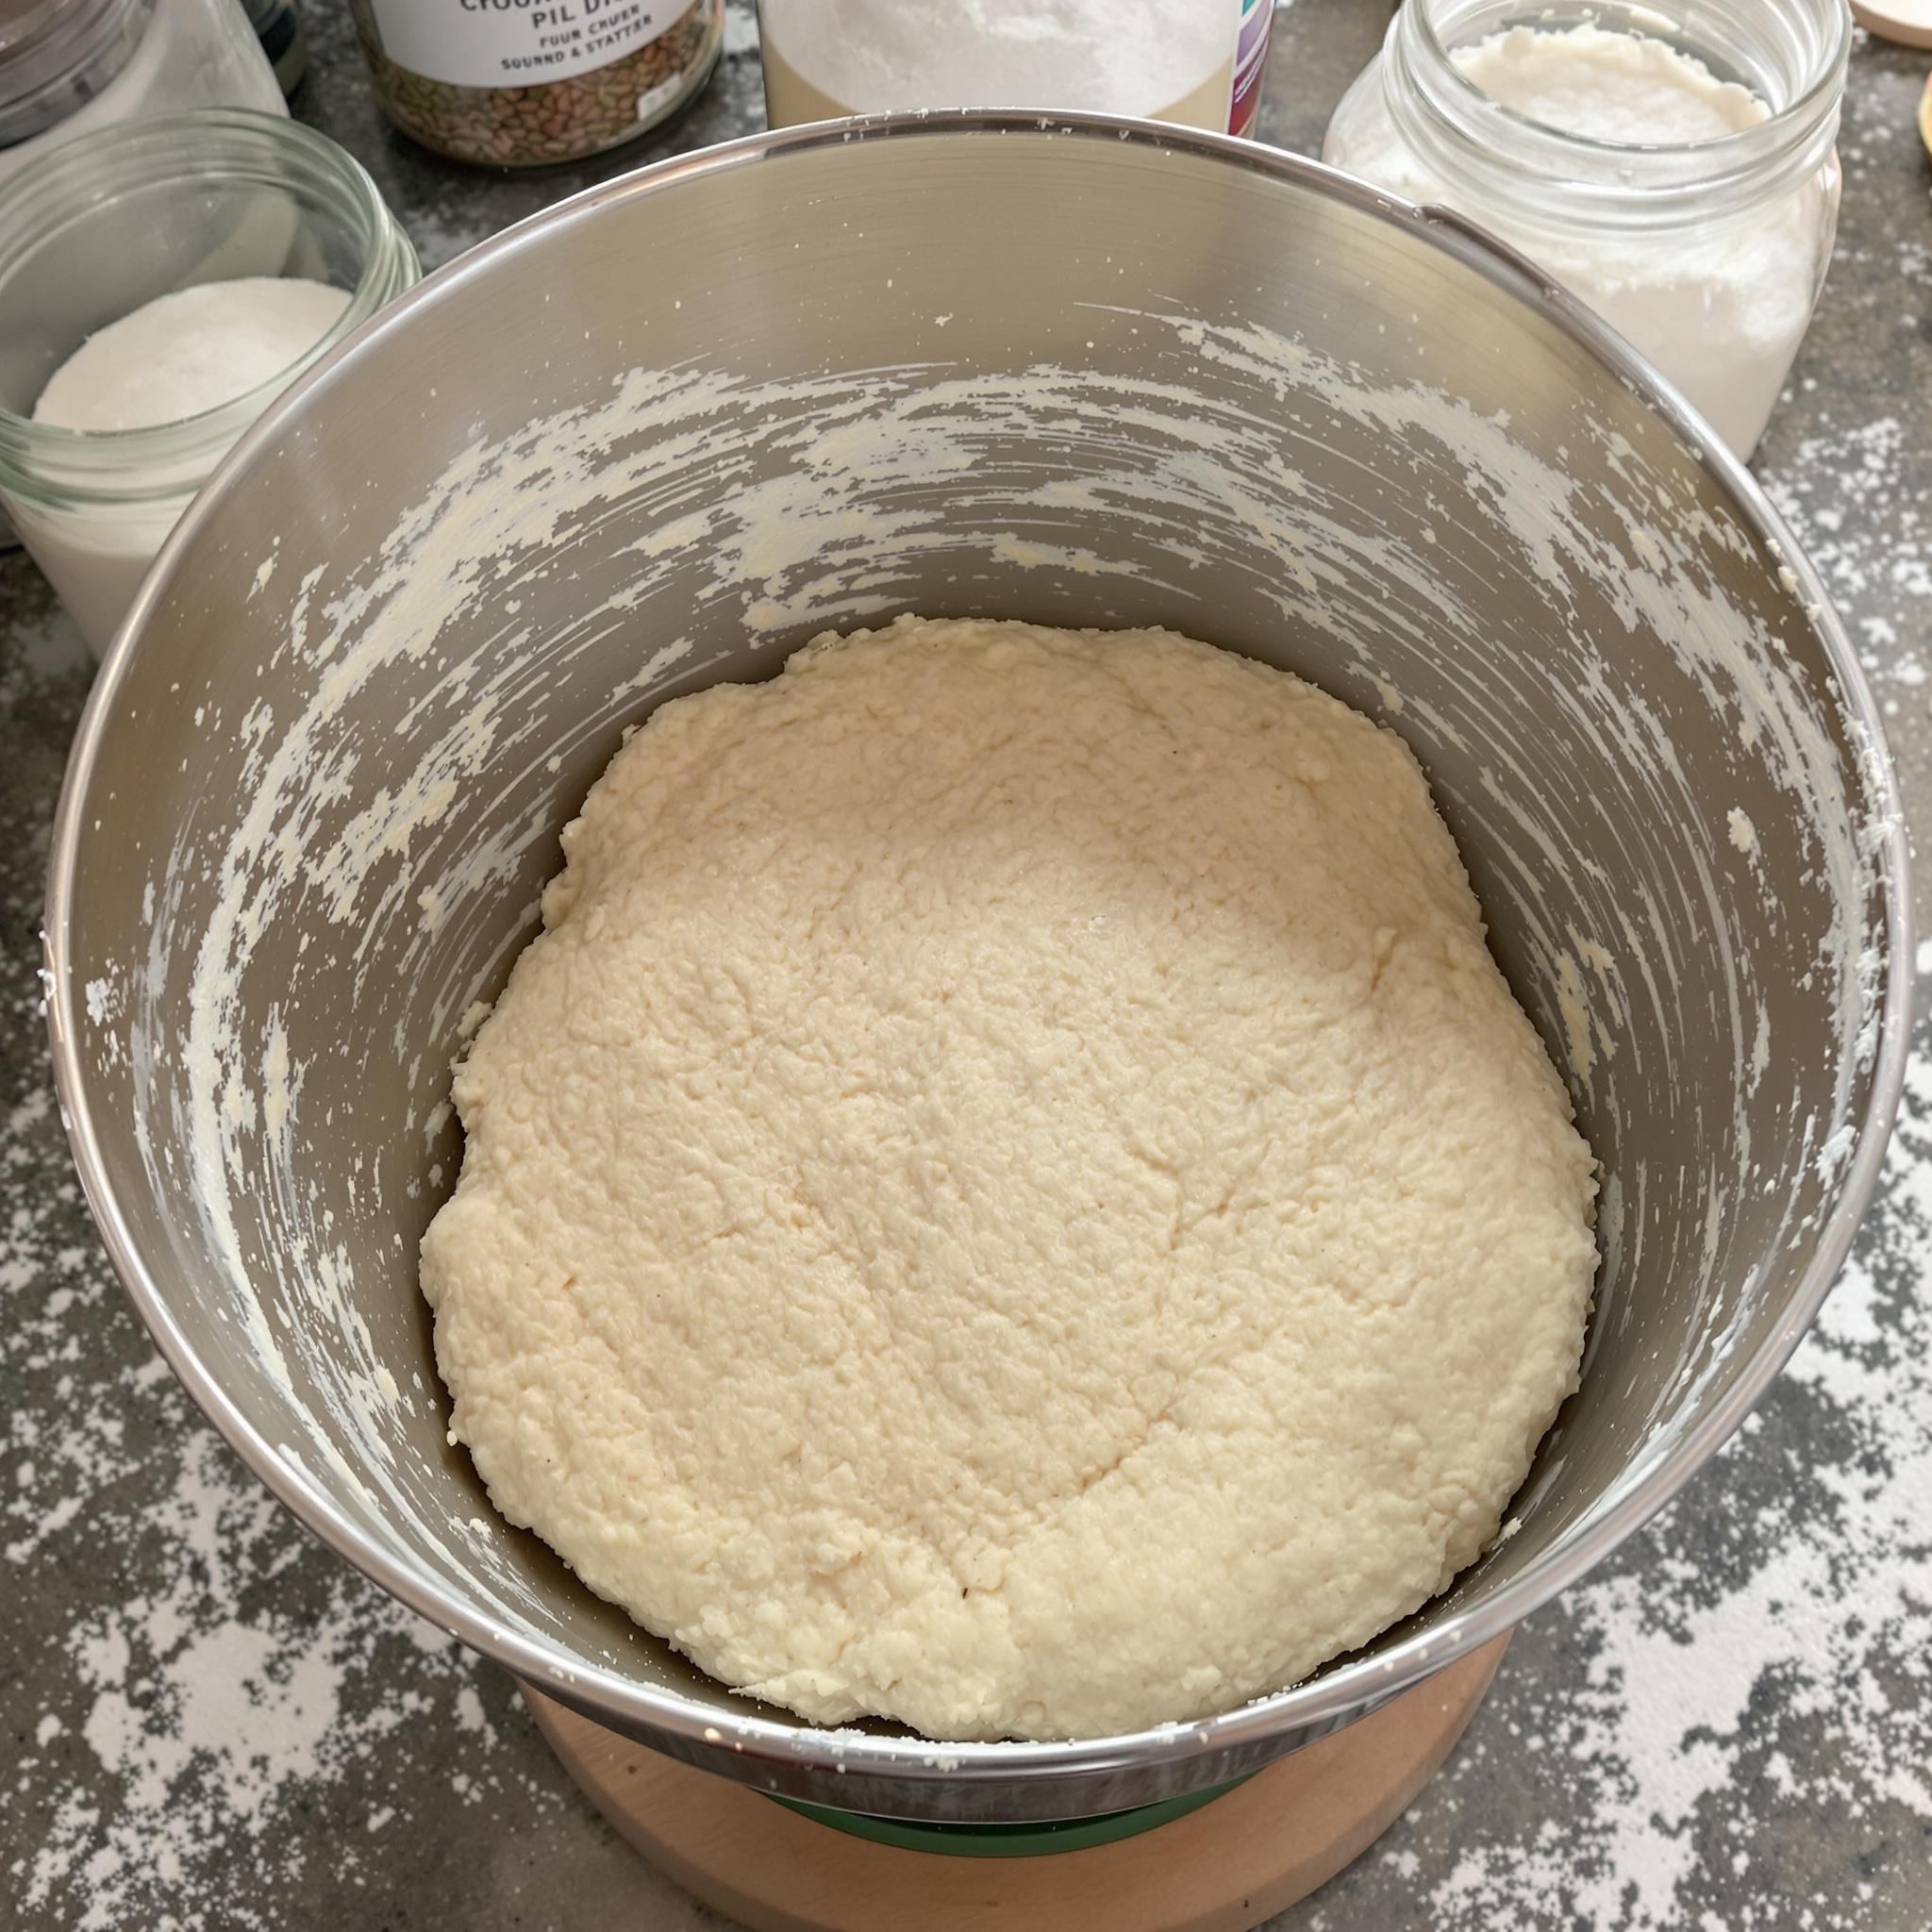
Step 2: Add Flour and Form Dough
Gradually stir in the flour until a shaggy dough forms. Don’t worry if it looks messy—that’s normal. The goal is to bring everything together. Notice how the dough starts clinging to itself, forming a sticky mass ready for kneading.
Step 3: Knead Until Smooth
Sprinkle salt and sugar over the dough. Turn it onto a floured surface and knead until smooth and elastic. This takes about 8-10 minutes. Feel the texture change under your hands—it becomes softer and more cohesive. If it feels too sticky, add a dusting of flour.
Step 4: Let It Rise
Place the dough in a greased bowl, cover it with a towel, and let it rise in a warm spot. Patience is key here. Wait until it doubles in size, which could take 4-6 hours depending on your starter. Watch as tiny bubbles form, signaling fermentation magic.
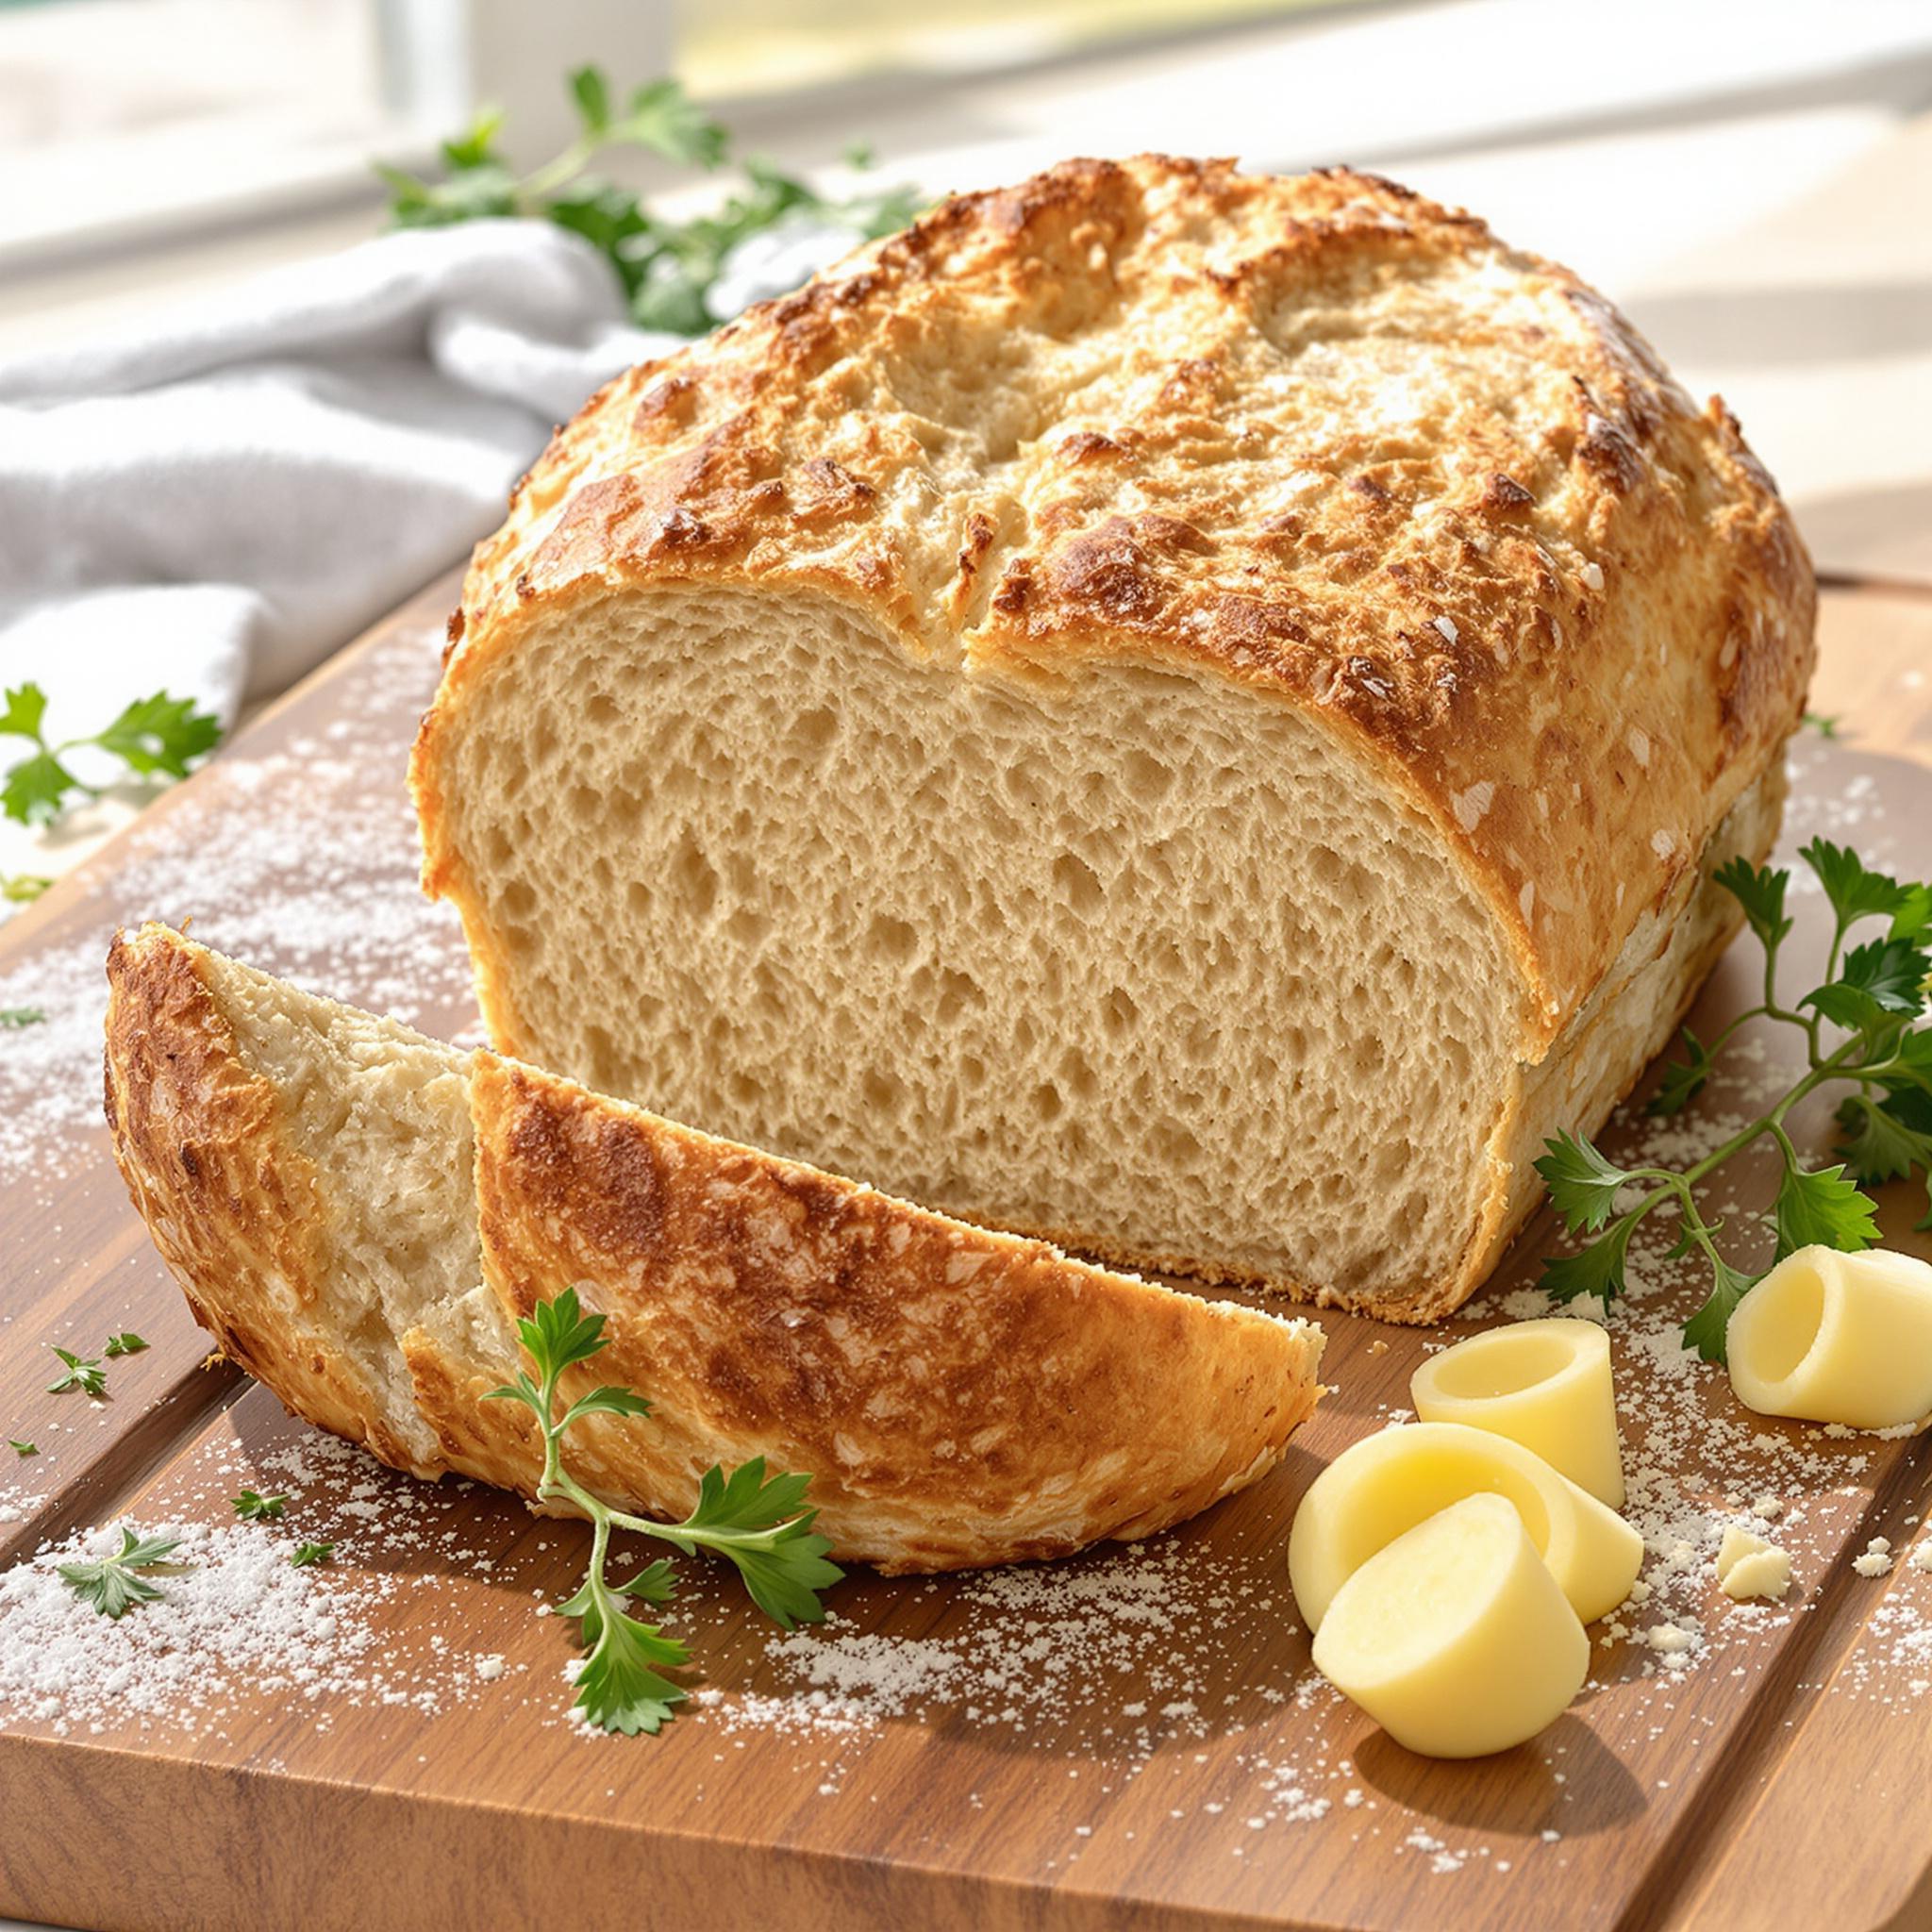
Step 5: Shape and Bake
Once risen, shape the dough into a loaf and place it in a greased loaf pan. Let it rise again until puffy, then bake at 375°F (190°C) for 30-35 minutes. The golden crust and heavenly smell mean it’s done. Tap the bottom—if it sounds hollow, it’s ready!
Chef’s Tip
For an extra soft loaf, brush the top with melted butter right after baking. It adds richness and keeps the crust tender.
Time Required
- Prep Time: 20 minutes
- Rising Time: 6-8 hours
- Baking Time: 35 minutes
- Total Time: Approximately 8-9 hours
Nutritional Information
Per slice (assuming 12 slices per loaf):
- Calories: 150
- Protein: 4g
- Fat: 1g
- Carbohydrates: 30g
- Fiber: 1g
Extra Information
Did you know sourdough fermentation makes nutrients easier to digest? Lactic acid breaks down phytic acid, enhancing mineral absorption.
Necessary Tools
- Large mixing bowl
- Loaf pan
- Kitchen towel
- Oven
Storage Instructions
To keep your sourdough sandwich bread fresh, store it in a paper bag first, then place it inside a plastic bag. This traps moisture without making the crust soggy. For longer storage, freeze slices individually. Simply thaw them overnight for quick use.
Avoid refrigerating bread, as it dries out faster. Instead, keep it at room temperature for up to three days. If freezing, wrap tightly in foil before placing in a freezer-safe bag.
Finally, always reheat frozen bread in the oven for best results. A few minutes at 350°F restores its original texture.
Tips and Tricks
- Feed your starter 6-8 hours before using it for optimal activity.
- Knead thoroughly to develop gluten for a better rise.
- Let the dough rise slowly in a cool spot for enhanced flavor.
Serving Suggestions
- Top slices with avocado and poached eggs for breakfast.
- Make classic PB&J sandwiches for lunch.
Healthier Alternatives
Here are six variations to try:
1. Whole Grain Version: Substitute half the all-purpose flour with whole wheat for added fiber.
2. Low-Sugar Option: Skip the sugar entirely or reduce it to ½ tablespoon.
3. Dairy-Free Twist: Replace butter with olive oil for brushing.
4. Gluten-Free Loaf: Experiment with gluten-free flour blends designed for bread.
5. Seed Boost: Add flaxseeds or sunflower seeds for extra crunch and nutrition.
6. Herb Infusion: Mix dried herbs like rosemary or thyme into the dough for savory flair.
Common Mistakes to Avoid
Mistake 1: Using Inactive Starter
Inactive starter won’t rise properly. Always ensure your starter is bubbly and active before mixing. Feed it regularly and give it time to peak.
Mistake 2: Skipping the Second Rise
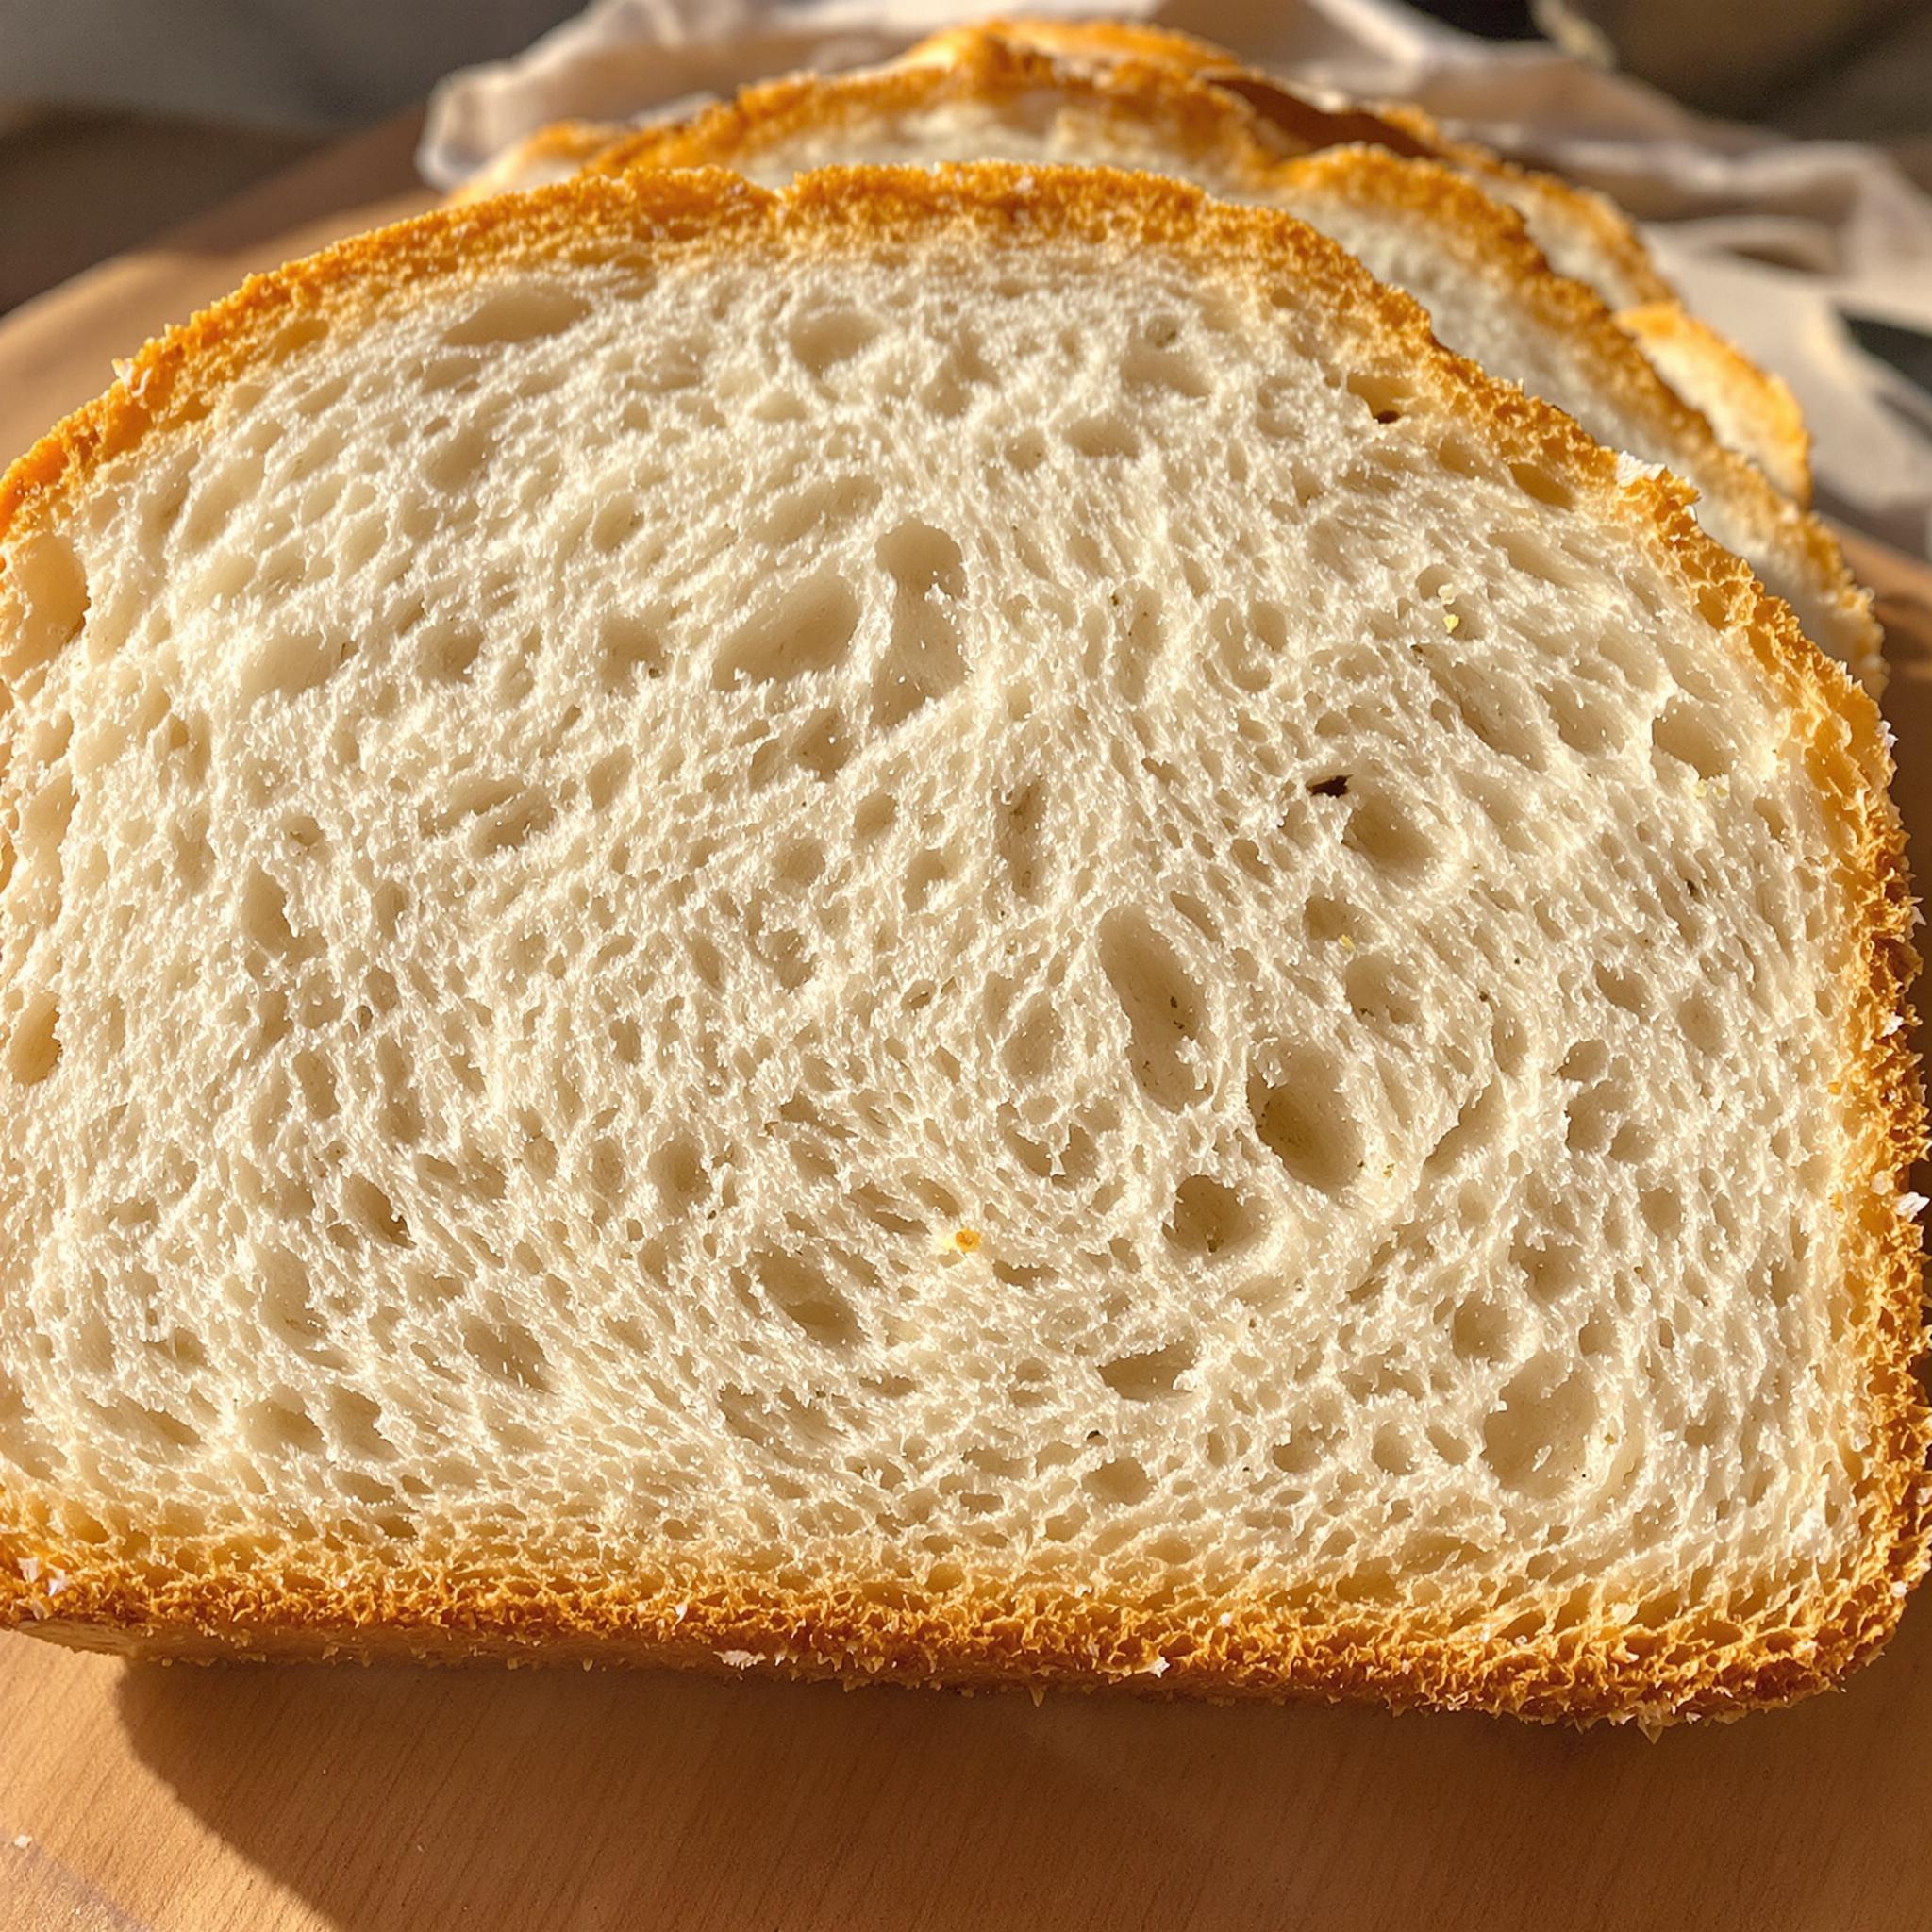
Rushing the process leads to dense bread. Allow enough time for both rises. The second rise ensures a light, airy texture.
Mistake 3: Overflouring the Dough
Adding too much flour makes the bread tough. Stick to the recipe measurements and trust the sticky stage during kneading.
Frequently Asked Questions
Can I use cold water instead of warm?
Cold water slows fermentation. Warm water speeds it up, so stick to lukewarm for consistent results.
How do I know my starter is ready?
Your starter should double in size within 4-6 hours and have a pleasant tang. Test by dropping a spoonful in water—if it floats, it’s good to go.
What if my dough doesn’t rise?
Check your starter’s activity level. Also, ensure your rising area is warm but not too hot. Patience is crucial; sometimes it just needs more time.
Can I bake this in a Dutch oven?
Yes! Preheat your Dutch oven, transfer the shaped dough inside, and bake covered for 20 minutes. Uncover for another 15-20 minutes for a crisp crust.
Why does my bread taste bland?
Longer fermentation enhances flavor. Try letting the dough rise slowly overnight in the fridge for deeper sourdough notes.
Is sourdough healthier than regular bread?
Sourdough contains less gluten due to fermentation, making it easier to digest. It also has higher nutrient availability compared to standard bread.
Can I freeze the dough?
Freezing raw dough isn’t recommended, as it affects yeast performance. Freeze baked loaves instead for best results.
How do I prevent a soggy crust?
Avoid covering the bread while cooling. Place it on a wire rack to allow airflow, keeping the crust crisp.
What’s the best way to slice fresh bread?
Wait until the bread cools completely. Use a serrated knife for clean cuts without squishing the loaf.
My bread sank after baking. Why?
Overproofing causes collapse. Ensure the dough isn’t left to rise beyond doubling. Handle gently during shaping to preserve air pockets.
Conclusion
Baking sourdough sandwich bread is rewarding and fun. With this recipe, you’ll master the art of creating soft, flavorful loaves perfect for any occasion. Happy baking!
Equipment
- Large mixing bowl
- Loaf pan
- Kitchen towel
- Oven
Ingredients
- 1 cup Active sourdough starter
- 3 cups All-purpose flour
- 1 cup Warm water
- 1 teaspoon Salt
- 1 tablespoon Sugar
Instructions
- Start by combining your sourdough starter and warm water in a large bowl. Stir until the mixture is smooth and bubbly. This step wakes up the yeast and sets the foundation for your dough. Pro tip: Use lukewarm water—not too hot—to avoid killing the yeast.
- Gradually stir in the flour until a shaggy dough forms. Don’t worry if it looks messy; that’s normal. The goal here is to bring everything together.
- Sprinkle salt and sugar over the dough. Turn it onto a floured surface and knead until smooth and elastic. This usually takes about 8-10 minutes.
- Place the dough in a greased bowl, cover it with a clean towel, and let it rise in a warm spot. Watch as tiny bubbles form, signaling fermentation magic.
- Once risen, shape the dough into a loaf and place it in a greased loaf pan. Let it rise again until puffy, then bake at 375°F (190°C) for 30-35 minutes.
Notes
Nutrition

Hi, I’m Olivia Parker, the founder of BakingSecret.com and a lifelong lover of all things sweet and homemade. I grew up in a small town in Oregon, where the smell of fresh cookies in my family’s kitchen sparked my passion for baking. Over the years, I turned that passion into a mission: to help home bakers feel confident, inspired, and creative.
After studying food science and working in several artisan bakeries across the U.S., I decided to create a space where everyone from beginners to seasoned bakers can find reliable recipes, expert tips, and a warm, welcoming community. BakingSecret.com is my way of sharing the magic of baking with the world. When I’m not testing new recipes, you’ll find me exploring farmers’ markets, collecting vintage cookbooks, or perfecting my sourdough technique.