
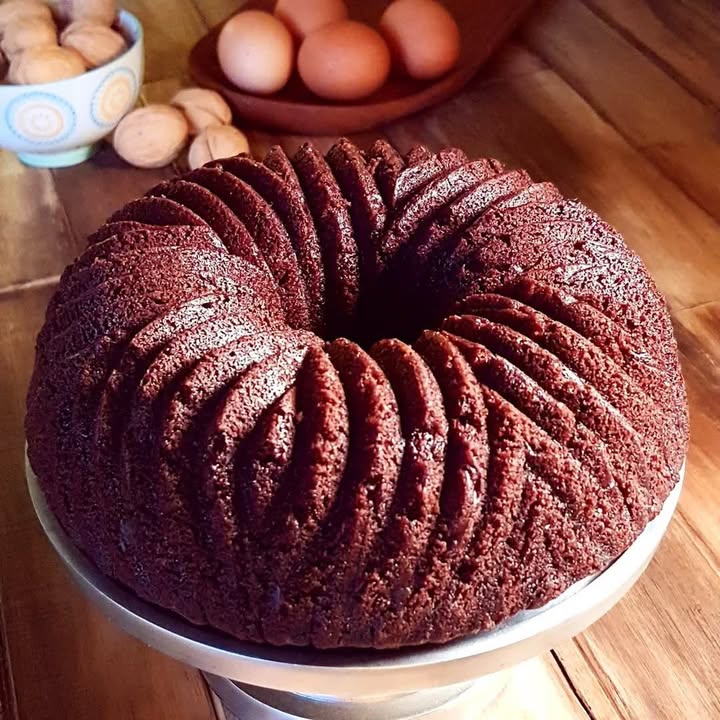
Why This Spongy Chocolate Delight is a Must-Try
Let me tell you a little story. Last weekend, I decided to surprise my family with a dessert that’s easy to make but feels indulgent. Enter this Spongy Chocolate Delight. When it came out of the oven, the kitchen smelled like a chocolate factory had exploded. My kids couldn’t wait to dig in, and honestly, neither could I. This cake is soft, rich, and utterly irresistible. Whether you’re baking for a birthday, coffee time, or just because, this recipe will quickly become your go-to.
A Little History Behind the Magic
This Spongy Chocolate Delight has roots in classic European chocolate cakes. Think of it as the love child of a French sponge cake and a gooey American chocolate brownie. Over the years, home bakers have tweaked it to perfection, making it simpler and more foolproof. I first tried this recipe at a friend’s house during a cozy tea party. The moment I tasted it, I knew I had to recreate it at home. After a few tweaks, I nailed it—and now I’m sharing my version with you!
Why You’ll Fall in Love with This Recipe
Here’s the deal: this cake is everything you want in a dessert. It’s moist, chocolatey, and melts in your mouth. Plus, it’s super easy to make—even if you’re a beginner baker. You don’t need fancy equipment or hard-to-find ingredients. Just basic pantry staples and a little love. And the best part? It’s versatile. Serve it plain, dusted with powdered sugar, or topped with whipped cream. No matter how you serve it, it’s guaranteed to impress.
Perfect Occasions to Bake This Spongy Chocolate Delight
This cake is perfect for so many occasions. Need a quick snack for the kids? Check. Want to wow your friends at a dinner party? Double-check. Looking for something sweet to pair with your afternoon coffee? Triple-check. It’s also a hit at birthdays, holidays, or even potlucks. Honestly, there’s no wrong time to bake this beauty. It’s like that one friend who’s always up for anything—reliable, fun, and always welcome.
Ingredients You’ll Need
- 200 g semi-sweet chocolate
- 150 g butter
- 3 eggs
- 200 g sugar
- 150 g all-purpose flour
- 1 teaspoon vanilla essence
- 1 pinch of salt
- 1/2 cup warm milk
Substitution Options
Life happens, and sometimes you run out of an ingredient. No worries! Here are some swaps:
- Semi-sweet chocolate: Use dark chocolate or milk chocolate if you prefer a sweeter taste.
- Butter: Margarine works fine, but butter gives a richer flavor.
- Eggs: If you’re out, try using 3 tablespoons of unsweetened applesauce per egg.
- All-purpose flour: Gluten-free flour blends work well if you need a gluten-free option.
- Milk: Any plant-based milk (almond, soy, oat) can replace dairy milk.
Step 1: Melting the Chocolate and Butter
Start by melting the chocolate and butter together. You can do this in a double boiler or the microwave. If using the microwave, heat in 30-second bursts, stirring between each round. This ensures the chocolate doesn’t burn. Pro tip: Keep an eye on it! Burnt chocolate is bitter and ruins the whole vibe. Once melted, set it aside to cool slightly while you tackle the next step.
Step 2: Whipping the Eggs and Sugar
In a large mixing bowl, beat the eggs and sugar until they’re light and fluffy. This is where the magic happens! The air you whip into this mixture helps make the cake spongy. Think of it as giving your cake a breath of fresh air. Use an electric mixer for about 3-4 minutes, or whisk by hand if you’re feeling strong. Either way, you’ll see the color lighten and the texture thicken. Pro tip: Don’t rush this step—it’s key to achieving that airy texture.
Step 3: Combining Wet Ingredients
Now, pour the melted chocolate mixture into the whipped eggs and sugar. Add the vanilla essence and warm milk, then mix gently with a spatula. The batter should look glossy and smooth, like liquid silk. Take a moment to inhale the heavenly chocolate aroma. It’s almost meditative, isn’t it?
Step 4: Adding the Dry Ingredients
Sift the flour and salt into the wet mixture. Folding them in gently is crucial. Use enveloping motions rather than vigorous stirring. This keeps the air bubbles intact, ensuring your cake stays light and fluffy. Picture folding a delicate blanket over a sleeping baby—gentle and loving.
Step 5: Pouring the Batter
Pour the batter into a greased and floured cake pan, ideally 20-22 cm in diameter. Smooth the top with a spatula for an even bake. Pro tip: Line the bottom of the pan with parchment paper for easy removal later.
Step 6: Baking Your Masterpiece
Bake in a preheated oven at 170°C (340°F) for 35-40 minutes. To check if it’s done, insert a toothpick into the center. If it comes out clean, your cake is ready. If not, give it another 5 minutes. Chef’s tip: Resist opening the oven door too often—it can cause the cake to sink.
Timing Breakdown
- Prep time: 15 minutes
- Cooking time: 40 minutes
- Total time: 55 minutes
Chef’s Secret
For extra richness, brush the cooled cake with a thin layer of simple syrup infused with a splash of coffee. It enhances the chocolate flavor without overpowering it. Trust me, it’s a game-changer.
Extra Info
Did you know that chocolate was once considered a sacred drink by the Aztecs? They believed it had mystical powers. While this cake might not grant you superhuman abilities, it sure feels magical when you take the first bite.
Necessary Equipment
- Mixing bowls
- Electric mixer or whisk
- Spatula
- Cake pan (20-22 cm)
- Oven
Storage Tips
Store your Spongy Chocolate Delight in an airtight container at room temperature for up to 2 days. If it’s hot where you live, pop it in the fridge. Just bring it back to room temp before serving for the best texture. For longer storage, wrap slices individually in plastic wrap and freeze for up to a month.
If freezing, thaw overnight in the fridge. Reheat briefly in the microwave to restore that fresh-from-the-oven feel. Never leave the cake uncovered—it dries out faster than you’d think.
Lastly, label your containers with dates. Trust me, nothing’s worse than finding mystery leftovers weeks later and wondering if they’re still good.
Tips and Advice
- Use room-temperature eggs for better emulsification.
- Don’t overmix the batter; it makes the cake dense.
- Grease the pan generously to avoid sticking.
- Let the cake cool completely before slicing for cleaner cuts.
Presentation Ideas
- Dust with powdered sugar for a classic touch.
- Top with fresh berries for a pop of color.
- Serve with a dollop of whipped cream or ice cream.
- Garnish with chocolate shavings or curls.
Healthier Alternatives
Looking to lighten things up? Try these variations:
- Gluten-Free Option: Swap all-purpose flour for almond or oat flour.
- Low-Sugar Option: Replace sugar with a sugar substitute like stevia or erythritol.
- Vegan Version: Use coconut oil instead of butter and flax eggs instead of regular eggs.
- Protein-Packed Cake: Add a scoop of chocolate protein powder to the batter.
- Fruit-Infused Cake: Fold in mashed bananas or applesauce for natural sweetness.
- Nutty Twist: Stir in chopped walnuts or almonds for added crunch.
Mistake 1: Overmixing the Batter
Overmixing leads to a dense cake instead of a spongy one. Once you add the flour, fold gently. Imagine you’re handling a fragile treasure, not kneading dough. Tip: Stop as soon as the flour disappears.
Mistake 2: Skipping the Sifting
Sifting the flour removes lumps, ensuring a smooth batter. Without it, you might end up with uneven textures. Tip: Always sift dry ingredients for consistent results.
Mistake 3: Opening the Oven Too Soon
Opening the oven door releases heat, causing the cake to collapse. Be patient and trust the process. Tip: Set a timer and peek only once near the end.
Mistake 4: Using Cold Eggs
Cold eggs don’t incorporate well with other ingredients. Bring them to room temperature for a smoother batter. Tip: Soak eggs in warm water for 5 minutes if short on time.
Mistake 5: Overbaking
An overbaked cake turns dry and crumbly. Check for doneness early and often. Tip: Insert a toothpick; if it’s slightly sticky, it’s done.
FAQ: Can I use margarine instead of butter?
Absolutely! Margarine works fine, though butter adds a richer flavor. Just ensure it’s unsalted to control sodium levels. Many bakers swear by margarine for its affordability and ease of use.
FAQ: Why does my cake sink in the middle?
This usually happens due to underbaking or opening the oven too soon. Ensure your oven is fully preheated and resist checking on the cake prematurely. Also, confirm your leavening agents (if used) haven’t expired.
FAQ: How can I make this recipe vegan?
Swap butter for coconut oil, eggs for flax eggs, and use plant-based milk. These changes keep the cake moist and delicious while being entirely animal-free. Vegan desserts can be just as decadent!
FAQ: What size pan should I use?
A 20-22 cm round pan works best. Avoid larger pans, as the batter won’t rise properly. If using a square pan, aim for similar dimensions to maintain thickness.
FAQ: Can I freeze this cake?
Yes! Wrap individual slices in plastic wrap and store them in a freezer-safe bag. Thaw in the fridge overnight before serving. Freezing extends shelf life without compromising taste.
FAQ: Why is my cake too dense?
Density often stems from overmixing or skipping the whipping step. Remember to beat the eggs and sugar thoroughly to incorporate air. Gentle folding after adding flour is equally important.
FAQ: Can I add nuts or fruit?
Of course! Chopped walnuts, almonds, or dried fruits like raisins add texture and flavor. Fold them in gently after combining wet and dry ingredients.
FAQ: What’s the best way to serve this cake?
This cake pairs beautifully with coffee, tea, or a glass of cold milk. Dust it with powdered sugar or serve it with a dollop of whipped cream for extra flair. It’s versatile enough to fit any occasion.
FAQ: How do I know when the cake is done?
Insert a toothpick into the center. If it comes out clean or with a few crumbs, it’s ready. Avoid overbaking, as the cake continues to cook slightly after removal from the oven.
FAQ: Can I reduce the sugar?
Yes, but keep in mind sugar contributes to moisture and structure. Reduce by no more than half, or consider using a sugar substitute designed for baking.
FAQ: Should I grease the pan?
Definitely! Grease and flour the pan to prevent sticking. Alternatively, line the bottom with parchment paper for added insurance. A well-prepared pan ensures easy removal.
Final Thoughts
This Spongy Chocolate Delight is more than just a cake—it’s a hug in dessert form. With its melt-in-your-mouth texture and rich chocolate flavor, it’s bound to become a favorite in your household. Whether you’re baking for a special occasion or simply craving something sweet, this recipe delivers every time. So grab your apron, gather your ingredients, and let’s get baking. Happy cooking!
Equipment
- Mixing bowls
- Electric mixer or whisk
- Spatula
- Cake pan (20-22 cm)
- Oven
Ingredients
- 200 g semi-sweet chocolate
- 150 g butter
- 3 eggs
- 200 g sugar
- 150 g all-purpose flour
- 1 teaspoon vanilla essence
- 1 pinch salt
- 1/2 cup warm milk
Instructions
- Melt the chocolate and butter together in a double boiler or microwave, stirring every 30 seconds; set aside to cool slightly.
- In a large mixing bowl, beat the eggs and sugar until light and fluffy for about 3-4 minutes.
- Pour the melted chocolate mixture into the whipped eggs and sugar; add the vanilla essence and warm milk, and mix gently.
- Sift the flour and salt into the wet mixture; fold them in gently to maintain air bubbles.
- Pour the batter into a greased and floured 20-22 cm round cake pan and smooth the top.
- Bake in a preheated oven at 170°C (340°F) for 35-40 minutes; check with a toothpick for doneness.
Notes
Store in an airtight container at room temperature for up to 2 days. For longer storage, wrap slices individually and freeze for up to a month.
For extra richness, brush with a thin layer of simple syrup infused with coffee.
Tips: Use room-temperature eggs for better incorporation, avoid overmixing the batter, and let the cake cool completely before slicing for cleaner cuts.