
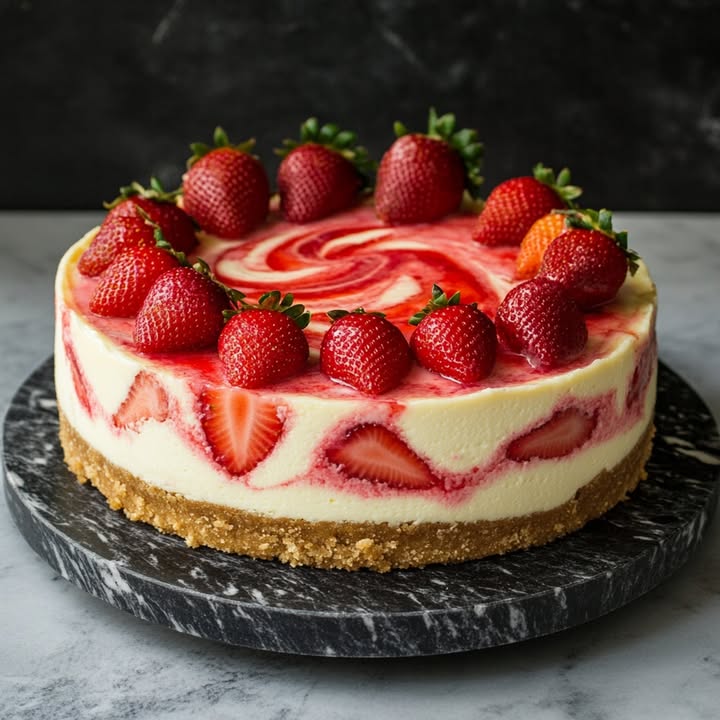
The Ultimate Strawberry Swirl Cheesecake Delight
Let me tell you about the little cheesecake that stole the show at last year’s Fourth of July picnic. My neighbor, who never eats dessert, asked for a second slice. That’s when I knew I had finally perfected this Strawberry Cheesecake Delight. It’s not just a dessert; it’s a creamy, dreamy cloud of happiness with ribbons of sweet-tart berry running through it. If you want to make people smile, this is your secret weapon.
A Sweet Slice of History
Cheesecake has been making folks happy since ancient Greece! They even served it to athletes at the Olympics. Our modern creamy version, with its buttery crust, started in New York delis. My Strawberry Swirl Cheesecake is a fun twist on that classic. It mixes the smooth, rich filling we all love with a homemade strawberry swirl that looks beautiful and tastes so fresh. It’s the perfect blend of tradition and a little homemade flair.
Why You’ll Love This Strawberry Swirl Cheesecake
This recipe is a keeper for three big reasons. First, the flavor is unbeatable. The tangy cream cheese and sweet berry purée are a match made in heaven. Second, it’s surprisingly forgiving! The water bath baking method I’ll show you is your best friend for preventing cracks. Finally, it makes you look like a professional baker, even if you’re just starting out. That gorgeous swirl pattern? It’s a simple trick with a huge “wow” factor.
Perfect Occasions for Cheesecake Delight
This isn’t an everyday cake. It’s an occasion cake. Think Mother’s Day brunch, a fancy dinner party centerpiece, or the star of a summer birthday celebration. It’s my go-to for potlucks because it travels well in the springform pan. Bringing a homemade Strawberry Cheesecake Delight is a surefire way to become everyone’s favorite guest.
Ingredients for Strawberry Swirl Cheesecake
Let’s gather our ingredients. Using full-fat, room-temperature components is key for that silky texture we crave.
- For the crust: 1 ½ cups graham cracker crumbs, ¼ cup granulated sugar, ½ cup unsalted butter, melted
- For the strawberry swirl: 1 ½ cups fresh or frozen strawberries, 2 tablespoons sugar, 1 teaspoon lemon juice
- For the filling: 24 ounces (three 8+ ounce blocks) cream cheese, softened, 1 cup granulated sugar, 3 large eggs, 1 teaspoon vanilla extract, ½ cup sour cream, ½ cup heavy cream
Ingredient Substitution Options
No worries if you’re missing something! Here are some easy swaps:
- Graham Crackers: Use digestive biscuits or 1 ½ cups of any crushed cookie you like.
- Fresh Strawberries: Frozen work beautifully. Just thaw and drain a little extra liquid.
- Sour Cream: Plain, full-fat Greek yogurt is a great stand-in.
- Heavy Cream: You can use more sour cream or yogurt for a tangier, denser texture.
How to Make My Strawberry Cheesecake Delight
Follow these steps closely for perfect results every single time.
Step 1: Prep and Bake the Crust
Preheat your oven to 325°F. Grease a 9-inch springform pan and wrap the outside with a big piece of foil. This is your waterproof shield for the water bath. Mix the graham crumbs, sugar, and melted butter in a bowl until it resembles wet sand. Press it firmly and evenly into the bottom of your pan. Bake for 10 minutes. The warm, buttery smell will fill your kitchen. Let it cool a bit while you work on the swirl.
Step 2: Create the Strawberry Swirl
In a small saucepan, combine your strawberries, sugar, and lemon juice. Cook this over medium heat. You’ll watch the berries soften and release their gorgeous ruby-red juices, creating a simple syrup. Let it simmer for about 10 minutes until thick and jammy. Pro tip: Use an immersion blender or regular blender to purée it until completely smooth. This ensures your swirl is elegant, not chunky. Let this beautiful purée cool completely.
Step 3: Make the Dreamy Filling
In a large bowl, beat the softened cream cheese until it’s completely smooth and lump-free. This is crucial! Scrape down the bowl. Add the sugar and beat again until just combined. Now, add the eggs one at a time. Mix gently after each egg until it disappears into the batter. This keeps air out, which helps prevent cracks. Finally, stir in the vanilla, sour cream, and heavy cream. Your goal is a velvety, homogeneous batter. Don’t overbeat!
Step 4: Swirl and Bake to Perfection
Pour the creamy filling over your cooled crust and smooth the top. Now, drop random spoonfuls of your cooled strawberry purée all over the surface. Take a thin knife or a skewer and gently drag it through the batter and purée. Make figure-eights or zig-zags to create that beautiful marbled effect. Chef’s tip: For a stunning presentation, don’t swirl too much. You want distinct ribbons of red.
Place your foil-wrapped springform pan into a larger roasting pan. Carefully pour hot water into the roasting pan until it comes halfway up the side of the springform. This water bath is the magic trick for gentle, even baking. Bake for 55-65 minutes. The center should still have a slight jiggle when you gently shake the pan.
Step 5: The Crucial Cool Down
Turn off the oven and crack the door open with a wooden spoon. Let the cheesecake cool slowly in this turned-off oven for one full hour. This gradual temperature change is your second secret against cracking. After the hour, remove it from the water bath, take off the foil, and let it cool to room temperature on a rack. Then, and this is the hard part, refrigerate it for at least 4 hours, but overnight is truly best. The flavors meld and the texture becomes perfectly sliceable.
Strawberry Swirl Cheesecake Timeline
Timing is everything with cheesecake! Here’s the realistic schedule:
- Prep Time: 25 minutes (active work)
- Cooking Time: 1 hour (baking)
- Cooling & Chilling Time: 5+ hours (patience pays!)
- Total Time: 6 hours 25 minutes (mostly hands-off)
- Servings: 12 happy people
- Kcal per serving: Approximately 430
My Chef’s Secret
My biggest secret? Room temperature ingredients are non-negotiable. Take your cream cheese, eggs, and sour cream out of the fridge at least 2 hours before you start. This is the single best way to ensure a silky-smooth filling without lumps. Trying to beat cold cream cheese is a fast track to a grainy texture.
A Fun Berry Fact
Did you know strawberries are the only fruit with seeds on the *outside*? Each one has about 200 tiny seeds! They’re also a fantastic source of vitamin C. When you swirl that ruby-red purée into your cheesecake, you’re not just adding color and flavor—you’re adding a little pop of sunshine and nutrition, too. It makes me feel slightly better about having that second slice.
Necessary Equipment
You don’t need fancy gear, just a few key items:
- 9-inch springform pan
- Stand mixer or electric hand mixer
- Large roasting pan for the water bath
- Blender or food processor for the strawberry purée
- Aluminum foil
Storing Your Strawberry Cheesecake Delight
Once your cheesecake is fully chilled, you can store it right in the springform pan in the fridge. Just make sure you cover the top tightly with plastic wrap. This will keep it fresh and prevent it from absorbing any other fridge smells.
For longer storage, cheesecake freezes beautifully. Simply wrap the whole cake or individual slices in a layer of plastic wrap, followed by a layer of heavy-duty aluminum foil. Place it in a freezer-safe bag if you can. It will keep for up to 2 months.
When you’re ready to enjoy a frozen slice, thaw it overnight in the refrigerator. This slow thawing keeps the texture perfect. Never thaw it at room temperature, as this can make it soggy.
Tips and Advice for Success
A few more pointers from my kitchen to yours:
- Always use a springform pan. Trying to get a cheesecake out of a regular pan is a nightmare.
- Check the foil wrap for leaks before adding water. A soggy crust is a sad crust.
- If you see small cracks forming, don’t panic! A dollop of extra strawberry purée or some whipped cream on top covers it right up.
- For super clean slices, dip your knife in hot water and wipe it dry between each cut.
Inspired Presentation Ideas
Make it pretty! Here are some simple ways to serve your masterpiece:
- Top each slice with a single fresh strawberry and a mint leaf.
- Drizzle a little extra strawberry purée around the plate.
- Serve with a side of lightly sweetened whipped cream.
- For a party, top the whole cake with a ring of fresh berries just before serving.
Healthier Twists and Variations
Love this recipe but want to mix it up? Here are 6 delicious variations on the theme:
- No-Bake Strawberry Swirl: Use gelatin in the filling and set it in the fridge. Perfect for hot summer days when you don’t want to turn on the oven.
- Gluten-Free Delight: Swap the graham crackers for your favorite certified gluten-free cookie crumbs for a crust everyone can enjoy.
- Lemon Berry Fusion: Add the zest of one lemon to the filling for a bright, citrusy kick that pairs wonderfully with the strawberry.
- Mini Cheesecake Bites: Bake the batter in a muffin tin with liners. You get adorable individual portions with a swirl in each one—great for parties!
- Chocolate-Dipped Crust: Add ¼ cup of cocoa powder to the crust mixture and use chocolate cookies for a decadent chocolate-strawberry combo.
- Mixed Berry Swirl: Use a blend of raspberries, blackberries, and strawberries for a deeper, more complex berry flavor and a gorgeous purple-red swirl.
If you’re exploring healthier baking, you might love my recipe for flourless banana oat cookies for a wholesome snack. For another classic, zesty dessert, try this bright and moist lemon sour cream pound cake. When holidays roll around, my easy crockpot candy clusters are a huge hit, and this playful Easter bunny poke cake is always a favorite with the kids.
Common Mistakes to Avoid
Mistake 1: Using Cold Ingredients
This is the number one cause of a lumpy cheesecake filling. Cold cream cheese doesn’t blend smoothly with sugar and eggs. It creates tiny lumps that bake into the final product. Always plan ahead and let your cream cheese, eggs, and sour cream sit on the counter for a good 2 hours. They should feel room temperature to the touch. This simple step makes the mixing process so much easier and guarantees that velvety texture we all want.
Mistake 2: Skipping the Water Bath
I know it seems like an extra, messy step. But the water bath (or *bain-marie*) is not optional for a classic baked cheesecake. Without it, the oven’s dry heat cooks the edges too quickly, causing them to puff and crack while the center stays raw. The hot water creates a gentle, humid environment for even, slow baking. Just double-check your foil wrap for holes! A little caution here prevents a lot of heartache later.
Mistake需: Overmixing the Batter After Adding Eggs
Once you add the eggs, your mixing style needs to change. Beat them in one at a time on low speed, just until the yolk disappears. Over-beating at this stage incorporates too much air. That extra air expands in the oven and then collapses as the cake cools, leading to cracks and a less dense, creamy texture. Think “gentle incorporation,” not “vigorous whipping.”
Mistake 4: Not Letting it Cool Gradually
Taking a hot cheesecake straight from the oven and plopping it on the counter (or worse, into the fridge) is a shock to its system. That sudden temperature drop is a major crack-causer. The slow cool-down in the turned-off oven with the door ajar, followed by room temperature cooling, is a critical part of the recipe. It lets the cheesecake settle and firm up at a relaxed pace. Patience truly is a virtue here.
Mistake 5: Swirling with a Warm Strawberry Purée
If your strawberry sauce is still warm or hot when you swirl it into the filling, it can start to cook the surrounding batter. This can create uneven textures and make the swirl bleed too much into the filling, losing its beautiful defined ribbon look. Always let your purée cool to at least room temperature. You can even make it a day ahead and store it in the fridge. A cool swirl gives you the most control for that picture-perfect marble.
For building balanced plates with all your favorite foods, including delicious desserts like this one, check out the helpful guidelines for everyday meals from a trusted nutrition source.
Frequently Asked Questions
Can I use frozen strawberries for the swirl?
Absolutely! Frozen strawberries work perfectly for this recipe. There’s no need to thaw them first. Just place the frozen berries directly into your saucepan with the sugar and lemon juice. They will thaw and cook down as you simmer them. You might get a little extra liquid, so just let the mixture simmer for a couple extra minutes until it thickens back up to a jam-like consistency before you blend it. This is a great way to make a Strawberry Cheesecake Delight any time of year.
Why did my cheesecake crack on top?
A few things can cause cracks: overmixing the batter (adding too much air), a sudden temperature change, or overbaking. The most common fix is using the water bath and the gradual cooling method described in the steps. If you get a small crack, don’t worry! It doesn’t affect the taste at all. You can easily decorate over it with extra strawberry sauce, whipped cream, or fresh berries. Think of it as a little character mark on your homemade creation.
How do I know when the cheesecake is done baking?
Don’t rely on a toothpick test like a regular cake. Instead, give the pan a gentle shake. The edges should look set, but the center (about a 2-3 inch circle in the middle) should have a slight, soft jiggle. It will look underdone, but it will firm up dramatically during the slow cool-down and chilling process. Remember, it keeps cooking from residual heat after you turn the oven off.
Can I make this cheesecake ahead of time?
Yes, and I highly recommend it! Cheesecake needs that long chill time for the flavors to develop and the texture to become perfect. Making it the day before you need it is the ideal plan. This also takes the stress out of day-of preparation. Just keep it covered in the fridge. The strawberry swirl holds up beautifully overnight, so you’ll have a dessert ready to impress without any last-minute work.
What’s the best way to slice a cheesecake cleanly?
For picture-perfect slices, use a long, thin, sharp knife. Run the blade under very hot tap water, wipe it completely dry with a clean towel, and make your slice. The warm knife glides through the cold cream cheese cleanly. Repeat this “heat, dry, slice” process for every single cut. It takes a minute longer, but the results are worth it for a beautiful presentation.
Can I freeze strawberry swirl cheesecake?
You sure can! Cheesecake freezes exceptionally well. Wrap the whole chilled cake (or individual slices) tightly in plastic wrap, then again in aluminum foil. Place it in a freezer bag if possible. It will keep for 1-2 months. To serve, thaw it overnight in the refrigerator. This slow thawing keeps the texture creamy and prevents sogginess. The swirl might bleed a tiny bit after freezing, but the flavor will still be fantastic.
Do I have to use a springform pan?
For this baked cheesecake recipe, a springform pan is essential. The removable sides allow you to release the cheesecake without damaging it or the crust. Trying to invert a cheesecake from a regular pan is nearly impossible. If you don’t have one, they are a great investment for any baker! You’ll use it for other tortes and deep-dish desserts, too.
My strawberry swirl sank. What happened?
If your swirl sank to the bottom, it was likely too heavy or liquidy. Make sure your strawberry purée is cooked down to a thick, spreadable consistency—almost like a jam. A runny purée is more likely to sink. Also, don’t drop huge dollops of it. Use smaller spoonfuls distributed evenly across the top before you do the marbling with your knife.
Can I use a different fruit for the swirl?
Of course! This method works with many fruits. Raspberries, blackberries, blueberries, or a mix are all wonderful. Even a mango or peach purée would be delicious. Just adjust the sugar in the swirl to match the sweetness of your chosen fruit. The tartness of lemon juice still helps balance the sweetness. You’re creating your own signature fruit swirl cheesecake delight.
Is there a way to make this recipe without a water bath?
While the water bath is the best method, you can try a low-temperature bake without one. Bake at 300°F (not 325°F) and place a pan of water on the rack below the cheesecake. It creates some steam. The texture might be slightly less creamy and the risk of cracking is higher, but it can work in a pinch. For guaranteed results, I always use the full water bath method.
For more incredible recipes like this one, from classic New York style to fun fruity swirls, explore our full collection of favorite cheesecake recipes.
Your New Favorite Dessert Awaits
So there you have it—my foolproof path to a stunning Strawberry Cheesecake Delight. It might seem like a project, but most of the time is hands-off chilling. The payoff is huge: a creamy, impressive dessert that feels special. Trust the process, embrace the water bath, and let your ingredients warm up. I promise, when you see that beautiful swirl and take that first silky bite, you’ll know it was worth every minute. Now go preheat that oven and make some magic!
Equipment
- Mélangeur
- Grand bol
- Spatule
- Moule à charnière de 9 pouces
- Papier aluminium
Ingredients
- 1.5 tasse biscuits Graham émiettés
- 0.25 tasse sucre
- 0.5 tasse beurre non salé, fondu
- 1.5 tasse fraises fraîches ou congelées
- 2 cuillères à soupe sucre (pour les fraises)
- 1 cuillère à café jus de citron
- 24 oz fromage à la crème, ramolli
- 1 tasse sucre (pour la garniture)
- 1 cuillère à café extrait de vanille
- 0.5 tasse crème aigre
- 0.5 tasse crème épaisse
Instructions
- Préchauffez votre four à 160°C. Graissez une moule à charnière de 9 pouces et enveloppez l'extérieur avec du papier aluminium.
- Mélangez les miettes de biscuits Graham, le sucre et le beurre fondu jusqu'à ce que cela ressemble à du sable humide. Pressez au fond du moule et faites cuire 10 minutes.
- Dans une casserole, combinez les fraises, le sucre et le jus de citron. Faites cuire à feu moyen pendant environ 10 minutes jusqu'à épaississement, puis réduisez en purée jusqu'à obtenir un mélange lisse et laissez refroidir.
- Battez le fromage à la crème ramolli jusqu'à obtenir une consistance lisse. Ajoutez le sucre, puis les œufs un par un. Incorporez l'extrait de vanille, la crème aigre et la crème épaisse jusqu'à obtenir un mélange homogène.
- Versez la garniture sur la croûte. Déposez des cuillerées de purée de fraises sur le dessus et tourbillonnez avec un couteau pour créer un effet marbré.
- Placez le moule à charnière dans un plus grand moule à rôtir. Versez de l'eau chaude dans le moule à rôtir jusqu'à ce qu'elle atteigne la moitié des côtés. Faites cuire pendant 55-65 minutes, jusqu'à ce que le centre tremble légèrement.
- Après la cuisson, éteignez le four, entrouvrez la porte et laissez le cheesecake refroidir pendant une heure.
- Retirez du bain d'eau et laissez refroidir à température ambiante. Réfrigérez pendant au moins 4 heures, de préférence toute la nuit.
Notes
Nutrition

Hi, I’m Olivia Parker, the founder of BakingSecret.com and a lifelong lover of all things sweet and homemade. I grew up in a small town in Oregon, where the smell of fresh cookies in my family’s kitchen sparked my passion for baking. Over the years, I turned that passion into a mission: to help home bakers feel confident, inspired, and creative.
After studying food science and working in several artisan bakeries across the U.S., I decided to create a space where everyone from beginners to seasoned bakers can find reliable recipes, expert tips, and a warm, welcoming community. BakingSecret.com is my way of sharing the magic of baking with the world. When I’m not testing new recipes, you’ll find me exploring farmers’ markets, collecting vintage cookbooks, or perfecting my sourdough technique.