
Why This Strawberry Chocolate Roll Will Win Your Heart
Picture this: a soft, spongy chocolate cake rolled up with fluffy whipped cream and juicy strawberries. Sounds dreamy, right? I first made this Strawberry Chocolate Roll for my daughter’s birthday, and let me tell you, it was love at first bite. The combination of rich cocoa, sweet cream, and fresh berries is simply irresistible. What makes this dessert even better? It’s easy to make yet looks like it came straight out of a fancy bakery. Whether you’re baking for your family or hosting friends, this recipe will leave everyone asking for seconds.
A Little History Behind the Gypsy Arm Dessert
The Strawberry Chocolate Roll is inspired by the classic Gypsy arm, also known as brazo de gitano. This treat has roots in Spanish and Latin American cuisine, where it’s often served during holidays and celebrations. Traditionally filled with dulce de leche or custard, modern versions have embraced lighter fillings like whipped cream and fruit. My twist adds strawberries, which bring freshness and balance to the rich chocolate cake. It’s a nod to tradition with a fruity update that feels perfect for today’s dessert lovers.
Why You’ll Love This Recipe
First off, this Strawberry Chocolate Roll is all about simplicity without sacrificing flavor. The ingredients are pantry staples, so chances are you already have most of them on hand. Plus, rolling the cake might sound intimidating, but trust me—it’s easier than it looks. And once you see those swirls of chocolate and strawberry peeking out when you slice into it, you’ll feel like a pro baker. Best of all, this dessert works for any occasion, from casual brunches to elegant dinner parties.
Perfect Occasions to Whip Up This Treat
This Strawberry Chocolate Roll shines at spring gatherings, baby showers, or Valentine’s Day celebrations thanks to its romantic red-and-brown color palette. But honestly, who needs a special event? Make it just because—it’s a guaranteed crowd-pleaser no matter the season. Serve it chilled for a refreshing summer dessert or warm it slightly for cozy winter vibes.
Ingredients You’ll Need
Let’s get started! Here’s what you’ll need to create this masterpiece:
For the Cake:
- 6 eggs
- 150 g of sugar
- 100 g of flour
- 50 g of powdered cocoa
For the Filling:
- 200 ml of heavy cream (for whipping)
- 100 g of icing sugar
- 200 g of fresh strawberries
Substitution Options
Don’t stress if you’re missing an ingredient. Swap heavy cream with coconut cream for a dairy-free option. Use maple syrup instead of icing sugar for a touch of natural sweetness. If strawberries aren’t in season, try raspberries or blueberries for a different burst of flavor. For gluten-free bakers, almond flour works beautifully in place of regular flour.
Step 1: Prepare the Cake
Start by preheating your oven to 180°C (350°F). Grab a mixing bowl and beat the eggs with sugar until they transform into a pale, airy cloud—this step is key to achieving that light, spongy texture. Next, sift the flour and cocoa powder together before gently folding them into the egg mixture. Be kind to your batter; use soft, enveloping motions to keep it fluffy. Pour the mix onto a lined tray and spread it evenly. Pop it in the oven for 10–12 minutes. Keep an eye on it—the cake should be cooked but still flexible enough to roll.
Pro tip: To prevent sticking, sprinkle a little powdered sugar over the baked cake while it’s still warm.
Step 2: Form the Gypsy Arm
Once the cake comes out of the oven, grab a clean, damp cloth and carefully roll the cake while it’s still hot. This trick helps set the shape, making it easier to unroll later. Let it cool completely before moving on to the next steps. Trust me, patience pays off here!
Step 3: Prepare the Filling
Whip the heavy cream with icing sugar until it forms stiff peaks. This part always reminds me of making homemade ice cream—it’s satisfying to watch the transformation. Wash and slice the strawberries into small pieces. Their vibrant red hue against the white cream is pure magic.
Step 4: Fill and Decorate
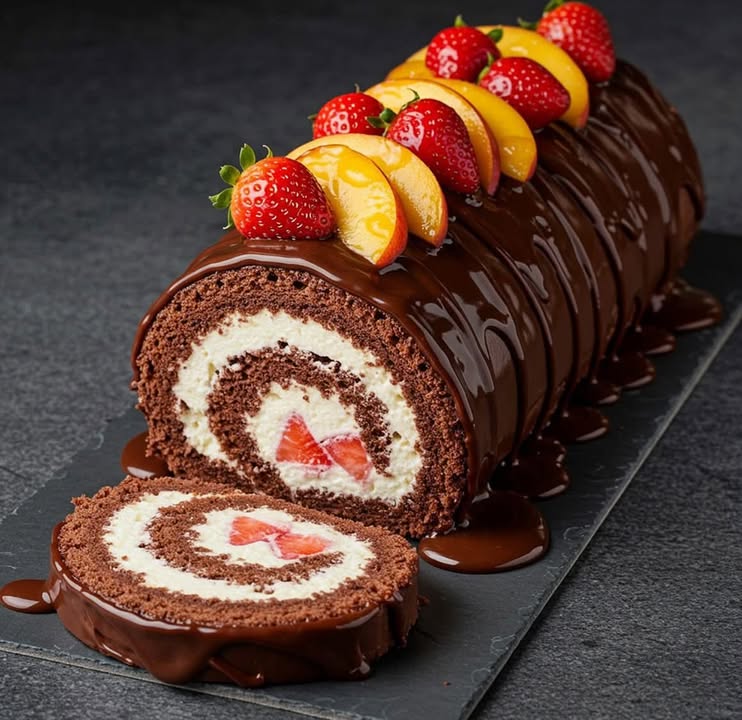
Unroll the cooled cake gently and spread the whipped cream evenly across the surface. Sprinkle the chopped strawberries generously, leaving a bit of space around the edges to avoid spillage. Now, roll it back up carefully, ensuring the seam is tucked underneath. Dust with icing sugar or drizzle melted chocolate for a final touch. Voilà—you’ve got yourself a stunning Strawberry Chocolate Roll.
Chef’s tip: Chill the roll for 30 minutes before slicing to help it hold its shape.
Timing Breakdown
Preparation time: 20 minutes
Cooking time: 12 minutes
Resting time: 30 minutes
Total time: Approximately 1 hour and 2 minutes
Chef’s Secret
To ensure your sponge cake doesn’t crack, don’t skip rolling it with the damp cloth immediately after baking. This step trains the cake to bend gracefully without breaking.
An Interesting Fact About Strawberries
Did you know strawberries are the only fruit with seeds on the outside? Each berry has about 200 tiny seeds, adding not just texture but also antioxidants. No wonder they pair so well with chocolate!
Necessary Equipment
- Mixing bowls
- Electric mixer or whisk
- Baking tray
- Parchment paper
- Damp kitchen towel
- Offset spatula (optional but helpful)
Storage Tips
Store your Strawberry Chocolate Roll in the fridge, wrapped tightly in plastic wrap or placed in an airtight container. This keeps it fresh for up to three days. Avoid freezing, as the cream filling may separate upon thawing.
If you want to prep ahead, bake the cake layer a day in advance and store it at room temperature. Assemble the roll closer to serving time to maintain freshness.
When transporting, lay the roll flat in a sturdy container to prevent squishing. A cooler bag can help keep it chilled during travel.
Tips and Advice
Use room-temperature eggs for fluffier results. They incorporate air more easily, giving your cake extra lift. Also, don’t rush the cooling process—letting the cake rest ensures it rolls smoothly without tearing.
Presentation Ideas
- Slice diagonally for dramatic effect.
- Garnish with whole strawberries and mint leaves.
- Drizzle chocolate sauce in zigzag patterns.
Healthier Alternatives
Here are six ways to tweak this recipe:
- Gluten-Free: Replace wheat flour with almond or oat flour.
- Vegan: Use aquafaba (chickpea liquid) for eggs and coconut cream for filling.
- Low-Sugar: Opt for stevia or monk fruit sweetener instead of sugar.
- Fruit Swap: Try mango or kiwi for a tropical twist.
- Dark Chocolate: Add dark cocoa powder for a richer flavor.
- Nutty: Sprinkle crushed almonds or hazelnuts inside the filling.
Common Mistakes to Avoid
Mistake 1: Overmixing the Batter
Overmixing deflates the air bubbles, leading to a dense cake. Fold ingredients gently to preserve the light texture.
Mistake 2: Skipping the Rolling Step
Not rolling the cake while warm causes cracking later. Always use a damp cloth to guide the process.
Mistake 3: Adding Too Much Filling
Overloading the filling makes rolling messy. Stick to a thin, even layer for best results.
FAQ
Can I freeze this dessert?
Freezing isn’t recommended due to the cream filling, which may separate when thawed. Instead, enjoy it fresh within three days.
What size tray should I use?
A standard 9×13-inch baking tray works perfectly. Just line it with parchment paper for easy removal.
How do I prevent the cake from sticking?
Dusting the parchment paper lightly with flour or powdered sugar prevents sticking.
Can I use frozen strawberries?
Yes, but thaw and pat them dry first to avoid excess moisture ruining the filling.
Why did my cake crack?
Cracking usually happens if the cake cools too much before rolling. Work quickly while it’s still warm.
Is this recipe kid-friendly?
Absolutely! Kids adore the combination of chocolate and strawberries.
Can I add liqueur to the filling?
For adults, a splash of Grand Marnier or Amaretto adds a sophisticated touch.
How far in advance can I make this?
Bake the cake a day ahead, but assemble it closer to serving time for optimal freshness.
What other fruits work well?
Raspberries, blueberries, or sliced peaches complement the chocolate beautifully.
Do I need a stand mixer?
Nope! A handheld electric mixer or whisk works fine.
Final Thoughts
There you have it—a show-stopping Strawberry Chocolate Roll that’s as fun to make as it is to eat. Whether you’re celebrating a special occasion or simply craving something sweet, this dessert delivers. So grab your apron, gather your ingredients, and give it a try. Happy baking! 🍓🍫
Equipment
- Mixing bowls
- Electric mixer or whisk
- Baking tray
- Parchment paper
- Damp kitchen towel
Ingredients
- 6 eggs eggs
- 150 g sugar
- 100 g flour
- 50 g powdered cocoa
- 200 ml heavy cream for whipping
- 100 g icing sugar
- 200 g fresh strawberries
Instructions
- Preheat your oven to 180°C (350°F).
- Beat the eggs with sugar until pale and airy.
- Sift the flour and cocoa powder together, then fold them into the egg mixture gently.
- Pour the batter onto a lined baking tray and spread it evenly.
- Bake in the oven for 10–12 minutes until cooked but still flexible.
- Sprinkle powdered sugar over the baked cake while it’s warm to prevent sticking.
- Roll the warm cake using a clean, damp cloth and let it cool completely.
- Whip the heavy cream with icing sugar until stiff peaks form.
- Wash and slice the strawberries into small pieces.
- Unroll the cooled cake and spread the whipped cream evenly over it.
- Sprinkle the chopped strawberries over the cream, leaving space at the edges.
- Roll the cake back up carefully, tucking the seam underneath.
- Dust with icing sugar or drizzle melted chocolate for decoration.
- Chill for 30 minutes before slicing.