
A Cheesecake That’s Sweet, Tangy, and Oh-So-Pretty
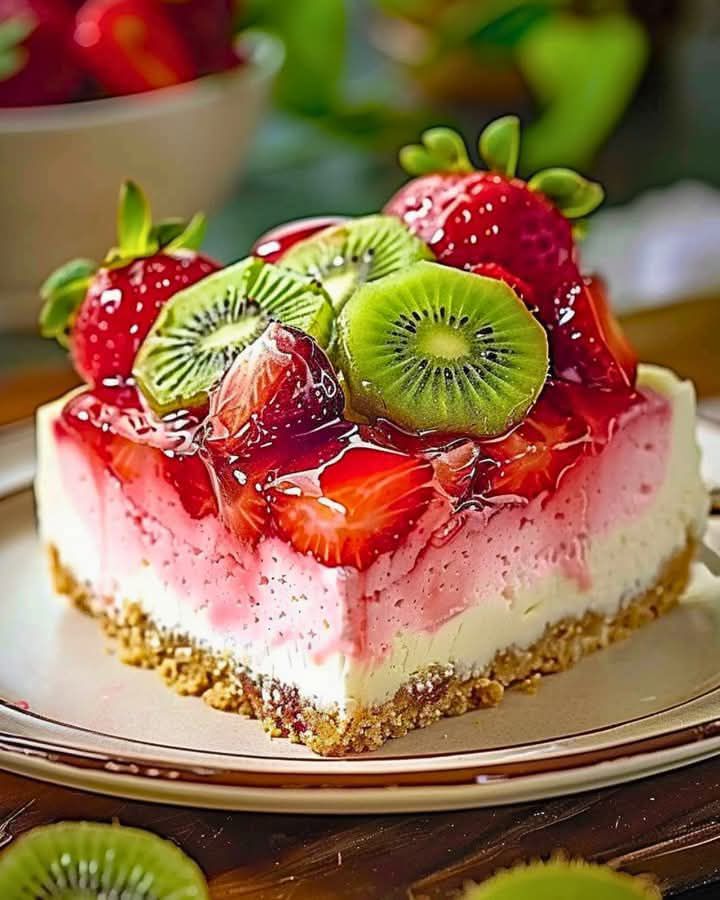
Picture this: a slice of creamy cheesecake with layers of vibrant pink and green, topped with glossy strawberries and kiwis. Sounds dreamy, right? I first made this Strawberry Kiwi Delight for a family brunch, and it was an instant hit. The kids loved the fruity flavors, while the adults couldn’t stop raving about how beautiful it looked. It’s not just a dessert—it’s a showstopper! Let me share my tips and tricks to make this recipe foolproof for you.
The Story Behind This Colorful Treat
Cheesecakes have been around for centuries, but this version is all about modern flair. Traditional cheesecakes are rich and decadent, but adding fresh fruit purees gives them a refreshing twist. I stumbled upon the idea of layering strawberry and kiwi while experimenting with summer fruits one lazy afternoon. The result? A dessert that’s as fun to make as it is to eat. Plus, it’s perfect for celebrating any occasion—or just because!
Why You’ll Love This Recipe
This Strawberry Kiwi Delight is a winner for so many reasons. First, it’s bursting with flavor—creamy cheesecake meets tangy kiwi and sweet strawberries. Second, it’s surprisingly easy to make. No fancy techniques here, just simple steps anyone can follow. And finally, it’s visually stunning. Whether you’re serving it at a party or bringing it to a potluck, it’s guaranteed to impress.
Perfect Occasions to Whip Up This Dessert
Need ideas? This cheesecake is perfect for birthdays, bridal showers, or holiday gatherings. It’s also great for casual get-togethers or even a quiet weekend treat. Imagine slicing into this beauty after a cozy family dinner—it’s sure to spark smiles all around.
Ingredients You’ll Need
Here’s what you’ll need to create your own Strawberry Kiwi Delight:
For the Crust:
- 1 1/2 cups graham cracker crumbs
- 1/4 cup granulated sugar
- 1/3 cup unsalted butter, melted
For the Cheesecake Filling:
- 24 oz (3 packages) cream cheese, softened
- 3/4 cup granulated sugar
- 1/4 cup sour cream
- 1 teaspoon vanilla extract
- 1 tablespoon lemon juice
- 3 large eggs
- 1/2 cup strawberry puree (blend fresh or frozen strawberries)
- 1/4 cup kiwi puree (blend peeled kiwis)
For the Topping:
- 1 cup fresh strawberries, sliced
- 2 kiwis, peeled and sliced
- 1/4 cup strawberry jelly or apricot jelly, melted for glaze
- 1 tablespoon lemon juice
Substitution Options
If you’re missing an ingredient, don’t worry! Here are some swaps:
- Use digestive biscuits instead of graham crackers for the crust.
- Swap Greek yogurt for sour cream if needed.
- If you can’t find fresh strawberries or kiwis, frozen works just fine for the puree.
Preparation Section
Step 1: Prepare the Crust
Start by preheating your oven to 325°F (163°C). Grease a 9-inch springform pan and line the bottom with parchment paper. In a medium bowl, mix the graham cracker crumbs, sugar, and melted butter until it resembles wet sand. Press the mixture firmly into the pan using the back of a spoon or your fingers. Pop it in the oven for 10 minutes, then let it cool while you prepare the filling. Pro tip: Use the bottom of a glass to press the crust evenly for a professional touch.
Step 2: Make the Cheesecake Filling
In a large mixing bowl, beat the cream cheese and sugar together until smooth and creamy. Add the sour cream, vanilla extract, and lemon juice, mixing until well combined. Crack in the eggs one at a time, mixing on low speed to avoid air bubbles. Divide the batter into two bowls. Stir the strawberry puree into one bowl and the kiwi puree into the other. The colors will be vibrant and inviting—perfect for layering!
Step 3: Assemble the Cheesecake
Pour the strawberry batter into the cooled crust and spread it evenly. Carefully spoon the kiwi batter on top, gently spreading it to cover the strawberry layer without mixing them. Chef’s tip: Tap the pan lightly on the counter to release any trapped air bubbles before baking.
Step 4: Bake and Cool
Bake the cheesecake for 60–70 minutes, or until the edges are set and the center has a slight jiggle. Turn off the oven, crack the door slightly, and let it cool inside for 1 hour. Remove from the oven and allow it to cool completely before refrigerating for at least 4 hours or overnight. Patience pays off—the longer it chills, the better it sets!
Step 5: Add the Topping
Once chilled, arrange the sliced strawberries and kiwis on top in a decorative pattern. Combine the melted jelly and lemon juice to create a shiny glaze, then brush it over the fruit. This step adds a glossy finish and enhances the flavors.
Timing Breakdown
Here’s how long each stage takes:
- Prep time: 20 minutes
- Cooking time: 70 minutes
- Resting time: 5 hours (including cooling and chilling)
- Total time: About 6 hours
Chef’s Secret
To prevent cracks in your cheesecake, avoid overmixing the batter. Gentle folding keeps the texture smooth and creamy.
Extra Info
Did you know that kiwis are packed with vitamin C? They pair beautifully with strawberries, which are rich in antioxidants. Together, they make this cheesecake not only delicious but also nutritious!
Necessary Equipment
You’ll need a few basic tools:
- 9-inch springform pan
- Mixing bowls
- Electric mixer
- Spatula
- Parchment paper
- Pastry brush (for glazing)
Storage Tips
Store leftovers in the fridge, covered with plastic wrap or in an airtight container. It stays fresh for up to 5 days. For longer storage, freeze slices wrapped individually in plastic wrap and foil. Thaw in the fridge overnight before serving.
If you live in a warm climate, keep the cheesecake chilled until ready to serve. Fruit toppings can soften quickly at room temperature.
Never store the cheesecake near strong-smelling foods like onions or garlic. Cream cheese absorbs odors easily, which could affect the taste.
Tips and Advice
Want to take your cheesecake to the next level? Use a water bath during baking to ensure even cooking and prevent cracks. Also, let the cream cheese come to room temperature before mixing—it blends much smoother.
Presentation Ideas
Get creative with your toppings! Arrange the fruit in concentric circles, scatter edible flowers, or drizzle chocolate sauce for extra flair. Serve each slice with a dollop of whipped cream for added indulgence.
Healthier Alternatives
Looking for lighter options? Try these variations:
- Low-Sugar Version: Replace granulated sugar with a sugar substitute like stevia.
- Vegan Cheesecake: Use cashew cream or vegan cream cheese instead of dairy.
- Gluten-Free Crust: Swap graham crackers for almond flour or gluten-free cookies.
- No-Bake Option: Set the cheesecake with gelatin instead of baking.
- Dairy-Free Topping: Use coconut milk-based whipped cream.
- Fruit Swaps: Experiment with mango, blueberry, or raspberry purees.
Common Mistakes to Avoid
Mistake 1: Overmixing the Batter
Overmixing introduces too much air, leading to cracks during baking. Mix just until ingredients are combined. Pro tip: Use a spatula for the final fold to minimize air bubbles.
Mistake 2: Skipping the Water Bath
A water bath helps maintain even heat distribution, preventing the cheesecake from cracking. If you’re worried about leaks, wrap the pan in foil before placing it in the water bath.
Mistake 3: Rushing the Cooling Process
Letting the cheesecake cool gradually prevents sinking or cracking. Don’t rush it—patience is key!
FAQs
Can I use store-bought fruit puree?
Absolutely! Just make sure it’s unsweetened and free of additives. Homemade puree gives a fresher taste, though.
How do I know when the cheesecake is done?
The edges should look set, while the center will still have a slight jiggle. Overbaking dries out the cheesecake.
Can I freeze this cheesecake?
Yes! Wrap individual slices tightly and freeze for up to 2 months. Thaw in the fridge before serving.
What if I don’t have a springform pan?
A regular cake pan works, but lining it with parchment paper makes removal easier.
Why does my crust stick to the pan?
Make sure to grease the pan thoroughly and press the crust firmly into place.
Can I add more fruit to the filling?
Feel free to experiment, but too much liquid can make the cheesecake soggy. Stick to the recommended amounts.
How far in advance can I make this?
Prepare it up to 2 days ahead and store it in the fridge. It tastes even better the next day!
Do I have to use both strawberry and kiwi?
Nope! You can stick to one fruit if you prefer, but the combo is magical.
What’s the best way to slice it cleanly?
Dip your knife in hot water, wipe it dry, and cut through the cheesecake for clean slices every time.
Can I use flavored jelly for the glaze?
Of course! Raspberry or peach jelly pairs beautifully with the fruit flavors.
Final Thoughts
This Strawberry Kiwi Delight is more than just a dessert—it’s a celebration of color, flavor, and creativity. Whether you’re baking for a special occasion or simply treating yourself, this cheesecake promises to deliver joy in every bite. So grab your apron, gather your ingredients, and let’s make something amazing together!
Equipment
- Mixing Bowls
- Electric Mixer
- Spatula
- 9-inch Springform Pan
- Pastry Brush
Ingredients
- 1 1/2 cups graham cracker crumbs
- 1/4 cup granulated sugar
- 1/3 cup unsalted butter, melted
- 24 oz cream cheese, softened
- 3/4 cup granulated sugar
- 1/4 cup sour cream
- 1 teaspoon vanilla extract
- 1 tablespoon lemon juice
- 3 large eggs
- 1/2 cup strawberry puree blend fresh or frozen strawberries
- 1/4 cup kiwi puree blend peeled kiwis
- 1 cup fresh strawberries, sliced
- 2 kiwis, peeled and sliced
- 1/4 cup strawberry jelly or apricot jelly, melted for glaze
- 1 tablespoon lemon juice
Instructions
- Preheat oven to 325°F (163°C) and grease a 9-inch springform pan, lining the bottom with parchment paper.
- In a medium bowl, mix graham cracker crumbs, sugar, and melted butter until it resembles wet sand; press firmly into the pan and bake for 10 minutes.
- Cool the crust while preparing the cheesecake filling.
- In a large mixing bowl, beat cream cheese and sugar until smooth; add sour cream, vanilla extract, and lemon juice, mixing until combined.
- Mix in eggs one at a time on low speed; divide the batter into two bowls.
- Stir strawberry puree into one bowl and kiwi puree into the other.
- Pour the strawberry batter into the cooled crust and spread evenly, then spoon kiwi batter on top without mixing.
- Bake for 60–70 minutes until the edges are set and the center has a slight jiggle; cool inside the oven for 1 hour, then refrigerate for at least 4 hours or overnight.
- Once chilled, arrange sliced strawberries and kiwis on top; mix melted jelly and lemon juice to create a glaze and brush over the fruit.
Notes
Nutrition

Hi, I’m Olivia Parker, the founder of BakingSecret.com and a lifelong lover of all things sweet and homemade. I grew up in a small town in Oregon, where the smell of fresh cookies in my family’s kitchen sparked my passion for baking. Over the years, I turned that passion into a mission: to help home bakers feel confident, inspired, and creative.
After studying food science and working in several artisan bakeries across the U.S., I decided to create a space where everyone from beginners to seasoned bakers can find reliable recipes, expert tips, and a warm, welcoming community. BakingSecret.com is my way of sharing the magic of baking with the world. When I’m not testing new recipes, you’ll find me exploring farmers’ markets, collecting vintage cookbooks, or perfecting my sourdough technique.