
A Cake That Feels Like Magic
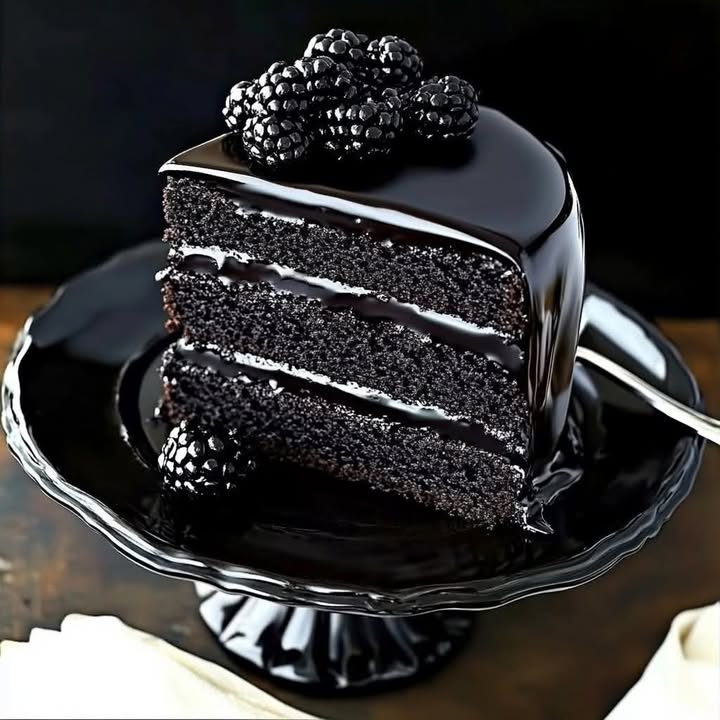
Picture this: a cake so dark, so velvety, and so rich that it feels like biting into a piece of midnight. That’s exactly what happened when I first baked the Velvet Blackberry Cake. It was for my best friend’s birthday—she loves anything dramatic—and let me tell you, this cake stole the show. The deep black hue, the tangy-sweet blackberry preserves layered between fluffy chocolate frosting, and the fresh blackberries on top? Pure perfection. If you’re looking for a dessert that’s equal parts indulgent and Instagram-worthy, this is your recipe.
A Little History Behind the Velvet
Now, you might be wondering where this Velvet Blackberry Cake idea came from. While red velvet cakes have been around since the early 1900s, their darker cousin—the black velvet—is a modern twist. Chefs started experimenting with black cocoa powder and food coloring to create something bold and mysterious. My version swaps the traditional cream cheese frosting for a decadent chocolate-blackberry combo. It’s a nod to classic flavors with a touch of whimsy. Plus, who doesn’t love a cake that looks like it belongs in a fairy tale?
Why You’ll Fall in Love With This Recipe
This cake isn’t just about its stunning looks—it’s all about flavor. The cocoa powder gives it a deep chocolatey base, while the blackberry preserves add a fruity zing that balances the sweetness. The frosting? Oh, it’s silky smooth, almost like spreading clouds over your cake layers. And don’t even get me started on how easy it is to make! Even if you’re not a seasoned baker, this recipe will guide you step by step. Trust me, your friends will think you went to pastry school.
Perfect Occasions for Your Velvet Blackberry Cake
Special occasions call for special desserts, and this cake fits the bill. Whether it’s a birthday, anniversary, or holiday gathering, this Velvet Blackberry Cake will leave everyone talking. It’s also perfect for themed parties—imagine serving this at a gothic-inspired dinner or a Halloween bash. Honestly, though, you don’t need an excuse. Sometimes, life just needs a little extra sweetness.
Ingredients You’ll Need
- 2 cups all-purpose flour
- 2 cups granulated sugar
- 1 cup unsweetened cocoa powder
- 2 teaspoons baking powder
- 1 1/2 teaspoons baking soda
- 1 teaspoon salt
- 1 cup buttermilk, at room temperature
- 1/2 cup vegetable oil
- 2 large eggs, at room temperature
- 2 teaspoons vanilla extract
- 1 cup boiling water
- 1/2 cup black food coloring gel
- Frosting:
- 1 cup unsalted butter, softened
- 4 cups powdered sugar
- 1/2 cup unsweetened cocoa powder
- 1/4 cup heavy cream
- 2 teaspoons vanilla extract
- 1/2 cup blackberry preserves
- Garnish:
- Fresh blackberries
- Dark chocolate shavings
- Fresh mint leaves
Substitution Options
If you’re missing an ingredient, don’t panic! Here are some swaps:
- Buttermilk: Mix 1 tablespoon lemon juice or vinegar with 1 cup milk; let it sit for 5 minutes.
- Black food coloring: Use activated charcoal powder for a natural alternative.
- Blackberry preserves: Substitute raspberry or strawberry jam if needed.
- Heavy cream: Whole milk works in a pinch, though the frosting won’t be as fluffy.
Step-by-Step Preparation
Step 1: Preheat and Prep
Start by preheating your oven to 350°F (175°C). Grease and flour three 8-inch round cake pans. I always use parchment paper circles at the bottom—it makes removing the cakes a breeze. Pro tip: Make sure your ingredients are at room temperature. Cold eggs or buttermilk can affect how well everything mixes together.
Step 2: Mix Dry Ingredients
In a large bowl, sift together the flour, sugar, cocoa powder, baking powder, baking soda, and salt. Sifting isn’t just for show—it helps break up lumps and aerates the dry mix, giving you a lighter cake. Imagine the rich, earthy aroma of cocoa filling your kitchen. Doesn’t that smell amazing?
Step 3: Combine Wet Ingredients
In another bowl, whisk together the buttermilk, vegetable oil, eggs, and vanilla extract. Once combined, pour this wet mixture into the dry ingredients. Stir gently until smooth. Don’t overmix—you want a tender crumb, not a tough one.
Step 4: Add the Magic Touch
Slowly stir in the boiling water and black food coloring gel. Watch as the batter transforms into a glossy, jet-black masterpiece. Chef’s tip: Add the water gradually to prevent splashing. The batter will be thin—that’s normal! Thin batter means moist cake.
Step 5: Bake to Perfection
Divide the batter evenly among the prepared pans. Pop them into the oven for 30-35 minutes. How do you know they’re done? Insert a toothpick into the center. If it comes out clean, you’re golden—or should I say, black? Let the cakes cool in the pans for 10 minutes before transferring them to wire racks.
Step 6: Whip Up the Frosting
Beat the softened butter until creamy. Gradually mix in the powdered sugar and cocoa powder. Add the heavy cream and vanilla extract, then beat until light and fluffy. Picture spreading this dreamy frosting over your cake layers—it’s like painting with chocolate clouds.
Step 7: Assemble and Garnish
Spread blackberry preserves between each cake layer, then frost the top and sides with the chocolate frosting. Top with fresh blackberries, dark chocolate shavings, and mint leaves. Voilà! Your Velvet Blackberry Cake is ready to dazzle.
Timing Breakdown
- Prep Time: 20 minutes
- Cooking Time: 35 minutes
- Cooling Time: 1 hour
- Total Time: 2 hours
Chef’s Secret
Here’s a little trick: chill your frosted cake in the fridge for 15 minutes before serving. This sets the frosting and makes slicing cleaner. No more smudged edges!
An Interesting Tidbit
Did you know blackberries are packed with antioxidants? They’re not just delicious—they’re good for you too. So go ahead, indulge guilt-free!
Necessary Equipment
- Three 8-inch round cake pans
- Parchment paper
- Mixing bowls
- Whisk and spatula
- Electric mixer
- Wire cooling racks
- Offset spatula for frosting
Storage Tips
Store your Velvet Blackberry Cake in an airtight container at room temperature for up to 2 days. For longer storage, keep it in the fridge for up to a week. Bring it back to room temperature before serving for the best texture.
If freezing, wrap each layer tightly in plastic wrap and foil. Freeze for up to 3 months. Thaw overnight in the fridge before assembling and frosting.
Avoid leaving the cake uncovered, as the frosting can dry out. A cake dome works wonders for keeping it fresh.
Tips and Advice
- Use high-quality cocoa powder for the richest flavor.
- Don’t skip sifting—it really does make a difference.
- Let the cakes cool completely before frosting to prevent melty frosting disasters.
Presentation Ideas
- Serve on a sleek black or white cake stand for contrast.
- Add edible gold leaf for a luxurious touch.
- Place candles for birthdays or sparklers for celebrations.
Healthier Alternatives
Want to lighten things up? Try these variations:
- Gluten-Free Option: Swap all-purpose flour for a gluten-free blend.
- Low-Sugar Version: Use sugar substitutes like stevia or monk fruit.
- Vegan Delight: Replace eggs with flax eggs and use plant-based butter and milk.
- No-Food-Coloring Cake: Skip the black gel and embrace the natural brown color.
- Reduced-Fat Frosting: Use Greek yogurt instead of heavy cream.
- Fruit-Only Sweetener: Omit granulated sugar and rely on the sweetness of blackberries.
Common Mistakes to Avoid
Mistake 1: Overmixing the Batter
Overmixing leads to dense, tough cakes. Mix just until the ingredients come together. Remember, a few lumps are okay!
Mistake 2: Skipping Room Temperature Ingredients
Cold ingredients don’t blend well, which can ruin the texture. Take them out of the fridge ahead of time.
Mistake 3: Rushing the Cooling Process
Frosting warm cakes causes the frosting to melt. Patience pays off here—let those layers cool completely.
Mistake 4: Using Low-Quality Cocoa Powder
Cheap cocoa can taste chalky. Invest in a good brand for a smoother, richer flavor.
Mistake 5: Overloading the Frosting
Too much frosting overwhelms the delicate balance of flavors. Spread it evenly and sparingly.
FAQs
Can I make this cake without black food coloring?
Absolutely! While the black hue adds drama, the cake will still taste fantastic without it. Just enjoy its natural cocoa color.
What can I use instead of blackberry preserves?
Raspberry or strawberry jam works beautifully. Any berry-based preserve complements the chocolate flavors.
How do I prevent my cake from sticking to the pan?
Grease and flour your pans thoroughly, or line them with parchment paper. Nonstick spray with flour also works wonders.
Can I freeze the cake layers?
Yes! Wrap each layer tightly in plastic wrap and foil, then freeze for up to 3 months. Thaw overnight in the fridge before using.
Is this cake suitable for vegans?
With a few tweaks, yes! Use flax eggs, plant-based butter, and dairy-free milk to make it vegan-friendly.
Why did my frosting turn grainy?
Grainy frosting usually happens when powdered sugar isn’t fully incorporated. Beat it longer to achieve a smooth consistency.
Can I bake this as a sheet cake?
Of course! Pour the batter into a greased 9×13-inch pan and adjust the baking time to 35-40 minutes.
How far in advance can I make this cake?
You can bake the layers a day ahead and store them wrapped at room temperature. Assemble and frost on the day of serving.
What’s the best way to transport this cake?
Use a sturdy cake carrier or box. Chill the cake slightly before transporting to stabilize the frosting.
Can I use fresh blackberries in the frosting?
While tempting, fresh berries can add moisture and alter the frosting’s texture. Stick to preserves for stability.
Final Thoughts
Baking a Velvet Blackberry Cake is more than just following a recipe—it’s creating a memory. Whether you’re celebrating a special occasion or simply treating yourself, this cake promises to deliver joy in every slice. So grab your apron, gather your ingredients, and let’s make magic happen in the kitchen. Happy baking!
Equipment
- Mixing Bowls
- Whisk
- Spatula
- 3 8-inch Round Cake Pans
- Electric Mixer
Ingredients
- 2 cups all-purpose flour
- 2 cups granulated sugar
- 1 cup unsweetened cocoa powder
- 2 teaspoons baking powder
- 1.5 teaspoons baking soda
- 1 teaspoon salt
- 1 cup buttermilk, at room temperature
- 0.5 cup vegetable oil
- 2 large eggs, at room temperature
- 2 teaspoons vanilla extract
- 1 cup boiling water
- 0.5 cup black food coloring gel
- 1 cup blackberry preserves
Instructions
- Preheat oven to 350°F (175°C) and grease/flour three 8-inch round cake pans.
- Sift together flour, sugar, cocoa powder, baking powder, baking soda, and salt in a large bowl.
- Whisk together buttermilk, vegetable oil, eggs, and vanilla extract in another bowl.
- Pour the wet mixture into the dry ingredients and stir gently until smooth.
- Slowly stir in boiling water and black food coloring gel until well combined.
- Divide batter among prepared pans and bake for 30-35 minutes, testing with a toothpick.
- Cool cakes in pans for 10 minutes, then transfer to wire racks to cool completely.
- Beat softened butter until creamy, then mix in powdered sugar and cocoa powder.
- Add heavy cream and vanilla extract, then beat until light and fluffy.
- Spread blackberry preserves between each cake layer and frost the top and sides with chocolate frosting.
- Garnish with fresh blackberries, dark chocolate shavings, and mint leaves.