
My Ultimate Chocolate Cake: A Strawberry & Condensed Milk Dream
I remember the first time I made this cake. It was for my daughter’s birthday, and she wanted something “chocolatey but not boring.” I experimented, adding a lush strawberry and condensed milk filling, and it was a hit! The room went silent except for the happy murmurs of “mmm.” This moist chocolate cake is more than a dessert; it’s a celebration waiting to happen.
The Story Behind This Special Cake
This recipe is my own twist on a classic. I grew up with simple chocolate cakes, but I always loved the idea of a surprise inside. The condensed milk filling is inspired by traditional Latin American desserts, where its sweet, creamy magic is often used. Adding fresh strawberries brings a bright, tangy note that cuts through the richness. It’s a modern take on comfort food, blending familiar chocolate warmth with a playful, indulgent center.
Why You’ll Love This Moist Chocolate Cake
First, the texture is incredibly moist and soft, thanks to the buttermilk. Then, you get that deep, rich cocoa flavor. The real showstopper is the filling: a creamy, sweet condensed milk blend with bursts of juicy strawberry. It’s visually stunning and tastes even better. It’s surprisingly straightforward to make, but the result feels gourmet. Perfect for making your family and friends feel extra special.
Perfect Occasions for This Cake
This cake shines at any gathering. It’s ideal for birthday parties, anniversaries, or holiday dinners like Christmas. It makes a wonderful centerpiece for a summer picnic or a potluck. I love baking it for “just because” weekends, turning a regular Saturday into a sweet celebration. Any moment you want to add a touch of love and luxury is the right occasion.
What You’ll Need: Ingredients
- 3 cups all-purpose flour
- 1 cup cocoa powder
- 2 teaspoons baking soda
- 1 teaspoon salt
- 3 large eggs
- 1 cup vegetable oil
- 1 cup buttermilk (see step below)
- 2 teaspoons vanilla essence
- 2 cups granulated sugar
For the Homemade Buttermilk:
- 1 ½ cups whole milk
- 2 tablespoons lemon juice
For the Strawberry Condensed Milk Filling:
- 100g butter (about 7 tablespoons)
- 2 cans (approximately 14 oz each) of condensed milk
- 150g milk powder
- 200g fresh strawberries, chopped
Ingredient Substitution Options
Don’t worry if you’re missing something! Here are easy swaps:
- Buttermilk: Use 1 ½ cups milk mixed with 1 ½ tablespoons white vinegar or lemon juice. Let it sit 5 minutes.
- Cocoa Powder: Use Dutch-processed for a darker color, or natural for a lighter taste.
- Oil: Melted coconut oil or even applesauce can work for a slightly different texture.
- Strawberries: Frozen strawberries (thawed and drained) or other berries like raspberries are great.
- Milk Powder: If you don’t have it, you can use an extra ½ can of condensed milk and reduce the butter slightly. The filling will be softer but still delicious.
Step-by-Step Preparation
Step 1: Prep Your Kitchen
Start by preheating your oven to 350°F (180°C). This ensures it’s ready when your cake batter is perfectly mixed. Grease your cake pan thoroughly. I like to use a 9-inch round pan. Line the bottom with parchment paper and give it a light dusting of flour. This little trick guarantees your beautiful cake will release cleanly without any stuck bits.
Step 2: Make Your Buttermilk
In a small bowl or measuring cup, combine the whole milk and lemon juice. Stir gently and let it rest for about 15 minutes. You’ll see it curdle slightly and thicken. This homemade buttermilk adds a wonderful tang and activates the baking soda, giving your cake a tender, fluffy rise. Pro tip: If you’re in a rush, store-bought buttermilk works perfectly too!
Step 3: Combine the Dry Ingredients
Sift your flour, cocoa powder, baking soda, and salt into a large mixing bowl. Sifting is key! It aerates the flour, breaks up any lumps in the cocoa, and evenly distributes the baking soda and salt. This means every slice of your moist chocolate cake will have a uniform, gorgeous color and no bitter spots.
Step 4: Mix the Wet Ingredients
In another bowl, crack in your eggs. Add the vegetable oil, your prepared buttermilk, and the vanilla essence. Whisk everything together until it’s smooth and well-blended. The mixture will turn a pale caramel color and smell sweetly fragrant. This liquid base is the foundation of your cake’s moisture.
Step 5: Bring the Batter Together
Pour your wet ingredients into the bowl of dry ingredients. Mix with a spatula using gentle, encircling movements. Don’t overmix! Just fold until no dry streaks remain. Then, add the granulated sugar and mix again until fully integrated. The batter will be thick, shiny, and deeply brown—like liquid chocolate silk.
Step 6: Bake to Perfection
Pour the batter into your prepared pan. Smooth the top with your spatula. Place it in the center of your preheated oven. Bake for 25-30 minutes. To test, insert a thin knife or skewer into the center. It should come out clean or with just a few moist crumbs. Pro tip: If the top springs back when lightly touched, it’s done!
Step 7: Cool and Split the Cake
Let the cake cool in its pan for 10 minutes. This allows it to settle and makes it easier to handle. Then, turn it out onto a wire rack and let it cool completely. Once cool, use a serrated knife to carefully slice the cake horizontally into two or three even layers. This is where you create the space for your amazing filling.
Step 8: Create the Dreamy Filling
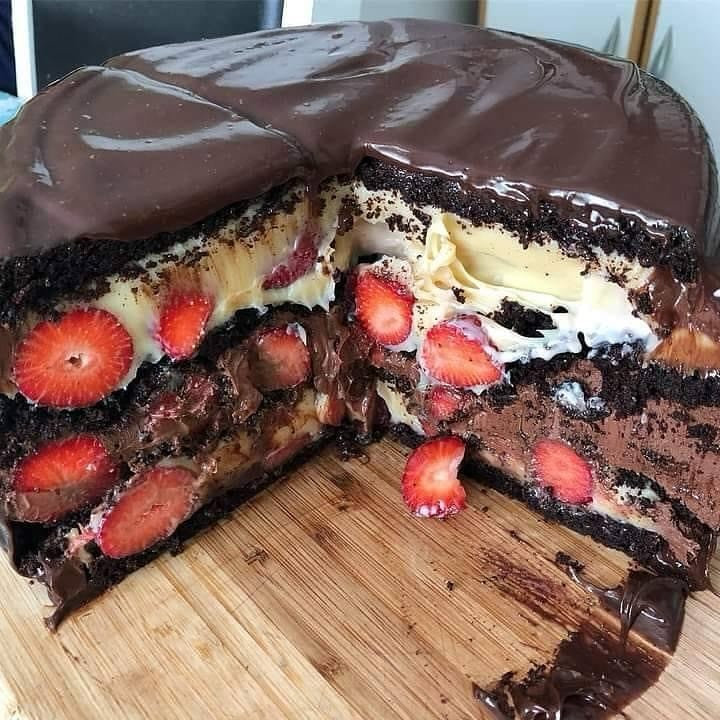
In a saucepan over medium heat, melt the butter. Add the two cans of condensed milk and the milk powder. Stir continuously until everything melts together into a smooth, homogeneous, creamy mass. It will thicken slightly and become gloriously shiny. Remove from heat and fold in your chopped strawberries. The red berries will dot the creamy filling with brilliant color.
Step 9: Assemble and Decorate
Place the bottom layer of your cake on a serving plate. Pour a generous amount of the strawberry condensed milk filling over it, spreading it evenly. Carefully place the next cake layer on top as your “lid.” For the final touch, drizzle or coat the top with melted milk chocolate. You can decorate with whole strawberries, chocolate shavings, or a dusting of cocoa powder. Chef’s secret: Let the assembled cake chill in the fridge for an hour before serving. This sets the filling perfectly and makes slicing neat and beautiful.
Timing Your Baking Success
Good planning makes baking stress-free. Here’s the timeline for this moist chocolate cake:
- Prep Time: 25 minutes (including making buttermilk)
- Bake Time: 25-30 minutes
- Cooling Time: 1 hour (cake & filling)
- Assembly & Chill Time: 15 minutes + 1 hour
- Total Time: Approximately 2 hours 45 minutes
A Chef’s Secret for the Ultimate Moist Chocolate Cake
The secret is in the buttermilk and oil. The buttermilk’s acidity tenderizes the flour, creating a soft crumb. The oil, unlike butter, stays liquid at room temperature, locking in moisture. This combination ensures your cake stays incredibly moist for days, not just hours. It’s the reason this cake feels so lush and tender.
A Little Extra Fun Fact
Adding strawberries to the condensed milk filling isn’t just for taste. The natural pectin and acidity in the berries help stabilize the creamy mixture, giving it a better texture and preventing it from being too one-dimensional sweet. It’s a little bit of kitchen science making your dessert even better!
Necessary Equipment
- 9-inch round cake pan
- Parchment paper
- Two large mixing bowls
- Sifter or fine mesh strainer
- Whisk and spatula
- Saucepan for the filling
- Serrated knife for splitting the cake
- Wire cooling rack
Storing Your Beautiful Cake
Because this cake is so moist, storage is easy. If you’re serving it within a day, you can keep it covered at room temperature. The filling is stable and the cake holds up well.
For longer storage, the refrigerator is your best friend. Cover the cake loosely with plastic wrap or place it in a cake carrier. It will stay fresh and delicious for up to 4 days. The cool temperature helps the filling firm up nicely.
I do not recommend freezing the fully assembled cake, as the condensed milk filling can separate. You can, however, freeze the unfilled cake layers individually for up to a month. Thaw them at room temperature before filling and decorating.
Tips and Advice for the Best Results
- Measure your flour correctly: spoon it into the measuring cup and level it off. Don’t scoop directly from the bag.
- Ensure your baking soda is fresh for the best rise.
- When chopping strawberries for the filling, make the pieces small and uniform so they distribute evenly.
- Let the cake cool completely before splitting and filling. A warm cake will melt the filling and make it messy.
- For a smoother top, run a knife under hot water and dry it before slicing the cake layers.
Presentation Ideas to Wow Your Guests
- Dust the top with powdered sugar and fresh strawberry slices for a simple, elegant look.
- Create a chocolate drip effect by letting melted chocolate run down the sides from the top.
- Pipe whipped cream rosettes around the top edge and place a strawberry in each one.
- Serve on a beautiful cake stand with a vintage cake server.
- For individual servings, pre-slice the cake on the plate and add a small dollop of extra filling on top.
Healthier Alternative Recipes & Variations
Love this cake but want different options? Here are six inspired twists:
- Gluten-Free Chocolate Cake: Swap the all-purpose flour for a quality gluten-free flour blend. Ensure it contains xanthan gum for structure.
- Reduced-Sugar Version: Cut the sugar in the cake to 1 ½ cups. Use a sugar-free condensed milk alternative for the filling.
- Vegan Chocolate Cake: Use plant-based milk and apple cider vinegar for buttermilk. Replace eggs with flax eggs and use vegan butter.
- Chocolate-Orange Cake: Add the zest of one orange to the cake batter. Use orange segments instead of strawberries in the filling.
- Mocha Cake: Dissolve 2 tablespoons of instant espresso powder into the buttermilk for a coffee-chocolate flavor.
- Nutty Delight Cake: Add ½ cup of finely chopped toasted hazelnuts or almonds to the cake batter. Use chopped toasted nuts in the filling instead of strawberries.
Exploring different cake styles is a joy. If you’re looking for more classic inspiration, check out our collection of tried-and-true cake and cupcake recipes for every occasion.
Common Mistakes to Avoid
Mistake 1: Overmixing the Batter
Vigorously beating the batter after adding the dry ingredients is a common error. This overworks the flour, developing too much gluten. The result is a tough, dense cake instead of a light, moist chocolate cake. To avoid this, fold the ingredients gently with a spatula until just combined. Stop as soon as you see no dry flour pockets.
Mistake 2: Using Cold Ingredients
Using eggs or buttermilk straight from the refrigerator can hinder proper emulsification. The cold ingredients don’t blend as smoothly with the oil, which can affect the cake’s texture. Let your eggs and buttermilk sit out for 15-20 minutes to come to room temperature. This small step ensures a smoother, more homogeneous batter.
Mistake 3: Underbaking or Overbaking
It’s easy to misjudge baking time. Underbaking leaves a gummy, wet center. Overbaking dries out the cake. The toothpick test is your best friend. Insert it into the cake’s center—it should come out with a few moist crumbs attached, not clean wet batter or completely dry. Also, the cake edges will lightly pull away from the pan when done.
Mistake 4: Filling a Warm Cake
The excitement to assemble can lead to pouring the creamy filling onto a warm cake layer. The heat will melt the filling, causing it to soak into the cake or even spill out. It becomes messy and unstable. Always, always let your cake layers cool completely on a wire rack before you start the assembly process.
Mistake 5: Not Chopping Strawberries evenly
Tossing in large, uneven strawberry chunks creates an unbalanced filling. Some slices get a huge berry, others get none. It also makes spreading the filling difficult. Take time to chop your strawberries into small, consistent pieces. This ensures every bite gets a perfect burst of strawberry flavor and a beautiful, even distribution.
Frequently Asked Questions
Can I use frozen strawberries for the filling?
Yes, you can use frozen strawberries. Thaw them completely first. Drain any excess liquid thoroughly, even pat them dry with a paper towel. Extra water from the berries will thin out your condensed milk filling, making it runny and less creamy. Chopped thawed berries work well, but fresh ones are ideal for texture and flavor.
My cake sunk in the middle, what happened?
A sunken center often points to underbaking or too much leavener. Ensure your baking soda is fresh and you measured it correctly (2 teaspoons, not tablespoons!). Also, make sure your oven temperature is accurate. An oven thermometer is a cheap tool that can save many bakes. Finally, don’t open the oven door frequently during baking; the sudden temperature drop can cause collapse.
How can I make the cake layers more even when splitting?
Use a simple tool: toothpicks or wooden skewers. Insert them horizontally around the cake at the height you want to cut. Use them as a guide for your serrated knife. You can also use a cake leveler, a handy gadget with a adjustable blade. For the eye, mark the middle by lightly scoring with the knife first before making the full cut.
The filling is too thick or too thin, how can I fix it?
The consistency depends on heat and mixing. If it’s too thick, you may have overheated it. Add a tablespoon of warm milk and stir gently to loosen it. If it’s too thin, it likely didn’t cook enough. Return it to low heat and stir for another 2-3 minutes until it thickens slightly. Remember, it will firm up more as it cools.
Can I make this cake ahead of time?
Absolutely! The unfilled cake layers can be baked, cooled completely, and wrapped tightly in plastic wrap. They can stay at room temperature for a day or be refrigerated for 2-3 days before filling. You can also make the filling a day ahead and keep it sealed in the refrigerator. Gently re-warm it on the stove or microwave to make it spreadable before assembly.
What’s the best way to melt chocolate for the topping?
Chop your milk chocolate into small pieces. Melt it using a double boiler method (a bowl over simmering water) or in the microwave in short 20-second bursts, stirring between each burst. Avoid direct high heat. Adding a tiny bit of coconut oil or butter (1 teaspoon) can make the melted chocolate more fluid for a beautiful drip effect.
My buttermilk didn’t curdle, is it still okay?
It’s likely still fine. Sometimes the curdling is subtle. The acid from the lemon juice is still in the milk, which is what’s important for the recipe’s chemistry. Proceed with the recipe. If you’re concerned, you can add an extra half tablespoon of lemon juice and wait another 5 minutes.
Can I use a different pan size?
Yes, but baking times will change. For a 9×13 rectangular pan, the batter will be thinner. Bake for 22-25 minutes. For two 8-inch rounds, divide the batter evenly and bake for 20-22 minutes. Always do the toothpick test to confirm doneness. Adjusting pan size might yield more or fewer layers for your filling.
How do I prevent the cake from sticking to the pan?
The greasing, parchment paper, and flour method described is very reliable. Ensure you grease every side of the pan, including the corners. The parchment paper on the bottom is a foolproof safety net. A light flour dusting over the grease creates a barrier. Never skip these steps for a delicate, moist cake like this.
Is this cake suitable for people with dietary restrictions?
The base recipe contains gluten, dairy, and eggs. However, the substitution section provides ideas for gluten-free, vegan, and reduced-sugar variations. Always check specific product labels if allergies are a concern. For example, use certified gluten-free flour and vegan condensed milk alternatives to adapt the recipe safely.
Final Thoughts on Baking Bliss
This moist chocolate cake filled with strawberries and condensed milk is a labor of love that pays off in every slice. The process is fun, the result is stunning, and the taste is unforgettable. It’s about creating a moment of joy, whether for a special event or a simple family treat. Remember, baking is about more than following steps. It’s about understanding how ingredients work together, like the role of balanced nutrition in a healthy lifestyle, to create something wonderful. So preheat your oven, gather your ingredients, and get ready to make something truly delicious. Happy baking!
Equipment
- Moule à gâteau de 9 pouces
- Papiers sulfurisés
- Deux grands bols de mélange
- Tamis ou passoire fine
- Fouet et spatule
- Casserole pour la garniture
- Couteau denté pour couper le gâteau
- Grille de refroidissement
Ingredients
- 3 tasses farine tout usage
- 1 tasse cacao en poudre
- 2 cuillères à café poudre à lever
- 1 cuillère à café sel
- 1 tasse huile végétale
- 1 tasse lait fermenté
- 2 cuillères à café essence de vanille
- 2 tasses sucre granulé
- 100 g beurre environ 7 cuillères à soupe
- 2 boîtes lait condensé environ 14 oz chacune
- 150 g lait en poudre
- 200 g fraises hachées
Instructions
- Préchauffez votre four à 180°C et préparez un moule à gâteau de 9 pouces en le graissant et en le farinant.
- Préparez le lait fermenté maison en mélangeant du lait entier et du jus de citron, puis laissez reposer pendant environ 15 minutes.
- Tamisez ensemble la farine, le cacao en poudre, la poudre à lever et le sel dans un grand bol de mélange.
- Dans un autre bol, fouettez les œufs, l'huile végétale, le lait fermenté préparé et l'essence de vanille jusqu'à obtenir un mélange homogène.
- Versez les ingrédients humides dans les ingrédients secs et mélangez doucement jusqu'à ce qu'ils soient combinés. Ajoutez le sucre granulé et mélangez jusqu'à ce qu'il soit complètement incorporé.
- Versez la pâte dans le moule préparé et lissez le dessus, puis faites cuire pendant 25-30 minutes.
- Laissez le gâteau refroidir dans le moule pendant 10 minutes, puis démoulez-le sur une grille et laissez-le refroidir complètement.
- Faites fondre le beurre dans une casserole et ajoutez le lait condensé et le lait en poudre, en remuant jusqu'à obtenir un mélange lisse ; incorporez les fraises hachées.
- Assemblez le gâteau en superposant la garniture entre les couches et en décorant le dessus avec du chocolat fondu et des fraises.
Notes
Nutrition

Hi, I’m Olivia Parker, the founder of BakingSecret.com and a lifelong lover of all things sweet and homemade. I grew up in a small town in Oregon, where the smell of fresh cookies in my family’s kitchen sparked my passion for baking. Over the years, I turned that passion into a mission: to help home bakers feel confident, inspired, and creative.
After studying food science and working in several artisan bakeries across the U.S., I decided to create a space where everyone from beginners to seasoned bakers can find reliable recipes, expert tips, and a warm, welcoming community. BakingSecret.com is my way of sharing the magic of baking with the world. When I’m not testing new recipes, you’ll find me exploring farmers’ markets, collecting vintage cookbooks, or perfecting my sourdough technique.