
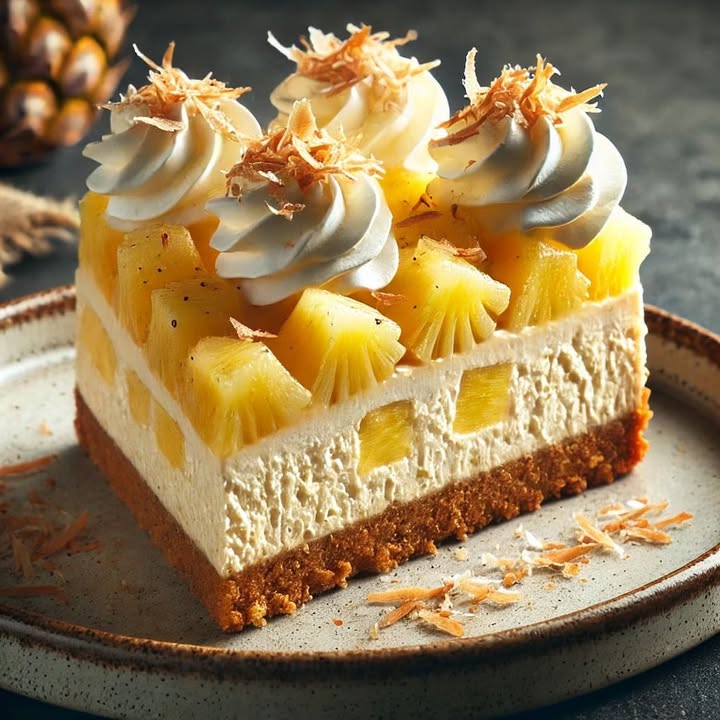
Let’s Bake Some Sunshine: My Ultimate Pineapple Cheesecake
You know that feeling when you need a dessert that’s both a showstopper and a hug in a pan? That’s this Pineapple Cheesecake for me. I first made it for a summer potluck, and let me tell you, it disappeared faster than kids chasing an ice cream truck. The creamy filling and that tangy, glossy topping? Pure magic. It brings a taste of the tropics right to your table, no passport required.
A Slice of Cheesecake History
Cheesecake itself is ancient, dating back to Greece. But the pineapple twist? That’s a modern, sunny delight. I think of it as the classic New York-style cheesecake went on vacation and came back with a fantastic tan. The sweet-tart fruit cuts through the rich cream cheese perfectly. It’s a beautiful mix of tradition and a little bit of fun, just like my grandma’s recipes with my own spin.
Why You’ll Adore This Pineapple Cheesecake Recipe
This recipe is a winner for so many reasons! First, the flavor is unbeatable—creamy, sweet, and refreshing. Second, it’s surprisingly simple. No water bath needed! The steps are clear, and the result is always impressive. It’s the kind of dessert that makes people think you slaved for hours, but we’ll keep our little secret. Plus, that vibrant pineapple topping just makes everyone smile.
The Perfect Moments for This Tropical Treat
This cheesecake is your secret weapon for celebrations. It’s a star at:
- Summer BBQs and picnics: It’s cool, refreshing, and travels well.
- Potlucks and family reunions: It serves a crowd and always gets compliments.
- Birthdays or Mother’s Day: It feels special and celebratory.
- Just because! Sometimes a Tuesday deserves a slice of sunshine.
Gathering Your Pineapple Cheesecake Ingredients
Let’s get everything on the counter. Using full-fat, room-temperature ingredients is key for the smoothest filling!
For the Crust:
- 2 cups graham cracker crumbs
- 1/4 cup granulated sugar
- 1/2 cup (1 stick) unsalted butter, melted
For the Cheesecake Filling:
- 24 oz (three 8-oz blocks) cream cheese, softened
- 1 cup granulated sugar
- 1 teaspoon pure vanilla extract
- 3 large eggs, at room temperature
- 1/2 cup crushed pineapple, very well drained
For the Pineapple Topping:
- 1 can (20 oz) crushed pineapple in juice (do not drain)
- 1/2 cup granulated sugar
- 2 tablespoons cornstarch
- 1 tablespoon lemon juice
Smart Ingredient Swaps
No worries if you’re missing something! Here are easy swaps:
- Graham Cracker Crumbs: Use digestive biscuits, vanilla wafers, or even gluten-free graham crackers.
- Butter: Margarine works, but butter gives the best flavor.
- Cream Cheese: Full-fat is best for structure and taste. Don’t use whipped or reduced-fat.
- Crushed Pineapple: You can use tidbits or chunks and chop them smaller. Fresh pineapple works too, but cook it down a bit first as it’s more watery.
Crafting Your Dreamy Pineapple Cheesecake
Alright, apron on! Let’s create some deliciousness together.
Step 1: Building the Buttery Crust
Preheat your oven to 350°F (175°C). In a medium bowl, combine the graham cracker crumbs and sugar. Pour in the melted butter. The mixture will look like wet sand and smell wonderfully toasty. Dump it into your ungreased 9×13-inch pan. Press it down firmly and evenly with the bottom of a cup or measuring cup. Pop it in the oven for 8-10 minutes just to set. Pull it out and let it cool completely on a rack. This prevents a soggy bottom!
Pro tip: For the neatest slices, line your pan with parchment paper, letting it hang over the sides for easy lifting later.
Step 2: Whipping Up the Creamy Filling
In a large bowl, beat the softened cream cheese with an electric mixer until it’s completely smooth and lump-free. This is crucial! Scrape down the bowl. Add the sugar and vanilla, beating again until it’s silky. Now, add the eggs one at a time, beating just until each is blended in. Overbeating adds too much air and can cause cracks. Finally, fold in the 1/2 cup of well-drained crushed pineapple gently with a spatula. The filling will be thick and creamy with little flecks of gold.
Pro tip: To drain pineapple, press it in a fine-mesh strainer and then squeeze it in a clean kitchen towel or paper towels. Extra moisture is the enemy of a firm cheesecake.
Step 3: Baking to Perfection
Pour the luscious filling over your cooled crust. Use a spatula to spread it evenly. Tap the pan gently on the counter to release any air bubbles. Bake for 35-40 minutes. The edges should be set, but the center will still have a slight jiggle—like firm Jell-O. It will firm up as it chills. Turn off the oven, crack the door open, and let it cool inside for about an hour. This gentle cooling helps prevent cracks. Then, move it to the fridge to chill for at least 4 hours, or better yet, overnight.
Step 4: Creating the Glossy Pineapple Topping
In a medium saucepan, whisk together the entire can of pineapple (with its juice), sugar, cornstarch, and lemon juice. Turn the heat to medium. Cook, stirring constantly, until the mixture comes to a simmer and thickens beautifully. It will turn clear and glossy. Let it cool completely to room temperature before spreading it over your chilled cheesecake. Refrigerate the whole thing for another 1-2 hours so the topping sets. Then, slice and enjoy the tropical paradise!
Chef’s tip: For an extra flavor boost, add a teaspoon of finely grated fresh ginger or a pinch of cinnamon to the topping while it cooks.
Your Pineapple Cheesecake Timeline
| Activity | Time |
|---|---|
| Preparation | 25 minutes |
| Baking Time | 40 minutes |
| Cooling & Chilling Time | 6+ hours (overnight best) |
| Total Time (hands-off chilling included) | About 7 hours 5 minutes |
The #1 Secret for the Smoothest Filling
All ingredients must be at room temperature. Seriously, this is non-negotiable! Take the cream cheese and eggs out of the fridge at least 1-2 hours before you start. Room-temperature ingredients blend together seamlessly, creating a velvety, lump-free batter that bakes evenly. Cold cream cheese will leave lumps no matter how long you beat it.
A Sweet Little Fact
Pineapples were once such a symbol of wealth and hospitality that people would rent them for parties! Having this cheesecake on your table is a much tastier (and less prickly) way to show your guests a fabulous welcome.
Kitchen Tools You’ll Need
- 9×13-inch baking pan (metal or glass)
- Electric hand mixer or stand mixer
- Mixing bowls (large and medium)
- Measuring cups and spoons
- Saucepan and whisk
- Rubber spatula
- Fine-mesh strainer
Storing Your Pineapple Cheesecake Masterpiece
Once topped and set, cover the pan tightly with plastic wrap or aluminum foil. It will keep beautifully in the refrigerator for up to 5 days. The flavors actually meld and get even better after a day or two.
You can also freeze this cheesecake for longer storage. Freeze the whole pan or individual slices on a parchment-lined baking sheet until solid. Then, wrap them tightly in plastic wrap and place in a freezer bag. They’ll keep for up to 2 months. Thaw overnight in the fridge before serving.
For serving, always use a clean, sharp knife. Dip the knife in hot water and wipe it dry between each cut. This gives you those gorgeous, clean slices with perfect layers of crust, filling, and topping.
My Best Tips for Cheesecake Success
- Don’t skip the draining: Get as much liquid out of the pineapple for the filling as you can.
- Avoid overmixing after adding eggs: This incorporates too much air and leads to cracks.
- Chill patiently: Rushing the chilling process means a messy slice. Let it set fully.
- Customize it: Add 1/2 cup of shredded coconut to the crust or sprinkle toasted coconut on top!
Presentation Ideas to Wow Your Guests
- Serve each square with a dollop of freshly whipped cream and a maraschino cherry.
- Garnish with thin slices of fresh pineapple or a mint leaf for a pop of color.
- For a party, cut into small “cheesecake bite” squares and serve on a platter.
- Drizzle a little caramel sauce over the top for a pineapple upside-down cake vibe.
6 Fun Variations to Try
Love this base recipe? Mix it up with these tasty twists!
- Pina Colada Cheesecake: Add 1/2 cup of cream of coconut to the filling and use macadamia nut crumbs for the crust.
- Strawberry-Pineapple Cheesecake: Layer sliced strawberries over the crust before adding the filling. Use a strawberry glaze for the topping.
- Individual Pineapple Cheesecakes: Use a muffin tin with liners. Perfect for portion control and parties! Check out my guide for perfect mini dessert portions.
- No-Bake Pineapple Cheesecake: Use whipped cream or Cool Whip folded into the cream cheese mixture for a lighter, chilled option.
- Ginger Pineapple Cheesecake: Add 2 tablespoons of minced crystallized ginger to the filling. Use gingersnap cookies for an amazing crust.
- Tropical Fusion Cheesecake: Mix in 1/4 cup each of well-drained crushed pineapple, mango, and passion fruit puree into the filling.
Common Mistakes to Avoid
Mistake 1: Using Cold Ingredients
This is the biggest culprit for a lumpy, uneven cheesecake batter. Cold cream cheese doesn’t blend smoothly with sugar and eggs. It leaves tiny lumps that bake into your filling. Always plan ahead. Take your cream cheese and eggs out of the fridge at least an hour before you start baking. They should feel cool to the touch, not cold.
Mistake 2: Not Draining the Pineapple Enough
Pineapple is packed with water. If you add it straight from the can to your filling, that extra liquid will seep out during baking. This can cause a soggy crust and prevent the cheesecake from setting properly. Be thorough! Drain it in a strainer, then press it with the back of a spoon. For the best results, give it a good squeeze in a clean kitchen towel.
Mistake 3: Overbeating the Batter After Adding Eggs
Once you add the eggs, your mixing goal changes. You just want them incorporated, not whipped. Beating on high speed adds too much air into the batter. This trapped air expands in the oven and then collapses as it cools, leading to cracks and a less dense texture. After adding each egg, mix on low speed just until you no longer see streaks of yolk.
Mistake 4: Overbaking the Cheesecake
A cheesecake is done when the edges are puffed and set, but the center still has a slight wobble. It will look underdone to you. That’s perfect! It continues to cook from residual heat as it cools. If you bake it until the center is completely firm, it will be dry and dense. Set a timer, trust the jiggle test, and remember it will firm up in the fridge.
Frequently Asked Questions
Can I use fresh pineapple instead of canned?
Yes, you can! Fresh pineapple has a brighter, tangier flavor. For the filling, you’ll need to finely chop or crush about 1/2 cup of it. For the topping, you’ll need about 2 1/2 cups of crushed fresh pineapple. The key difference is that fresh pineapple contains more active enzymes (bromelain) which can prevent gelatin from setting, but since we use cornstarch here, it’s fine. Just simmer it a bit longer to break down and release its juices for the topping.
Why did my cheesecake crack on top?
Cracks usually happen from sudden temperature changes or overmixing. To avoid them, don’t open the oven door during baking. Let the cheesecake cool slowly in the turned-off oven with the door cracked. Also, make sure not to overbeat the batter after adding the eggs. If a crack does appear, don’t worry! The beautiful pineapple topping will cover it right up, and it will still taste incredible.
How do I know when the cheesecake is done baking?
The best test is the “jiggle test.” Gently shake the pan. The edges should look set and puffed, but the center (about a 2-3 inch circle in the middle) should have a slight, gentle jiggle—like Jell-O that’s almost set. It will firm up completely as it chills. The internal temperature should be around 150°F (65°C) if you use a thermometer. Remember, it keeps cooking from the pan’s heat even after it’s out of the oven.
Can I make this pineapple cheesecake ahead of time?
Absolutely! In fact, making it a day ahead is ideal. Cheesecake needs time to chill and set properly for the cleanest slices and best texture. Bake and cool it, then add the topping. Cover it tightly and refrigerate overnight. This allows all the flavors to develop and meld together beautifully. It’s one less thing to do on the day of your party or gathering.
Can I freeze pineapple cheesecake?
You sure can. For best results, freeze it without the topping. Once the baked cheesecake (just the crust and filling) is completely chilled, wrap the whole pan tightly in a double layer of plastic wrap and then aluminum foil. Freeze for up to 2 months. Thaw it overnight in the refrigerator. Then, make your fresh pineapple topping and spread it on just before serving. This keeps the topping’s texture perfect.
What can I use if I don’t have a 9×13 pan?
You have options! A 10-inch springform pan will work, but your cheesecake will be thicker. You may need to add 5-10 minutes to the bake time. You can also use two 8-inch or 9-inch square pans. Just divide the crust and filling evenly between them. The baking time might be slightly less, so start checking at 30 minutes. For more pan-swap ideas, see my article on baking pan substitutes.
My topping is too runny. How can I fix it?
If your pineapple topping hasn’t thickened enough, it likely needed more cooking time. Cornstarch needs to come to a full simmer to activate its thickening power. Put the runny topping back into the saucepan. Mix 1 more tablespoon of cornstarch with 2 tablespoons of cold water until smooth. Whisk this into the warm topping and bring it back to a simmer, stirring constantly, until it thickens. Let it cool again before using.
Is there a way to make a lighter version of this cheesecake?
You can make some adjustments for a lighter pineapple cheesecake. Use reduced-fat (Neufchâtel) cream cheese and light butter. Substitute the sugar in the filling with a monk fruit or stevia blend made for baking. For the crust, you could use fewer cracker crumbs. Keep in mind, the texture will be slightly less rich and firm. For more guidance on balancing indulgence and wellness, the CDC offers great resources on making nutritious choices.
Can I add other fruits to this recipe?
Of course! This is a fantastic base for a tropical fruit medley. Try adding 1/4 cup of well-drained chopped maraschino cherries or mango to the filling. For the topping, you could do a mix of pineapple and passion fruit or even a layer of strawberry glaze. Just make sure any added fruit is very well drained so you don’t add extra moisture to the batter.
How do I get really clean slices?
The secret is a hot, clean knife. Fill a tall glass with very hot water. For each slice, dip a sharp, non-serrated knife into the water, wipe it dry with a clean towel, and then cut. The heat helps the knife glide through the creamy filling and sticky topping without dragging. Wipe the knife clean and re-dip it for every single cut. This gives you picture-perfect, restaurant-style slices every time.
I hope this recipe becomes a beloved favorite in your home, just like it is in mine. For more creamy, dreamy inspiration, explore all my favorite creations in the cheesecake recipe collection.
Ready to Bring the Tropics Home?
So there you have it, my friend—the ultimate guide to a Pineapple Cheesecake that’s sure to impress. It’s a dessert that balances simplicity with spectacular flavor. The creamy filling, the crunchy crust, and that sunny pineapple glaze create pure happiness on a plate. Don’t be intimidated; you’ve got this. Gather your ingredients, follow these happy tips, and get ready for the compliments to roll in. Now, go preheat that oven and bake some joy!
Equipment
- Grand bol
- Fouet
- Spatule
- Plaque à pâtisserie
- Papier sulfurisé
Ingredients
- 2 tasses miettes de biscuits Graham
- 1/4 tasse sucre granulé
- 1/2 tasse beurre non salé, fondu
- 24 oz fromage à la crème, ramolli
- 1 tasse sucre granulé
- 1 cuil. extrait de vanille
- 3 oeufs, à température ambiante
- 1/2 tasse ananas écrasé, très bien égoutté
- 1 boîte (20 oz) ananas écrasé dans du jus (ne pas égoutter)
- 1/2 tasse sucre granulé
- 2 cuil. maïzena
- 1 cuil. jus de citron
Instructions
- Préchauffez votre four à 175 °C (350 °F).
- Dans un bol moyen, combinez les miettes de biscuits Graham et le sucre. Ajoutez le beurre fondu et mélangez jusqu'à obtenir une texture de sable humide.
- Transférez le mélange dans un moule à pâtisserie de 23x33 cm (9x13 pouces) non graissé et appuyez fermement. Faites cuire pendant 8-10 minutes, puis laissez refroidir complètement sur une grille.
- Dans un grand bol, battez le fromage à la crème ramolli avec un batteur électrique jusqu'à ce qu'il soit lisse. Ajoutez le sucre et la vanille, et battez jusqu'à obtenir une consistance soyeuse.
- Ajoutez les œufs un par un, en battant à basse vitesse juste jusqu'à ce qu'ils soient intégrés. Incorporez délicatement l'ananas écrasé égoutté.
- Versez la garniture au fromage à la crème sur la croûte refroidie et étalez uniformément. Tapotez le moule pour libérer les bulles d'air. Faites cuire pendant 35-40 minutes jusqu'à ce que les bords soient pris mais que le centre tremble légèrement.
- Éteignez le four, entrouvrez la porte et laissez le cheesecake refroidir à l'intérieur pendant environ 1 heure. Déplacez-le au réfrigérateur pour le refroidir pendant au moins 4 heures ou toute la nuit.
- Dans une casserole moyenne, mélangez ensemble l'ananas, le sucre, la maïzena et le jus de citron. Faites cuire à feu moyen en remuant jusqu'à ce que le mélange arrive à ébullition et épaississe.
- Laissez la garniture refroidir complètement avant de l'étaler sur le cheesecake refroidi. Réfrigérez pendant encore 1-2 heures avant de servir.
Notes
Nutrition

Hi, I’m Olivia Parker, the founder of BakingSecret.com and a lifelong lover of all things sweet and homemade. I grew up in a small town in Oregon, where the smell of fresh cookies in my family’s kitchen sparked my passion for baking. Over the years, I turned that passion into a mission: to help home bakers feel confident, inspired, and creative.
After studying food science and working in several artisan bakeries across the U.S., I decided to create a space where everyone from beginners to seasoned bakers can find reliable recipes, expert tips, and a warm, welcoming community. BakingSecret.com is my way of sharing the magic of baking with the world. When I’m not testing new recipes, you’ll find me exploring farmers’ markets, collecting vintage cookbooks, or perfecting my sourdough technique.