
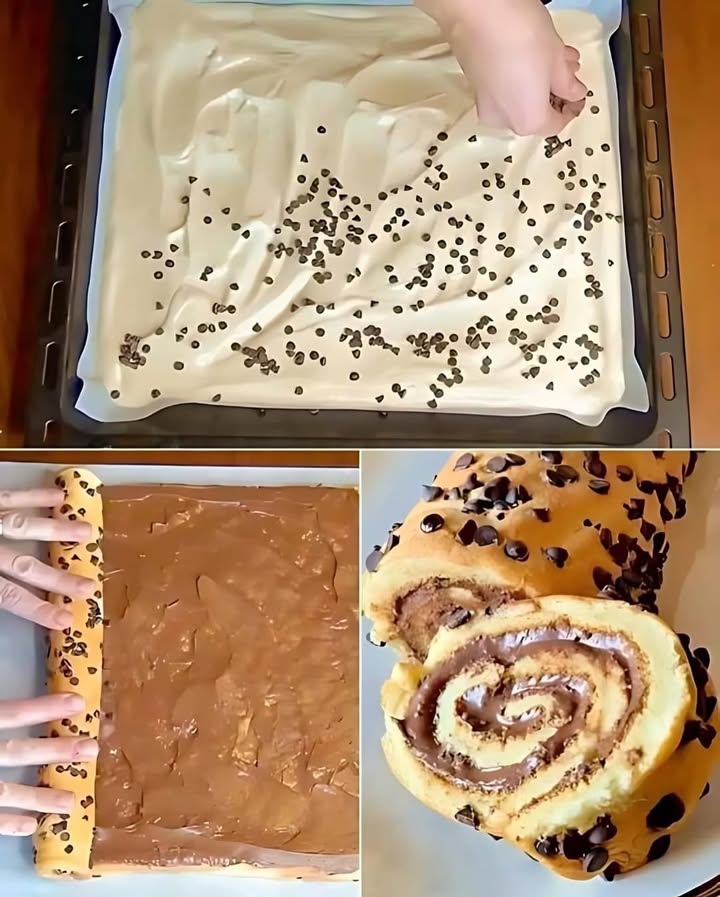
What Makes This Chocolate Cookie Roll Special
There’s something magical about sinking your teeth into a soft, chocolatey treat that’s both decadent and comforting. I remember the first time I made this Chocolate Cookie Roll. My kitchen smelled like cocoa heaven—rich, warm, and sweet. It wasn’t just a dessert; it was a moment of joy. Since then, this recipe has become my go-to for impressing guests and indulging my sweet tooth without hours of effort. Whether you’re hosting a dinner party or simply craving something delicious, this cookie roll is sure to win hearts.
A Little History of the Chocolate Cookie Roll
Cookie rolls have been around for decades, with their origins rooted in European baking traditions. The idea was to take simple ingredients and turn them into something elegant yet approachable. Over time, bakers added their own twists—like rolling the dough with cocoa for a rich chocolate flavor. I love how this recipe bridges classic baking techniques with modern flair. For me, it represents family gatherings and cozy afternoons spent sipping coffee while enjoying a slice of homemade goodness.
Why You’ll Love This Recipe
The beauty of this Chocolate Cookie Roll lies in its simplicity and versatility. The deep chocolate flavor pairs wonderfully with any garnish you choose, from whipped cream to fresh berries. Plus, it’s easy enough for beginner bakers but impressive enough to wow seasoned cooks. Best of all? It only takes basic pantry staples and a little patience. Trust me; once you try it, you’ll want to make it over and over again.
Perfect Occasions for Your Chocolate Cookie Roll
This recipe shines on so many occasions! Serve it at birthday parties, holiday dinners, or even casual get-togethers. It’s also perfect as a dessert centerpiece for themed events like Valentine’s Day or Easter. Once, I brought this Chocolate Cookie Roll to a potluck, and everyone kept asking for seconds—and the recipe!
Ingredients for the Perfect Chocolate Cookie Roll
- 4 eggs
- 125g sugar
- 75g plain flour
- 25g unsweetened cocoa powder
- 1 teaspoon vanilla extract
- 1/2 teaspoon baking powder
- A pinch of salt
Garnish: Find the full recipe details below.
Ingredient Substitutions
No worries if you don’t have everything on hand! Here are some swaps:
- Use almond flour instead of plain flour for a gluten-free version.
- Swap vanilla extract with almond extract for a nuttier taste.
- If you’re out of eggs, try using an egg replacer designed for baking.
Step 1: Preparing Your Ingredients
Start by gathering all your ingredients. Measure them carefully because precision is key in baking. Crack the eggs into a mixing bowl, add the sugar, and beat them until they’re light and fluffy—a pale yellow color tells you it’s ready. This step creates air pockets, giving your cookie roll a lovely texture. Pro tip: Make sure your eggs are at room temperature for better results.
Step 2: Sifting Dry Ingredients
In another bowl, sift together the flour, cocoa powder, baking powder, and salt. Sifting ensures no lumps ruin the smooth batter. When you mix these dry ingredients into the wet ones, fold gently with a spatula. Be careful not to overmix—it can deflate the batter. Chef’s tip: A light hand keeps the final product airy and tender.
Step 3: Baking the Base Layer
Pour the batter onto a lined baking tray and spread it evenly. Pop it into the oven for about 10 minutes. As it bakes, your kitchen will fill with the irresistible aroma of chocolate. The edges should spring back lightly when touched. Don’t let it overbake; otherwise, it might crack later. Cooling it properly afterward is crucial too.
Step 4: Rolling the Dough
Once cooled slightly, dust the surface with powdered sugar to prevent sticking. Roll the sheet tightly starting from one short end. Let it cool completely rolled up. This technique helps it hold its shape once filled. Imagine peeling back layers of pure joy as you unroll it for garnishing!
Timing Everything Right
Prep time: 15 minutes
Cooking time: 10–12 minutes
Resting time: 30 minutes
Total time: About 1 hour
Keep an eye on your timer—timing makes all the difference in baking!
Chef’s Secret for Success
To enhance the flavor, sprinkle a touch of espresso powder into the batter. Coffee amplifies the richness of chocolate, making every bite unforgettable.
An Interesting Tidbit
Did you know cocoa powder is made by pressing most of the fat out of chocolate liquor? That’s why recipes like this cooking process often call for unsweetened varieties—it allows for more control over sweetness levels.
Necessary Equipment for Baking Success
- Baking tray
- Mixing bowls
- Electric mixer
- Spatula
- Rolled parchment paper
Storing Your Chocolate Cookie Roll
To keep it fresh, wrap the finished cookie roll tightly in plastic wrap. Store it in the fridge for up to three days. The flavors meld beautifully overnight, so serving it chilled is always a good idea. If frozen, wrap it further in foil for longer storage. Thaw it in the fridge before serving.
Avoid leaving it uncovered, as it may dry out quickly. For best results, reheat slices briefly in the microwave to soften before eating.
Proper storage ensures each bite remains moist and flavorful!
Tips and Advice for Perfection
Always grease your pan generously to prevent sticking. Dusting with cocoa powder instead of flour adds extra chocolate flavor. Patience during cooling prevents cracks. And remember, practice makes perfect!
Presentation Ideas
- Dust with powdered sugar for elegance.
- Drizzle melted chocolate across the top.
- Add edible flowers for a pop of color.
Healthier Alternatives
Here are six variations to suit different dietary needs:
- Gluten-Free: Use almond flour and ensure cocoa powder is certified gluten-free.
- Dairy-Free: Swap traditional garnishes with dairy-free options.
- Vegan: Replace eggs with flaxseed gel and use plant-based sugars.
- Low-Sugar: Opt for stevia or monk fruit sweeteners.
- Spiced: Add cinnamon or chili powder for warmth.
- Fruity: Incorporate dried fruits inside the roll.
Looking for other amazing cakes? Check out our guide to Tray-Baked Mole Cake, a unique twist on chocolate desserts. Or explore the creamy layers of our Heavenly Vanilla Layer Cake.
More chocolate lovers? Try the delightful M&M Chocolate Cake or the playful Colorful Funfetti Delight.
Mistake 1: Underbaking the Base
New bakers often remove the base too early, leading to soggy rolls. Watch for those set edges! Stick to recommended times for the perfect texture.
Mistake 2: Skipping Parchment Paper
Without parchment, the dough sticks horribly. Always line your tray to avoid disasters.
Mistake 3: Overfilling Garnish
Loading too much filling makes rolling tricky. Keep it minimal for smoother results.
For more inspiration, browse through our collection of desserts here.
FAQs
Absolutely! Just double-wrap it in plastic and foil. Thaw in the refrigerator overnight for best results.
How do I fix a cracked roll?
Dust with powdered sugar or drizzle frosting creatively—they hide imperfections perfectly.
Is cocoa powder essential?
Yes—it provides the signature chocolate flavor. Without it, the dish loses its charm.
What tools do I need?
You’ll need mixing bowls, a spatula, and a rolling pin, along with standard baking gear.
Why is my roll dry?
Overbaking or skipping proper storage causes dryness. Follow timing instructions closely.
Can I add nuts?
Of course! Fold chopped nuts into the batter for crunch. Almonds work wonderfully.
Does it work with egg substitutes?
Yes, commercial egg replacers perform well. Test beforehand for confidence.
How long does prep take?
About 15 minutes of active prep ensures efficiency.
What’s the ideal garnish?
Fresh whipped cream or fruity spreads complement the flavors superbly.
Is there a vegan option?
Definitely! Flax eggs and dairy-free toppings adapt beautifully for vegan diets.
Final Thoughts
This Chocolate Cookie Roll isn’t just a dessert—it’s an experience. From its rich history to its endless possibilities, it’s a joy to create and share. Whether you follow the classic recipe or experiment with healthier versions, one thing’s certain: happiness awaits in every slice. So grab your apron, gather your loved ones, and let the magic unfold. Happy baking!
Equipment
- Baking tray
- Mixing bowls
- Electric mixer
- Spatula
- Rolled parchment paper
Ingredients
- 4 pieces eggs
- 125 g sugar
- 75 g plain flour
- 25 g unsweetened cocoa powder
- 1 tsp vanilla extract
- 1/2 tsp baking powder
- a pinch salt
Instructions
- Gather all your ingredients and measure them carefully.
- Crack the eggs into a mixing bowl, add the sugar, and beat until light and fluffy.
- In another bowl, sift together the flour, cocoa powder, baking powder, and salt.
- Fold the dry ingredients gently into the wet ingredients using a spatula.
- Pour the batter onto a lined baking tray and spread it evenly.
- Bake in the oven for about 10 minutes or until edges spring back when touched.
- Dust the surface with powdered sugar once slightly cooled, then roll the sheet tightly starting from one short end.
- Let it cool completely rolled up.
Notes
Nutrition

Hi, I’m Olivia Parker, the founder of BakingSecret.com and a lifelong lover of all things sweet and homemade. I grew up in a small town in Oregon, where the smell of fresh cookies in my family’s kitchen sparked my passion for baking. Over the years, I turned that passion into a mission: to help home bakers feel confident, inspired, and creative.
After studying food science and working in several artisan bakeries across the U.S., I decided to create a space where everyone from beginners to seasoned bakers can find reliable recipes, expert tips, and a warm, welcoming community. BakingSecret.com is my way of sharing the magic of baking with the world. When I’m not testing new recipes, you’ll find me exploring farmers’ markets, collecting vintage cookbooks, or perfecting my sourdough technique.