
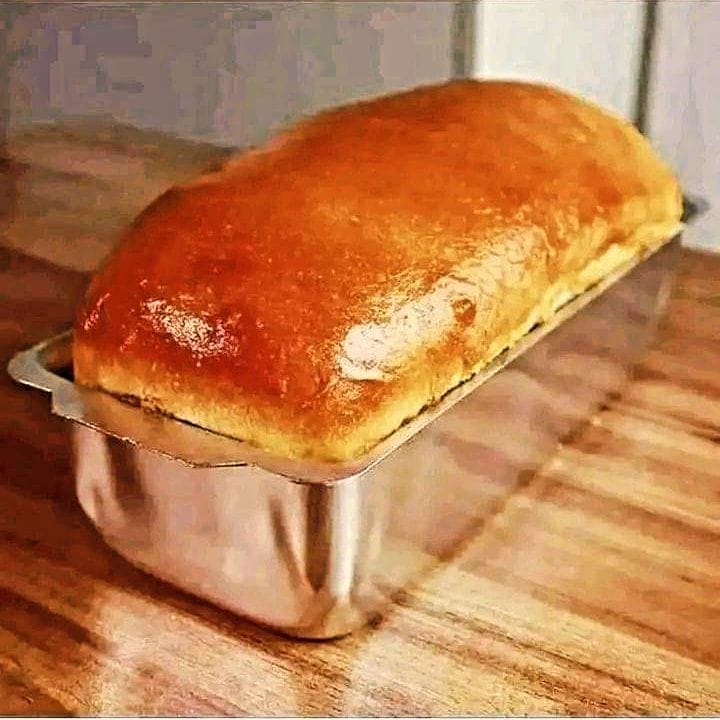
A Slice of Heaven: Why Homemade Bread Delight is a Must-Try
There’s something magical about the smell of warm bread wafting through the house. It reminds me of cozy Sunday mornings when my grandmother would pull fresh loaves from the oven, filling the kitchen with a buttery aroma. I recently decided to try my hand at making Homemade Bread Delight, and let me tell you—it was love at first bite! Fluffy insides, golden crusts, and that unbeatable homemade charm make this recipe unforgettable. Whether you’re a novice baker or an expert in the kitchen, this recipe is simple enough for anyone to master.
The Tale of Warm Loaves Through Time
Bread has been a staple food for thousands of years, dating back to ancient civilizations. From Egyptian flatbreads to French baguetres, every culture has its own twist on this humble dish. My favorite memory connected to bread goes back to a family trip we took to Italy. We visited a small village bakery where they baked bread in wood-fired ovens. Ever since then, I’ve been dreaming of creating that same rustic yet comforting flavor at home. What makes Homemade Bread Delight special isn’t just its rich history but also how it brings families together around the table.
Why You’ll Fall Head Over Heels for This Recipe
If you’re looking for a recipe that ticks all the boxes—deliciousness, simplicity, affordability—you’ve found it! The dough comes together effortlessly, and the result is pure magic. Not only does it taste amazing, but it’s also healthier than store-bought options because you control what goes into it. Plus, nothing beats serving your loved ones warm slices straight out of the oven. As someone who adores sharing meals with friends and family, I find that homemade bread transforms any gathering into something truly special.
When Should You Whip Up This Bread?
This bread is perfect for weekend brunches, holiday dinners, or even as a thoughtful gift for neighbors. Imagine slicing into warm Homemade Bread Delight while sipping coffee on a lazy Saturday morning. Or picture yourself placing a freshly baked loaf at the center of your Thanksgiving spread—it’s bound to impress everyone! It pairs beautifully with soups, salads, or spreads like honey butter. Trust me, there’s no bad time to bake this beauty.
Ingredients You’ll Need for Perfect Homemade Bread Delight
- 1 kg of wheat flour (approximately)
- 1 and ½ cups of warm milk (approx. 400 ml)
- ½ cup warm water
- ½ cup oil (approx. 100 ml)
- 4 tablespoons of sugar (approx. 54 g)
- 1 tablespoon of salt
- 2 eggs
- 30 g of fresh organic yeast or 10 g of dry organic yeast
Ingredient Swaps for Every Pantry
No need to stress if you don’t have every ingredient listed above. Feel free to swap warm milk with almond or soy milk for a dairy-free version. If you’re cutting down on sugar, honey or maple syrup works just fine too. For oil, melted butter can add extra richness. And if you prefer whole grains, switching to whole wheat flour adds a nutty flavor and boosts fiber content. Flexibility is key here!
Step 1: Kick Off with Yeast Magic
The first step is to dissolve the yeast in warm water with a touch of sugar. Watch those tiny bubbles appear as the yeast wakes up—it’s like watching science unfold right before your eyes! Once activated, mix in the remaining wet ingredients, including the eggs and oil. Pro tip: Make sure your liquids are lukewarm—not too hot, otherwise the yeast will die. This sets the stage for soft, airy bread.
Step 2: Bring the Flour to Life
Slowly incorporate the flour into your liquid mixture until the dough begins to form. Kneading takes some elbow grease, but it’s so worth it. The dough should feel smooth and elastic after about ten minutes of working it. Notice how the texture changes under your hands—it transforms from sticky to supple, signaling it’s ready to rest. Chef’s tip: Lightly oil your bowl before letting the dough rise; this prevents sticking and keeps things neat.
Step 3: Patience Pays Off During Proofing
Allow the dough to double in size by covering it with a clean kitchen towel and letting it sit for about an hour. During this time, the yeast ferments and creates those beautiful air pockets essential for fluffy bread. Peek in occasionally—you’ll see the dough puff up like a happy little cloud. A warm spot on your countertop speeds things along nicely.
Step 4: Shape It Any Way You Want
Once risen, punch the dough down gently and divide it into portions. Roll them into balls or shape them into classic loaves—the world is your oyster here. Place these beauties in greased baking pans and give them another chance to rise until they look plump and proud. Picture how satisfying it feels to watch your creations grow and take shape—it’s almost poetic!
Step 5: Bake Your Masterpiece
Preheat your oven to 200°C (about 392°F), then pop the dough in for roughly 30 minutes. Keep an eye out for that golden-brown crust forming—it smells divine, doesn’t it? After removing it from the oven, brush the tops generously with melted margarine to achieve a softer finish. Voilà, you now have warm, fragrant Homemade Bread Delight ready to serve!
Timing Breakdown for Success
Here’s how long each phase typically takes: preparing the dough clocks in at around 20 minutes, proofing requires two rounds totaling 1.5 hours, and baking lasts approximately 30 minutes. Altogether, plan for roughly two-and-a-half hours from start to finish. Worth every second, right?
One Secret Ingredient That Makes All the Difference
To elevate your bread further, sprinkle a handful of seeds—like sesame or poppy—onto the top before baking. Not only does it boost aesthetics, but it also adds a subtle crunch and nutritional kick. Try it once, and you might never bake plain bread again!
A Fun Fact About Bread Baking
Did you know that bakers often refer to breadmaking as “alchemy”? The process turns basic ingredients like flour, water, and yeast into something far greater than the sum of its parts. Much like food preparation itself, it’s less about precision and more about passion.
Tools You Can’t Do Without
You’ll need a few essentials to whip up this masterpiece: a large mixing bowl, measuring cups and spoons, a rolling pin, loaf pans, and a whisk. Investing in good-quality tools simplifies the entire process significantly.
Storing Your Freshly Baked Goodness
After cooling completely, store your bread in an airtight container to keep it moist. Avoid refrigeration, which dries it out quickly. Instead, leave it on the counter for daily consumption over three days. For longer storage, freeze sliced portions wrapped tightly in plastic wrap. Thaw overnight at room temperature before reheating for best results.
If freezing, label each package with the date to track freshness. Lastly, remember that stale bread isn’t wasted—it makes fantastic breadcrumbs or French toast bases!
Tips and Tricks for Maximum Flavor
Add herbs like rosemary or thyme to the dough for a savory twist. Brushing egg wash on top yields a glossy crust, while adding vital wheat gluten improves elasticity. Experiment with different flours to discover new textures.
Presentation Perfection for Your Loaves
Aesthetics matter! Dust powdered sugar lightly over sweet versions or drizzle a glaze for elegance. Wrap mini loaves in parchment paper tied with twine for gifting. Pair savory breads with bowls of olive oil or flavored butters for dipping.
Six Ways to Make Healthier Variations
For a nutrient-packed upgrade, consider these six healthy alternatives:
- Multigrain Bread: Mix oats, flaxseeds, and sunflower seeds into the dough.
- Gluten-Free Option: Swap regular flour with a GF blend and xanthan gum.
- Low-Sugar Recipe: Replace refined sugar with stevia or monk fruit extract.
- Vegan Delight: Use plant-based milk and chia gel instead of eggs.
- Herbed Sourdough: Incorporate starter cultures and chopped parsley/cilantro.
- Rye Infusion: Combine rye flour with white for deeper flavors.
Related Recipes to Explore
If you enjoyed baking this bread, why not try other treats like chocolate chip donuts? They’re equally fun to make! Or check out our beginner-friendly easy bread recipe for simpler steps. For dessert lovers, dive into the decadence of our best chocolate cake recipes, which pair perfectly with your bread creations. Dive deeper into the bread category for more inspiration too!
Common Mistakes to Avoid
Mistake 1: Rushing the Rise
Skipping or shortening the rising period leaves you with dense bread. Dough needs time to develop air pockets, so patience is crucial. Set a timer and resist peeking too early.
Mistake 2: Using Cold Ingredients
Cold liquids slow down yeast activation, hindering proper fermentation. Always use lukewarm mixtures for consistent results.
Mistake 3: Overloading Flour
Adding excessive flour makes the dough stiff and hard to knead properly. Follow measurements closely and adjust gradually.
Frequently Asked Questions
Is fresh yeast better than dry?
Fresh yeast often gives a distinct flavor, but both types work well. Dry yeast is convenient and lasts longer, making it ideal for occasional bakers.
Can I freeze unbaked dough?
Absolutely! Shape and freeze portions before the final rise. Thaw overnight in the fridge for easy prep later.
What causes a dense crumb?
Overmixing, insufficient rising, or low-protein flour can lead to tight crumbs. Stick to recommended techniques for lightness.
How do I prevent burnt bottoms?
Place a shallow pan underneath the rack to catch excess heat. Alternatively, lower the oven temperature slightly.
Do I need a stand mixer?
Nope! Hand-kneading builds strength and connects you closer to the process. Both methods yield great results.
Final Thoughts on Homemade Bread Joy
Baking Homemade Bread Delight fills your home with warmth and happiness. It’s proof that sometimes, the simplest pleasures bring the greatest joys. So grab your apron, roll up your sleeves, and dive into the art of breadmaking. Discover more delights in our baking archives, where inspiration awaits. Happy baking, dear reader—may your loaves always be golden and your kitchen forever filled with laughter!
Equipment
- Large mixing bowl
- Measuring cups and spoons
- Rolling pin
- Loaf pans
- Whisk
Ingredients
- 1 kg wheat flour approximately
- 1.5 cups warm milk approx. 400 ml
- 0.5 cup warm water
- 0.5 cup oil approx. 100 ml
- 4 tbsp sugar approx. 54 g
- 1 tbsp salt
- 30 g fresh organic yeast or 10 g of dry organic yeast
Instructions
- Dissolve the yeast in warm water with a touch of sugar until it bubbles.
- Mix in the remaining wet ingredients, including eggs and oil.
- Slowly incorporate the flour into the liquid mixture until dough forms.
- Knead the dough until smooth and elastic, about 10 minutes.
- Lightly oil a bowl and let the dough rise for about an hour, covered with a kitchen towel.
- Once risen, punch down the dough and divide into portions.
- Shape dough into balls or loaves, then place in greased baking pans to rise again.
- Preheat oven to 200°C (392°F).
- Bake the dough in the oven for approximately 30 minutes, until golden brown.
- Brush tops with melted margarine after removing from the oven.
Notes
Nutrition

Hi, I’m Olivia Parker, the founder of BakingSecret.com and a lifelong lover of all things sweet and homemade. I grew up in a small town in Oregon, where the smell of fresh cookies in my family’s kitchen sparked my passion for baking. Over the years, I turned that passion into a mission: to help home bakers feel confident, inspired, and creative.
After studying food science and working in several artisan bakeries across the U.S., I decided to create a space where everyone from beginners to seasoned bakers can find reliable recipes, expert tips, and a warm, welcoming community. BakingSecret.com is my way of sharing the magic of baking with the world. When I’m not testing new recipes, you’ll find me exploring farmers’ markets, collecting vintage cookbooks, or perfecting my sourdough technique.