
Homemade Roadhouse Rolls: Your New Favorite Comfort Food
Can you smell that? The warm, buttery, yeasty scent of fresh bread baking in your oven. That’s the magic I want to bring to your kitchen today! I still remember the first time I tried to make these rolls. My kitchen was a flour-dusted mess, but the moment my family took a bite of those soft, fluffy pillows of joy, they demanded I make them every week. Now, I’m sharing that fail-proof recipe with you. These homemade Roadhouse Rolls are easier than you think and will make you feel like a superstar baker.
A Little Slice of Bread History
While the famous steakhouse chain perfected and popularized these rolls, the concept of a soft, sweet, pull-apart dinner roll is a classic American tradition. Think of the bread baskets at family-style restaurants—they’re meant to be shared, to be comforting, and to start the meal with a smile. This version I’ve tweaked over the years brings that restaurant-quality experience right to your dinner table. It’s a modern take on a timeless favorite, using simple ingredients you likely already have in your pantry.
Why You’ll Absolutely Adore This Recipe
First, the flavor is unreal—sweet, buttery, and impossibly light. Second, it’s so forgiving. Even if you’re new to baking with yeast, this recipe guides you every step of the way. The dough is a dream to work with, and the reward is a batch of warm, golden rolls that beat any store-bought version. Plus, making bread from scratch is such a joyful, satisfying act of love for your people. It’s pure baking joy!
Perfect Occasions for These Heavenly Rolls
- Sunday Supper: Turn a regular roast chicken dinner into a special event.
- Friendsgiving or Potlucks: Be the person who brings the rolls everyone raves about.
- Weekend Baking Project: A fun activity with kids—they love shaping the dough!
- Just Because: Sometimes, a Tuesday night deserves freshly baked bread.
Gathering Your Ingredients
Here’s what you’ll need for these easy Roadhouse Rolls:
- 2 teaspoons active dry yeast
- 1/4 cup warm water (around 110°F)
- 1 cup warm milk
- 1 1/2 tablespoons melted unsalted butter, plus more for brushing
- 1/4 cup + 1 teaspoon granulated sugar, divided
- 3 to 4 cups all-purpose flour
- 1 large egg
- 1 teaspoon salt
Handy Ingredient Substitutions
- Milk: Whole milk creates the richest texture, but 2% works fine. For a dairy-free version, unsweetened almond or oat milk is a great swap.
- Sugar: You can use honey or maple syrup in equal measure for a deeper flavor.
- All-Purpose Flour: For slightly denser, heartier rolls, you can substitute up to 1 cup with whole wheat flour. One of my favorite variations is using this trick for a Honey Whole Wheat Dinner Rolls.
Crafting Your Homemade Roadhouse Rolls
Step 1: Wake Up the Yeast
Start by pouring your warm water into a small bowl. It should feel like a comfortable bath temperature—not hot! Sprinkle in the yeast and that single, lonely teaspoon of sugar. Give it a gentle stir and let it sit for about 7 minutes. You’ll see a creamy foam form on top. This “blooming” is the yeast coming to life and is the key to light, airy rolls. No foam? Your yeast might be old, and it’s best to start fresh. Pro tip: Cover the bowl with a clean kitchen towel to keep it cozy.
Step 2: Create the Dough Base
In a large mixing bowl, combine the warm milk, melted butter, and the beaten egg. The mixture will look pale yellow and beautifully smooth. Pour in the foamy yeast mixture—watch it swirl into the liquids. Now, add the remaining 1/4 cup of sugar and the salt. Gradually stir in 3 cups of flour, one cup at a time. The dough will start to pull away from the sides of the bowl and form a shaggy mass.
Step 3: Knead to Perfection
Lightly flour your clean countertop. Turn the dough out and begin to knead. Use the heels of your hands to push the dough away, then fold it back over itself. This builds strength and structure. Add the remaining flour, a tablespoon at a time, only if the dough sticks too much to your hands. You want it soft and slightly tacky, not dry. Knead for about 7-8 minutes until it’s smooth and elastic. Chef’s tip: A well-kneaded dough will spring back slowly when you poke it.
Step 4: The First Rise
Place your beautiful ball of dough back into a lightly oiled bowl. Flip it once so the top gets a little oiled too. Cover the bowl tightly with plastic wrap or that trusty kitchen towel. Find a warm, draft-free spot in your kitchen. Let the dough rest and rise for about 1 to 1.5 hours. It should double in size, looking puffy and full of promise. I often let it rise in my oven with just the light on for consistent warmth.
Step 5: Shape Your Roadhouse Rolls
Punch down the risen dough to release the air. Turn it out onto your surface again. Divide it into 12-15 equal pieces, like you’re slicing a pie. Roll each piece into a smooth ball between your palms. Place these balls onto a greased baking sheet or in a round cake pan, letting them just touch each other. Flatten each ball slightly with your palm. This helps them bake evenly and get that signature roll shape.
Step 6: The Final Rise & Bake
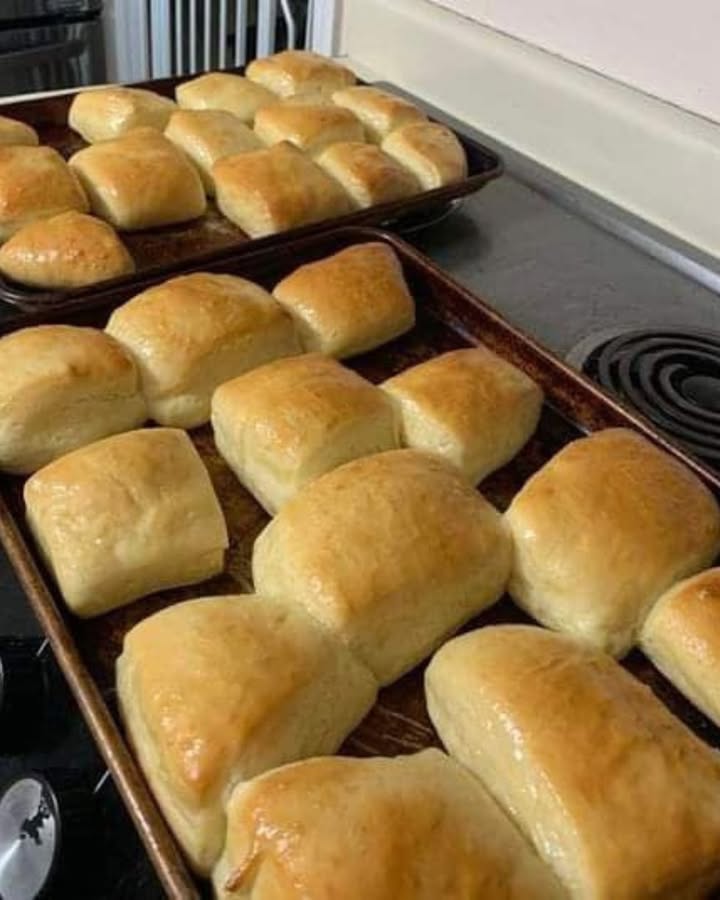
Cover the shaped rolls and let them rise again for 30-45 minutes. They’ll get nice and puffy. While they rest, preheat your oven to 350°F (175°C). Bake for 18-22 minutes. You’ll know they’re done when the tops are a gorgeous golden brown and they sound hollow if you tap the bottom. Immediately brush the hot rolls with melted butter. This gives them that irresistible glossy shine and extra flavor.
Your Baking Timeline
Prep Time: 25 minutes
Rising Time: 1.5 – 2 hours
Cook Time: 20 minutes
Total Time: About 2.5 hours
Servings: 12-15 delicious rolls
Chef’s Secret for the Softest Rolls
For an incredibly tender crumb, use a technique called a “tangzhong.” Before you start, whisk 3 tablespoons of the recipe’s flour with 1/2 cup of the recipe’s milk in a small saucepan over medium heat. Cook, stirring, until it thickens to a paste. Let it cool slightly before adding it to your wet ingredients with the yeast. This simple step locks in moisture!
A Buttery Bit of Extra Info
That iconic side of honey cinnamon butter is no accident! The sweetness of the roll is designed to pair with savory, salty, and sweet toppings. It makes the bread a versatile canvas. This is similar to the principle behind my favorite Simple Sourdough, where the bread’s flavor complements so many meals.
Necessary Equipment
- Large mixing bowl
- Measuring cups and spoons
- Stand mixer with dough hook (optional, but helpful)
- Baking sheet or 9×13 inch pan
- Kitchen towel or plastic wrap
- Pastry brush for butter
How to Store Your Roadhouse Rolls
Let the rolls cool completely on a wire rack. Once cool, place them in an airtight container or a resealable plastic bag. They will stay soft and fresh at room temperature for 2-3 days. The airtight seal is crucial to prevent them from drying out and becoming stale.
For longer storage, you can freeze them beautifully. Wrap individual rolls or the whole batch tightly in plastic wrap, then place in a freezer bag. They can be frozen for up to 3 months. This is perfect for planning ahead for holidays or last-minute dinners.
To revive rolls, thaw at room temperature if frozen. Then, warm them in a 300°F oven for 5-10 minutes, or microwave for 10-15 seconds. A quick brush of butter after warming brings back that just-baked taste and smell.
Top Tips and Advice for Success
- Always check the expiration date on your yeast. Old yeast won’t give you that good rise.
- Don’t rush the rising times. Let the dough tell you when it’s ready (doubled in size).
- If your kitchen is cold, create a warm spot by placing the bowl of dough in your oven with the light on.
- Weigh your flour for the most consistent results. Too much flour is the most common reason for dense rolls.
Presentation Ideas to Impress
- Serve them in a cloth-lined basket to keep them warm.
- Present the honey cinnamon butter in a small ramekin right in the center of the rolls.
- For a party, make them mini! Use a tablespoon of dough per roll for adorable bite-sized versions.
- Sprinkle a little flaky sea salt on the buttered tops right out of the oven for a sweet-salty kick.
6 Delicious Healthier Alternative Recipes
Love the idea of fresh bread but want to mix it up? Try these tasty twists!
- Whole Wheat Roadhouse Rolls: Swap half the all-purpose flour for whole wheat flour. It adds fiber and a nutty flavor. Start with the same liquid amount, as whole wheat flour absorbs more moisture.
- Rosemary & Sea Salt Rolls: Add 1 tablespoon of finely chopped fresh rosemary to the dry ingredients. Brush with olive oil and sprinkle with coarse salt before baking for a savory option.
- Honey Oat Rolls: Replace 1/2 cup of flour with old-fashioned oats and use honey instead of sugar. It’s a wonderfully hearty and slightly sweet variation.
- Garlic & Herb Pull-Apart Bread: Use this same dough recipe! After the first rise, roll it into a rectangle, brush with garlic-herb butter, cut into squares, stack them, and bake in a loaf pan. It’s spectacular. You can find more pull-apart magic in this Garlic Herb Pull-Apart Bread guide.
- Dairy-Free & Vegan Rolls: Use plant-based milk and butter, and substitute the egg with a “flax egg” (1 tbsp ground flax + 3 tbsp water). The texture will be just slightly different but still delicious.
- Everything Bagel Rolls: After the final butter brush, dip the top of each warm roll into an “Everything Bagel” seasoning mix. It’s an incredible flavor combination for brunch.
Common Mistakes to Avoid
Mistake 1: Using Water That’s Too Hot or Too Cold
This is the yeast killer! If your water is too hot (over 130°F), it will kill the yeast and your rolls won’t rise. If it’s too cold, the yeast won’t activate. Aim for water that feels warm to the touch, like a baby’s bottle, around 105-110°F. A quick tip: if it feels comfortably warm on your wrist, it’s perfect for the yeast.
Mistake 2: Adding Too Much Flour During Kneading
It’s tempting to keep adding flour when the dough sticks to your hands. But adding too much creates a dense, dry roll. The dough should be soft and slightly tacky, not stiff. Use a light hand when flouring your surface, and try to resist adding more than the recipe calls for. A bench scraper can help manage a sticky dough without extra flour.
Mistake 3: Not Letting the Dough Rise Long Enough
Patience is key in bread baking! If you don’t let the dough double in size during the first rise, your rolls will be small and heavy. The rise time can vary based on your kitchen’s temperature. Don’t go by the clock alone. Go by the look of the dough. It should look visibly puffy and leave an indentation that slowly fills back when gently poked.
Mistake 4: Overbaking the Rolls
We want golden brown, not dark brown! Overbaked rolls lose their signature soft, pillowy texture and become dry. Set a timer and start checking at the 18-minute mark. They are done when the tops are a lovely light golden color. Remember, they will continue to cook a little on the hot pan after you take them out of the oven.
Frequently Asked Questions
Can I make the dough ahead of time?
Absolutely! This is a great make-ahead trick. After the first rise, punch down the dough, place it in a greased bowl, cover tightly, and refrigerate it overnight. The next day, let it sit at room temperature for about 30 minutes, then shape, let rise, and bake. The slow, cold rise often develops even more flavor. It’s perfect for planning a stress-free holiday meal.
Why didn’t my rolls rise very much?
There are a few common reasons. First, your yeast might have been old or the liquid was too hot. Second, the rising spot might have been too cold. Yeast loves warmth. Third, you might have used too much flour, making the dough too heavy to rise well. Always check your yeast freshness and find a cozy, draft-free spot for the dough to rest.
Can I use instant yeast instead of active dry yeast?
Yes, you can! Instant yeast doesn’t need to be dissolved in water first. You can mix it directly with the dry ingredients. Use the same amount (2 teaspoons). Because it works a bit faster, your rising times might be slightly shorter. Just keep an eye on the dough until it doubles in size.
How do I get my rolls to be super soft and stay soft?
The key is moisture and proper storage. Brushing with butter right out of the oven adds a layer of fat that softens the crust. Storing them in an airtight container once completely cool seals in their moisture. Also, be careful not to overbake them, as that dries them out. Following the baking time closely is crucial.
Can I freeze the unbaked dough?
You can! After the first rise and shaping the rolls, place the shaped rolls on a baking sheet and freeze them solid. Then, transfer the frozen dough balls to a freezer bag. When ready to bake, place the frozen rolls on a pan, cover, and let them thaw and rise (this can take several hours), then bake as directed. It’s a wonderful shortcut.
What’s the best way to reheat leftover rolls?
The oven is best for restoring texture. Warm them in a 300°F oven for 5-10 minutes wrapped in foil to prevent drying. The microwave works in a pinch (10-15 seconds) but can make them a bit chewy. A quick re-toast in a toaster oven also works wonderfully for a slightly crisp exterior.
Can I make these rolls without a stand mixer?
Of course! I make them by hand most of the time. Simply use a large wooden spoon to mix until it becomes too difficult, then use your hands on a floured surface to knead. Kneading by hand is actually a great way to feel the dough’s texture change and know when it’s ready. It’s a soothing, hands-on process.
My dough is too sticky. What should I do?
Don’t panic! Slightly sticky dough is often better than dry dough. If it’s truly unworkable, add just one tablespoon of flour at a time, mixing well after each addition, until it becomes manageable. Remember, a well-floured surface and a bench scraper are your best friends for handling sticky dough without over-flouring it.
What can I serve with these rolls besides honey butter?
The possibilities are endless! Try them with jam for breakfast, dipped in soup or stew, as a base for mini sliders, or with a savory whipped herb cheese. They’re also amazing just plain with a hearty pasta dish. Their mild sweetness pairs well with almost anything, much like a perfect Classic Banana Bread can be a snack or a dessert.
Are these rolls considered healthy?
They are a homemade treat made with simple ingredients, which is always better than highly processed options. As with all good things, enjoying them in balance is key. For more on balancing indulgence with wellness, the CDC has helpful resources on heart-smart eating principles that focus on overall dietary patterns. You can feel good about sharing these homemade rolls as part of a varied diet.
If this recipe has sparked a love for homemade bread, you’ll find a whole world of delicious ideas waiting for you in our breads and muffins category.
There you have it, friends—your guide to creating the most amazing Homemade Roadhouse Rolls. This recipe is about more than just bread. It’s about the warmth it brings to your kitchen and the smiles it brings to the table. So go ahead, get your hands a little floury, and embrace the simple joy of baking. I can’t wait for you to pull that first golden-brown batch from your oven. Don’t forget to share your results and spread the baking joy. Happy baking!
Equipment
- Grand bol
- Mesure à cuillère
- Spatule
- Plaque à pâtisserie
- Torchon
Ingredients
- 2 cuillères à café levure sèche active
- 60 ml eau chaude environ 110°F
- 240 ml lait chaud
- 22.5 ml beurre non salé fondu plus pour badigeonner
- 50 g sucre granulé divisé
- 360 g farine tout usage
- 1 grand œuf
- 5 g sel
Instructions
- Versez l'eau chaude dans un petit bol, ajoutez la levure et 1 cuillère à café de sucre. Remuez et laissez reposer pendant environ 7 minutes jusqu'à ce qu'un mousseux se forme.
- Dans un grand bol, mélangez le lait chaud, le beurre fondu et l'œuf battu.
- Ajoutez le mélange de levure mousseuse dans les liquides, ainsi que le reste du sucre et le sel. Incorporez progressivement 360 g de farine.
- Farinez légèrement votre plan de travail et pétrissez la pâte jusqu'à ce qu'elle soit lisse et élastique, environ 7-8 minutes.
- Placez la pâte dans un bol huilé, couvrez et laissez lever dans un endroit chaud pendant 1 à 1,5 heures jusqu'à ce qu'elle double de volume.
- Dégazez la pâte levée, divisez-la en 12-15 morceaux égaux et façonnez chaque morceau en boule.
- Placez les boules de pâte sur une plaque à pâtisserie graissée ou dans un moule rond, aplatissez-les légèrement, et laissez lever à nouveau pendant 30-45 minutes.
- Préchauffez votre four à 175°C pendant que les petits pains lèvent.
- Faites cuire pendant 18-22 minutes jusqu'à ce qu'ils soient dorés et sonnent creux lorsque vous les tapez. Badigeonnez de beurre fondu immédiatement après la cuisson.
Notes
Nutrition

Hi, I’m Olivia Parker, the founder of BakingSecret.com and a lifelong lover of all things sweet and homemade. I grew up in a small town in Oregon, where the smell of fresh cookies in my family’s kitchen sparked my passion for baking. Over the years, I turned that passion into a mission: to help home bakers feel confident, inspired, and creative.
After studying food science and working in several artisan bakeries across the U.S., I decided to create a space where everyone from beginners to seasoned bakers can find reliable recipes, expert tips, and a warm, welcoming community. BakingSecret.com is my way of sharing the magic of baking with the world. When I’m not testing new recipes, you’ll find me exploring farmers’ markets, collecting vintage cookbooks, or perfecting my sourdough technique.