
The Ultimate Chocolate Squares Cake Recipe: Your New Best Friend
Is there anything better than a rich, chocolatey treat that’s easy to make and impossible to mess up? I truly don’t think so! This Ultimate Chocolate Squares Cake recipe was born during a chaotic week when my kids needed a bake sale item and I needed a hug in dessert form. It combines a tender cake, a dreamy creamy layer, and a glossy ganache into perfect, shareable squares. Every bite feels like a celebration, and the best part? It’s simpler than it looks. Let’s get baking!
A Little Slice of Happiness: The Story Behind These Chocolate Squares
This dessert is my happy mash-up of a classic sheet cake and a no-bake refrigerator treat. I wanted the comfort of a baked good but the convenience of something I could make ahead. The creamy, almost mousse-like middle layer was inspired by old-fashioned icebox cakes, while the sturdy yet soft chocolate base comes from my favorite one-bowl cake recipes. It’s a modern take on chocolate cake that fits our busy lives perfectly. You get that homemade baked flavor without stressing over complicated layers or fancy decorating skills.
Why You’ll Fall Head Over Heels for This Recipe
You’ll love this chocolate squares cake for so many reasons! First, the texture is pure magic. The cake is moist and springy, the creamy filling is light yet rich, and the ganache topping is pure silk. Second, it’s incredibly forgiving. If you’re new to baking, this is a fantastic recipe to build your confidence. Finally, it’s a crowd-pleaser. From kids to grandparents, everyone goes back for a second (or third) square. It’s the kind of dessert that makes people ask, “Can I get the recipe?” every single time.
Perfect Occasions for Your Chocolate Squares Cake
This versatile cake shines at any gathering! It’s my top pick for potlucks because it travels well and feeds a crowd. For birthday parties, you can cut it into smaller bites and serve on a platter. It’s a wonderful after-school surprise or a cozy weekend baking project with the family. I’ve even served it at book club meetings and holiday parties. Honestly, any day that ends with “y” is a good day for this chocolate squares recipe!
Gathering Your Ingredients for Chocolate Heaven
Here’s your shopping list for these incredible chocolate squares. I recommend having everything at room temperature for easier mixing!
- 2 large eggs
- A pinch of salt
- 120g granulated sugar
- 150 ml whole milk
- 50ml neutral vegetable oil (like canola)
- 150g all-purpose flour
- 30g unsweetened cocoa powder
- 5g baking powder
- 10g unflavored powdered gelatin
- 50ml cool water
- 200g sweetened condensed milk
- 200 ml heavy whipping cream, cold
- 50g semi-sweet or dark chocolate, finely chopped
- 40ml lukewarm heavy cream (for the ganache)
Easy Swaps: Your Substitution Guide
No worries if you’re missing an item! Baking should be fun, not stressful.
- Milk: Any milk you have works—dairy-free like almond or oat milk is fine.
- Oil: Melted, cooled butter adds a richer flavor.
- Flour: For a gluten-free version, use a 1:1 gluten-free all-purpose blend.
- Gelatin: Agar-agar powder can be used for a vegetarian option (follow package instructions).
- Whipped Cream: A tub of stabilized whipped topping can be used in the filling for extra ease.
- Condensed Milk: You can make a quick “DIY condensed milk” by simmering milk and sugar, but store-bought is easiest.
Baking the Ultimate Chocolate Squares Cake: Step-by-Step
Follow these steps for a perfect, no-fuss dessert. Let’s create something amazing!
Step 1: Whisking the Base
Grab a large mixing bowl. Crack in your two eggs, add the sugar and that tiny pinch of salt. Now, whisk like you mean it! You want the mixture to become pale, frothy, and slightly thickened. This incorporates air, giving our cake a lovely light texture. The sound of the whisk against the bowl is the sweet song of dessert on its way. Pro tip: Whisk for a full 2-3 minutes by hand. If you have an electric mixer, use it on medium speed.
Step 2: Blending the Wet Ingredients
Pour in the milk and vegetable oil gently. Switch to a spatula or wooden spoon and stir until everything is just combined. The mixture will look glossy and smooth. Don’t worry if it seems a bit thin at this point—that’s perfect! The oil ensures our chocolate squares stay wonderfully moist for days.
Step 3: Incorporating the Dry Mix
It’s time for the dry team! In a separate bowl, sift together the flour, cocoa powder, and baking powder. Sifting is key here. It removes any lumps and aerates the dry ingredients for a smoother batter. Gradually add the sifted dry ingredients to your wet mix. Fold gently with your spatula until no white streaks of flour remain. The batter will be thick and lusciously chocolatey.
Step 4: Baking the Cake Layer
Preheat your oven to 350°F (180°C). Lightly grease an 8×8 inch square baking pan or skillet and line it with parchment paper for easy removal. Pour your beautiful dark batter into the pan, smoothing the top with your spatula. Bake for 15-18 minutes. You’ll know it’s done when the top springs back lightly to the touch and a toothpick comes out clean. Let it cool completely in the pan.
Step 5: Preparing the Creamy Filling
While the cake cools, make the creamy layer. Sprinkle the gelatin over the 50ml of cool water in a small bowl. Let it “bloom” for 5 minutes until it looks spongy. Gently heat this bloomed gelatin (a few seconds in the microwave or over a double boiler) until it becomes a clear liquid. In a large bowl, whisk the cold whipping cream until it forms soft peaks. In another bowl, stir the melted gelatin into the condensed milk until smooth. Now, gently fold the condensed milk mixture into the whipped cream. You’ll get a fluffy, dreamy cloud of filling.
Step 6: Layering and Chilling
Once the cake is cool, carefully slice it horizontally to create two even layers. If this feels tricky, you can simply spread all the filling on top of the whole cake. Place one cake layer back in the pan. Spoon all of the creamy filling on top, spreading it into an even, luxurious layer. Top with the second cake layer. Now, the hard part—patience! Cover the pan and refrigerate for at least 2 hours, or until the filling is firmly set.
Step 7: Creating the Ganache Topping
Time for the final glamour! Place your 50g of chopped chocolate in a heatproof bowl. Heat the 40ml of cream until it’s just warm (not boiling) and pour it over the chocolate. Let it sit for one minute, then stir slowly from the center outwards. Watch as it transforms into a shiny, smooth, pourable ganache. This is pure chocolate magic.
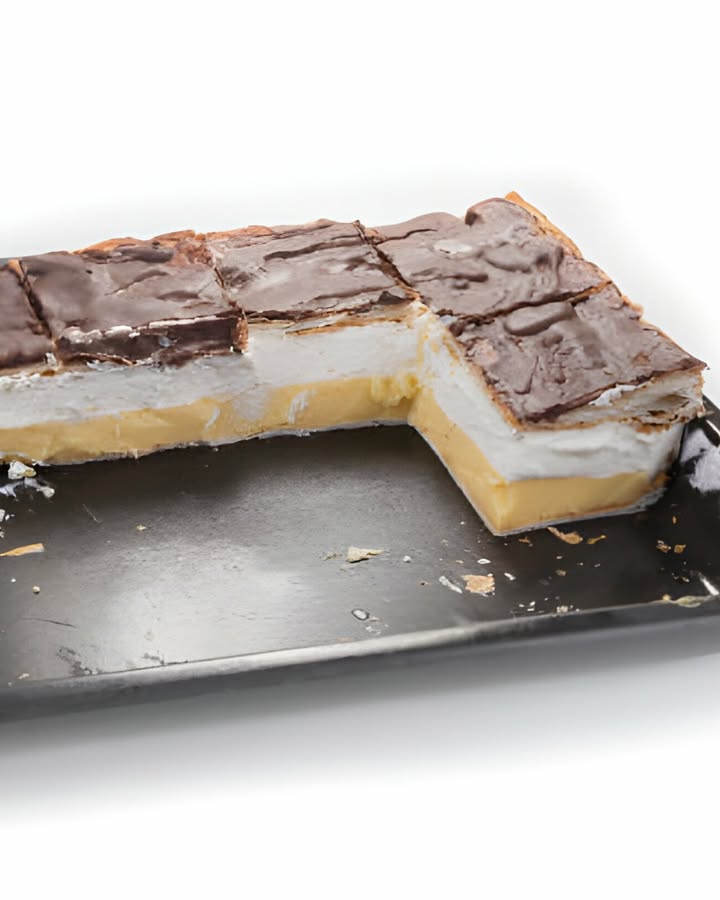
Step 8: The Grand Finale
Take your chilled cake from the fridge. Pour the beautiful ganache over the top, tilting the pan to help it spread evenly into a perfect, glossy coating. Let it set for about 10 minutes. Finally, use a sharp knife to slice your masterpiece into beautiful squares. Wipe the knife clean between cuts for super sharp edges. Serve and get ready for the compliments!
Chef’s tip: For an extra professional touch, run your knife under hot water before slicing. It glides through the ganache and layers like butter.
Your Recipe Timetable
Good baking is all about timing. Here’s your schedule for success.
- Prep Time: 25 minutes
- Cooking Time: 15-18 minutes
- Chilling Time: 2 hours (minimum)
- Total Time: About 3 hours (mostly hands-off chilling)
My Secret Weapon for Perfect Chocolate Squares
My absolute secret? Using the right cocoa powder. A high-quality, unsweetened cocoa powder makes a world of difference in flavor. It gives the cake a deep, complex chocolaty taste instead of just sweetness. Don’t use a sweetened hot chocolate mix. Trust me, spending a little extra on good cocoa is the best investment for your baking.
A Fun Fact About Your Main Ingredient
Did you know the cocoa powder in our cake started as a bean inside a fruit? Cocoa beans grow in colorful pods on the cacao tree. The beans are fermented, dried, roasted, and then ground. The fat (cocoa butter) is pressed out, and what’s left is ground into the dark powder we love. So every time you bake with cocoa, you’re using a product of an amazing, global journey!
Kitchen Tools You’ll Need
You likely have everything you need already! Here’s the list:
- 8×8 inch square baking pan or ovenproof skillet
- Large and medium mixing bowls
- Whisk and rubber spatula
- Measuring cups and spoons or a kitchen scale
- Fine-mesh sieve for sifting
- Electric hand mixer (optional, but helpful for whipping cream)
- Small saucepan or microwave-safe bowl
How to Store Your Chocolate Squares Cake
Because of the creamy filling, storage is key. Keep the squares in an airtight container in the refrigerator. They will stay fresh and delicious for up to 4 days. The cake stays beautifully moist, and the flavors actually meld and improve after a day.
You can also freeze these squares for longer storage. Place them in a single layer on a baking sheet to freeze solid, then transfer to a freezer bag or container. They’ll keep for up to 2 months. Thaw overnight in the fridge before serving.
Remember, the ganache may lose a little shine in the fridge, but the taste remains perfect. If you’re presenting it for a party, you can add the ganache and slice it just before your guests arrive for maximum visual impact.
My Best Tips and Advice for Success
- Ensure all your ingredients, especially eggs and milk, are at room temperature. This helps the batter come together smoothly.
- Don’t overmix the batter after adding the flour. Mix just until combined to keep the cake tender.
- Make sure your whipping cream is very cold before whipping. It whips up faster and holds its shape better.
- If your ganache seizes or gets too thick, add a tiny splash of warm milk and stir vigorously to bring it back.
- For clean cuts, chill the whole cake again for 15 minutes after adding the ganache before slicing.
Presentation Ideas to Wow Your Guests
Make your chocolate squares look as fantastic as they taste!
- Dust with powdered sugar or a light sprinkle of sea salt flakes before serving.
- Place each square on a small dessert plate with a few fresh raspberries or a strawberry slice.
- Add a dollop of extra whipped cream or a small scoop of vanilla ice cream on the side.
- For a party, place mini squares in colorful paper cupcake liners on a tiered stand.
- Grate a little white chocolate or orange zest over the dark ganache for a beautiful color contrast.
Healthier & Fun Variations to Try
Love this base recipe? Here are six ways to mix it up for different tastes and diets!
1. Vegan Chocolate Squares: Swap eggs for flax eggs, use plant-based milk and oil, coconut cream instead of dairy cream, and agar-agar. The texture stays wonderfully creamy.
2. Orange Chocolate Dream: Add the zest of one orange to the cake batter. Infuse the cream for the filling with a tablespoon of orange liqueur or extract for a bright, citrusy twist.
3. Mint Chocolate Chip Version: Stir ½ teaspoon of peppermint extract into the creamy filling and fold in ¼ cup of mini dark chocolate chips. It’s refreshing and decadent.
4. Peanut Butter Lover’s: Swirl ⅓ cup of smooth peanut butter into the creamy filling before adding the top cake layer. Top with ganache and chopped peanuts.
5. Gluten-Free & Dairy-Free: Use your favorite gluten-free flour blend and ensure all dairy products are substituted with plant-based alternatives like coconut condensed milk.
6. Mocha Espresso Boost: Dissolve 1-2 teaspoons of instant espresso powder into the milk for the cake batter. It deepens the chocolate flavor beautifully without a strong coffee taste.
If you’re looking for more classic inspiration, you might enjoy our traditional Devil’s Food Cake recipe or a quick 3-minute Chocolate Mug Cake. For another great make-ahead dessert, try our popular Vanilla Bean Panna Cotta, or if you have extra egg yolks, this Rich Chocolate Crème Brûlée is pure luxury.
Common Mistakes to Avoid With This Recipe
Avoid these simple pitfalls for perfect chocolate squares every single time.
Mistake 1: Not Letting the Cake Cool Completely
This is the biggest one! If you add the creamy filling onto a warm cake, the heat will melt the gelatin and whipped cream. Your filling will become runny and won’t set properly. Always be patient. Let the cake cool in the pan on a wire rack until it’s truly room temperature. You can even pop it in the fridge for 30 minutes to speed things up.
Mistake 2: Over-Whipping or Under-Whipping the Cream
The texture of your filling depends on perfectly whipped cream. Under-whipped cream is too soft and won’t hold the filling’s shape. Over-whipped cream becomes grainy and buttery. You want soft peaks that hold their shape but still droop gently at the tip. Use a chilled bowl and beaters, and stop mixing the second you see those soft peaks form.
Mistake 3: Using Hot Cream on the Ganache Chocolate
Pouring boiling hot cream over chocolate can cause it to “seize.” This means the fats separate and you get a grainy, clumpy mess instead of smooth ganache. Your cream should be just warm to the touch, not boiling. Lukewarm is the key word here. Heat it gently, then pour it over the chopped chocolate and let it sit for a minute before stirring.
Mistake 4: Skipping the Sifting Step
It might seem like an extra dish to wash, but sifting your dry ingredients is non-negotiable. Cocoa powder and baking powder love to form tiny lumps. Sifting aerates the flour and breaks up any clumps, ensuring your cake batter is smooth and your cake rises evenly. A lump-free batter means a perfectly textured cake.
Mistake 5: Rushing the Chill Time
The chilling time in the fridge is what sets the creamy layer. If you only chill for 30 minutes, the filling will still be soft and the cake layers might slide when you cut it. Two hours is the minimum. For the cleanest slices and best texture, I often chill it for 3-4 hours or even overnight. Good things come to those who wait!
Mastering recipes like this one is all about understanding a few basic cooking techniques, such as proper whipping, folding, and temperature control. These foundational skills make all the difference.
This Ultimate Chocolate Squares Cake is just one of many wonderful desserts you can explore. For more baking ideas that range from simple to spectacular, check out our full collection of cakes and cupcake recipes to find your next favorite treat.
Your Ultimate Chocolate Squares Cake Questions, Answered
Can I make this chocolate squares recipe ahead of time?
Absolutely! This cake is actually better the next day. You can prepare the entire cake, cover it well, and store it in the refrigerator for up to 24 hours before you plan to serve it. This allows all the flavors to meld beautifully. You can even add the ganache the day before. If you want to make it further ahead, you can freeze the assembled (but un-ganached) cake for up to two months. Thaw it in the fridge overnight and add the fresh ganache on the day of serving for the best shine and texture.
What can I use instead of gelatin in the filling?
If you prefer not to use gelatin, you have a couple of good options. For a vegetarian alternative, use agar-agar powder. Keep in mind it sets more firmly than gelatin, so use a little less (about ¾ of the amount). You can also try using cornstarch. Make a slurry with 1 tablespoon of cornstarch and 2 tablespoons of milk from the recipe. Heat the condensed milk gently, whisk in the slurry, and cook until thickened. Let it cool completely before folding it into the whipped cream. The texture will be slightly different but still delicious.
Why did my ganache turn out grainy or separate?
A grainy ganache usually happens if the cream was too hot and caused the chocolate to “seize,” or if you stirred too vigorously while it was still very hot. If it separates (looks oily), it means the fat split. Don’t panic! For a grainy ganache, try adding a small splash of warm milk or cream and stir gently until it becomes smooth again. For a separated ganache, whisk in a bit more cold cream, one teaspoon at a time, to bring it back together. Using good quality chocolate that melts smoothly also helps prevent these issues.
Can I bake this in a different size pan?
Yes, but the baking time and final look will change. For a 9×9 inch pan, the layers will be thinner. Your baking time will be slightly shorter, so start checking at 12 minutes. For a 9×13 pan (to feed a bigger crowd), you’d want to double the recipe. The cake layer will bake faster in a larger, thinner layer. Always do the toothpick test to check for doneness. No matter the pan, lining it with parchment paper is your best friend for easy removal.
How do I get really clean, sharp cuts on my squares?
Clean cuts are all about temperature and the right tool. First, make sure the cake is fully chilled and set. Warm cake is messy to cut. Second, use a long, sharp knife (a chef’s knife works well). Wipe the knife clean with a warm, damp cloth between each cut. For the absolute sharpest edges, you can even briefly run the knife under very hot water, dry it quickly, and then slice. The heat helps it glide through the ganache and creamy layers without dragging.
Is Dutch-process or natural cocoa powder better here?
This recipe is designed to work with natural unsweetened cocoa powder (the most common type in US supermarkets). It reacts with the baking powder to help the cake rise. Dutch-process cocoa is treated with an alkali, making it milder and darker. If you only have Dutch-process, your cake will still taste great and be very chocolatey, but it might not rise quite as high. The flavor will be slightly different—less sharp and more mellow. Both will give you a fantastic dessert.
My filling didn’t set. What went wrong?
If your filling is still loose after chilling, a few things could have happened. The most common reason is that the gelatin wasn’t fully dissolved or activated before being mixed in. Make sure you let it bloom in cool water first, then melt it completely into a clear liquid. Another reason could be that the cake or condensed milk mixture was too warm when you folded in the whipped cream, melting it. Finally, ensure you used the correct amount of gelatin and that it wasn’t past its expiration date. If it’s still soft, just chill it longer—sometimes it just needs more time.
Can I use a different type of chocolate for the ganache?
You certainly can! Semi-sweet or dark chocolate (around 60-70% cacao) gives a rich, adult flavor that balances the sweet filling. Milk chocolate will make a much sweeter, softer-setting ganache. White chocolate can be used for a beautiful contrast, but be careful—it burns easily. Use a 3:1 ratio of white chocolate to warm cream. Chocolate chips can be used in a pinch, but they contain stabilizers that can make the ganache thicker. Chopped baking chocolate from a bar is always the best choice for a smooth, pourable finish.
How long can I leave the finished cake out at a party?
Because of the dairy-based creamy filling, you shouldn’t leave the cake out at room temperature for more than 2 hours. For food safety, it’s best to keep it refrigerated until just before serving. You can set it out for your guests to enjoy, and if there’s any left after an hour or two, just put it back in the fridge. The ganache may soften a bit at room temp, but it will re-firm once chilled again.
Can I add decorations on top of the ganache?
Yes, decorating makes it even more special! The key is timing. Add sprinkles, chopped nuts, or edible gold flakes right after you pour the ganache, while it’s still wet, so they stick. For things like fresh berries or piped whipped cream, wait until the ganache has fully set (about 30 minutes in the fridge), then place them on gently. You can also use a stencil to dust powdered sugar or cocoa powder on top for a beautiful pattern after the ganache is firm.
Ready to Make Some Magic?
And there you have it, friends! Your complete guide to the most delicious, foolproof Ultimate Chocolate Squares Cake. This recipe is my go-to for sharing joy, and I know it will become a favorite in your home too. It has the perfect balance of rich chocolate, creamy lightness, and simple fun. Don’t forget to share your beautiful creations online and tag me—I love seeing your baking adventures! Now, go preheat that oven and treat yourself to something wonderfully sweet. You deserve it!
Equipment
- Grand bol
- Fouet
- Spatule
- Plaque à pâtisserie
- Papier sulfurisé
Ingredients
- 2 g œufs
- 120 g sucre cristallisé
- 150 ml lait entier
- 50 ml huile végétale neutre
- 150 g farine tout usage
- 30 g cacao en poudre non sucré
- 5 g poudre à lever
- 10 g gélatine en poudre
- 50 ml eau froide
- 200 g lait concentré sucré
- 200 ml crème épaisse froide
- 50 g chocolat semi-amer haché finement
- 40 ml crème épaisse tiède pour la ganache
Instructions
- Préchauffez votre four à 180°C (350°F).
- Dans un grand bol, fouettez les œufs, le sucre et le sel jusqu'à ce que le mélange soit pâle et mousseux.
- Ajoutez le lait et l'huile végétale tout en remuant délicatement.
- Dans un autre bol, tamisez ensemble la farine, le cacao en poudre et la poudre à lever.
- Incorporez progressivement le mélange sec dans le mélange humide jusqu'à ce qu'il n'y ait plus de stries blanches.
- Graissez légèrement un moule carré de 8x8 pouces et tapissez-le de papier sulfurisé.
- Versez la pâte dans le moule et faites cuire pendant 15-18 minutes ou jusqu'à ce qu'un cure-dent en ressorte propre.
- Incorporez le mélange de lait concentré à la crème fouettée.
- Coupez le gâteau refroidi horizontalement en deux couches.
- Placez une couche dans le moule et étalez la garniture crémeuse dessus.
- Ajoutez la deuxième couche de gâteau et couvrez. Réfrigérez pendant au moins 2 heures.
- Pour la ganache, chauffez 40 ml de crème jusqu'à ce qu'elle soit tiède et versez-la sur le chocolat haché.
- Remuez jusqu'à consistance lisse et versez sur le gâteau réfrigéré.
- Laissez prendre pendant environ 10 minutes avant de couper en carrés.
Notes
Nutrition

Hi, I’m Olivia Parker, the founder of BakingSecret.com and a lifelong lover of all things sweet and homemade. I grew up in a small town in Oregon, where the smell of fresh cookies in my family’s kitchen sparked my passion for baking. Over the years, I turned that passion into a mission: to help home bakers feel confident, inspired, and creative.
After studying food science and working in several artisan bakeries across the U.S., I decided to create a space where everyone from beginners to seasoned bakers can find reliable recipes, expert tips, and a warm, welcoming community. BakingSecret.com is my way of sharing the magic of baking with the world. When I’m not testing new recipes, you’ll find me exploring farmers’ markets, collecting vintage cookbooks, or perfecting my sourdough technique.