
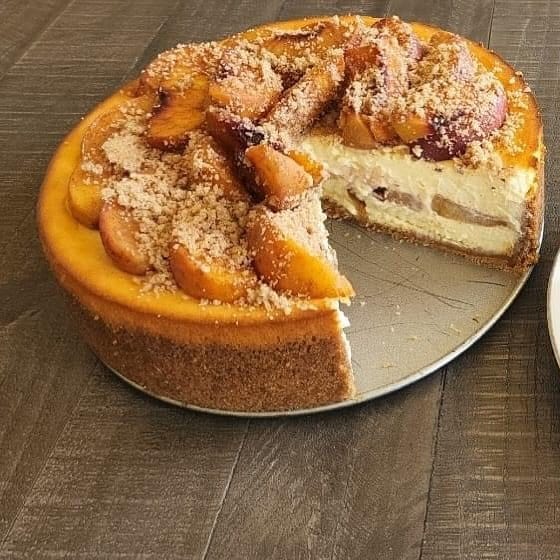
Your New Favorite Dessert: Peach Cobbler Cheesecake
You know that magical moment when summer hands you a basket of perfectly ripe peaches? That’s exactly what happened to me last July. I stood in my kitchen, smelling that sweet, sunny scent, and thought, “Cheesecake is great. Peach cobbler is heavenly. Why not have it all?” After a few delicious experiments (my family was very happy to taste-test!), I landed on this recipe. This Peach Cobbler Cheesecake is the love child of two classic desserts. It brings the creamy, tangy joy of cheesecake and the warm, fruity comfort of a cobbler into one stunning dish.
The Sweet Story Behind Peach Cobbler Cheesecake
Peach cobbler itself has deep roots in American cooking, especially in the South. It was a clever, delicious way for home cooks to use summer’s bounty. Cheesecake, of course, has a history that goes way back. But the beauty of modern baking is we get to play! This recipe is a wonderful “mash-up.” It takes the soul of a traditional cobbler—juicy, spiced fruit with a buttery topping—and layers it into the smooth, rich canvas of a New York-style cheesecake. It’s a celebration of both tradition and tasty innovation right on your dessert plate.
Why You’ll Fall in Love With This Recipe
First, the flavor is just incredible. You get three distinct layers in every bite: a crunchy crust, a velvety cheesecake, tender peaches, and a sugary crumble. It’s a party for your mouth! Second, while it looks fancy, the steps are straightforward. You don’t need to be a pastry chef. If you can mix, pour, and bake, you can make this. Finally, it’s a total crowd-pleaser. I’ve brought this to potlucks and watched it disappear faster than anything else. It makes people so happy.
When to Whip Up This Peach Cobbler Cheesecake
This dessert is perfect for so many occasions! It’s a showstopper for Fourth of July barbecues or Labor Day picnics. Bring it to a family reunion and become the most popular relative. It’s also wonderful for a cozy Sunday dinner dessert or a special birthday treat for someone who loves peaches. Honestly, any day you want to feel a little celebration is a good day for this cheesecake.
Gathering Your Ingredients
Here’s everything you’ll need to make this dreamy Peach Cobbler Cheesecake. I recommend having all your ingredients at room temperature unless noted. It makes blending so much smoother!
For the Graham Cracker Crust:
- 1 1/2 cups crushed graham crackers
- 1/3 cup packed brown sugar
- 1/2 cup (1 stick) unsalted butter, melted
For the Cheesecake Filling:
- 3 packages (8 oz each) full-fat cream cheese, softened
- 1 cup granulated sugar
- 3 large eggs, at room temperature
- 1 teaspoon pure vanilla extract
- 1/2 cup full-fat sour cream, at room temperature
For the Peach Cobbler Filling:
- 4 cups fresh peaches, peeled and sliced (about 4-5 medium peaches)
- 1/2 cup granulated sugar
- 1 teaspoon ground cinnamon
- 1/4 teaspoon ground nutmeg
- 2 tablespoons all-purpose flour
For the Crumble Topping:
- 1/2 cup all-purpose flour
- 1/4 cup packed brown sugar
- 1/4 cup (1/2 stick) cold unsalted butter, cubed
Easy Ingredient Swaps (Don’t Panic!)
Don’t have exactly what’s listed? No problem! Here are some simple swaps:
- Graham Crackers: You can use digestive biscuits or even vanilla wafers for the crust.
- Fresh Peaches: In a pinch, you can use frozen peach slices. Thaw and drain them very well first. Canned peaches in juice (not heavy syrup) can also work—drain and pat them dry.
- Sour Cream: Plain, full-fat Greek yogurt is a great substitute and adds a nice tang.
- Nutmeg: If you don’t have it, just add an extra 1/4 teaspoon of cinnamon.
How to Make Peach Cobbler Cheesecake, Step-by-Step
Step 1: Prep and Preheat
Start by preheating your oven to 350°F (175°C). This gives it time to reach the perfect, even temperature. Grab a 9-inch springform pan. I like to line the bottom with a round of parchment paper. It makes releasing the cheesecake so much easier later. Lightly grease the sides of the pan with a little butter or non-stick spray. Now you’re ready to build your masterpiece!
Step 2: Make the Crust
In a medium bowl, combine the crushed graham crackers and brown sugar. The brown sugar adds a hint of caramel flavor that’s just wonderful. Pour in the melted butter. Stir it all together until the mixture looks like wet sand and holds together when you pinch it. Pour this into your prepared pan. Use the bottom of a glass or a measuring cup to press it firmly and evenly across the bottom. Pro tip: Press it up the sides about half an inch for a sturdier crust edge. Bake this for 10 minutes, then let it cool on a rack. It will smell amazing!
Step 3: Create the Cheesecake Filling
In a large mixing bowl, beat the softened cream cheese and granulated sugar with an electric mixer. Start on low speed to avoid a sugar cloud, then go to medium-high. Beat for 2-3 minutes until it’s completely smooth and no lumps remain. Add the eggs, one at a time, beating well after each. This is key for a smooth texture. Now, mix in the vanilla extract and the sour cream. Beat just until everything is combined and creamy. The filling will be thick and luxurious. Pour it gently over your cooled crust. Smooth the top with a spatula.
Step 4: Cook the Peach Filling
While your crust was baking, you could prep the peaches. Good knife skills help here for even slices, but don’t stress—rustic is fine! In a medium saucepan, toss the peach slices with sugar, cinnamon, nutmeg, and flour. The flour will help thicken the juices. Cook this over medium heat, stirring gently, for about 5-7 minutes. The peaches will soften and release their gorgeous juices, creating a glossy, fragrant sauce. Let it cool for a few minutes, then spoon it evenly over the cheesecake layer.
Step 5: Add the Crumble Topping
Time for the final layer! In a small bowl, mix the flour and brown sugar for the crumble. Add the cold, cubed butter. Using a pastry cutter, a fork, or even your clean fingertips, work the butter into the dry mix. Keep going until you have a crumbly texture with pea-sized bits of butter throughout. Sprinkle this mixture evenly over the layer of peaches. Those cold butter bits will melt in the oven, creating delicious, crispy pockets.
Step 6: Bake to Perfection
Carefully place your assembled cheesecake in the preheated oven. Bake for 50 to 60 minutes. The crumble will turn a beautiful golden brown. The edges of the cheesecake will be set, but the center should still have a slight jiggle—like Jell-O—when you gently shake the pan. This is important! It will firm up as it cools. Chef’s tip: To prevent cracks, you can place a pan of hot water on the rack below the cheesecake to add steam to your oven.
Step 7: Cool and Chill
Once baked, turn the oven off and crack the door open. Let the cheesecake sit in there for about an hour. This slow cooling helps prevent major cracking from temperature shock. After that, move it to a wire rack to cool completely to room temperature. Then, and this is the hardest part, cover it and refrigerate for at least 4 hours, but overnight is best. This chilling time allows the flavors to meld and the cheesecake to set up perfectly for slicing.
Your Peach Cobbler Cheesecake Timeline
| Prep Time: | 30 minutes |
| Cook Time: | 60 minutes |
| Cooling/Chilling Time: | 5 hours (minimum) |
| Total Time: | 6 hours 30 minutes |
A Chef’s Little Secret
For the absolute best flavor, take the extra minute to toast your graham cracker crumbs. Spread the crushed crackers on a baking sheet and toast them in the 350°F oven for 5 minutes before mixing with the butter and sugar. It deepens the flavor of the crust incredibly and adds a whole new dimension of nutty warmth.
A Fun Peach Fact
Did you know Georgia isn’t actually the largest peach producer in the U.S.? That title goes to California! But Georgia proudly calls itself the “Peach State” because of the superb quality and iconic variety of its peaches. No matter where your peaches are from, they make this dessert special.
What You’ll Need in Your Kitchen
- 9-inch springform pan
- Parchment paper
- Mixing bowls (various sizes)
- Electric hand mixer or stand mixer
- Medium saucepan
- Spatula
- Measuring cups and spoons
- Pastry cutter or fork (for crumble)
Storing Your Masterpiece
Once you’ve served the cheesecake (if there are leftovers!), cover it tightly with plastic wrap or transfer slices to an airtight container. It will keep beautifully in the refrigerator for up to 4-5 days. The flavors actually continue to get better on day two and three as everything melds together.
You can also freeze this cheesecake for longer storage. Wrap the whole cheesecake or individual slices very well in plastic wrap, then in a layer of aluminum foil. Freeze for up to 2 months. To serve, thaw it overnight in the refrigerator.
A note on the crumble topping: After refrigeration, it will soften a bit. If you love a crisp topping, you can pop a slice under the broiler for just a minute or two before serving to re-crisp it. Watch it closely so it doesn’t burn!
My Best Tips for Success
- Room temp is key: Let your cream cheese, eggs, and sour cream sit out for at least an hour. This prevents a lumpy batter and helps the cheesecake bake evenly.
- Don’t overmix: Once you add the eggs, mix just until combined. Overbeating adds too much air, which can cause the cheesecake to puff up and then crack as it cools.
- Test for doneness: The jiggle test is your best friend. A 2-inch circle in the center should jiggle slightly when you nudge the pan. It will set as it cools.
- Run a knife: After baking and the initial cool, run a thin knife around the inside edge of the springform pan. This helps the cheesecake pull away evenly as it shrinks while cooling, reducing cracks.
Make It Look Gorgeous on the Plate
- Serve each slice with a dollop of freshly whipped cream or a scoop of vanilla bean ice cream.
- Garnish with a thin, fresh peach slice and a mint leaf for a pop of color.
- Drizzle a little caramel sauce around the plate for a fancy restaurant-style look.
- For a summer party, serve it on pretty pastel plates to match the peaches’ color.
Love This? Try These Healthier Twists!
Want to lighten things up a bit? Here are six delicious variations on our Peach Cobbler Cheesecake theme:
- Greek Yogurt Swapped: Replace the sour cream and one block of cream cheese with an equal amount of full-fat plain Greek yogurt. It adds protein and a wonderful tang while cutting some fat.
- Nutty Almond Crust: Swap the graham crackers for ground almonds (almond flour) mixed with a touch of maple syrup and coconut oil for a gluten-free, protein-packed base.
- Sweetener Switch: Use a natural sweetener blend like monk fruit or erythritol in place of granulated sugar in both the filling and peach layer for a lower-sugar option.
- Mini Cheesecakes: Make individual portions in a muffin tin with liners. They bake faster, offer portion control, and are adorable for parties.
- Berry Bliss Cobbler Cheesecake: Use mixed berries (raspberries, blueberries, blackberries) instead of peaches. Berries are lower in natural sugar and packed with antioxidants.
- Vegan Dream: Use cashew-based cream cheese, flax eggs, and coconut cream. Sweeten with agave and top with a coconut oil crumble for a completely plant-based delight.
Exploring these variations is part of the fun of baking. You can find more inspiration in our entire collection of delicious cheesecake recipes.
Common Mistakes to Avoid
Mistake 1: Using Cold Ingredients
This is the number one reason for a lumpy cheesecake batter. Cold cream cheese doesn’t blend smoothly with sugar and eggs. It creates tiny lumps that bake into your filling. Always plan ahead! Take your cream cheese, eggs, and sour cream out of the fridge at least an hour before you start baking. They should feel cool to the touch, not cold.
Mistake 2: Overbaking the Cheesecake
We want a creamy, velvety texture, not a dry, crumbly one. Overbaking happens when you wait for the center to look completely firm like a cake. Instead, perform the “jiggle test.” At the 50-minute mark, gently shake the oven rack. The edges should be set, but a small circle in the center (about the size of a lemon) should have a slight, gentle jiggle. It will continue to cook from residual heat as it cools.
Mistake 3: Skipping the Chill Time
I know it’s tempting to cut into your beautiful dessert right away. But patience is a virtue here! A cheesecake needs that long, slow chill in the fridge to fully set its structure. Slicing into a warm cheesecake will give you a soupy, messy slice. For clean, perfect slices and the best flavor, chill it for a full 4 hours, or ideally, overnight. Your future self will thank you.
Mistake 4: Not Draining the Peach Filling Enough
If your cooked peaches are too juicy or watery, that extra liquid can seep into the cheesecake layer below and make it soggy. After cooking the peaches, let them cool and sit for a few minutes. You can even spoon them into a mesh strainer for a minute to let excess juice drip off. You want the peaches coated in the thick, glossy sauce, not floating in a pool of liquid.
Peach Cobbler Cheesecake FAQs
Can I use canned peaches?
Yes, you can use canned peaches in a real pinch. Make sure to get peaches canned in juice, not heavy syrup, as the syrup is much too sweet. Drain them very, very well and pat them dry with paper towels before using. I’d even suggest skipping the stovetop cooking step with canned peaches since they’re already soft. Just toss them with the sugar, spices, and flour and let them sit for 15 minutes to macerate before layering.
Why did my cheesecake crack?
Don’t worry, a crack doesn’t affect the taste! Cracks usually happen from a sudden temperature change or from overbeating/overbaking. To avoid them: cool the cheesecake slowly in the oven with the door cracked. Don’t overmix the batter after adding eggs. Use the water bath method (pan of hot water on lower rack). And remember, the crumble topping hides a multitude of sins, so it’s no big deal!
How do I know when it’s done baking?
The visual cues are your best guide. The crumble topping will be a lovely golden brown. The edges of the cheesecake will look puffed and set. Gently nudge the oven rack. The center of the cheesecake (about a 2-inch circle) should jiggle like soft Jell-O when you move it. It will not be liquid, but it will have a clear, gentle movement. It firms up completely during the long chilling process.
Can I make this ahead of time?
Absolutely! In fact, I highly recommend it. This cheesecake is an ideal make-ahead dessert because it needs that long chill time. You can bake it the day before your event, let it cool, and refrigerate it overnight. The flavors develop and it slices perfectly. Just add any fresh garnishes (like whipped cream) right before you serve it.
Can I freeze this cheesecake?
You sure can. Once the cheesecake is completely cooled, wrap the whole thing (or individual slices) tightly in plastic wrap. Then, wrap it again in aluminum foil to prevent freezer burn. Label it and freeze for up to 2 months. Thaw it slowly in the refrigerator overnight before serving. The texture holds up remarkably well.
My crust is soggy. What happened?
A soggy bottom crust usually means the peach filling was too wet when added, or the cheesecake wasn’t baked long enough for the crust to set. Make sure to pre-bake your crust for the full 10 minutes and let it cool before adding filling. Also, ensure your peach filling has thickened nicely on the stove and isn’t overly liquidy. Proper drainage is key!
What’s the best way to slice a cheesecake cleanly?
For those picture-perfect slices, use a large, thin-bladed knife. Run the knife under very hot water, wipe it dry with a clean towel, and then make your cut. The heat helps the knife glide through the creamy filling and crumble topping without dragging. Repeat this “hot knife wipe” between each cut for super clean edges.
Can I use a different fruit?
Of course! This recipe is wonderfully adaptable. Apples with a dash of apple pie spice would be perfect for fall. Cherries, mixed berries, or even spiced pears would all be fantastic. Just adjust the sugar in the fruit layer based on the natural sweetness of your chosen fruit. A mixed berry version is always a hit at my house.
Do I have to use a springform pan?
A springform pan is highly recommended because it has a removable side. This makes it almost impossible to get the cheesecake out of a regular pan neatly. If you only have a regular cake pan, you must line the bottom very well with parchment paper that hangs over the edges. This gives you “handles” to lift the whole cheesecake out after chilling.
Is there a way to make this without an electric mixer?
You can, but it will take some elbow grease! Ensure your cream cheese is very, very soft. Use a sturdy whisk and a strong arm to beat the cream cheese and sugar together until completely smooth before adding the eggs. It’s a workout, but it’s doable for a smaller batch. For a no-bake option, check out our creamy No-Bake Strawberry Cheesecake which is much easier to mix by hand.
Go Forth and Bake!
I hope you feel excited to make this Peach Cobbler Cheesecake. It truly combines the best of two worlds in the most delightful way. Remember, baking is about joy and sharing. Don’t stress over a little crack or a messy slice. The love you put into it is the main ingredient. Gather your peaches, put on some music, and have fun in the kitchen. Your friends and family are going to be so impressed. For more fruity dessert adventures, my Blueberry Lemon Pound Cake is a bright and zesty option, or try the cozy comfort of a classic Southern Pecan Pie. And if you’re looking for another stunning layered dessert, you must see our Triple Chocolate Mousse Cake. Happy baking!
Equipment
- Grand bol
- Fouet
- Spatule
- Moule à charnière
- Papier sulfurisé
Ingredients
- 1 1/2 tasse biscuits Graham écrasés
- 1/3 tasse sucre brun
- 1/2 tasse beurre non salé, fondu
- 3 paquet (8 oz chaque) fromage à la crème entier, ramolli
- 1 tasse sucre granulé
- 3 œufs, à température ambiante
- 1 cuillère à café extrait de vanille
- 1/2 tasse crème aigre entière, à température ambiante
- 4 tasse pêches fraîches, pelées et tranchées
- 1/2 tasse sucre granulé
- 1 cuillère à café cannelle moulue
- 1/4 cuillère à café muscade moulue
- 2 cuillères à soupe farine tout usage
- 1/2 tasse farine tout usage
- 1/4 tasse sucre brun
- 1/4 tasse beurre non salé, froid, en dés
Instructions
- Préchauffez votre four à 175°C (350°F) et préparez un moule à charnière de 9 pouces avec du papier sulfurisé et les côtés huilés.
- Dans un bol moyen, combinez les biscuits Graham écrasés et le sucre brun, puis incorporez le beurre fondu jusqu'à ce que le mélange soit homogène. Pressez fermement le mélange au fond et sur les côtés du moule. Faites cuire pendant 10 minutes et laissez refroidir sur une grille.
- Dans un grand bol, battez le fromage à la crème et le sucre granulé jusqu'à obtenir un mélange homogène, puis incorporez les œufs un à un, suivis de la vanille et de la crème aigre. Versez-le sur la croûte refroidie et égalisez le dessus.
- Dans une casserole moyenne, combinez les tranches de pêches avec le sucre, la cannelle, la muscade et la farine, puis faites cuire à feu moyen pendant 5 à 7 minutes jusqu'à ce que les pêches soient tendres. Laissez refroidir légèrement avant de les garnir sur la couche de cheesecake.
- Dans un petit bol, mélangez la farine et le sucre brun pour le crumble, puis incorporez le beurre en dés jusqu'à ce que le mélange devienne granuleux. Éparpillez-le sur la couche de pêches.
- Faites cuire le cheesecake pendant 50 à 60 minutes jusqu'à ce que le crumble soit doré et que le centre tremble légèrement. Éteignez le four, entrouvrez la porte et laissez refroidir pendant 1 heure.
- Transférez sur une grille pour refroidir complètement, puis réfrigérez pendant au moins 4 heures avant de servir.
Notes
Nutrition

Hi, I’m Olivia Parker, the founder of BakingSecret.com and a lifelong lover of all things sweet and homemade. I grew up in a small town in Oregon, where the smell of fresh cookies in my family’s kitchen sparked my passion for baking. Over the years, I turned that passion into a mission: to help home bakers feel confident, inspired, and creative.
After studying food science and working in several artisan bakeries across the U.S., I decided to create a space where everyone from beginners to seasoned bakers can find reliable recipes, expert tips, and a warm, welcoming community. BakingSecret.com is my way of sharing the magic of baking with the world. When I’m not testing new recipes, you’ll find me exploring farmers’ markets, collecting vintage cookbooks, or perfecting my sourdough technique.