
Bite-Sized Bliss: My Ultimate Boston Cream Cupcakes Recipe
You know that feeling when you see a perfect Boston Cream Pie in a bakery case? You want a slice, but you also want something you can share easily at a party. That’s exactly why I fell in love with making Boston Cream Cupcakes. They give you all the amazing flavor in a cute, handheld package. I’ve made these for countless birthdays and potlucks, and they disappear faster than I can say “seconds, please!” My kids love them because they’re fun, and my friends love them because they taste just like the classic, but better. Let me show you how to make these decadent Boston Cream Cupcakes at home.
A Slice of History in a Cupcake
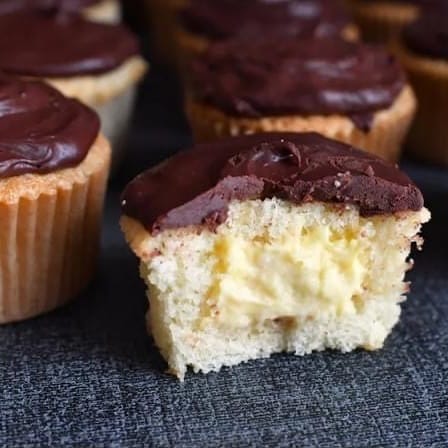
These cupcakes are a fun twist on a true American classic. The original Boston Cream Pie isn’t a pie at all—it’s a cake! It was invented at Boston’s Parker House Hotel in the 1850s. The genius lay in layering sponge cake with rich custard and topping it with chocolate glaze. My version takes that famous trio and shrinks it into cupcake form. It’s the modern, shareable way to enjoy a dessert with serious history. You get the soft yellow cake, the creamy vanilla center, and the shiny chocolate ganache in every single bite.
Why You’ll Love This Boston Cream Cupcakes Recipe
First, they are incredibly satisfying. The mix of soft cake, cool custard, and rich chocolate is just magical. Second, they look super impressive, but the steps are totally doable. I promise! The custard filling might seem fancy, but it’s just a simple stovetop pudding. Finally, they are the ultimate crowd-pleaser. Whether it’s a fancy dinner or a casual game day gathering, these decadent Boston Cream Cupcakes make everyone feel special. They taste like you bought them from a high-end bakery, but they come straight from your heart (and your kitchen!).
Perfect Occasions for Your Homemade Cupcakes
These cupcakes are perfect for so many events! I always make a batch for my husband’s office parties—they’re easy to transport and serve. They’re a star at birthday celebrations, especially if someone loves Boston Cream Pie. I’ve also brought them to school bake sales (they sell out first!) and weekend brunches with friends. Honestly, any day that needs a little sweetening up is the right day for these cupcakes.
Gathering Your Ingredients for Decadent Boston Cream Cupcakes
Let’s get everything ready. Using room-temperature ingredients, especially butter and eggs, is a small secret that makes a big difference in texture.
For the Cupcakes:
- 1 1/2 cups all-purpose flour
- 1 1/2 teaspoons baking powder
- 1/4 teaspoon salt
- 3/4 cup granulated sugar
- 1/2 cup unsalted butter, room temperature
- 2 large eggs
- 1 teaspoon vanilla extract
- 1/2 cup whole milk
For the Filling:
- 1 cup whole milk
- 2 egg yolks
- 1/3 cup granulated sugar
- 2 tablespoons cornstarch
- 1 teaspoon vanilla extract
For the Ganache:
- 1/2 cup heavy cream
- 4 ounces semisweet chocolate, chopped
Handy Substitutions for Your Pantry
Don’t have every ingredient? No problem! Here are some easy swaps:
- Milk: You can use 2% milk in both the cupcakes and the filling, but whole milk gives the richest flavor.
- Chocolate: Good-quality chocolate chips work for the ganache if you don’t have a baking bar. Just chop them up a bit.
- Filling Thickener: All-purpose flour can replace cornstarch in the custard. Use 3 tablespoons instead of 2.
- Butter: If you only have salted butter, just omit the extra 1/4 teaspoon of salt in the cupcake batter.
How to Make Decadent Boston Cream Cupcakes: Step-by-Step
Follow these simple steps for perfect cupcakes every time. The aroma of vanilla cake baking is pure happiness!
Step 1: Bake the Cupcake Bases
Start by preheating your oven to 350°F (175°C). Line your muffin tin with pretty cupcake liners. In a medium bowl, whisk together your flour, baking powder, and salt. This aerates the dry ingredients and prevents lumps. In a larger bowl, use a hand mixer to cream the soft butter and sugar. You want it light, fluffy, and pale yellow. Beat in the eggs, one at a time, letting each mix in fully. The batter will become smooth and glossy. Stir in that lovely vanilla extract. Now, add about a third of your flour mixture, mix, then half the milk. Repeat, ending with the last of the flour. Mix just until you see no more dry streaks.
Pro tip: Fill your cupcake liners only 2/3 full. This gives them room to rise into perfect domes, not mushroom tops!
Step 2: Create the Velvety Custard Filling
While the cupcakes bake and cool, make the custard. Heat one cup of milk in a saucepan until it’s just steaming. In a separate bowl, vigorously whisk the egg yolks, sugar, and cornstarch. It will look thick and pasty. Now, slowly pour the hot milk into this egg mixture while whisking non-stop. This is called tempering, and it keeps the eggs from scrambling. Pour everything back into the saucepan. Cook over medium heat, whisking constantly. Watch as it transforms from a thin liquid to a thick, pudding-like consistency. Once big bubbles pop on the surface, cook for one more minute. Take it off the heat and stir in the vanilla. Pour it into a bowl and press plastic wrap directly onto the surface. This prevents a skin from forming. Let it cool completely.
Step 3: Whip Up the Simple Chocolate Ganache
The ganache is the elegant finish. Chop your chocolate into small pieces so it melts evenly. Place it in a heatproof bowl. Heat the heavy cream in a small saucepan until it just begins to simmer—you’ll see tiny bubbles around the edge. Immediately pour the hot cream over the chopped chocolate. Let it sit, untouched, for one full minute. This allows the heat to gently melt the chocolate. Then, start stirring slowly from the center outward. You’ll see a beautiful, glossy chocolate sauce come together. Let it cool for about 10-15 minutes so it thickens slightly and won’t run off the cupcakes.
Step 4: Assemble Your Masterpiece
This is the fun part! Once your cupcakes are completely cool, use a small paring knife or a cupcake corer to cut a little cone out of the center of each one. Go about halfway down. Spoon or pipe your cool custard into each hole, filling it right to the top. Now, take a cupcake, hold it by the liner, and gently dip the top right into the bowl of ganache. Twist your wrist slightly as you lift it out for a smooth, even coat. Let the excess drip off for a second before setting it down. The ganache will set into a beautiful, firm shell.
Chef’s tip: Use a piping bag with a round tip (or a plastic bag with the corner snipped) to fill the cupcakes. It’s so much cleaner and you can pack in more filling!
Your Boston Cream Cupcakes Timeline
Good baking is about timing. Here’s how your schedule will look:
- Prep Time: 30 minutes (gathering, mixing, making custard)
- Cook Time: 20 minutes (baking the cupcakes)
- Cooling Time: About 1 hour (crucial for the custard and cupcakes!)
- Assembly Time: 15 minutes
- Total Time: About 2 hours 5 minutes (including cooling)
Don’t rush the cooling. Assembling warm cupcakes will make the custard runny and the ganache melt.
Chef’s Secret for the Best Cupcakes
My secret weapon? A tiny pinch of nutmeg (about 1/8 teaspoon) in the cupcake batter. You won’t taste it as “nutmeg,” but it adds a wonderful warmth and depth that makes the vanilla and chocolate flavors sing. It’s that “what is that amazing taste?” factor.
A Fun Fact About Your Dessert
In 1996, Boston Cream Pie was officially declared the state dessert of Massachusetts! So when you make these Boston Cream Cupcakes, you’re basically making a portable, party-friendly version of a state symbol. How cool is that?
Necessary Equipment
- Standard 12-cup muffin tin
- Cupcake liners
- Mixing bowls (2-3 medium/large)
- Hand mixer or stand mixer
- Whisk and spatula
- Small saucepan (for custard and ganache)
- Measuring cups and spoons
- Piping bag or small plastic bag (for filling)
Storing Your Decadent Boston Cream Cupcakes
Because of the dairy-based custard filling, these cupcakes need to be stored in the refrigerator. Place them in a single layer in an airtight container. They will keep well for up to 3 days. The cake might firm up a bit when cold, but the flavors are still fantastic.
You can also prepare components ahead of time. Bake the cupcakes and store them unfilled at room temperature for a day. Make the custard and keep it covered in the fridge for up to two days. Make the ganache and keep it at room temperature if using the same day, or refrigerate it and gently re-warm it before using.
I do not recommend freezing the assembled cupcakes, as the custard can become watery when thawed. You can freeze the unfilled cupcakes for up to 2 months, then fill and glaze them when you’re ready to serve.
Tips and Advice for Cupcake Success
- Ensure all ingredients, especially butter, eggs, and milk, are at room temperature for a smooth, even batter.
- When making the custard, constant whisking is your best friend to avoid lumps or a scrambled egg texture.
- Let the ganache cool a bit before dipping. If it’s too hot, it will soak into the cupcake. If it’s too cold, it will be gloppy.
- For a super-neat fill, use an apple corer or a small knife to remove the cupcake centers.
Presentation Ideas to Wow Your Guests
- Dust the finished cupcakes with a light sprinkle of powdered sugar or cocoa powder.
- Add a single chocolate-covered espresso bean or a fresh raspberry on top of each one.
- Serve them on a beautiful cake stand instead of a regular plate.
- For a kids’ party, add a small dollop of whipped cream and a cherry on top.
Healthier & Fun Variations to Try
Love the idea but want to mix it up? Here are six tasty twists:
- Gluten-Free Boston Cream Cupcakes: Swap the all-purpose flour for your favorite 1-to-1 gluten-free baking blend. The result is just as tender and delicious.
- Dairy-Free Delight: Use plant-based milk, butter, and heavy cream. For the ganache, use full-fat coconut milk and dairy-free chocolate chips.
- Chocolate Cake Version: Replace 1/4 cup of the flour with unsweetened cocoa powder for a chocolate cupcake base. It’s a double-chocolate dream!
- Coffee-Infused: Add 1 teaspoon of instant espresso powder to the cupcake batter and another 1/2 teaspoon to the ganache for a mocha flavor.
- Lemon Zest Twist: Add the zest of one lemon to the cupcake batter and a tablespoon of lemon juice to the custard for a bright, citrusy note.
- Mini Boston Cream Cupcakes: Use a mini muffin tin and reduce baking time to 10-12 minutes. Perfect for a large party spread alongside other delightful cakes and cupcakes.
Common Mistakes to Avoid
Even great bakers can run into a few hiccups. Here’s how to steer clear of the common ones.
Mistake 1: Using Cold Ingredients
This is the number one reason for dense, heavy cupcakes. Cold butter doesn’t cream properly with sugar, and cold eggs or milk can cause the batter to curdle. It also leads to uneven baking. Always plan ahead. Take your butter, eggs, and milk out of the fridge at least 30-60 minutes before you start baking. Your batter will be smooth, and your cupcakes will have a perfect, light crumb.
Mistake 2: Overmixing the Batter
Once you add the flour to the wet ingredients, you need a gentle hand. Overmixing develops the gluten in the flour, which makes cupcakes tough and chewy instead of soft and tender. Mix the dry ingredients in just until you no longer see streaks of flour. It’s okay if the batter is a little lumpy. A few swift strokes with your spatula is all it needs.
Mistake 3: Rushing the Custard
Patience is key for the perfect pastry cream. If you add the hot milk to the egg yolks too quickly, you’ll get sweet scrambled eggs. If you don’t cook it long enough, it will stay runny. Always whisk the hot milk in slowly at first. Then, cook the mixture over medium heat, whisking constantly, until it truly thickens and large bubbles break the surface. This ensures the cornstarch is fully activated. Pour it into a bowl and cool it completely before filling, or it will melt the ganache.
Mistake 4: Assembling Warm Cupcakes
It’s tempting to fill and frost them right away, but don’t! If the cupcakes are even slightly warm, the heat will melt the custard and cause the ganache to slide right off. It makes a huge mess. Let the cupcakes cool completely in the pan on a wire rack. Let the custard cool to room temperature or become chilled. Let the ganache thicken slightly. Cool ingredients are the secret to neat, beautiful Boston Cream Cupcakes.
Frequently Asked Questions
Can I make Boston Cream Cupcakes a day ahead?
Absolutely! You can bake the cupcakes and make the custard filling the day before. Store the cupcakes at room temperature in an airtight container. Keep the custard covered with plastic wrap directly on its surface in the fridge. On the day you want to serve them, make the fresh ganache and assemble everything. This is actually my preferred method, as it breaks up the work and the custard sets up perfectly overnight.
My custard is lumpy. What can I do?
Don’t worry, this happens to everyone sometimes! The best fix is to strain your cooked custard through a fine-mesh sieve into your bowl before adding the vanilla. This will catch any little bits of cooked egg or cornstarch lumps. Simply press it through with your spatula. Then stir in the vanilla, cover, and cool as directed. Your custard will be silky smooth.
What can I use if I don’t have a piping bag to fill them?
No special tools are needed. You can use a small paring knife to cut a cone out of the top, spoon in the filling, and then replace the cake “plug.” Or, take a plastic sandwich bag, spoon the custard into one corner, and snip off a very small piece of the corner. Now you have a makeshift piping bag! Squeeze the custard right into the center of each cupcake.
Why is my ganache not shiny?
A dull ganache usually means the cream was too hot and “broke” the chocolate, or you stirred it too vigorously. Gently simmer the cream—don’t let it boil hard. When you pour it over the chocolate, let it sit for a full minute to melt it gently. Then, stir slowly in one direction, starting in the center, until it comes together. If it does separate, try adding a teaspoon of warm milk and stirring gently to bring it back.
Can I use a different chocolate for the ganache?
Yes, you can experiment! Semi-sweet is classic, but milk chocolate will give you a sweeter, milder topping. Dark chocolate (60-70%) will be richer and less sweet, which is a great contrast to the sweet custard. Just avoid chocolate chips if you can, as they have stabilizers that can prevent a perfectly smooth melt. A baking bar is best.
How do I know when the cupcakes are done baking?
The toothpick test is your best friend. Insert a toothpick into the center of a cupcake in the middle of the pan. If it comes out with a few moist crumbs clinging to it, they’re done. If it comes out with wet batter, they need more time. Also, look for the tops to spring back lightly when you touch them. They should be a light golden brown.
Is the custard filling the same as pudding mix?
It’s very similar to a homemade vanilla pudding, but a traditional pastry cream is often a bit thicker and richer because of the egg yolks. It’s cooked on the stove, just like pudding. Using a homemade custard is so much better than a box mix—the flavor is pure and wonderful. It’s worth the few extra minutes.
My ganache is too runny. How can I thicken it?
If your ganache is too thin to coat the cupcakes, just let it sit at room temperature for 10-20 minutes. It will thicken as it cools. You can also pop it in the fridge for 5-minute intervals, stirring well each time, until it reaches a dipping consistency. Be careful not to let it get too cold and hard.
Can I freeze these cupcakes?
I don’t recommend freezing the fully assembled cupcakes, as the custard doesn’t freeze and thaw well. However, you can freeze the unfilled, unglazed cupcakes very successfully. Once they are completely cool, wrap them tightly in plastic wrap and place them in a freezer bag. They’ll keep for 2-3 months. Thaw overnight in the fridge, then fill and glaze them fresh.
Are these cupcakes very high in calories?
These are a rich, special-occasion treat. Each cupcake comes in at about 320 kcal. To put that in perspective, it’s similar to a large slice of banana bread or a big cookie. Enjoying them as part of a balanced diet is key. It’s always good to be mindful of your overall recommended intake of sugars and fats, especially from indulgent desserts like these.
I hope you feel ready and excited to make these incredible Decadent Boston Cream Cupcakes. They truly are a little bite of joy. The process is part of the fun, and the proud feeling you get when you serve them is the best reward. For more inspiration and delicious treats like this, be sure to explore our entire collection of cakes and cupcakes recipes. Now, grab your mixing bowl and preheat that oven—your kitchen is about to smell amazing!
Equipment
- Grand bol
- Fouet
- Spatule
- Plaque à pâtisserie
- Papier sulfurisé
Ingredients
- 1 1/2 tasse farine tout usage
- 1 1/2 cuil. à café poudre à lever
- 1/4 cuil. à café sel
- 3/4 tasse sucre en poudre
- 1/2 tasse beurre non salé, à température ambiante
- 2 œufs
- 1 cuil. à café extrait de vanille
- 1/2 tasse lait entier
- 1 tasse lait entier (pour la garniture)
- 2 jaunes d'œufs jaunes d'œufs
- 1/3 tasse sucre en poudre (pour la garniture)
- 2 cuil. à soupe fécule de maïs
- 1 cuil. à café extrait de vanille (pour la garniture)
- 1/2 tasse crème épaisse
- 4 oz chocolat semi-amer haché
Instructions
- Préchauffez votre four à 175°C et tapissez un moule à muffins avec des caissettes à cupcakes.
- Dans un bol moyen, mélangez la farine, la poudre à lever et le sel.
- Dans un grand bol, crémez le beurre et le sucre jusqu'à ce que le mélange soit léger et aérien.
- Incorporez les œufs, un à un, puis ajoutez l'extrait de vanille.
- Mélangez le mélange de farine et le lait alternativement, en commençant et en terminant par la farine.
- Remplissez les caissettes à cupcakes aux deux tiers et faites cuire au four pendant 20 minutes.
- Tandis que les cupcakes cuisent, préparez la crème pâtissière en chauffant le lait dans une casserole.
- Dans un bol séparé, battez les jaunes d'œufs, le sucre et la fécule de maïs, puis temperer avec le lait chaud.
- Cuisinez le mélange dans la casserole à feu moyen jusqu'à épaississement, puis ajoutez l'extrait de vanille et laissez refroidir.
- Pour la ganache, versez la crème chaude sur le chocolat haché et laissez reposer avant de mélanger.
- Une fois les cupcakes refroidis, découpez un petit cône au centre de chacun et remplissez-le de crème pâtissière.
- Plongez le dessus des cupcakes farcis dans la ganache refroidie et laissez prendre.
Notes
Nutrition

Hi, I’m Olivia Parker, the founder of BakingSecret.com and a lifelong lover of all things sweet and homemade. I grew up in a small town in Oregon, where the smell of fresh cookies in my family’s kitchen sparked my passion for baking. Over the years, I turned that passion into a mission: to help home bakers feel confident, inspired, and creative.
After studying food science and working in several artisan bakeries across the U.S., I decided to create a space where everyone from beginners to seasoned bakers can find reliable recipes, expert tips, and a warm, welcoming community. BakingSecret.com is my way of sharing the magic of baking with the world. When I’m not testing new recipes, you’ll find me exploring farmers’ markets, collecting vintage cookbooks, or perfecting my sourdough technique.