
Quick Balloon Bread: A Fun and Bouncy Delight in 6 Minutes
Imagine a soft, fluffy bread that puffs up like a balloon straight out of the oven. That’s exactly what this Quick Balloon Bread recipe is all about! It’s a simple yet delightful treat that I love to whip up for my family and friends. The best part? You can have it ready in just 6 minutes. Let’s dive into this bouncy, yummy goodness!
The History and Background of Quick Balloon Bread
This recipe has its roots in traditional Middle Eastern and Mediterranean cuisines, where quick, easy, and delicious breads are a staple. The modern version you see today has been adapted to fit our busy lifestyles, making it a perfect fit for those who want a bit of homemade magic without spending hours in the kitchen. It’s a blend of old-world charm with a dash of contemporary convenience.
Why You’ll Love This Quick Balloon Bread Recipe
This bread is not just a visual delight; it’s also incredibly tasty. The combination of warm, slightly sweet dough and the light, airy texture makes it a hit with everyone. Plus, the simplicity of the ingredients and the quick preparation time means you can enjoy fresh, homemade bread any day of the week. It’s a win-win!
Perfect Occasions to Prepare Quick Balloon Bread
Whether you’re hosting a casual brunch, having a family dinner, or just looking for a quick snack, Quick Balloon Bread fits the bill. It’s great as a side with a hearty stew, a companion to a cup of coffee, or even as a fun treat for kids. It’s versatile and always a crowd-pleaser!
Ingredients for Quick Balloon Bread
- 1 teaspoon of sugar
- 1 packet of dry yeast
- 2 cups of warm milk
- 2 tablespoons of olive oil
- 2 tablespoons of yogurt
- 5 cups of flour
- 1 teaspoon of salt
Substitution Options
If you’re out of some ingredients, don’t worry! Here are a few substitutions:
- You can use honey instead of sugar for a slightly different sweetness.
- Butter or vegetable oil can replace olive oil for a different flavor profile.
- For a dairy-free option, use almond or soy milk instead of regular milk.
- Greek yogurt works well if you don’t have regular yogurt.
Preparation Section
Step 1: Activate the Yeast
Add the sugar, dry yeast, and warm milk to a large mixing bowl. Stir gently until the yeast dissolves. You’ll start to see bubbles forming, which is a good sign that your yeast is active. The mixture will smell slightly sweet and yeasty.
Step 2: Mix in Olive Oil and Yogurt
Next, add the olive oil and yogurt to the yeast mixture. Stir everything together until it’s well combined. The yogurt adds a creamy texture and a subtle tanginess that complements the bread beautifully.
Step 3: Add Flour and Salt
Gradually add the flour and salt to the mixture, stirring as you go. Keep adding flour until the dough comes together in a soft, pliable ball. The dough should be smooth and elastic but not too sticky. If it’s too sticky, add a bit more flour. If it’s too dry, add a splash of water.
Step 4: Knead and Rest the Dough
Knead the dough on a clean, floured surface for a few minutes until it’s smooth and elastic. Place the dough back in the bowl, cover it with a clean kitchen towel, and let it rest for about 10-15 minutes. This resting time allows the dough to rise and develop its airy texture.
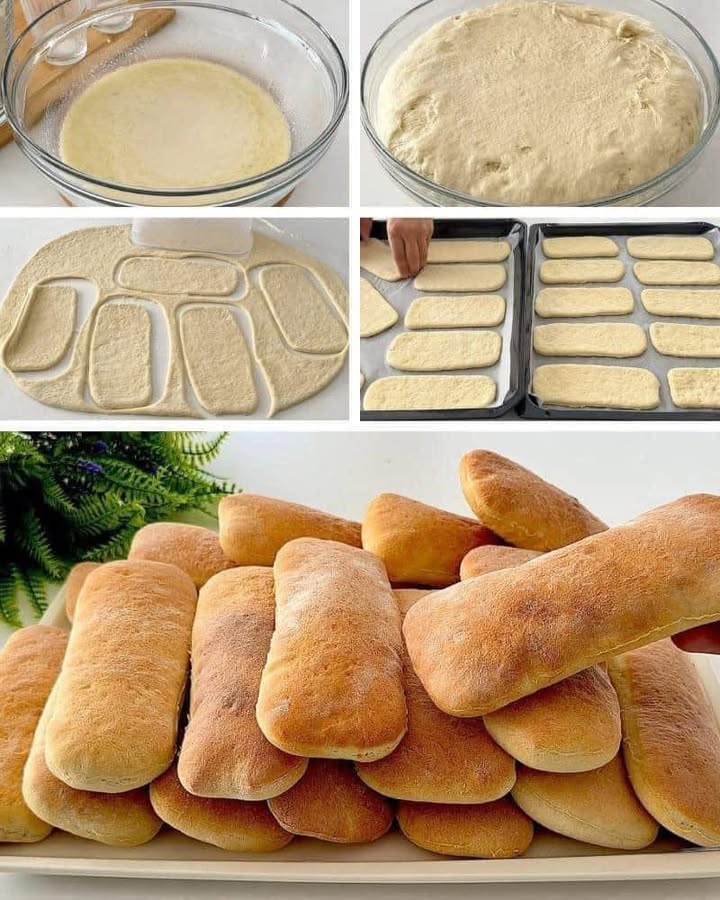
Step 5: Shape the Dough
Once the dough has doubled in size, punch it down to release any air bubbles. Divide the dough into two equal parts and shape each part into a round ball. Use a rolling pin to flatten them slightly. Then, cut the dough using a cookie cutter or a small container to create perfect shapes.
Step 6: Bake the Bread
Place the shaped dough on a baking sheet lined with parchment paper. Cover the dough again and let it rest for 5 minutes. Preheat your oven to 250 degrees Fahrenheit (or 121 degrees Celsius). Bake the bread for 6 minutes, or until it puffs up and turns a light golden brown.
Timing
Here’s a quick breakdown of the timing for this recipe:
– Prep Time: 10 minutes
– Cooking Time: 6 minutes
– Resting Time: 15 minutes
– Total Time: 71 minutes
Chef’s Secret
To make your Quick Balloon Bread extra special, try brushing the top with a little bit of melted butter right before baking. This gives the bread a lovely, golden crust and a rich, buttery flavor. It’s a small touch that makes a big difference!
Extra Info
Did you know that the key to a perfectly puffed balloon bread is the right temperature? Too hot, and the bread will burn; too cool, and it won’t puff up. The ideal temperature is around 250 degrees Fahrenheit, which allows the bread to rise and form that perfect, bouncy shape.
Necessary Equipment
- A large mixing bowl
- A rolling pin
- A baking sheet
- Parchment paper
- A clean kitchen towel
Storage
Storing Quick Balloon Bread is easy and straightforward. For the best results, keep it in an airtight container at room temperature. It will stay fresh for up to 3 days. If you need to store it longer, you can freeze it for up to 3 months. Just make sure to let it thaw completely at room temperature before serving.
Tips and Advice
To get the best results, make sure all your ingredients are at room temperature. This helps the yeast activate properly and ensures a consistent texture. Also, don’t overwork the dough when kneading. Gentle, steady kneading is key to achieving that soft, bouncy texture.
Presentation Tips
For a beautiful presentation, serve Quick Balloon Bread with a side of olive oil and balsamic vinegar. You can also sprinkle some fresh herbs like rosemary or thyme on top for a aromatic touch. Another fun idea is to serve it with a variety of dips, like hummus or tzatziki, for a colorful and flavorful spread.
Healthier Alternative Recipes
If you’re looking for some healthier alternatives or variations, here are six options to consider:
- Whole Wheat Quick Balloon Bread: Replace half of the all-purpose flour with whole wheat flour for a nutty, wholesome flavor. This version is packed with fiber and nutrients, making it a healthier choice for everyday snacking.
- Honey-Sweetened Quick Balloon Bread: Swap the sugar for honey to add a natural, subtle sweetness. Honey also has antibacterial properties, making it a great addition to your bread.
- Herb-Infused Quick Balloon Bread: Add your favorite herbs, such as rosemary or thyme, to the dough for a burst of fresh, herbal flavors. This version is perfect for pairing with savory dishes.
- Spiced Quick Balloon Bread: Incorporate a pinch of cinnamon, nutmeg, or cardamom to create a warmly spiced version. This is a great choice for a cozy, comforting treat during the cooler months.
- Garlic and Herb Quick Balloon Bread: Add finely chopped garlic and a mix of dried herbs to the dough for a savory, robust flavor. This variation is perfect for garlic lovers and pairs wonderfully with pasta or grilled meats.
- Berry-Studded Quick Balloon Bread: Fold in some fresh or frozen berries, such as blueberries or raspberries, for a sweet and tangy twist. This version is a delightful addition to breakfast or as a dessert.
Check Out These Other Delicious Recipes
If you loved this Quick Balloon Bread recipe, you might also enjoy these other delightful treats:
- For a sweet, fluffy indulgence, try the Fluffy Sweet Brioche.
- Craving something nutty and chocolaty? The Snickers Peanut Butter Muffins are a must-try.
- If you’re in the mood for more bread, the Homemade Bread Delight is a classic that never disappoints.
- And for a sweet, gooey treat, the Chocolate Chip Donuts are simply irresistible.
Common Mistakes to Avoid
Mistake 1: Using Cold Ingredients
One of the most common mistakes is using cold ingredients. Cold milk, oil, and yogurt can slow down the yeast activity, leading to a dense, heavy bread. Make sure all your ingredients are at room temperature to ensure the yeast can do its job properly.
Mistake 2: Over-Kneading the Dough
Over-kneading the dough can make it tough and chewy. The key is to knead just until the dough is smooth and elastic. If you notice the dough becoming too tight, stop kneading and let it rest for a few minutes before continuing.
Mistake 3: Not Preheating the Oven
Another common mistake is not preheating the oven. A properly preheated oven ensures that the bread bakes evenly and rises properly. Set your oven to 250 degrees Fahrenheit (121 degrees Celsius) and let it preheat for at least 10-15 minutes before baking.
Mistake 4: Not Letting the Dough Rise Enough
A well-risen dough is essential for a light and airy bread. If the dough doesn’t double in size, it won’t have the right texture. Make sure to let it rise for the full 15 minutes, and place it in a warm, draft-free spot to help the process along.
Mistake 5: Opening the Oven Door Too Often
Opening the oven door while the bread is baking can cause the temperature to drop, leading to uneven baking. Resist the temptation to open the door and check on your bread. Instead, trust the timing and wait until the 6-minute mark to take it out.
FAQ
Can I use instant yeast instead of active dry yeast?
Yes, you can use instant yeast instead of active dry yeast. Instant yeast doesn’t require activation in warm water, so you can add it directly to the dry ingredients. The rising time may be slightly shorter, so keep an eye on the dough as it rests.
What if my dough is too sticky?
If your dough is too sticky, you can gradually add a little more flour. Start with a tablespoon at a time and knead it in until the dough reaches the right consistency. Be careful not to add too much flour, as it can make the bread dense.
Can I use a different type of milk?
Absolutely! You can use any type of milk you prefer, including almond milk, soy milk, or coconut milk. Each type of milk will give the bread a slightly different flavor, so feel free to experiment and find your favorite.
How do I know when the bread is done?
The bread is done when it has puffed up and turned a light golden brown. You can also tap the bottom of the bread; if it sounds hollow, it’s ready. The total baking time should be around 6 minutes, but always check for the right color and texture.
Can I freeze the bread?
Yes, you can freeze the bread. Let it cool completely, then wrap it tightly in plastic wrap or place it in an airtight container. It will keep in the freezer for up to 3 months. When you’re ready to eat it, let it thaw at room temperature.
Is this recipe suitable for vegans?
With a few simple substitutions, this recipe can be made vegan. Use plant-based milk, such as almond or soy milk, and replace the yogurt with a non-dairy yogurt. You can also use a vegan-friendly alternative for the butter, such as coconut oil or margarine.
Conclusion
There you have it—a quick, easy, and utterly delicious Quick Balloon Bread recipe that’s sure to impress! Whether you’re a seasoned baker or a beginner, this recipe is a fantastic way to bring a touch of homemade magic to your table. So, grab your apron, preheat your oven, and let’s get baking! And if you’re looking for more delectable bread recipes, head over to our bread category for more inspiration.
Equipment
- Large mixing bowl
- Rolling pin
- Baking sheet
- Parchment paper
- Clean kitchen towel
Ingredients
- 1 tsp sugar
- 1 packet dry yeast
- 2 cups warm milk
- 2 tbsp olive oil
- 2 tbsp yogurt
- 5 cups flour
- 1 tsp salt
Instructions
- Add the sugar, dry yeast, and warm milk to a large mixing bowl. Stir gently until the yeast dissolves.
- Add olive oil and yogurt to the yeast mixture. Stir until well combined.
- Gradually add flour and salt, stirring until the dough comes together in a soft, pliable ball.
- Knead the dough on a floured surface until smooth and elastic. Cover and let it rest for 10-15 minutes.
- Punch down the dough, divide into two parts, shape into balls, and slightly flatten with a rolling pin.
- Arrange on a baking sheet lined with parchment paper, cover, and let rest for 5 minutes.
- Preheat oven to 250°F (121°C) and bake the bread for 6 minutes until puffed and golden brown.
Notes
Nutrition

Hi, I’m Olivia Parker, the founder of BakingSecret.com and a lifelong lover of all things sweet and homemade. I grew up in a small town in Oregon, where the smell of fresh cookies in my family’s kitchen sparked my passion for baking. Over the years, I turned that passion into a mission: to help home bakers feel confident, inspired, and creative.
After studying food science and working in several artisan bakeries across the U.S., I decided to create a space where everyone from beginners to seasoned bakers can find reliable recipes, expert tips, and a warm, welcoming community. BakingSecret.com is my way of sharing the magic of baking with the world. When I’m not testing new recipes, you’ll find me exploring farmers’ markets, collecting vintage cookbooks, or perfecting my sourdough technique.