
Why This Marble Cake Delight is a Must-Try
There’s something magical about the swirls of vanilla and chocolate in a marble cake. It reminds me of my childhood, sneaking pieces of cake fresh from the oven before it even had time to cool. This Marble Cake Delight recipe has been tested and tweaked countless times in my kitchen. The result? A giant, spongy cake that’s always perfect for family gatherings or just because you deserve a treat.
The Story Behind the Swirls
Marble cakes have been around since the 19th century, born from the creativity of bakers who wanted to combine two flavors into one beautiful creation. Back then, they used molasses and spices to create contrast. Today, we lean on cocoa powder to give us those gorgeous swirls. I love how this Marble Cake Delight bridges tradition with modern simplicity. Whether you’re baking for a birthday or just craving something sweet, this cake feels like home.
Why You’ll Love This Recipe
This recipe is as easy as it gets. No fancy techniques, no hard-to-find ingredients—just straightforward steps that deliver big on flavor and texture. The cake is light, fluffy, and packed with that signature vanilla-chocolate goodness. Plus, it’s versatile enough to suit any occasion. Trust me, once you try this, it’ll become your go-to dessert.
Perfect Occasions for Your Marble Cake Delight
This cake is perfect for birthdays, potlucks, or Sunday brunches. It’s also great for when you want to impress guests without spending hours in the kitchen. I’ve served it at family dinners, and everyone always asks for seconds. And let’s be honest—it’s also ideal for those days when you just need a little pick-me-up.
Ingredients for Your Marble Cake Delight
- 3 large eggs at room temperature
- 1 cup of sugar
- ½ cup of vegetable oil
- 1 cup of warm milk
- 2 cups of all-purpose flour
- 1 teaspoon of baking powder
- 1 teaspoon of vanilla essence
- 3 tablespoons of unsweetened cocoa powder
Substitution Options
If you’re out of certain ingredients, don’t worry! Here are some swaps:
- Vegetable oil can be replaced with melted butter for a richer flavor.
- Warm milk can be swapped with almond or oat milk for a dairy-free option.
- All-purpose flour can be substituted with a gluten-free blend if needed.
Step-by-Step Preparation
Step 1: Beat Eggs and Sugar
Start by beating the eggs and sugar together until they’re sparkling and creamy. This step is crucial because it incorporates air into the batter, making your cake light and fluffy. I use a stand mixer, but a hand whisk works too. Watch as the mixture transforms from pale yellow to a frothy, golden delight.
Step 2: Add Oil and Milk
Once the eggs and sugar are ready, gently pour in the vegetable oil and warm milk. Mix well to combine. The warmth of the milk helps everything blend smoothly. Pro tip: Use a spatula to scrape down the sides of the bowl so no ingredients get left behind.
Step 3: Sift Dry Ingredients
In another bowl, sift the flour, baking powder, and vanilla essence. Sifting ensures there are no lumps in your batter, which means a smoother cake. Slowly add these dry ingredients to the wet mixture, beating until you achieve a silky, homogeneous consistency.
Step 4: Divide and Conquer with Cocoa
Split the batter into two equal parts. To one half, stir in the cocoa powder until fully incorporated. Now you’ve got your chocolate layer ready to swirl with the vanilla base. Isn’t it fun watching the colors come together?
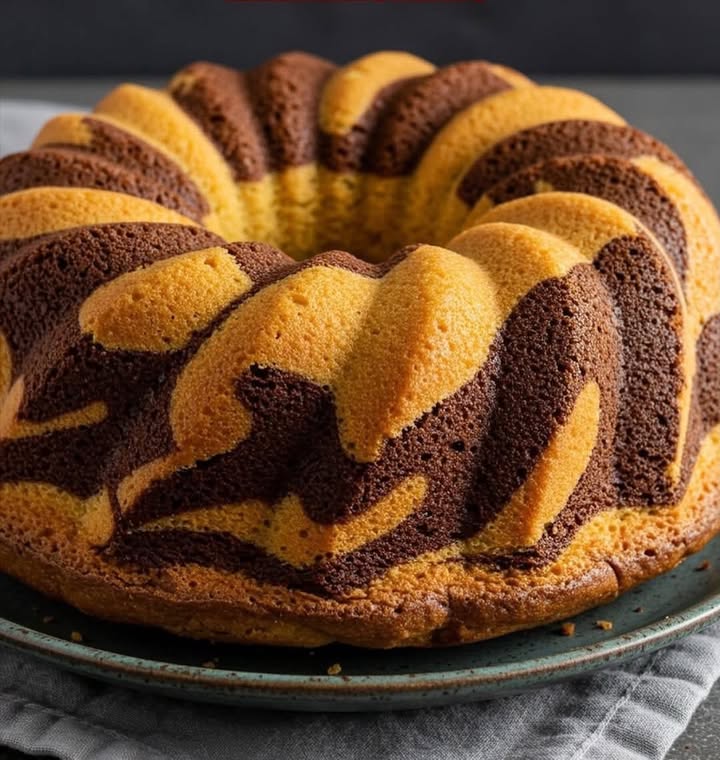
Step 5: Create the Marble Effect
Pour alternating tablespoons of white and chocolate batter into a greased and floured mold. For an eye-catching swirl, drag a knife through the batter in zigzag motions. Chef’s tip: Don’t overmix; a few gentle strokes are all you need for that marbled magic.
Step 6: Bake to Perfection
Bake your Marble Cake Delight at 180°C (350°F) for 40–45 minutes. You’ll know it’s done when a toothpick inserted comes out clean. As it bakes, your kitchen will fill with the most irresistible aroma—a mix of vanilla and chocolate that’s pure comfort.
Timing Breakdown
- Preparation Time: 15 minutes
- Cooking Time: 40–45 minutes
- Cooling Time: 20 minutes
- Total Time: About 1 hour and 15 minutes
Chef’s Secret
For extra moistness, brush the cooled cake with a simple syrup made from equal parts sugar and water. It adds a subtle sweetness and keeps the cake soft for days.
Extra Info
Did you know that marble cakes were considered a status symbol in the Victorian era? Only wealthy households could afford the luxury of combining multiple flavors. Luckily, today we can enjoy this treat anytime!
Necessary Equipment
- Mixing bowls
- Electric mixer or whisk
- Spatula
- Loaf pan or round cake mold
- Oven
Storage Tips
To store your Marble Cake Delight, wrap it tightly in plastic wrap or place it in an airtight container. This prevents it from drying out. If you live in a humid area, refrigerate the cake to extend its shelf life.
For longer storage, freeze slices individually wrapped in parchment paper. They’ll stay fresh for up to three months. Simply thaw at room temperature before serving.
Avoid leaving the cake uncovered on the counter for more than a day, as it may lose its moisture and become stale.
Tips and Advice
Always bring your eggs to room temperature before starting. Cold eggs can make the batter separate, affecting the texture. Also, don’t skip greasing and flouring the mold—it ensures the cake releases easily.
Presentation Ideas
- Dust with powdered sugar for a classic look.
- Add chocolate ganache drizzle for extra indulgence.
- Serve with fresh berries for a pop of color.
Healthier Alternatives
Here are six ways to make this recipe healthier:
- Whole Wheat Flour: Swap half the all-purpose flour with whole wheat for added fiber.
- Coconut Oil: Replace vegetable oil with coconut oil for a tropical twist.
- Honey or Maple Syrup: Use natural sweeteners instead of refined sugar.
- Greek Yogurt: Add a dollop to the batter for extra moisture and protein.
- Egg Whites: Use only egg whites to reduce fat content.
- Dark Cocoa Powder: Opt for dark cocoa for a richer flavor and antioxidants.
Common Mistakes to Avoid
Mistake 1: Overmixing the Batter
Overmixing can lead to a dense cake instead of a light and airy one. Mix just until the ingredients are combined. Pro tip: Stop mixing as soon as you see no streaks of flour.
Mistake 2: Skipping the Sifting
Sifting might seem tedious, but it makes a huge difference. Skipping this step can leave lumps in your batter, ruining the smooth texture. Take the extra minute—it’s worth it!
Mistake 3: Opening the Oven Too Soon
Resist the urge to peek while the cake is baking. Opening the oven door lets heat escape, which can cause the cake to sink. Patience is key here!
FAQ Section
Can I use self-rising flour?
Yes, you can substitute self-rising flour for all-purpose flour and omit the baking powder. Just ensure the ratios remain the same for best results.
How do I prevent the cake from sticking?
Grease and flour your pan thoroughly. Alternatively, line it with parchment paper for foolproof removal.
Can I double the recipe?
Absolutely! Doubling the recipe works perfectly if you’re feeding a crowd. Just adjust your baking time slightly if using larger pans.
What type of cocoa powder should I use?
Use unsweetened cocoa powder for balanced sweetness. Dutch-processed cocoa will give a deeper chocolate flavor.
Can I make this gluten-free?
Yes, replace the all-purpose flour with a gluten-free blend. Ensure the blend includes xanthan gum for structure.
How long does the cake last?
Stored properly, the cake stays fresh for up to five days at room temperature or a week in the fridge.
Can I freeze the cake?
Definitely! Wrap slices individually and freeze for up to three months. Thaw before serving.
Why is my cake dry?
Dry cakes often result from overbaking. Check for doneness a few minutes before the recommended time and avoid opening the oven too frequently.
Can I add nuts or fruits?
Of course! Fold in chopped walnuts, chocolate chips, or dried fruit after dividing the batter.
What if I don’t have vanilla essence?
Vanilla extract works fine as a substitute. You can also use almond essence for a unique twist.
Final Thoughts
This Marble Cake Delight is more than just a dessert—it’s a celebration of flavors, textures, and memories. Whether you’re baking for loved ones or treating yourself, this cake promises joy in every slice. So grab your apron, preheat that oven, and let’s create something delicious together!
Equipment
- Mixing bowls
- Electric mixer or whisk
- Spatula
- Loaf pan or round cake mold
- Oven
Ingredients
- 3 large eggs at room temperature
- 1 cup sugar
- ½ cup vegetable oil
- 1 cup warm milk
- 2 cups all-purpose flour
- 1 teaspoon baking powder
- 1 teaspoon vanilla essence
- 3 tablespoons unsweetened cocoa powder
Instructions
- Beat the eggs and sugar together until sparkling and creamy.
- Gently pour in the vegetable oil and warm milk, mixing well.
- Sift the flour, baking powder, and vanilla essence in another bowl.
- Slowly add the dry ingredients to the wet mixture, beating until silky.
- Split the batter into two equal parts; stir cocoa powder into one part.
- Pour alternating tablespoons of white and chocolate batter into a greased mold and create swirls with a knife.
- Bake at 180°C (350°F) for 40–45 minutes or until a toothpick comes out clean.
Notes
To store, wrap tightly in plastic wrap or place in an airtight container; refrigerate if in a humid area.
For longer storage, freeze individual wrapped slices for up to three months, thawing at room temperature before serving.
Dusting with powdered sugar, adding chocolate ganache, or serving with fresh berries enhances presentation.
Don't forget to bring your eggs to room temperature and grease the mold thoroughly for easy release!
Nutrition

Hi, I’m Olivia Parker, the founder of BakingSecret.com and a lifelong lover of all things sweet and homemade. I grew up in a small town in Oregon, where the smell of fresh cookies in my family’s kitchen sparked my passion for baking. Over the years, I turned that passion into a mission: to help home bakers feel confident, inspired, and creative.
After studying food science and working in several artisan bakeries across the U.S., I decided to create a space where everyone from beginners to seasoned bakers can find reliable recipes, expert tips, and a warm, welcoming community. BakingSecret.com is my way of sharing the magic of baking with the world. When I’m not testing new recipes, you’ll find me exploring farmers’ markets, collecting vintage cookbooks, or perfecting my sourdough technique.