
Why This Million Dollar Delight is a Must-Try
There’s nothing quite like the magic of a dessert that feels like pure luxury but doesn’t require hours in the kitchen. One bite of this Million Dollar Delight, and you’ll understand why it’s called that. Creamy, tropical, and with a crunchy base that honors its name, this dessert is a showstopper at any gathering. I first made it for a family reunion, and let me tell you, it disappeared faster than I could grab a slice for myself! It’s become my go-to recipe for potlucks, birthdays, or even just because.
The Sweet History Behind Million Dollar Delight
This dessert hails from the era of retro recipes, when home cooks loved combining simple pantry staples into something extraordinary. Some say it originated in the Midwest, where sweet and creamy desserts reign supreme. Back then, it was all about using canned goods and easy-to-find ingredients to create something special. Today, we’ve kept the classic charm but added little twists, like fresh fruit toppings or extra whipped cream. I love how this dish bridges generations—it reminds me of my grandma’s kitchen but feels totally modern when served at a summer barbecue.
Why You’ll Love This Recipe
What’s not to love? The Million Dollar Delight is creamy, fruity, and crunchy all at once. It’s also super forgiving—no need to be a baking wizard to nail this one. Plus, it’s make-ahead friendly, so you can prep it the night before and let it chill in the fridge. Whether you’re feeding a crowd or treating yourself, this dessert brings joy without the fuss. Trust me, your friends will think you spent hours on it, but your secret is safe with me!
Perfect Occasions to Whip Up This Dessert
This Million Dollar Delight shines at summer parties, holiday feasts, or casual get-togethers. It’s perfect for backyard barbecues, bridal showers, or even as a surprise treat for your book club. I’ve also made it for Thanksgiving, and it pairs beautifully with pumpkin pie. Honestly, though, you don’t need a special occasion—sometimes, a random Tuesday calls for a slice of this tropical goodness.
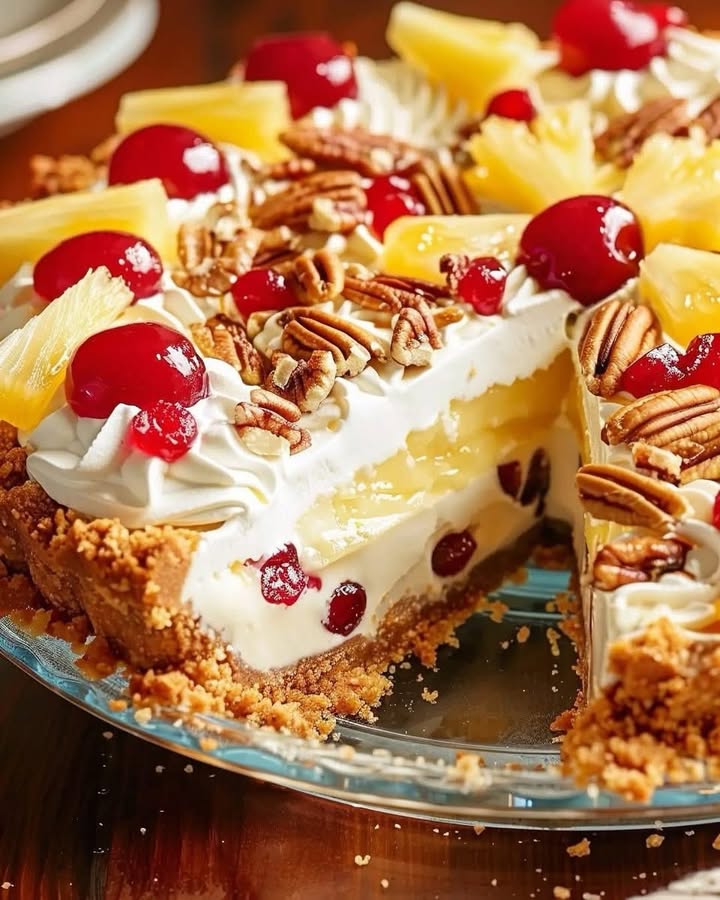
Ingredients
Here’s what you’ll need to create this masterpiece:
Base:
- 1 cup graham cracker crumbs
- ¼ cup granulated sugar
- ½ cup unsalted butter, melted
Filling:
- 1 can (14 oz) sweetened condensed milk
- 1 can (20 oz) crushed pineapple, well drained
- ½ cup minced maraschino cherries (reserve some whole for decoration)
- ½ cup chopped nuts (reserve some halves for decoration)
- ¼ cup lemon juice
- 1 container (8 oz) thawed whipped topping
Decoration:
- Whole maraschino cherries
- Pineapple pieces
- Walnut halves
- Extra whipped topping for edges
Substitution Options
If you want to switch things up, here are some ideas:
- Graham crackers: Substitute with crushed digestive biscuits or vanilla wafers.
- Maraschino cherries: Use fresh cherries if you prefer a less sweet option.
- Nuts: Swap walnuts for pecans, almonds, or even macadamia nuts for a tropical twist.
- Whipped topping: Make your own whipped cream with heavy cream and sugar for a fresher taste.
Preparation
Step 1: Create the Crunchy Base
Start by mixing the graham cracker crumbs, sugar, and melted butter in a bowl. The mixture should resemble wet sand—perfect for pressing into a 9-inch pan. Use your fingers or the back of a spoon to press it firmly into the bottom. For an extra-firm base, bake it at 350°F for 8-10 minutes. If you’re short on time, you can skip the baking and just refrigerate it instead. Pro tip: Line your pan with parchment paper for easy removal later.
Step 2: Mix the Tropical Filling
In a large bowl, combine the sweetened condensed milk, drained crushed pineapple, minced cherries, chopped nuts, and lemon juice. Stir gently to avoid breaking up the pineapple too much. The lemon juice adds a zesty kick that balances the sweetness perfectly. Imagine the vibrant colors coming together—golden pineapple, bright red cherries, and rich brown nuts. It’s almost too pretty to eat… almost.
Step 3: Fold in the Whipped Topping
Now comes the fun part—adding the whipped topping. Gently fold it into the pineapple mixture until everything is light and fluffy. Be careful not to overmix; you want to keep that airy texture. Think of it as giving the filling a gentle hug rather than a tight squeeze. Once it’s combined, pour it over the chilled crust and smooth it out with a spatula. Doesn’t it look dreamy already?
Step 4: Chill and Set
Cover the pan with plastic wrap and pop it in the fridge for at least 4 hours, or better yet, overnight. This step is crucial—it allows the flavors to meld and the filling to firm up. Patience is key here, but trust me, it’s worth the wait. While it chills, you can prep your decorations or simply daydream about how amazing it’s going to taste.
Step 5: Decorate Like a Pro
Once the dessert is set, it’s time to make it Instagram-worthy. Arrange whole cherries, pineapple pieces, and walnut halves on top. Add rosettes of extra whipped topping around the edges for a fancy touch. Don’t stress too much about perfection—this dessert is meant to look inviting and fun. Chef’s tip: Use a piping bag or a zip-top bag with the corner snipped off to make neat whipped cream swirls.
Timing
Let’s break it down:
- Prep time: 20 minutes
- Cooking time (optional): 10 minutes
- Chilling time: 4 hours (or overnight)
- Total time: About 5 hours
Chef’s Secret
For an extra burst of flavor, toast the nuts before adding them to the filling. Just toss them in a dry skillet over medium heat for a few minutes until they’re fragrant and golden. This small step adds depth and richness to the dessert without much effort.
Extra Info
Did you know that sweetened condensed milk was invented in the 1850s as a way to preserve milk without refrigeration? It’s been a pantry staple ever since and is the star ingredient in many beloved desserts, including this one. Fun fact: It’s also a key player in dulce de leche, which is basically caramelized condensed milk. Yum!
Necessary Equipment
You don’t need anything fancy to make this dessert. Here’s what you’ll need:
- 9-inch square or round pan
- Mixing bowls
- Spatula
- Measuring cups and spoons
- Parchment paper (optional but helpful)
Storage
Storing this dessert is a breeze. Keep it covered in the fridge for up to 3 days. The flavors actually deepen over time, so it’s even tastier on day two. If you live in a warm climate, make sure to keep it chilled until serving to prevent the whipped topping from melting.
For longer storage, you can freeze individual slices. Wrap each piece tightly in plastic wrap and place them in a freezer-safe container. They’ll last up to a month. Just thaw in the fridge overnight before enjoying.
If you’re transporting it to a party, keep it in the original pan and cover it securely. A cooler with ice packs is a great idea to ensure it stays cold during transit.
Tips and Advice
Here are a few tips to take your Million Dollar Delight to the next level:
- Drain the pineapple thoroughly to avoid a soggy filling.
- Use room-temperature ingredients for easier mixing.
- Don’t skip the chilling step—it’s what makes the layers hold together.
- Experiment with different nuts or fruits to match your taste preferences.
Presentation Tips
Make your dessert stand out with these creative ideas:
- Serve slices on colorful plates with a sprig of mint for contrast.
- Add edible flowers for a touch of elegance.
- Dust the edges with powdered sugar for a bakery-worthy finish.
- Use a hot knife to cut clean slices—just dip it in hot water and wipe it dry between cuts.
Healthier Alternative Recipes
Love the idea but want to lighten it up? Try these variations:
- Low-Sugar Version: Use sugar-free sweetened condensed milk and a reduced-sugar whipped topping.
- Vegan Delight: Swap the butter for coconut oil, use vegan whipped topping, and opt for dairy-free condensed milk.
- Gluten-Free Option: Use gluten-free graham crackers or cookies for the base.
- Fruit Lover’s Twist: Add diced mango or kiwi to the filling for extra tropical flair.
- Protein-Packed Version: Mix in a scoop of vanilla protein powder with the filling.
- No-Bake Cheesecake Style: Layer the filling over a no-bake cheesecake base for a decadent spin.
Common Mistakes to Avoid
Mistake 1: Skipping the Draining Step
One of the biggest mistakes is not draining the pineapple properly. Excess liquid can make the filling watery and ruin the texture. To avoid this, press the pineapple against a fine mesh strainer or use paper towels to absorb the moisture. Pro tip: Let it drain for at least 15 minutes before mixing.
Mistake 2: Overmixing the Whipped Topping
Overmixing deflated whipped topping turns your fluffy filling into a dense mess. Fold it gently, and stop as soon as everything is incorporated. Think of it as folding egg whites into batter—gentle hands are key.
Mistake 3: Rushing the Chilling Process
Skipping or rushing the chilling time is a recipe for disaster. The dessert needs time to set, so resist the urge to dig in too early. Plan ahead and let it chill overnight for the best results.
FAQ
Can I make this dessert ahead of time?
Absolutely! In fact, it’s best made a day in advance. The flavors have time to meld, and the filling firms up beautifully in the fridge.
Is this dessert suitable for vegans?
With a few tweaks, yes! Use coconut oil instead of butter, dairy-free whipped topping, and vegan sweetened condensed milk. It’s a crowd-pleaser for everyone.
Can I freeze Million Dollar Delight?
Yes, you can freeze individual slices. Wrap them tightly and store them in a freezer-safe container for up to a month. Thaw in the fridge before serving.
What can I substitute for maraschino cherries?
Fresh cherries, dried cranberries, or even pomegranate seeds work well. They add color and a hint of tartness.
How do I prevent the base from being too crumbly?
Make sure to press the crust firmly into the pan. Baking it for 8-10 minutes also helps it hold together better.
Can I use fresh pineapple instead of canned?
Yes, but make sure to chop it finely and drain it thoroughly. Fresh pineapple has more juice, so you’ll need to account for that.
What size pan should I use?
A 9-inch square or round pan works perfectly. If you don’t have one, an 8×8-inch pan will do, but the layers will be slightly thicker.
How long does it last in the fridge?
It stays fresh for up to 3 days when stored covered in the refrigerator. After that, the whipped topping may start to lose its fluffiness.
Can I add alcohol to this dessert?
For an adult version, try adding a splash of rum or coconut liqueur to the filling. It pairs wonderfully with the tropical flavors.
What other fruits can I use?
Mango, kiwi, or mandarin oranges are great options. Just make sure to drain them well to avoid excess moisture.
Final Thoughts
There’s something magical about the Million Dollar Delight. It’s creamy, crunchy, and bursting with tropical flavors, making it a hit at any gathering—or even just a quiet night at home. With its simple preparation and endless customization options, it’s a dessert that keeps on giving. So grab your ingredients, put on some music, and treat yourself to a slice of paradise. Your taste buds will thank you!
Equipment
- Mixing Bowl
- Spatula
- 9-inch Pan
- Measuring Cups and Spoons
- Parchment Paper (optional)
Ingredients
- 1 cup graham cracker crumbs
- ¼ cup granulated sugar
- ½ cup unsalted butter, melted
- 1 can (14 oz) sweetened condensed milk
- 1 can (20 oz) crushed pineapple, well drained
- ½ cup minced maraschino cherries reserve some whole for decoration
- ½ cup chopped nuts reserve some halves for decoration
- ¼ cup lemon juice
- 1 container (8 oz) thawed whipped topping
Instructions
- Mix graham cracker crumbs, sugar, and melted butter in a bowl, then press into a 9-inch pan.
- (Optional) Bake at 350°F for 8-10 minutes for an extra-firm base; otherwise, just refrigerate.
- In a large bowl, combine sweetened condensed milk, drained crushed pineapple, minced cherries, chopped nuts, and lemon juice; stir gently.
- Fold in the whipped topping until light and fluffy, then pour onto the chilled crust.
- Cover and chill for at least 4 hours or overnight to set.
- Decorate with whole cherries, pineapple pieces, walnut halves, and extra whipped topping on the edges.
Notes
Nutrition

Hi, I’m Olivia Parker, the founder of BakingSecret.com and a lifelong lover of all things sweet and homemade. I grew up in a small town in Oregon, where the smell of fresh cookies in my family’s kitchen sparked my passion for baking. Over the years, I turned that passion into a mission: to help home bakers feel confident, inspired, and creative.
After studying food science and working in several artisan bakeries across the U.S., I decided to create a space where everyone from beginners to seasoned bakers can find reliable recipes, expert tips, and a warm, welcoming community. BakingSecret.com is my way of sharing the magic of baking with the world. When I’m not testing new recipes, you’ll find me exploring farmers’ markets, collecting vintage cookbooks, or perfecting my sourdough technique.