
Why Strawberry Tiramisu Cups Are a Dessert Game-Changer
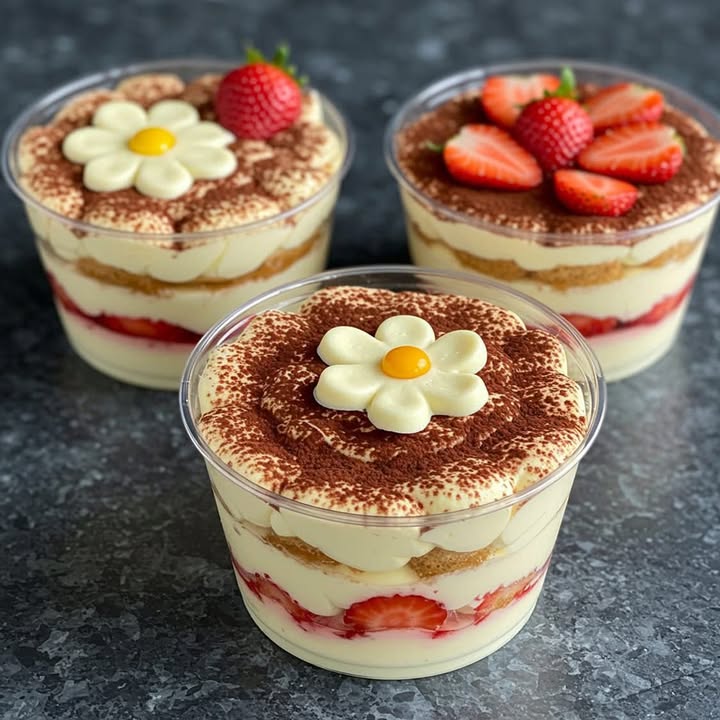
Picture this: you’re at a summer picnic, and someone hands you a little glass filled with layers of creamy goodness, fresh strawberries, and just the right hint of sweetness. You take a bite, and it’s like a party in your mouth. That’s exactly what happened to me when I first tried Strawberry Tiramisu Cups. Ever since, I’ve been hooked. These cups are not only delicious but also easy to make, portable, and oh-so-pretty. Whether you’re whipping them up for a family gathering or selling them at a local market, they’re sure to impress.
A Sweet Twist on Tradition
Tiramisu is an Italian classic, known for its coffee-soaked layers and mascarpone cream. But let’s be honest—sometimes we want something lighter and fruitier. Enter Strawberry Tiramisu Cups, a modern twist on the original. I first made these for a friend’s birthday party because she loves strawberries but isn’t a fan of coffee. The result? A dessert that disappeared faster than I could snap a photo. It’s now my go-to recipe for spring and summer events.
Why You’ll Fall Head Over Heels for This Recipe
What makes Strawberry Tiramisu Cups so irresistible? First, the flavors are a dreamy mix of fresh, sweet, and creamy. Second, they’re super simple to assemble—even if you’re not a pro in the kitchen. Plus, they’re served in individual portions, which means no messy slicing or uneven servings. And did I mention how cute they look? Trust me, once you try these, you’ll want to make them again and again.
Perfect Occasions for Strawberry Tiramisu Cups
These cups are perfect for almost any occasion. Bring them to a potluck, serve them at a bridal shower, or wow your friends at a dinner party. They’re also a hit at bake sales or farmers’ markets because they’re easy to package and sell. I once made them for a neighborhood block party, and people were asking for seconds—and even the recipe!
Ingredients You’ll Need
- 250 g of fresh strawberries
- 200 g of sponge cakes
- 250 g of mascarpone cheese
- 1 cup of milk cream
- 1/2 cup of sugar
- 1/2 cup of strawberry puree
- 1/4 cup of strawberry liquor (optional)
Substitution Options
If you’re missing an ingredient or want to switch things up, here are some ideas:
- Sponge cakes: Use ladyfingers or even store-bought pound cake.
- Mascarpone cheese: Substitute with cream cheese for a tangier flavor.
- Milk cream: Heavy whipping cream works just as well.
- Strawberry liquor: Skip it or replace it with vanilla extract for a non-alcoholic version.
Step 1: Whip Up the Creamy Base
To start, grab a mixing bowl and beat the mascarpone cheese with the milk cream and sugar until it’s smooth and creamy. This step is where the magic begins! The mascarpone adds richness, while the cream lightens it up. Pro tip: Make sure your ingredients are cold—it helps the mixture whip up beautifully. As you beat, you’ll notice the texture transform into a cloud-like consistency that’s just begging to be layered.
Step 2: Prepare the Strawberry Mixture
Next, mix the strawberry puree with the optional strawberry liquor. If you’re skipping the liquor, don’t worry—the puree alone will still pack a punch of fruity flavor. This step fills your kitchen with the sweet aroma of fresh strawberries. I love using ripe, juicy berries for the puree because they make the dish pop with color and taste. Once mixed, set it aside—you’ll use it to soak the sponge cakes.
Step 3: Build the First Layer
Now comes the fun part: assembling the cups! Dip each sponge cake briefly into the strawberry mixture, then place it at the bottom of your serving glass. Be careful not to soak them too long, or they’ll fall apart. This layer creates a soft, flavorful base that complements the creamy topping. Repeat this process for each cup, and soon you’ll have a neat stack of soaked cakes ready for the next step.
Step 4: Add the Creamy Layer
Spoon a generous dollop of the mascarpone mixture over the soaked sponge cakes. Spread it evenly to create a smooth, luscious layer. This is where the dessert starts to look truly decadent. The contrast between the pink puree and the white cream is visually stunning. If you’re feeling fancy, you can even pipe the cream for a more polished look.
Step 5: Finish with Fresh Strawberries
Finally, top each cup with fresh strawberries for a burst of color and freshness. Slice the berries thinly or leave them whole for a rustic touch. Let the cups chill in the fridge for at least 4 hours to allow the flavors to meld together. When you serve them, your guests will marvel at how beautiful and delicious they are. Voila—your masterpiece is complete!
Chef’s Tip: Make Them Ahead
Here’s a secret: Strawberry Tiramisu Cups taste even better the next day. Prepare them a day in advance, cover them tightly, and refrigerate overnight. This allows the flavors to deepen and the textures to meld perfectly. Just add the fresh strawberry garnish right before serving to keep it looking fresh and vibrant.
Timing Breakdown
- Prep time: 20 minutes
- Cooking time: None (no baking required!)
- Resting time: 4 hours (or overnight)
- Total time: About 4 hours and 20 minutes
Chef’s Secret: Choose the Right Glass
The key to perfect presentation is using clear glasses. Mason jars, shot glasses, or small dessert cups work wonderfully. Not only do they showcase the layers, but they also make the dessert feel extra special. For an added touch, tie a ribbon around the rim or attach a custom label—it’s perfect if you’re selling them or gifting them.
Extra Info: The Power of Strawberries
Did you know strawberries are packed with vitamin C and antioxidants? They’re not just tasty—they’re good for you too! Plus, their natural sweetness means you can often cut back on added sugar. I love using seasonal strawberries because they’re sweeter and juicier, making this dessert even more delightful.
Necessary Equipment
- Mixing bowls
- Electric mixer or whisk
- Small serving glasses or jars
- Knife and cutting board for slicing strawberries
- Spoon or piping bag for layering
Storage Tips
If you have leftovers (unlikely, but possible!), store them in the fridge. Cover each cup with plastic wrap or a lid to prevent the cream from absorbing odors. These cups stay fresh for up to 2 days, though the sponge cakes may soften over time. For best results, keep them chilled until ready to serve.
Never freeze Strawberry Tiramisu Cups, as the texture of the cream and berries won’t hold up. Instead, enjoy them fresh and make smaller batches if needed. If you’re transporting them, use a cooler to keep them cold and prevent melting.
For gifting or selling, consider packaging them in individual boxes or containers. Add a label with the name of the dessert and serving instructions. This personal touch makes them feel extra special.
Tips and Advice
- Use ripe, fragrant strawberries for the best flavor.
- Don’t over-soak the sponge cakes—just a quick dip will do.
- Chill the cups thoroughly to let the flavors develop.
- Pipe the cream for a professional finish.
Presentation Ideas
Make your Strawberry Tiramisu Cups stand out by adding edible flowers, a sprinkle of powdered sugar, or a drizzle of chocolate sauce. Serve them on a decorative tray or tiered stand for parties. For a rustic vibe, use mason jars with twine accents. The possibilities are endless!
Healthier Alternative Recipes
Here are six variations to make this dessert healthier:
- Low-Sugar Version: Use a sugar substitute or reduce the sugar by half.
- Vegan Option: Swap mascarpone for coconut cream and use plant-based sponge cakes.
- Gluten-Free: Use gluten-free sponge cakes or cookies.
- Protein-Packed: Add a scoop of vanilla protein powder to the cream mixture.
- No-Alcohol: Omit the liquor and use vanilla extract instead.
- Fruit Swap: Try raspberries or blueberries for a different flavor profile.
Mistake 1: Over-Soaking the Sponge Cakes
One common mistake is soaking the sponge cakes for too long. They can become soggy and lose their structure, ruining the texture of the dessert. To avoid this, dip them quickly into the strawberry mixture and let any excess drip off before placing them in the glass. Pro tip: Use a fork to handle the cakes—it gives you better control.
Mistake 2: Skipping the Chilling Time
Some people skip chilling the cups, thinking they’ll taste fine right away. But chilling is essential—it allows the flavors to blend and the layers to set. Always refrigerate for at least 4 hours, or overnight if possible. Trust me, the wait is worth it!
Mistake 3: Using Underripe Strawberries
Underripe strawberries lack sweetness and flavor, which can make your dessert taste bland. Always choose ripe, juicy berries for the best results. If your strawberries aren’t sweet enough, toss them with a bit of sugar and let them sit for 10 minutes before pureeing.
Mistake 4: Overbeating the Cream
Overbeating the mascarpone mixture can cause it to curdle or become grainy. Stop mixing as soon as it reaches a smooth, creamy consistency. If you’re unsure, err on the side of undermixing—it’s easier to fix than overmixing.
Frequently Asked Questions
Can I make Strawberry Tiramisu Cups ahead of time?
Absolutely! These cups are perfect for making ahead. Prepare them a day in advance, cover them, and refrigerate. Just add the fresh strawberry garnish before serving to keep them looking fresh and vibrant.
Can I use frozen strawberries?
Yes, but thaw and drain them first to remove excess liquid. Fresh strawberries are ideal for the best flavor and texture, but frozen ones work in a pinch.
What can I substitute for mascarpone cheese?
Cream cheese is a great alternative. It’s slightly tangier but still creamy and delicious. Blend it with a bit of heavy cream to mimic mascarpone’s texture.
How long do these cups last in the fridge?
They stay fresh for up to 2 days. After that, the sponge cakes may become too soft. Store them covered to prevent the cream from absorbing fridge odors.
Can I make these without alcohol?
Of course! Simply omit the strawberry liquor or replace it with vanilla extract for a non-alcoholic version. The flavor will still be amazing.
What size glasses should I use?
Small dessert cups, shot glasses, or mason jars work well. Aim for 4-6 ounce servings to keep the portions perfect and manageable.
Can I freeze these cups?
Unfortunately, freezing isn’t recommended. The cream and berries won’t hold up well, and the texture will suffer. Enjoy them fresh instead.
How can I make these vegan?
Use coconut cream instead of mascarpone and opt for plant-based sponge cakes. Agave syrup or maple syrup can replace sugar for a fully vegan treat.
Can I use other fruits?
Definitely! Raspberries, blueberries, or even mangoes would work beautifully. Adjust the puree and garnish accordingly for a new twist.
Are these cups kid-friendly?
Yes! Kids love the creamy layers and fresh fruit. Just skip the alcohol or use vanilla extract to make them suitable for all ages.
Final Thoughts
Strawberry Tiramisu Cups are a dessert that combines freshness, elegance, and ease of preparation. Whether you’re making them for a special occasion or simply to treat yourself, they’re guaranteed to bring joy. With their vibrant colors, creamy textures, and customizable options, they’re a dessert everyone will rave about. So grab your ingredients, gather your glasses, and get ready to create something truly unforgettable!
Equipment
- Mixing bowls
- Electric mixer or whisk
- Spoon or piping bag for layering
- Small serving glasses or jars
- Knife and cutting board for slicing strawberries
Ingredients
- 250 g fresh strawberries
- 200 g sponge cakes
- 250 g mascarpone cheese
- 1 cup milk cream
- 1/2 cup sugar
- 1/2 cup strawberry puree
- 1/4 cup strawberry liquor (optional) optional
Instructions
- Whip together the mascarpone cheese, milk cream, and sugar in a mixing bowl until smooth and creamy.
- Mix the strawberry puree with the optional strawberry liquor and set aside.
- Briefly dip each sponge cake into the strawberry mixture and layer them at the bottom of your serving glass.
- Spoon a generous dollop of the mascarpone mixture over the soaked sponge cakes.
- Top each cup with fresh strawberries and refrigerate for at least 4 hours before serving.
Notes
Nutrition

Hi, I’m Olivia Parker, the founder of BakingSecret.com and a lifelong lover of all things sweet and homemade. I grew up in a small town in Oregon, where the smell of fresh cookies in my family’s kitchen sparked my passion for baking. Over the years, I turned that passion into a mission: to help home bakers feel confident, inspired, and creative.
After studying food science and working in several artisan bakeries across the U.S., I decided to create a space where everyone from beginners to seasoned bakers can find reliable recipes, expert tips, and a warm, welcoming community. BakingSecret.com is my way of sharing the magic of baking with the world. When I’m not testing new recipes, you’ll find me exploring farmers’ markets, collecting vintage cookbooks, or perfecting my sourdough technique.