
Why This No-Bake Oreo Cheesecake Will Steal Your Heart
Picture this: it’s a hot summer evening, and the thought of turning on your oven feels like signing up for a sweat marathon. But you still want something sweet, creamy, and utterly indulgent. That’s when I discovered the magic of No-Bake Oreo Cheesecake. It’s rich, it’s easy, and it’s packed with the flavors we all love—chocolatey cookies and velvety creaminess. Plus, no oven means no fuss! I made this dessert for my family last weekend, and let me tell you, even my picky nephew couldn’t stop raving about it.
A Little Sweet History
Cheesecakes have been around for centuries, dating back to ancient Greece. But this modern twist—featuring Oreos—is pure American genius. The combination of crunchy cookies and smooth cream cheese filling is nothing short of magical. When I first tried making this recipe, I was skeptical. Could something so simple really taste so good? Spoiler alert: it does. And now, it’s become a staple in my dessert arsenal.
Why You’ll Love This Recipe
This No-Bake Oreo Cheesecake is a dream come true for busy bakers. It takes less than 20 minutes to assemble, and the hardest part is waiting for it to set in the fridge. The texture is divine—a buttery cookie crust topped with a luscious, creamy filling studded with chunks of Oreos. Whether you’re a seasoned baker or a kitchen newbie, this recipe is foolproof and fun to make.
Perfect Occasions for This Dessert
From birthday parties to casual get-togethers, this cheesecake fits every occasion. It’s also perfect for holidays like Thanksgiving or Christmas when you want something decadent but don’t have oven space. I’ve even served it as a surprise treat for movie nights—it pairs beautifully with a bowl of popcorn and laughter.
Ingredients for Your No-Bake Oreo Cheesecake
- 1 pack of Oreo cookies (approx. 30 units)
- 1 can of condensed milk
- 1 can of half-and-half cream (Nestlé works great)
- 1 bar of cream cheese (190 g)
- A splash of vanilla extract
- 1 packet of grenetina (7 g), previously hydrated and dissolved
- 1 bar of butter (90 g)
Substitution Options
- If you can’t find grenetina, use unflavored gelatin sheets instead.
- Swap half-and-half cream with heavy whipping cream for an extra-rich texture.
- For a dairy-free version, try vegan butter and coconut cream.
Step 1: Making the Cookie Base
Start by separating the creamy filling from 20 Oreo cookies. Crush the cookie shells into fine crumbs using a food processor or a ziplock bag and rolling pin. Melt your butter in the microwave or on the stove, then mix it with the crushed cookies until they resemble wet sand. Press this mixture firmly into the bottom of a removable mold. Pop it in the fridge while you work on the filling. Pro tip: Use the back of a spoon to press the crust evenly for a professional touch.
Step 2: Preparing the Creamy Filling
In a blender, combine the cream cheese, condensed milk, half-and-half cream, vanilla extract, and the reserved Oreo filling. Blend until smooth and silky. Dissolve your grenetina according to package instructions and add it to the mix. For added crunch, toss in 5 whole Oreos and pulse briefly to break them into small chunks. The contrast between the creamy filling and the cookie bits is what makes this cheesecake unforgettable.
Step 3: Assembling the Cheesecake
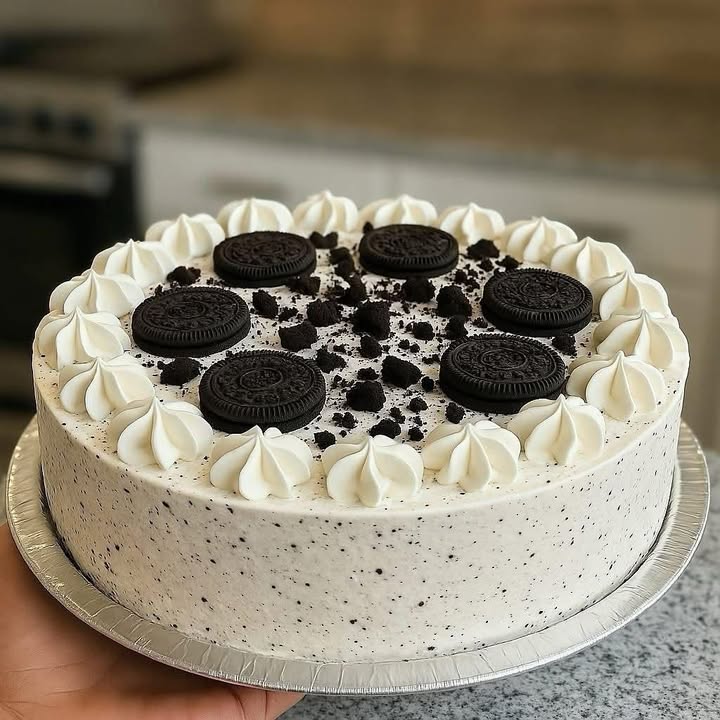
Pour the creamy mixture over the chilled cookie base. Gently tap the mold on the counter to remove air bubbles. Crush the remaining 5 Oreos and sprinkle them generously on top for a decorative finish. This step not only looks pretty but also adds an extra layer of crunch. Chef’s tip: Chill the cheesecake uncovered for the first hour to prevent condensation, which can ruin the texture.
Step 4: Refrigeration
Patience is key here. Place the cheesecake in the fridge for at least 6 hours, though overnight is ideal. Trust me, the wait is worth it. As it sets, the flavors meld together, creating a symphony of chocolate and cream that will leave your taste buds dancing.
Timing Breakdown
- Prep Time: 20 minutes
- Cooking Time: None (no-bake!)
- Resting Time: 6–8 hours
- Total Time: About 8 hours
Chef’s Secret
To make your cheesecake extra smooth, let the cream cheese sit at room temperature for 30 minutes before blending. This ensures there are no lumps in your filling.
Extra Info
Did you know Oreos were first introduced in 1912? They’ve been delighting cookie lovers ever since. Fun fact: the original name was “Oreo Biscuit,” but it was later changed to just “Oreo.”
Necessary Equipment
- Removable mold (springform pan)
- Blender or food processor
- Mixing bowls
- Spatula
- Ziplock bag and rolling pin (optional for crushing cookies)
Storage Tips
Once your No-Bake Oreo Cheesecake is ready, store it in the fridge covered with plastic wrap or in an airtight container. This keeps it fresh for up to 5 days. If you’re planning ahead, you can freeze slices wrapped individually in parchment paper for up to a month. Just thaw them in the fridge overnight before serving.
When storing leftovers, make sure the cheesecake isn’t exposed to strong-smelling foods in the fridge. Its creamy texture can absorb odors easily.
Always serve cold for the best experience. The chill enhances the richness of the flavors and gives the cheesecake its signature firm texture.
Tips and Advice
- Use high-quality ingredients for the best results.
- Don’t skip hydrating the grenetina properly—it’s crucial for setting the cheesecake.
- For a more intense chocolate flavor, dip the whole Oreos in melted dark chocolate before adding them to the filling.
Presentation Tips
- Garnish with fresh berries or a drizzle of chocolate sauce.
- Serve on a cake stand for a show-stopping effect.
- Add a dusting of cocoa powder or powdered sugar for elegance.
Healthier Alternative Recipes
Here are six variations to suit different dietary needs:
- Vegan Version: Replace cream cheese with cashew cream and use coconut oil instead of butter.
- Low-Sugar Option: Swap condensed milk with a sugar-free alternative.
- Gluten-Free Twist: Use gluten-free Oreos and ensure your grenetina is certified gluten-free.
- Protein-Packed: Add a scoop of protein powder to the filling.
- Keto-Friendly: Use almond flour mixed with melted butter for the crust and replace condensed milk with keto-approved sweeteners.
- Fruit-Infused: Mix in chopped strawberries or raspberries for a fruity twist.
Mistake 1: Not Crushing the Cookies Enough
If your cookie base ends up too chunky, it won’t hold together well. Aim for fine crumbs that stick together easily when pressed. Practical tip: Use a food processor for consistent results.
Mistake 2: Skipping the Grenetina Hydration
Grenetina needs time to bloom in liquid before dissolving. Rushing this step can lead to clumps in your filling. Always follow the package instructions carefully.
Mistake 3: Overmixing the Filling
Blending the filling for too long can incorporate too much air, making the cheesecake airy rather than dense and creamy. Pulse gently until just combined.
FAQs
Absolutely! While Oreos give this cheesecake its iconic flavor, you can experiment with chocolate wafers or digestive biscuits for a different twist.
How do I know if my cheesecake has set properly?
Your cheesecake should feel firm to the touch and hold its shape when sliced. If it’s still soft or runny, return it to the fridge for a few more hours.
Can I freeze this cheesecake?
Yes! Wrap individual slices in plastic wrap and freeze for up to a month. Thaw in the fridge before enjoying.
What size mold should I use?
A standard 8-inch springform pan works perfectly. Avoid larger molds, as the cheesecake may not set properly.
Do I need to grease the mold?
No greasing is needed since the cookie base acts as a natural barrier. Just line the bottom with parchment paper for easy removal.
Can I make this recipe ahead of time?
Definitely! This cheesecake tastes even better the next day, making it perfect for meal prep.
Is grenetina the same as gelatin?
Yes, grenetina is simply the Spanish term for unflavored gelatin. You can use either interchangeably.
Why does my cheesecake have cracks?
Cracks often occur due to uneven cooling. To prevent this, chill the cheesecake uncovered for the first hour, then cover it tightly.
Can I add alcohol to the filling?
Yes! A splash of Baileys or Kahlúa pairs beautifully with the chocolate flavor.
What if I don’t have a blender?
You can whisk the filling by hand, though it may take longer to achieve a smooth consistency.
Final Thoughts
This No-Bake Oreo Cheesecake is proof that amazing desserts don’t have to be complicated. With minimal effort and maximum flavor, it’s a dessert that brings joy to any table. So go ahead, whip up a batch, and watch as everyone asks for seconds—and maybe even the recipe!
Equipment
- Mixing Bowl
- Blender or Food Processor
- Spatula
- Removable Mold (Springform Pan)
- Rolling Pin or Ziplock Bag (optional for crushing cookies)
Ingredients
- 1 pack Oreo cookies (approx. 30 units)
- 1 can condensed milk
- 1 can half-and-half cream Nestlé works great
- 190 g cream cheese
- a splash vanilla extract
- 1 packet grenetina (7 g), previously hydrated and dissolved
- 90 g butter
Instructions
- Separate the creamy filling from 20 Oreo cookies and crush the cookie shells into fine crumbs.
- Melt the butter and mix it with the crushed Oreos until it resembles wet sand. Press into the bottom of a removable mold and refrigerate.
- Blend the cream cheese, condensed milk, half-and-half cream, vanilla extract, and reserved Oreo filling until smooth. Add dissolved grenetina and pulse in 5 whole Oreos for crunch.
- Pour the filling over the chilled cookie base, tap to remove air bubbles, and sprinkle crushed Oreos on top.
- Chill uncovered for the first hour then cover and refrigerate for at least 6 hours or overnight.
Nutrition

Hi, I’m Olivia Parker, the founder of BakingSecret.com and a lifelong lover of all things sweet and homemade. I grew up in a small town in Oregon, where the smell of fresh cookies in my family’s kitchen sparked my passion for baking. Over the years, I turned that passion into a mission: to help home bakers feel confident, inspired, and creative.
After studying food science and working in several artisan bakeries across the U.S., I decided to create a space where everyone from beginners to seasoned bakers can find reliable recipes, expert tips, and a warm, welcoming community. BakingSecret.com is my way of sharing the magic of baking with the world. When I’m not testing new recipes, you’ll find me exploring farmers’ markets, collecting vintage cookbooks, or perfecting my sourdough technique.