
Why This Black Forest Cheesecake Delight Will Steal Your Heart
Let me tell you a little story. Last Christmas, I decided to shake things up and surprise my family with a dessert that wasn’t the usual pumpkin pie or gingerbread cookies. Enter this Black Forest Cheesecake Delight. Oh, the moment I placed it on the table, the room went silent—followed by a chorus of “Wow!” The creamy cheesecake, rich chocolate drizzle, and sweet cherry topping were a hit. It’s decadent, it’s festive, and trust me, it’s unforgettable. If you’re looking for a show-stopping dessert, this is it.
A Taste of Tradition Meets Modern Magic
The Black Forest cake has deep roots in German baking culture, named after the lush Black Forest region known for its cherries and chocolate. Traditionally, it’s a towering cake with layers of chocolate sponge, whipped cream, and cherries. But let’s be honest: sometimes we want all that flavor without all the fuss. That’s where this Black Forest Cheesecake Delight comes in. It takes the classic flavors and transforms them into a no-fuss cheesecake that’s creamy, dreamy, and downright irresistible. When I first made it, I knew I had struck gold.
Why You’ll Fall Head Over Heels for This Recipe
What makes this recipe so special? First, it’s all about balance. The tangy cheesecake filling pairs perfectly with the sweetness of the cherries and the richness of the chocolate. Plus, it’s surprisingly simple to make. No need to layer cakes or frost anything—just press, pour, bake, and chill. Whether you’re a seasoned baker or a newbie, this recipe will make you feel like a pro. And the best part? Everyone who tries it will think you spent hours slaving away in the kitchen.
Perfect Occasions for This Cheesecake Symphony
This Black Forest Cheesecake Delight is perfect for any celebration. Imagine serving it at a holiday dinner, birthday party, or even a casual weekend get-together. It’s also a great option for Valentine’s Day—a dessert as romantic as it is delicious. Honestly, though, you don’t need a special occasion to whip this up. Sometimes, life just calls for a slice of something sweet and satisfying.
Ingredients
Here’s what you’ll need to create this masterpiece:
- For the crust:
- 2 cups chocolate cookie crumbs
- 1/4 cup unsalted butter, melted
- For the cheesecake filling:
- 3 (8-ounce) packages cream cheese, softened
- 1 cup granulated sugar
- 3 large eggs
- 1/4 cup cocoa powder
- 1/2 cup sour cream
- 1 teaspoon vanilla extract
- For the cherry topping:
- 1/2 cup cherry pie filling
- 1/2 cup fresh cherries (optional, for garnish)
- For the chocolate drizzle:
- 1/2 cup sweet chocolate pieces
- 2 tablespoons heavy cream
Substitution Options
Not everyone has the same ingredients on hand, and that’s okay! Here are some easy swaps:
- Use graham cracker crumbs instead of chocolate cookies for the crust.
- If you can’t find fresh cherries, frozen ones work just fine—just thaw them first.
- Swap out the sour cream for plain Greek yogurt for a tangier twist.
- Dark chocolate can replace sweet chocolate if you prefer a bolder flavor.
Preparation Section
Step 1: Prepare the Crust
Start by preheating your oven to 325°F (163°C). Grab a mixing bowl and combine your chocolate cookie crumbs with the melted butter until the mixture resembles wet sand. Press this into the bottom of a 9-inch springform pan, making sure it’s evenly spread. Pop it into the oven for 10 minutes to set, then let it cool while you prepare the filling. Pro tip: Use the bottom of a glass to press the crust firmly—it’ll hold together better.
Step 2: Make the Cheesecake Filling
In a large mixing bowl, beat the softened cream cheese and sugar until smooth and creamy. Add the eggs one at a time, mixing well after each addition. Stir in the cocoa powder, sour cream, and vanilla extract until everything is beautifully blended. The batter should be velvety and rich. Pour this luscious mixture over the cooled crust, smoothing the top with a spatula. Chef’s tip: Don’t overmix once the eggs are added—it can cause cracks in the cheesecake.
Step 3: Bake the Cheesecake
Place the pan in the preheated oven and bake for 50-60 minutes. The edges should be set, but the center will still have a slight jiggle—this is exactly what you want. Turn off the oven and leave the cheesecake inside with the door slightly ajar for an hour. This gradual cooling helps prevent cracks. Once the hour is up, transfer the cheesecake to the fridge to chill for at least 4 hours or overnight. Patience is key here!
Step 4: Add the Toppings
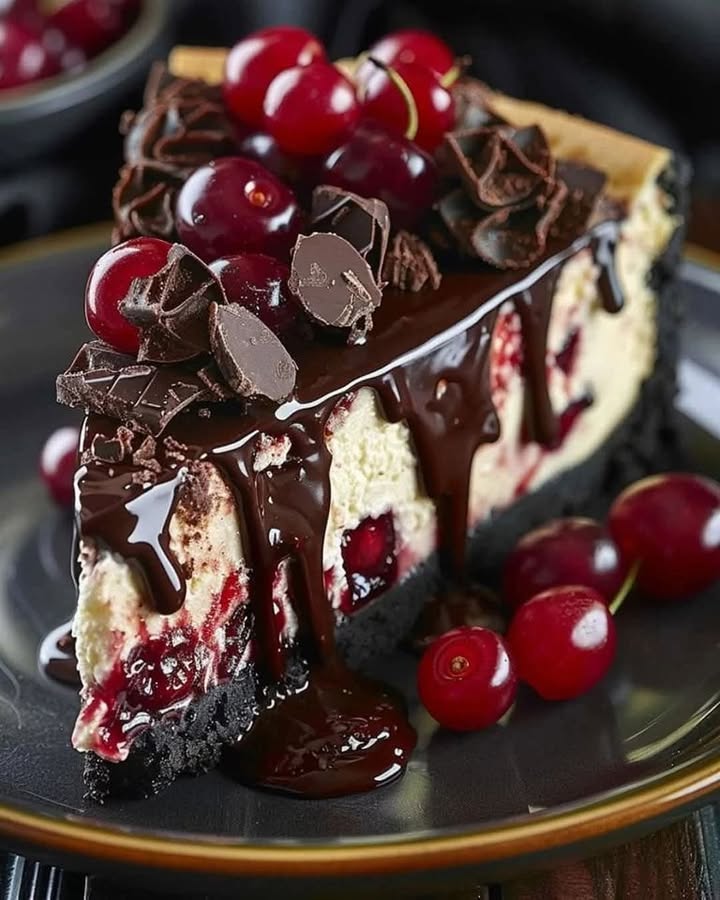
Now for the fun part—the toppings! Spread the cherry pie filling evenly over the chilled cheesecake. For the chocolate drizzle, melt the chocolate pieces with the heavy cream in a microwave-safe bowl, stirring until smooth. Drizzle this heavenly mixture over the cherries. If you’re feeling fancy, garnish with fresh cherries for a pop of color. Slice and serve with pride!
Timing
Here’s a quick breakdown of the timing:
- Prep Time: 20 minutes
- Cooking Time: 60 minutes
- Resting Time: 5 hours (including chilling)
- Total Time: About 6 hours
Chef’s Secret
To ensure your Black Forest Cheesecake Delight has a smooth, crack-free surface, run a knife around the edges of the pan as soon as it comes out of the oven. This prevents the cheesecake from sticking and cracking as it cools.
Extra Info
Did you know that the Black Forest region in Germany is famous for its cherry brandy, known as Kirschwasser? While we’re not using alcohol in this recipe, it’s a nod to the original inspiration. Fun fact: the cake was created in the early 20th century and has been a beloved classic ever since.
Necessary Equipment
You’ll need a few basic tools to bring this recipe to life:
- 9-inch springform pan
- Mixing bowls
- Electric mixer or stand mixer
- Spatula
- Measuring cups and spoons
- Microwave-safe bowl (for melting chocolate)
Storage
Once your cheesecake is ready, store it in the fridge to keep it fresh. Cover it tightly with plastic wrap or transfer it to an airtight container. It’ll stay good for up to 5 days. If you want to freeze it, wrap individual slices in plastic wrap and then aluminum foil. They’ll last for up to 2 months in the freezer. To thaw, simply place a slice in the fridge overnight.
When serving leftovers, let the cheesecake sit at room temperature for about 10 minutes to soften slightly. This brings back the creamy texture and enhances the flavors. Trust me, it’s worth the wait.
Tips and Advice
Here are a few tips to take your Black Forest Cheesecake Delight to the next level:
- Use room-temperature cream cheese for a smoother batter.
- Don’t skip the chilling step—it’s crucial for setting the cheesecake.
- Experiment with different fruit fillings, like raspberries or strawberries, for variety.
- For an extra-rich chocolate drizzle, use dark chocolate with a high cocoa content.
Presentation Tips
Presentation matters, especially for a dessert this stunning. Serve your cheesecake on a decorative plate or cake stand. Garnish with fresh mint leaves for a touch of elegance. Dust a little powdered sugar over the top for a whimsical finish. And don’t forget those fresh cherries—they’re the cherry on top, literally!
Healthier Alternative Recipes
If you’re looking to lighten things up, try these variations:
- Low-Sugar Option: Swap granulated sugar for a sugar substitute like stevia or monk fruit.
- Gluten-Free Crust: Use gluten-free chocolate cookies or almond flour for the crust.
- Vegan Version: Replace cream cheese with vegan cream cheese and eggs with flax eggs.
- Dairy-Free Delight: Use coconut cream instead of sour cream and dairy-free chocolate.
- Protein-Packed: Add a scoop of protein powder to the cheesecake batter.
- Fruit-Filled: Substitute the cherry topping with mixed berries for a refreshing twist.
Common Mistakes to Avoid
Mistake 1: Overmixing the Batter
Overmixing can incorporate too much air, leading to cracks in your cheesecake. Mix just until the ingredients are combined. Pro tip: Scrape down the sides of the bowl often to ensure even blending.
Mistake 2: Skipping the Water Bath
While this recipe doesn’t require a water bath, many cheesecakes do. If you notice cracks forming, consider using one next time. Simply place the springform pan in a larger pan filled with hot water before baking.
Mistake 3: Rushing the Chilling Process
Patience pays off! Skipping the chilling step can result in a soft, unstable cheesecake. Let it chill for at least 4 hours—or overnight—for the best texture.
Mistake 4: Using Cold Ingredients
Cold cream cheese won’t blend smoothly, leaving lumps in your batter. Always use room-temperature ingredients for a silky-smooth filling.
FAQ
Can I make this cheesecake ahead of time?
Absolutely! This Black Forest Cheesecake Delight tastes even better the next day. Make it a day in advance and store it in the fridge until you’re ready to serve.
How do I prevent cracks in my cheesecake?
Cracks happen when the cheesecake cools too quickly. Cool it gradually in the oven with the door slightly open, then chill it in the fridge.
Can I use fresh cherries instead of pie filling?
Yes! Simmer fresh pitted cherries with a bit of sugar and cornstarch to create a homemade cherry topping.
What’s the best way to cut cheesecake?
Dip a sharp knife in hot water, wipe it dry, and then slice. Repeat between cuts for clean, smooth edges.
Can I freeze this cheesecake?
Yes, wrap individual slices in plastic wrap and foil, then freeze for up to 2 months. Thaw in the fridge before serving.
Is this recipe kid-friendly?
Absolutely! Kids love the creamy texture and sweet cherry topping. Just omit any optional alcohol-based ingredients.
Can I use a different type of chocolate?
Of course! Dark, semi-sweet, or milk chocolate all work beautifully. Choose based on your preference.
How long does it take to chill?
Chill for at least 4 hours, but overnight is ideal for the best texture.
What size pan should I use?
A 9-inch springform pan is perfect. If you don’t have one, a regular 9-inch cake pan works too—just line it with parchment paper.
Can I make this gluten-free?
Yes! Use gluten-free chocolate cookies for the crust and ensure all other ingredients are gluten-free.
Final Thoughts
This Black Forest Cheesecake Delight is more than just a dessert—it’s an experience. From the rich chocolate crust to the creamy filling and juicy cherry topping, every bite is pure bliss. Whether you’re baking for a special occasion or just because, this recipe is sure to impress. So grab your apron, gather your ingredients, and let’s get baking. Your taste buds will thank you!
Equipment
- Mixing bowls
- Electric mixer or stand mixer
- Spatula
- 9-inch springform pan
- Microwave-safe bowl
Ingredients
- 2 cups chocolate cookie crumbs
- 1/4 cup unsalted butter melted
- 3 packages (8 ounces each) cream cheese softened
- 1 cup granulated sugar
- 3 large eggs
- 1/4 cup cocoa powder
- 1/2 cup sour cream
- 1 teaspoon vanilla extract
- 1/2 cup cherry pie filling
- 1/2 cup fresh cherries optional, for garnish
- 1/2 cup sweet chocolate pieces
- 2 tablespoons heavy cream
Instructions
- Preheat your oven to 325°F (163°C).
- Combine chocolate cookie crumbs and melted butter in a mixing bowl until it resembles wet sand.
- Press the crust mixture into the bottom of a 9-inch springform pan and bake for 10 minutes; let it cool.
- In a large mixing bowl, beat cream cheese and sugar until smooth.
- Add eggs one at a time, mixing well after each addition.
- Stir in cocoa powder, sour cream, and vanilla extract until well blended.
- Pour the cheesecake filling over the cooled crust and smooth the top.
- Bake in the preheated oven for 50-60 minutes until edges are set; the center should still jiggle.
- Turn off the oven and leave the cheesecake inside with the door slightly ajar for 1 hour.
- Transfer the cheesecake to the fridge and chill for at least 4 hours or overnight.
- Spread cherry pie filling over the chilled cheesecake.
- Melt chocolate pieces with heavy cream in a microwave-safe bowl and drizzle over the cherries.
- Garnish with fresh cherries if desired and serve.
Notes
Nutrition

Hi, I’m Olivia Parker, the founder of BakingSecret.com and a lifelong lover of all things sweet and homemade. I grew up in a small town in Oregon, where the smell of fresh cookies in my family’s kitchen sparked my passion for baking. Over the years, I turned that passion into a mission: to help home bakers feel confident, inspired, and creative.
After studying food science and working in several artisan bakeries across the U.S., I decided to create a space where everyone from beginners to seasoned bakers can find reliable recipes, expert tips, and a warm, welcoming community. BakingSecret.com is my way of sharing the magic of baking with the world. When I’m not testing new recipes, you’ll find me exploring farmers’ markets, collecting vintage cookbooks, or perfecting my sourdough technique.