
Why This Cheesecake is a Must-Try
Picture this: it’s a warm summer afternoon, and you’re craving something sweet yet refreshing. That’s when I discovered the magic of Fresh Fruit Cheesecake. It’s creamy, light, and topped with vibrant fruits that scream sunshine on a plate. The first time I made it, my family couldn’t stop raving about how the buttery cookie crust paired perfectly with the soft, velvety filling. Trust me, once you try this recipe, it’ll become your go-to dessert for every occasion.
A Little History Behind Cheesecake
Cheesecake has been around for centuries, with its origins tracing back to ancient Greece. Back then, it was made with simple ingredients like cheese, honey, and wheat. Fast forward to today, and we’ve added a modern twist—fresh fruits! I love how versatile cheesecake can be. Whether it’s a classic New York-style or a no-bake version like this one, there’s always room for creativity. My favorite part? Adding seasonal fruits to make it look as good as it tastes.
Why You’ll Love This Recipe
This Fresh Fruit Cheesecake is a winner for so many reasons. First, it’s super easy to make—even if you’re not a pro in the kitchen. Second, it’s customizable. You can swap out fruits depending on what’s in season or what you have at home. Lastly, it’s a crowd-pleaser. I’ve served it at birthdays, potlucks, and even casual weekend dinners, and everyone always asks for seconds.
Perfect Occasions for Fresh Fruit Cheesecake
Whether you’re hosting a holiday dinner, celebrating a birthday, or just want to treat yourself, this cheesecake fits the bill. It’s perfect for spring brunches, summer barbecues, or cozy winter gatherings. I once made it for a friend’s baby shower, and the colorful fruit topping made it the star of the dessert table. Plus, it’s a great way to impress guests without spending hours in the kitchen.
Ingredients You’ll Need
- 500 g cream cheese
- Fresh strawberries
- 1 kiwi
- 100 g sugar
- 600 ml liquid cream
- 1 package of Marías cookies (or similar)
- A little melted butter
Substitution Options
If you’re missing an ingredient or want to switch things up, here are some ideas:
- Use digestive biscuits instead of Marías cookies.
- Swap fresh strawberries for raspberries, blueberries, or mango slices.
- Replace liquid cream with heavy whipping cream for a richer texture.
- For a gluten-free option, use gluten-free cookies for the crust.
Step 1: Perfect Base
To start, crush the cookies into fine crumbs—I find using a food processor makes this step quick and easy. Mix the crumbs with melted butter until they resemble wet sand. Press this mixture firmly into the bottom of a greased mold. Pro tip: Use the back of a spoon or a flat-bottomed glass to press it down evenly. Pop it in the fridge while you work on the filling. This base will hold everything together and add a delightful crunch.
Step 2: Creamy Filling
Now comes the fun part—the filling! Whip the liquid cream until it starts to thicken slightly. Then, add the cream cheese and sugar, mixing gently until smooth and creamy. The aroma of vanilla from the cream cheese fills the air, making your kitchen smell heavenly. Be careful not to overmix; you want the filling to stay light and airy. Pour this dreamy mixture over the chilled cookie base and smooth it out with a spatula.
Step 3: Assembly
Once the filling is poured, cover the mold and let it chill in the fridge for several hours—or better yet, overnight. Patience is key here because the longer it sets, the firmer and tastier it becomes. As it chills, the flavors meld together beautifully. Imagine slicing into it later and seeing those clean, neat edges—it’s worth the wait!
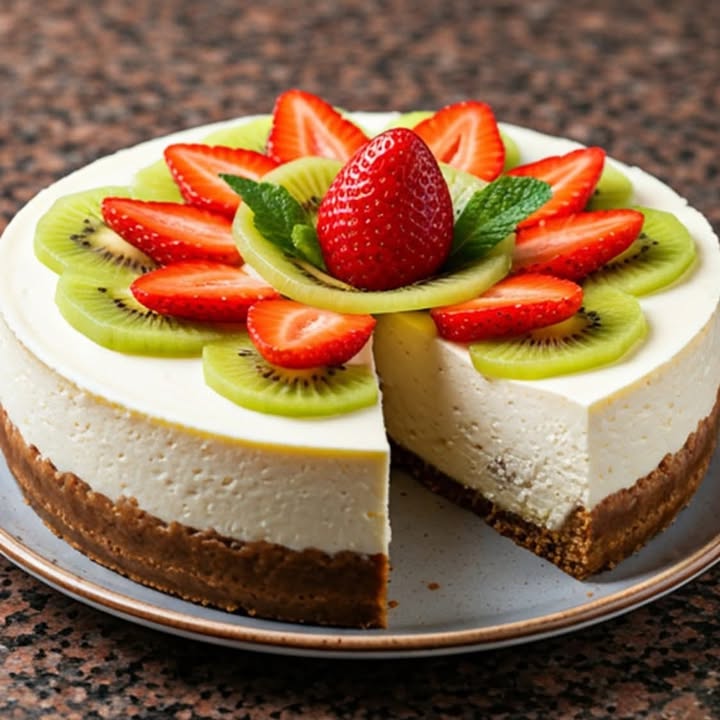
Step 4: Fresh Decoration
Before serving, take the cheesecake out of the mold and decorate it with slices of kiwi and fresh strawberries. Arrange them in a pattern or scatter them randomly—it’s up to you! The bright colors of the fruits make the dessert look inviting and Instagram-worthy. Chef’s tip: Add a drizzle of honey or a sprinkle of powdered sugar for extra flair.
Timing Breakdown
Here’s how long each part takes:
- Prep time: 20 minutes
- Chilling time: At least 4 hours (overnight recommended)
- Total time: Approximately 5 hours
Chef’s Secret
For an extra touch of elegance, brush the fruit toppings with a thin layer of apricot jam. It gives the fruits a glossy finish and enhances their natural sweetness. Your guests won’t believe how professional it looks!
An Interesting Fact About Cheesecake
Did you know that cheesecake was served to athletes during the first Olympic Games in 776 BC? They believed it provided energy and strength. While our modern version might not be considered “athletic fuel,” it sure does energize your taste buds!
Necessary Equipment
You don’t need fancy tools to make this dessert. Here’s what you’ll need:
- A mixing bowl
- An electric mixer or whisk
- A springform pan or any round mold
- A spatula
- A food processor (optional)
Storage Tips
To keep your Fresh Fruit Cheesecake fresh, store it in the refrigerator. Cover it tightly with plastic wrap or place it in an airtight container to prevent it from absorbing odors. It stays good for up to 3 days, but trust me, it rarely lasts that long!
If you live in a hot climate, avoid leaving the cheesecake at room temperature for too long. The cream filling can soften quickly, which might ruin the presentation.
For longer storage, freeze the cheesecake without the fruit toppings. Simply thaw it in the fridge overnight before decorating and serving.
Tips and Advice
Here are a few tricks to elevate your cheesecake game:
- Make sure your cream cheese is at room temperature before mixing. This ensures a smooth, lump-free filling.
- Don’t skip the chilling step. It’s crucial for setting the cheesecake properly.
- Experiment with different fruits based on the season. Peaches in summer or pomegranate seeds in winter add variety.
Presentation Ideas
Want to wow your guests? Try these presentation tips:
- Serve individual mini cheesecakes for a personalized touch.
- Garnish with mint leaves for a pop of color.
- Use edible flowers for a touch of elegance.
Healthier Alternatives
If you’re looking for lighter options, here are six variations:
- Low-Sugar Version: Use stevia or monk fruit sweetener instead of sugar.
- Vegan Cheesecake: Substitute cream cheese with cashew cream and use coconut cream instead of liquid cream.
- Gluten-Free Base: Swap regular cookies for gluten-free ones.
- Protein-Packed Option: Add a scoop of vanilla protein powder to the filling.
- No-Bake Keto Cheesecake: Use almond flour mixed with butter for the crust and top with berries.
- Dairy-Free Delight: Opt for plant-based cream cheese and whipped cream alternatives.
Mistake 1: Overmixing the Filling
One common error is overmixing the filling, which can cause it to lose its airy texture. To avoid this, mix gently and stop as soon as all the ingredients are combined. Pro tip: Use a low-speed setting on your mixer to maintain the lightness.
Mistake 2: Skipping the Chilling Step
Some people rush the process by skipping the chilling step. Without enough time in the fridge, the cheesecake won’t set properly and may fall apart when sliced. Always allow at least 4 hours for chilling.
Mistake 3: Using Stale Cookies
Using old or stale cookies for the crust can result in a lackluster base. Fresh cookies provide better flavor and texture. If your cookies aren’t fresh, toast them lightly in the oven to refresh them.
Mistake 4: Overloading with Toppings
While it’s tempting to pile on lots of fruit, too much weight can cause the filling to sink. Stick to a moderate amount of toppings to maintain the structure of the cheesecake.
Frequently Asked Questions
Can I use frozen fruit?
Yes, but thaw and pat them dry first to prevent excess moisture from seeping into the cheesecake. Fresh fruit is preferred for optimal flavor and texture.
How do I prevent cracks in the filling?
Cracks often occur due to temperature changes. Avoid opening the fridge door frequently while the cheesecake is setting. Also, ensure all ingredients are at room temperature before mixing.
What type of cream cheese works best?
Full-fat cream cheese provides the richest flavor and creamiest texture. Low-fat versions can make the filling less indulgent.
Can I make this ahead of time?
Absolutely! In fact, making it a day in advance allows the flavors to develop fully. Just add the fruit toppings right before serving.
Is this recipe kid-friendly?
Definitely! Kids love the combination of creamy filling and sweet fruits. Plus, they can help decorate the top.
Can I freeze the cheesecake?
Yes, but freeze it without the fruit toppings. Thaw it in the fridge overnight before adding fresh fruits.
What size pan should I use?
A standard 9-inch springform pan works perfectly. Adjust quantities if using a different size.
How do I know when it’s set?
The cheesecake should feel firm to the touch and hold its shape when sliced. If it’s still wobbly, chill it longer.
Can I use other fruits?
Of course! Berries, kiwis, mangoes, and peaches all work wonderfully. Choose fruits that complement each other.
Do I need a mixer?
Not necessarily. A whisk and some elbow grease can get the job done, though a mixer makes it faster and easier.
Final Thoughts
There’s something magical about sharing a slice of Fresh Fruit Cheesecake with loved ones. Its creamy texture, vibrant toppings, and irresistible flavor make it a dessert worth savoring. Whether you’re baking for a special occasion or simply treating yourself, this recipe is sure to bring joy to your table. So grab your ingredients, roll up your sleeves, and let’s create something delicious together!
Equipment
- Mixing bowl
- Electric mixer or whisk
- Spatula
- Springform pan
- Food processor (optional)
Ingredients
- 500 g cream cheese
- Fresh strawberries as needed for decoration
- 1 kiwi for decoration
- 100 g sugar
- 600 ml liquid cream
- 1 package Marías cookies or similar
- 50 g melted butter a little
Instructions
- Crush the cookies into fine crumbs using a food processor.
- Mix the crumbs with melted butter until they resemble wet sand.
- Press the mixture firmly into the bottom of a greased springform pan and refrigerate.
- Whip the liquid cream until it starts to thicken slightly.
- Add the cream cheese and sugar to the whipped cream, mixing gently until smooth.
- Pour the mixture over the chilled cookie base and smooth it out with a spatula.
- Cover the mold and chill in the fridge for at least 4 hours (or overnight).
- Before serving, decorate the cheesecake with slices of kiwi and fresh strawberries.
Notes
Nutrition

Hi, I’m Olivia Parker, the founder of BakingSecret.com and a lifelong lover of all things sweet and homemade. I grew up in a small town in Oregon, where the smell of fresh cookies in my family’s kitchen sparked my passion for baking. Over the years, I turned that passion into a mission: to help home bakers feel confident, inspired, and creative.
After studying food science and working in several artisan bakeries across the U.S., I decided to create a space where everyone from beginners to seasoned bakers can find reliable recipes, expert tips, and a warm, welcoming community. BakingSecret.com is my way of sharing the magic of baking with the world. When I’m not testing new recipes, you’ll find me exploring farmers’ markets, collecting vintage cookbooks, or perfecting my sourdough technique.