
A Slice of Paradise: Discover the Magic of Lite Coconut Delight
There’s something about coconut that just screams “tropical getaway,” even if you’re standing in your kitchen. I first made this Lite Coconut Delight for a summer potluck, and let me tell you, it was gone before the potato salad could even say hello. This cake is light, creamy, and oh-so-coconutty without weighing you down. It’s perfect for anyone who loves dessert but wants to keep things on the lighter side. Trust me, once you try this recipe, it’ll become your go-to for impressing family and friends.
The Sweet History Behind Lite Coconut Delight
Coconut cakes have been a Southern staple for decades, often served at weddings, church gatherings, and family reunions. Traditionally, these cakes are rich, buttery, and piled high with frosting. But as we’ve all started leaning toward healthier options, recipes like this Lite Coconut Delight have emerged. I love how this version keeps the classic flavors but swaps out heavy ingredients for lighter ones. When I tested this recipe, I used fat-free sour cream and lite whipped topping, and no one could tell the difference! It’s proof that you don’t need to sacrifice flavor for health.
Why You’ll Fall Head Over Heels for This Recipe
This Lite Coconut Delight is a dream come true for anyone who craves sweetness without the guilt. The combination of fluffy cake layers, creamy coconut filling, and a hint of whipped topping is simply irresistible. Plus, it’s easy to make—no fancy techniques or hours in the kitchen required. Whether you’re a seasoned baker or a newbie, this recipe will make you feel like a dessert wizard. And did I mention how versatile it is? You can tweak it to suit your taste or dietary needs!
Perfect Occasions for Lite Coconut Delight
This cake is a showstopper for any occasion. Serve it at a summer barbecue, and watch it disappear faster than the ice in your cooler. It’s also a hit at holiday gatherings, bridal showers, or even as a sweet treat after a cozy family dinner. I once brought this Lite Coconut Delight to a book club meeting, and my friends still talk about it. It’s the kind of dessert that makes people smile—and ask for seconds.
Ingredients for Your Lite Coconut Delight
- 1 18.25 oz package white cake mix
- 1 cup white sugar
- 1 8 oz container fat-free sour cream
- 2 cups flaked coconut
- 1 1/2 cups lite frozen whipped topping
Substitution Options
- Cake Mix: Swap the white cake mix for yellow or vanilla if you prefer a richer flavor.
- Sugar: Use coconut sugar for a deeper caramel-like taste.
- Sour Cream: Greek yogurt works as a great alternative for added protein.
- Whipped Topping: Opt for homemade whipped cream if you want a fresher option.
Step 1: Preparing the Cake Layers
Start by preparing the cake mix according to the package directions. If you’re feeling adventurous, use a 2-egg carton of egg substitute to keep things light. Pour the batter into two 9-inch round cake pans and pop them in the oven. As they bake, your kitchen will fill with the warm, comforting aroma of vanilla. Once baked, let the layers cool completely before slicing them horizontally into four thin layers. Pro tip: Use a serrated knife for clean cuts.
Step 2: Mixing the Coconut Filling
In a mixing bowl, combine the sugar, fat-free sour cream, and flaked coconut. Stir until everything is well blended. The mixture will look like a tropical dream, with bits of coconut peeking through the creamy base. Pop it in the fridge for a few minutes to chill—it’ll firm up slightly, making it easier to spread. Chef’s tip: Toast the coconut lightly before adding it to the mix for an extra layer of flavor.
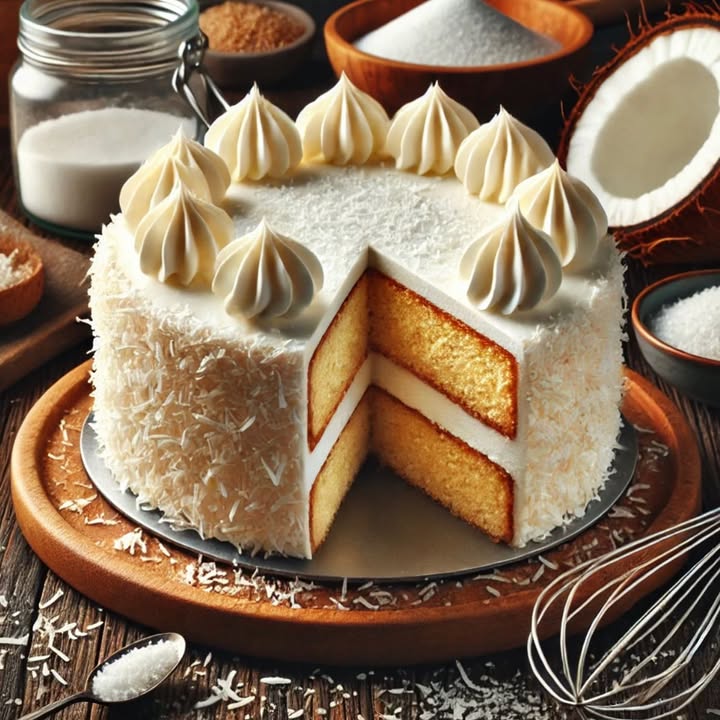
Step 3: Assembling the Cake
Now comes the fun part—building your Lite Coconut Delight. Spread all but 1 cup of the coconut mixture evenly between the cake layers. Imagine each layer as a fluffy cloud of coconut goodness. Reserve the remaining cup for the final touch. This step is where the magic happens, as the cake starts to take shape and look like a masterpiece.
Step 4: Adding the Whipped Topping
Mix the reserved coconut mixture with the lite frozen whipped topping. This creates a light, airy frosting that’s perfect for spreading over the top and sides of the cake. Use a spatula to smooth it out, creating a beautiful finish. The contrast between the white topping and the golden coconut flakes is simply stunning. Pro tip: Chill the cake for 15 minutes before serving to let the flavors meld.
Timing: How Long Does It Take?
Prep time for this Lite Coconut Delight is about 20 minutes, while baking takes around 25-30 minutes. After assembling, the cake needs to rest in the fridge for 1-3 days to allow the flavors to develop fully. In total, you’re looking at about 3 days from start to finish, but trust me, it’s worth the wait.
Chef’s Secret: A Little Patience Goes a Long Way
Here’s a little secret: letting the cake chill for a few days isn’t just a suggestion—it’s a must. The longer it sits, the more the flavors soak into the cake layers, creating a moist, heavenly texture. I learned this the hard way when I tried serving it after just a few hours. It was good, but not amazing. Patience truly pays off here.
Extra Info: Fun Facts About Coconut
Did you know that coconuts are technically fruits, not nuts? They’re often called the “tree of life” because every part of the coconut palm can be used. From coconut water to coconut oil, this versatile ingredient has been a staple in tropical cuisines for centuries. Fun fact: Coconuts can float for thousands of miles across oceans before washing ashore and sprouting new trees!
Necessary Equipment
To make this Lite Coconut Delight, you’ll need a few basic tools: two 9-inch round cake pans, a mixing bowl, a spatula, a serrated knife for slicing layers, and an airtight container for storage. Nothing fancy—just good old-fashioned kitchen gear.
Storage Tips for Your Lite Coconut Delight
Once assembled, store your cake in an airtight container in the fridge. This keeps it fresh and prevents the whipped topping from drying out. The flavors deepen over time, so don’t be afraid to let it sit for a couple of days. For best results, consume within a week. If you need to freeze it, wrap individual slices tightly in plastic wrap and store them in a freezer-safe bag. Thaw overnight in the fridge before serving.
When storing leftovers, make sure to keep the cake away from strong-smelling foods like onions or garlic. Coconut absorbs odors easily, which could alter the taste. Lastly, always serve chilled for the ultimate refreshing experience.
Tips and Advice for Baking Success
For an even lighter texture, sift the cake mix and sugar together before mixing. This removes lumps and ensures a smooth batter. Another tip: don’t skip the chilling step for the coconut filling. It firms up the mixture, making it easier to handle. Finally, if you’re short on time, consider using a store-bought angel food cake as a base. It’s a shortcut that still delivers delicious results.
Presentation Ideas to Wow Your Guests
- Garnish the top with toasted coconut flakes for a golden finish.
- Add a sprinkle of powdered sugar for a touch of elegance.
- Serve slices on colorful plates with a dollop of extra whipped topping.
- Pair with a tropical drink like piña colada or mango smoothie.
- Decorate the edges with fresh berries for a pop of color.
Healthier Alternative Recipes
If you’re looking to experiment, here are six variations of Lite Coconut Delight:
- Gluten-Free Version: Use a gluten-free cake mix and ensure all other ingredients are certified gluten-free.
- Vegan Option: Substitute the cake mix with a vegan-friendly brand and use plant-based sour cream and whipped topping.
- Low-Sugar Delight: Replace white sugar with a sugar substitute like stevia or monk fruit.
- Chocolate-Coconut Twist: Add cocoa powder to the cake mix for a chocolatey twist.
- Pineapple Infusion: Fold crushed pineapple into the coconut filling for a tropical kick.
- Spiced Coconut Cake: Add a pinch of cinnamon and nutmeg to the batter for a warm, spiced flavor.
Common Mistakes to Avoid
Mistake 1: Skipping the Chilling Step
One of the biggest mistakes people make is rushing the process by skipping the chilling step. Without proper chilling, the flavors won’t meld, and the whipped topping may slide off. To avoid this, plan ahead and give yourself enough time to let the cake rest. Pro tip: Set a reminder on your phone so you don’t forget!
Mistake 2: Overmixing the Batter
Overmixing the cake batter can lead to dense, tough layers instead of light and fluffy ones. Mix just until the ingredients are combined, and stop as soon as you see a smooth consistency. Remember, a little lumpy is okay—it’ll smooth out in the oven.
Mistake 3: Using Stale Coconut
Old or stale coconut can ruin the entire flavor profile of your Lite Coconut Delight. Always check the expiration date on your coconut flakes and store them in an airtight container to keep them fresh. Fresh coconut smells sweet and nutty—trust your nose!
FAQs About Lite Coconut Delight
Can I Use Fresh Coconut Instead of Flaked?
Fresh coconut adds a delightful texture, but it’s not ideal for this recipe. Flaked coconut blends better with the sour cream mixture and provides a consistent flavor throughout the cake.
How Do I Toast Coconut Flakes?
To toast coconut flakes, spread them evenly on a baking sheet and bake at 350°F for 5-7 minutes, stirring occasionally. Keep an eye on them—they can burn quickly!
Can I Make This Cake Ahead of Time?
Absolutely! In fact, making it a few days in advance enhances the flavors. Just store it in the fridge until you’re ready to serve.
What Can I Substitute for Fat-Free Sour Cream?
Greek yogurt or regular sour cream works perfectly. Both add creaminess and tang to balance the sweetness.
Is This Cake Suitable for Vegans?
With a few tweaks, yes! Use a vegan cake mix, plant-based sour cream, and dairy-free whipped topping.
How Do I Know When the Cake Is Done?
Insert a toothpick into the center of the cake. If it comes out clean, it’s ready. The edges should also pull away slightly from the pan.
Can I Freeze This Cake?
Yes, wrap individual slices tightly in plastic wrap and store them in a freezer-safe bag. Thaw in the fridge overnight before serving.
What Tools Do I Need to Slice the Layers?
A serrated knife works best for slicing cake layers evenly. Use a gentle sawing motion to avoid tearing the cake.
Why Does the Cake Need to Rest for Days?
Resting allows the flavors to meld and the cake layers to absorb the coconut filling, resulting in a moist, flavorful dessert.
Can I Use a Different Frosting?
While the whipped topping complements the cake beautifully, you can experiment with cream cheese frosting for a richer taste.
Final Thoughts on Lite Coconut Delight
This Lite Coconut Delight is more than just a cake—it’s a celebration of flavor, simplicity, and creativity. Whether you’re baking for a special occasion or just craving something sweet, this recipe has got you covered. With its light texture, creamy filling, and tropical flair, it’s sure to become a favorite in your dessert repertoire. So grab your apron, gather your ingredients, and get ready to create a little slice of paradise in your own kitchen. Happy baking!
Equipment
- Mixing bowl
- Spatula
- Serrated knife
- 2 9-inch round cake pans
- Airtight container for storage
Ingredients
- 1 18.25 oz white cake mix
- 1 cup white sugar
- 1 8 oz fat-free sour cream
- 2 cups flaked coconut
- 1.5 cups lite frozen whipped topping
Instructions
- Prepare the cake mix according to the package directions.
- Pour the batter into two 9-inch round cake pans and bake as directed.
- Let the layers cool completely before slicing them horizontally into four thin layers.
- In a mixing bowl, combine the sugar, fat-free sour cream, and flaked coconut; stir until well blended.
- Chill the mixture in the fridge for a few minutes to firm it up.
- Spread all but 1 cup of the coconut mixture evenly between the cake layers.
- Mix the reserved coconut mixture with the lite frozen whipped topping.
- Spread the topping over the top and sides of the cake, smoothing it out.
- Chill the cake for 15 minutes before serving.
Notes
Nutrition

Hi, I’m Olivia Parker, the founder of BakingSecret.com and a lifelong lover of all things sweet and homemade. I grew up in a small town in Oregon, where the smell of fresh cookies in my family’s kitchen sparked my passion for baking. Over the years, I turned that passion into a mission: to help home bakers feel confident, inspired, and creative.
After studying food science and working in several artisan bakeries across the U.S., I decided to create a space where everyone from beginners to seasoned bakers can find reliable recipes, expert tips, and a warm, welcoming community. BakingSecret.com is my way of sharing the magic of baking with the world. When I’m not testing new recipes, you’ll find me exploring farmers’ markets, collecting vintage cookbooks, or perfecting my sourdough technique.