
Why Mini Cheesecakes Delight is a Must-Try
Picture this: you’re at a family gathering, and everyone’s gathered around the dessert table. There, nestled on a platter, are these adorable little bites of heaven—Mini Cheesecakes Delight. I remember making them for the first time when my niece visited. She’s not much of a dessert fan, but one bite of these creamy, dreamy treats, and she was hooked! What makes them special? They’re just the right size for guilt-free indulgence, easy to make, and endlessly customizable. Whether you’re a seasoned baker or a newbie in the kitchen, this recipe will win your heart—and your taste buds!
A Little History Behind Cheesecake
Cheesecake has been around for centuries, dating back to ancient Greece. Legend has it that athletes ate cheesecake to fuel up before the first Olympic games in 776 BC. Fast forward to today, and cheesecake has evolved into countless variations. The mini version is perfect for modern times—it’s portable, portion-controlled, and oh-so-cute. I love how this recipe bridges tradition with a touch of fun. It’s like taking a classic and giving it a playful twist!
Why You’ll Love This Recipe
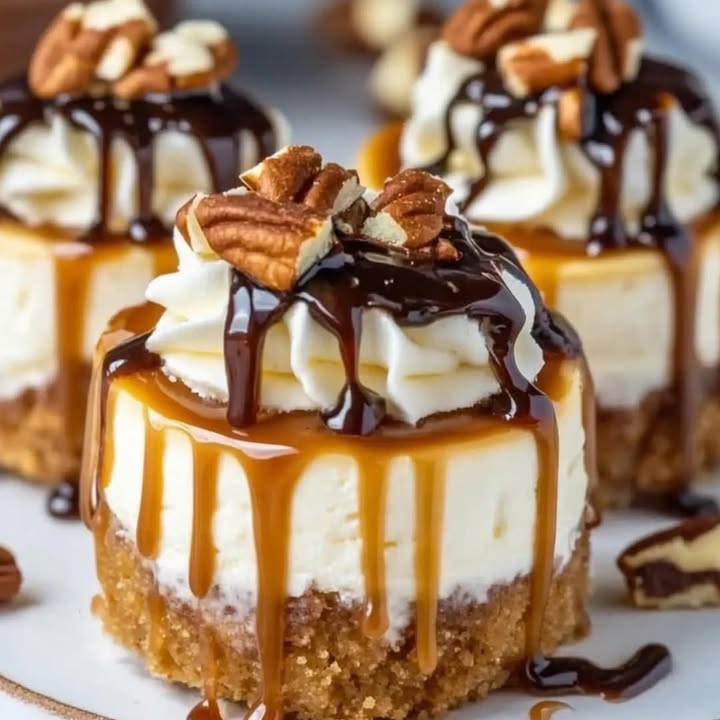
This Mini Cheesecakes Delight recipe is a winner for so many reasons. First, the flavors are spot-on: rich, creamy cheesecake paired with a buttery crust and topped with gooey caramel and chocolate. Second, it’s simple enough for a weeknight treat but fancy enough for a party. Plus, there’s no need for a water bath (yes, you heard me right!). Just a pan of water in the oven does the trick to keep these babies moist and crack-free. Trust me, once you try this, you’ll be making it again and again.
Perfect Occasions for Mini Cheesecakes Delight
These mini cheesecakes are perfect for any occasion—or no occasion at all! Whip them up for birthdays, baby showers, or holiday gatherings. They’re also great for potlucks because they’re easy to share. I once brought them to a book club meeting, and they were gone in minutes. Everyone loved how they looked so polished yet tasted so homemade. Bonus: they’re a hit with kids and adults alike!
Ingredients You’ll Need
- For the Crust:
- 1 cup graham cracker crumbs or cookies you like
- 1 tablespoon granulated sugar
- 3 tablespoons unsalted butter, melted
- For the Cheesecake:
- 16 oz cream cheese, softened
- ½ cup light brown sugar
- ½ cup sour cream
- 2 tablespoons all-purpose flour
- 2 large eggs
- For the Topping (optional):
- Caramel sauce
- Chocolate syrup
- Pecan halves
Substitution Options
Feel free to get creative with substitutions. Swap graham crackers for crushed cookies like Oreos or Biscoff for a fun twist. If you’re out of sour cream, Greek yogurt works just as well. For a gluten-free version, use gluten-free cookies for the crust. And if you’re avoiding dairy, try vegan cream cheese and coconut oil instead of butter. The possibilities are endless!
Step 1: Preparing the Oven and Pan
Start by preheating your oven to 350°F (175°C). Place a large rimmed sheet pan on the bottom oven rack and fill it halfway with water. This creates steam, which helps prevent cracks in your Mini Cheesecakes Delight. Line a muffin tin with 12 metal cupcake liners. Pro tip: Use silicone liners if you have them—they make cleanup a breeze!
Step 2: Making the Crust
In a small bowl, mix together the graham cracker crumbs, sugar, and melted butter until the mixture resembles wet sand. Evenly distribute it into the cupcake liners, pressing down firmly to create a solid base. The buttery aroma will make your kitchen smell amazing! Don’t skip this step—it’s the foundation of your cheesecake.
Step 3: Mixing the Cheesecake Batter
In a large bowl, beat the softened cream cheese and light brown sugar until smooth and creamy. Add the sour cream and flour, beating again until well combined. Crack in the eggs one at a time, mixing gently after each addition. Be careful not to overmix; we want our Mini Cheesecakes Delight to be light and airy. The batter should be silky and pale yellow, almost begging to be baked.
Step 4: Assembling and Baking
Fill each cupcake liner with the cheesecake batter, making sure they’re almost full. Place the muffin tin on the oven rack above the pan of steaming water. Bake for about 25 minutes, or until the cheesecakes are set but still slightly jiggly in the center. Chef’s tip: Resist the urge to open the oven door while they bake—it can cause cracks!
Step 5: Cooling and Chilling
Once baked, let the cheesecakes cool in the tin for 15 minutes. Then, carefully transfer them to a wire rack to cool for an hour. Finally, pop them in the fridge for at least 4 hours or overnight. This chilling time is crucial—it allows the flavors to meld and the texture to firm up perfectly.
Timing Breakdown
- Prep Time: 15 minutes
- Cooking Time: 25 minutes
- Resting Time: 4 hours (chilling)
- Total Time: 4 hours and 40 minutes
Chef’s Secret
Here’s a little secret: add a pinch of salt to your crust mixture. It enhances the sweetness and balances the flavors beautifully. Trust me, it’s a game-changer!
Extra Info
Did you know that cheesecake is technically a custard pie? Its creamy texture comes from the eggs binding everything together. Fun fact: New York-style cheesecake is denser because it uses more cream cheese, while lighter versions often include whipped cream or sour cream.
Necessary Equipment
- Muffin tin
- Metal or silicone cupcake liners
- Electric mixer or whisk
- Measuring cups and spoons
- Wire cooling rack
Storage Tips
Store your Mini Cheesecakes Delight in an airtight container in the fridge for up to 5 days. They stay fresh and delicious, ready to grab whenever a craving strikes. For longer storage, freeze them in a single layer on a baking sheet, then transfer to a freezer-safe bag. They’ll last up to 3 months.
If freezing, thaw them overnight in the fridge before serving. This ensures they retain their creamy texture. Always bring them to room temperature for 15-20 minutes before enjoying for the best flavor experience.
Pro tip: Keep toppings separate until serving. This prevents the crust from getting soggy and keeps everything looking picture-perfect.
Tips and Advice
- Use room-temperature ingredients for a smoother batter.
- Don’t skip the chilling step—it’s key to achieving the perfect texture.
- Experiment with different toppings like fresh fruit, nuts, or sprinkles.
Presentation Ideas
- Arrange them on a tiered dessert stand for a fancy look.
- Add a dollop of whipped cream and a drizzle of chocolate for extra flair.
- Serve them on colorful plates to make them pop visually.
Healthier Alternatives
Want to lighten things up? Try these variations:
- Low-Sugar Version: Use a sugar substitute like stevia or monk fruit in the batter and crust.
- Vegan Option: Substitute vegan cream cheese and coconut oil for the dairy ingredients.
- Gluten-Free: Use gluten-free cookies for the crust.
- Protein-Packed: Add a scoop of vanilla protein powder to the batter.
- Fruit-Infused: Swirl in some pureed berries for natural sweetness.
- Nutty Twist: Mix chopped nuts into the crust for added crunch and healthy fats.
Mistake 1: Overmixing the Batter
Overmixing can lead to dense, rubbery cheesecakes. To avoid this, mix the batter just until the ingredients are combined. Once the eggs are added, stop mixing as soon as they’re incorporated. Pro tip: Use a spatula to fold in the eggs gently for a lighter texture.
Mistake 2: Skipping the Water Bath
While this recipe doesn’t require a traditional water bath, skipping the pan of water entirely can result in dry cheesecakes. The steam helps keep them moist and prevents cracks. Always follow the instructions for the best results.
Mistake 3: Rushing the Chill Time
Patience is key here. Cutting corners on chilling time means your cheesecakes won’t set properly. Plan ahead and give them plenty of time in the fridge to firm up and develop their flavor.
FAQs
Can I use a different type of crust?
Absolutely! Crushed cookies, pretzels, or even granola make great alternatives. Just mix with melted butter and press into the liners.
How do I prevent cracks?
To avoid cracks, don’t overmix the batter, and ensure your oven isn’t too hot. The water pan also helps maintain moisture during baking.
Can I freeze these cheesecakes?
Yes! Freeze them in a single layer, then transfer to a freezer-safe bag. They’ll keep for up to 3 months.
What toppings work best?
Caramel, chocolate, fresh fruit, whipped cream, and nuts are all fantastic options. Get creative and tailor them to your taste!
Do I have to use metal liners?
No, but they help with even baking. Silicone liners work too, though they may require slightly longer baking time.
Can I double the recipe?
Of course! Just use two muffin tins and adjust the baking time slightly if needed.
Why is my cheesecake grainy?
Graininess usually happens when the cream cheese isn’t fully softened or the batter is overmixed. Make sure your ingredients are at room temperature.
How long do they last in the fridge?
They’ll stay fresh for up to 5 days when stored in an airtight container.
Can I use flavored cream cheese?
Yes! Strawberry or pumpkin spice cream cheese adds a fun twist to the classic recipe.
What if I don’t have sour cream?
Greek yogurt or even heavy cream can be used as substitutes. They’ll provide similar moisture and tanginess.
Final Thoughts
There you have it—your guide to making irresistible Mini Cheesecakes Delight. Whether you’re baking for a crowd or treating yourself, this recipe is sure to impress. With its creamy filling, buttery crust, and endless topping possibilities, it’s a dessert that never gets old. So grab your apron, preheat that oven, and get ready to wow everyone with these adorable little cheesecakes. Happy baking!
Equipment
- Muffin tin
- Cupcake liners Metal or silicone
- Electric mixer
- Measuring cups and spoons
- Wire cooling rack
Ingredients
- 1 cup graham cracker crumbs or cookies
- 1 tablespoon granulated sugar
- 3 tablespoons unsalted butter melted
- 16 oz cream cheese softened
- ½ cup light brown sugar
- ½ cup sour cream
- 2 tablespoons all-purpose flour
- 2 large eggs
Instructions
- Preheat your oven to 350°F (175°C) and prepare a large rimmed sheet pan with water on the bottom oven rack.
- Line a muffin tin with 12 metal or silicone cupcake liners.
- In a small bowl, mix graham cracker crumbs, sugar, and melted butter until shared resemble wet sand.
- Press the crust mixture evenly and firmly into the cupcake liners.
- In a large bowl, beat cream cheese and light brown sugar until smooth and creamy.
- Add sour cream and flour, then mix until well combined.
- Add eggs one at a time, mixing gently after each addition to avoid overmixing.
- Fill each cupcake liner with the cheesecake batter until almost full.
- Bake for about 25 minutes, or until set but slightly jiggly in the center.
- Let cheesecakes cool in the tin for 15 minutes before transferring to a wire rack for an hour.
- Chill in the fridge for at least 4 hours or overnight before serving.
Notes
Nutrition

Hi, I’m Olivia Parker, the founder of BakingSecret.com and a lifelong lover of all things sweet and homemade. I grew up in a small town in Oregon, where the smell of fresh cookies in my family’s kitchen sparked my passion for baking. Over the years, I turned that passion into a mission: to help home bakers feel confident, inspired, and creative.
After studying food science and working in several artisan bakeries across the U.S., I decided to create a space where everyone from beginners to seasoned bakers can find reliable recipes, expert tips, and a warm, welcoming community. BakingSecret.com is my way of sharing the magic of baking with the world. When I’m not testing new recipes, you’ll find me exploring farmers’ markets, collecting vintage cookbooks, or perfecting my sourdough technique.