
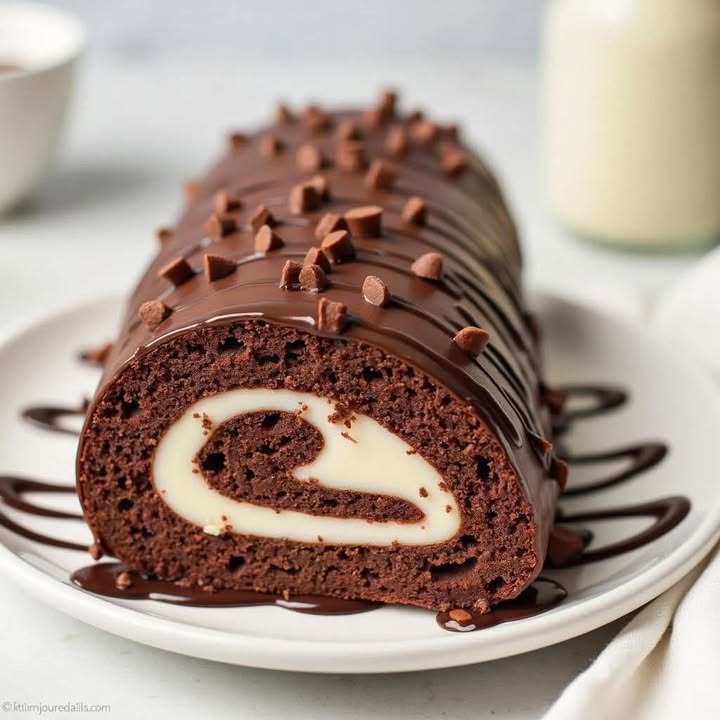
Why This Chocolate Cake Roll Will Make Your Day Sweeter
There’s something magical about a Chocolate Cake Roll. It’s soft, rich, and oh-so-decadent, with that perfect balance of cake and creamy filling. I remember the first time I made this for my family—it was a hit! My youngest nephew called it “a chocolate cloud,” and honestly, he wasn’t wrong. Whether you’re baking for a special occasion or just because, this recipe is foolproof and fun to make. Plus, it looks impressive without requiring hours in the kitchen. Let me show you how to master this delightful dessert.
A Little History Behind the Chocolate Cake Roll
The Chocolate Cake Roll has roots in European baking traditions, where rolled cakes were often served during festive gatherings. The technique of rolling cakes dates back centuries, but the addition of chocolate became popular in the 19th century when cocoa powder became widely available. Over time, bakers added their own twists, like flavored fillings and decorative toppings. My version combines classic flavors with modern simplicity, making it accessible for home cooks everywhere.
Why You’ll Love This Recipe
This Chocolate Cake Roll is all about indulgence without the fuss. The cake itself is light and airy, while the filling is luxuriously creamy. It’s easy enough for beginners but elegant enough to impress guests. And let’s not forget—it’s chocolate, which means it’s basically happiness on a plate. Whether you’re celebrating or just craving something sweet, this recipe delivers big flavor with minimal effort.
Perfect Occasions for a Chocolate Cake Roll
This dessert shines at holiday parties, birthdays, and even casual get-togethers. Imagine slicing into this beauty at Thanksgiving or Christmas—it’s sure to steal the spotlight. But don’t save it just for special events! A slice pairs perfectly with afternoon tea or as an after-dinner treat. Trust me, once you try it, you’ll find excuses to bake it again and again.
Ingredients You’ll Need
Here’s what you’ll need to whip up this Chocolate Cake Roll:
Cake:
- 2 1/4 cups (285g) all-purpose flour
- 1 1/2 cups (180g) granulated sugar
- 3/4 cup (85g) unsweetened cocoa powder
- 2 teaspoons baking powder
- 1 teaspoon salt
- 1/2 cup (115ml) whole milk, at room temperature
- 2 large eggs, at room temperature
- 1 teaspoon vanilla extract
Filling:
- 1 cup (200g) unsalted butter, softened
- 2 cups (400g) powdered sugar
- 1/2 cup (120g) unsweetened cocoa powder
- 2 teaspoons vanilla extract
Optional:
- Chocolate shavings or chopped nuts for garnish
Substitution Options
If you want to tweak the recipe, here are some swaps:
- All-purpose flour: Use gluten-free flour if needed.
- Whole milk: Substitute almond or oat milk for a dairy-free option.
- Butter: Coconut oil works well in the filling for a vegan twist.
- Powdered sugar: Swap with a sugar-free alternative if you’re watching your intake.
Step-by-Step Preparation
Step 1: Preheat Oven
Start by preheating your oven to 375°F (190°C). Grab a 10×15-inch (25x38cm) jelly roll pan and line it with parchment paper. This step is crucial—trust me, nothing sticks worse than a cake that won’t come off the pan. The parchment paper ensures your Chocolate Cake Roll slides right out, ready for rolling.
Step 2: Make Cake Batter
In a large bowl, whisk together the flour, sugar, cocoa powder, baking powder, and salt. Add the milk, eggs, and vanilla extract, then mix until smooth. The batter will be thick but pourable, with a deep chocolatey aroma that’ll make your kitchen smell amazing. Pro tip: Sift the dry ingredients to avoid lumps for a silky-smooth texture.
Step 3: Pour Batter
Pour the batter into your prepared pan, spreading it evenly with a spatula. The rich brown color should cover the entire surface. Tap the pan gently on the counter to release any air bubbles. This ensures your cake bakes evenly and rolls up beautifully later.
Step 4: Bake
Bake for 12–15 minutes, or until a toothpick inserted comes out clean. Keep an eye on it—the edges should spring back lightly when touched. Once done, remove from the oven and let it cool for 5 minutes. Don’t skip this resting time; it helps prevent cracks when rolling.
Step 5: Cool and Transfer
After cooling slightly, carefully transfer the cake to a wire rack. Peel off the parchment paper while it’s still warm. Letting it cool completely is key to avoiding soggy layers. Chef’s tip: Dust the cake with a little powdered sugar before rolling to keep it from sticking.
Step 6: Make Filling
For the filling, beat the butter, powdered sugar, cocoa powder, and vanilla extract until smooth and fluffy. This step transforms simple ingredients into a dreamy, velvety spread. Taste test? Absolutely allowed!
Step 7: Assemble
Spread the filling evenly over the cooled cake, leaving a small border around the edges. Now comes the fun part: rolling! Start at one short end and roll tightly, using the parchment paper to help guide you. Don’t worry if it feels delicate—it’s tougher than it looks.
Step 8: Chill
Wrap the rolled cake in plastic wrap and refrigerate for 30 minutes. Chilling firms up the filling, making slicing easier. Plus, it gives the flavors time to meld together.
Step 9: Serve
When ready, slice the Chocolate Cake Roll into thick pieces. Garnish with chocolate shavings or chopped nuts for a finishing touch. Serve and watch everyone’s eyes light up!
Timing Breakdown
- Prep Time: 20 minutes
- Cooking Time: 15 minutes
- Resting Time: 40 minutes (cooling + chilling)
- Total Time: 1 hour 15 minutes
Chef’s Secret
For extra flair, brush the cake with a thin layer of coffee syrup before adding the filling. It enhances the chocolate flavor without overpowering it. Just mix equal parts brewed coffee and sugar, then brush lightly over the cake.
Extra Info
Did you know cocoa powder contains antioxidants? That means this Chocolate Cake Roll isn’t just delicious—it’s also packed with goodness. Of course, we’re not saying it’s health food, but hey, every little bit counts!
Necessary Equipment
- Jelly roll pan (10×15 inches)
- Parchment paper
- Mixing bowls
- Electric mixer or whisk
- Spatula
- Wire rack
- Plastic wrap
Storage Tips
To store leftovers, wrap the Chocolate Cake Roll tightly in plastic wrap and place it in an airtight container. It keeps well in the fridge for up to 3 days. For longer storage, freeze slices individually wrapped in plastic and foil. They’ll stay fresh for up to 2 months. When reheating, let frozen slices thaw overnight in the fridge before bringing them to room temperature.
If you live in a humid climate, consider storing the cake in the fridge to prevent the filling from becoming too soft. Always bring it back to room temperature before serving for the best texture.
Lastly, never stack slices directly on top of each other unless separated by parchment paper. This prevents the filling from squishing and ruining the presentation.
Tips and Advice
- Use room-temperature eggs and milk for a smoother batter.
- Don’t overmix the batter—it can make the cake dense.
- Roll the cake while it’s still warm to set its shape.
- Chill the assembled roll before slicing for cleaner cuts.
Presentation Ideas
- Garnish with fresh berries for a pop of color.
- Dust with powdered sugar for a rustic look.
- Add edible flowers for a fancy touch.
- Serve on a wooden board for a cozy vibe.
- Drizzle melted chocolate over the top for extra decadence.
Healthier Alternatives
Want to lighten things up? Try these variations:
- Gluten-Free: Swap all-purpose flour with almond or oat flour.
- Vegan: Replace eggs with flax eggs and use coconut oil instead of butter.
- Low-Sugar: Use sugar substitutes like stevia or monk fruit in both the cake and filling.
- Protein-Packed: Add protein powder to the batter for a boost.
- Fruit-Filled: Mix mashed bananas or pureed raspberries into the filling.
- Nutty Delight: Stir chopped almonds or hazelnuts into the filling for crunch.
Common Mistakes to Avoid
Mistake 1: Skipping the Parchment Paper
Without parchment paper, your cake might stick to the pan, ruining the roll. Always line your pan properly. Pro tip: Lightly grease the parchment paper for extra insurance.
Mistake 2: Overbaking the Cake
An overbaked cake becomes dry and brittle, making it hard to roll. Check for doneness early and err on the side of underbaking slightly. Remember, the residual heat finishes the job.
Mistake 3: Rolling Too Late
Waiting too long to roll the cake can cause it to crack. Roll it while it’s still warm, even if it feels delicate. It’ll firm up as it cools.
Mistake 4: Using Cold Ingredients
Cold eggs and milk can curdle the batter. Bring them to room temperature beforehand for a smooth mix.
Mistake 5: Rushing the Chilling Step
Skipping the chill time makes slicing messy. Patience pays off here—a firmer filling means cleaner cuts and better presentation.
FAQs About Chocolate Cake Roll
Can I make this ahead of time?
Absolutely! You can prepare the Chocolate Cake Roll a day in advance and store it in the fridge. Just let it come to room temperature before serving.
How do I fix cracked rolls?
Small cracks are normal, but you can hide them with a dusting of powdered sugar or a drizzle of chocolate sauce. To minimize cracking, roll the cake while it’s warm.
What type of cocoa powder should I use?
Use natural unsweetened cocoa powder for the best results. Dutch-processed cocoa works too but may alter the flavor slightly.
Can I freeze the cake?
Yes, wrap individual slices in plastic wrap and foil, then freeze for up to 2 months. Thaw overnight in the fridge before serving.
Is this recipe kid-friendly?
Definitely! Kids love helping with the rolling and decorating. Plus, who can resist chocolate?
Can I add fruit to the filling?
Of course! Fresh strawberries or raspberries pair beautifully with the chocolate filling.
Why does my cake taste dry?
Dryness usually happens from overbaking. Check the cake earlier next time and ensure you’re measuring ingredients accurately.
Do I need an electric mixer?
No, but it speeds things up. A hand whisk works fine if you’re patient and have strong arms!
What size pan should I use?
A standard 10×15-inch jelly roll pan is ideal. Using a larger pan will result in a thinner cake, which could break easily.
Can I use whipped cream instead of buttercream?
Yes, though whipped cream is less stable. If using it, chill the cake thoroughly before slicing.
Final Thoughts
Baking a Chocolate Cake Roll is a joyful experience that brings people together. With its rich flavors, simple steps, and stunning presentation, this recipe is a winner every time. So grab your apron, gather your ingredients, and get ready to create a dessert that’s as delightful to make as it is to eat. Happy baking!
Equipment
- Jelly roll pan (10x15 inches)
- Parchment paper
- Mixing bowls
- Electric mixer or whisk
- Spatula
- Wire rack
- Plastic wrap
Ingredients
- 2 1/4 cups (285g) all-purpose flour
- 1 1/2 cups (180g) granulated sugar
- 3/4 cup (85g) unsweetened cocoa powder
- 2 teaspoons baking powder
- 1 teaspoon salt
- 1/2 cup (115ml) whole milk, at room temperature
- 2 large eggs, at room temperature
- 1 teaspoon vanilla extract
- 1 cup (200g) unsalted butter, softened
- 2 cups (400g) powdered sugar
- 1/2 cup (120g) unsweetened cocoa powder (for filling)
- 2 teaspoons vanilla extract (for filling)
- q.s. Chocolate shavings or chopped nuts for garnish (optional)
Instructions
- Preheat your oven to 375°F (190°C) and line a 10x15-inch (25x38cm) jelly roll pan with parchment paper.
- In a large bowl, whisk together the flour, sugar, cocoa powder, baking powder, and salt.
- Add the milk, eggs, and vanilla extract to the dry ingredients and mix until smooth.
- Pour the batter into the prepared pan, spreading it evenly, and tap gently to release air bubbles.
- Bake for 12–15 minutes or until a toothpick inserted comes out clean; let it cool for 5 minutes in the pan.
- Transfer the cake to a wire rack and peel off the parchment paper; allow it to cool completely.
- For the filling, beat together the butter, powdered sugar, cocoa powder, and vanilla extract until smooth and fluffy.
- Spread the filling evenly over the cooled cake, leaving a small border around the edges, then roll tightly from one end using the parchment paper to guide you.
- Wrap the rolled cake in plastic wrap and refrigerate for 30 minutes before slicing.
Notes
Nutrition

Hi, I’m Olivia Parker, the founder of BakingSecret.com and a lifelong lover of all things sweet and homemade. I grew up in a small town in Oregon, where the smell of fresh cookies in my family’s kitchen sparked my passion for baking. Over the years, I turned that passion into a mission: to help home bakers feel confident, inspired, and creative.
After studying food science and working in several artisan bakeries across the U.S., I decided to create a space where everyone from beginners to seasoned bakers can find reliable recipes, expert tips, and a warm, welcoming community. BakingSecret.com is my way of sharing the magic of baking with the world. When I’m not testing new recipes, you’ll find me exploring farmers’ markets, collecting vintage cookbooks, or perfecting my sourdough technique.